

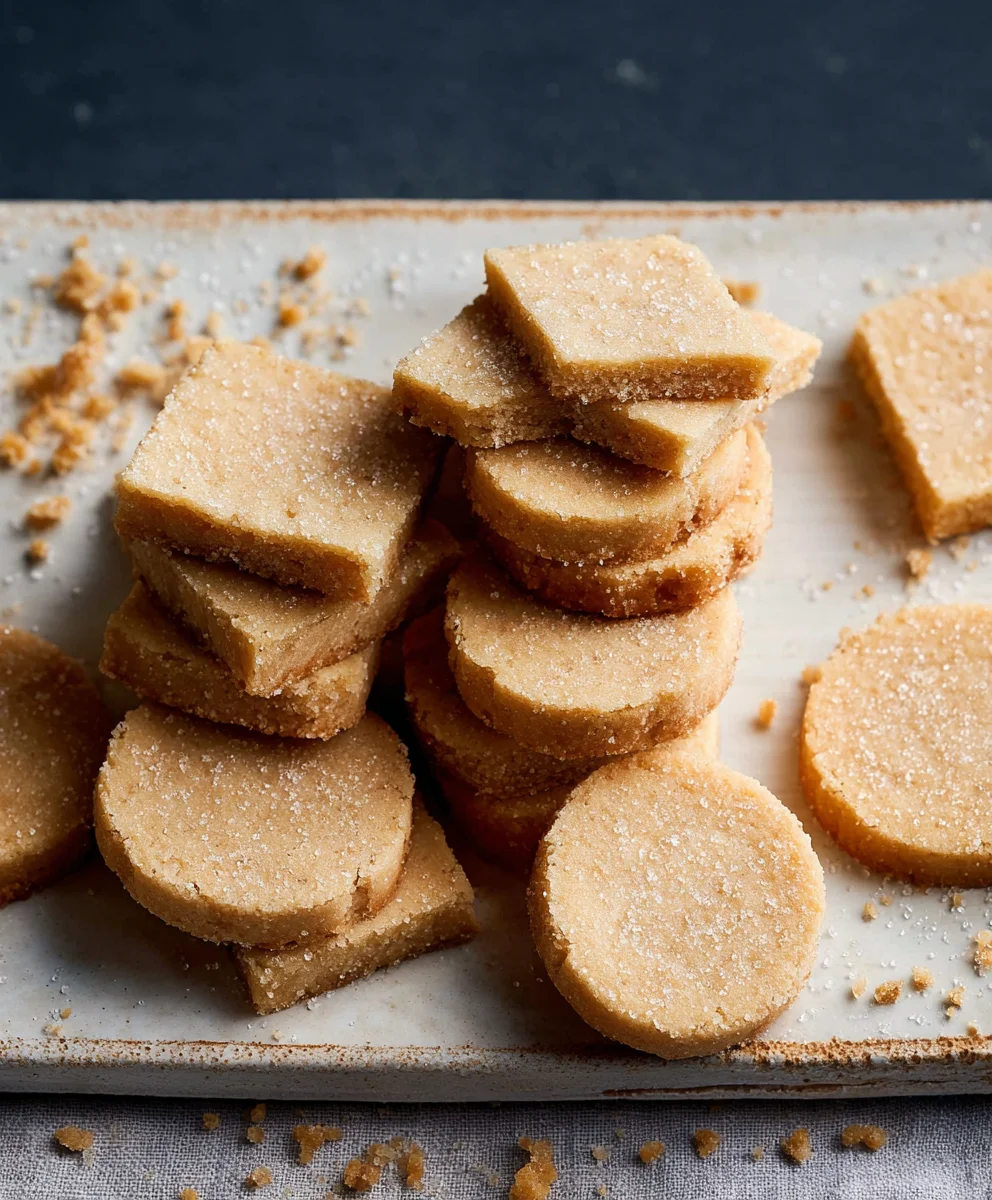
Brown Sugar Shortbread holds a special place in the hearts of many, a simple yet profoundly satisfying confection that promises a moment of pure bliss with every bite. If you’ve ever craved that delicate balance of buttery richness and a hint of warm, caramelized sweetness, then you understand the allure of this classic treat with a delightful twist. My personal journey into baking often brings me back to these comforting, golden squares, and for good reason.
Historically, shortbread hails from Scotland, where it evolved from medieval biscuit bread. Traditionally made with just three ingredients – flour, sugar, and butter – it was a staple that celebrated the purity of simple, quality components. The genius of adding brown sugar to this time-honored recipe elevates it, infusing a deeper, more nuanced flavor profile that perfectly complements its signature melt-in-your-mouth texture. It’s a testament to how a small change can create something truly extraordinary, transforming a beloved classic into an even more irresistible indulgence.
Why Brown Sugar Shortbread is Irresistible
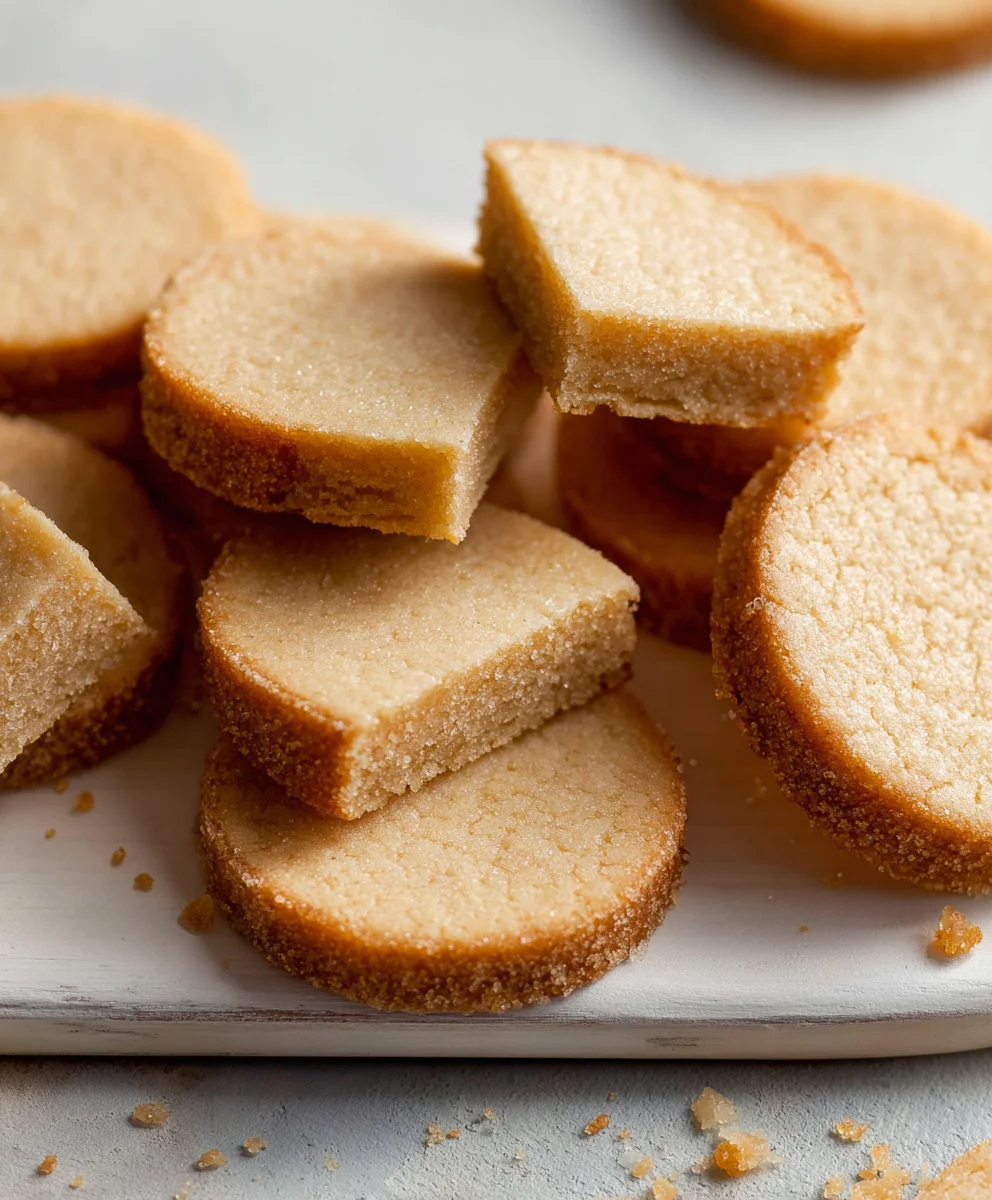
People adore Brown Sugar Shortbread not only for its comforting familiarity but also for its exquisite sensory experience. The golden-brown sugar lends a subtle toffee-like note and a slightly chewier crumb compared to its white sugar counterpart, making each piece wonderfully complex yet still wonderfully simple. Its incredible crumbly texture, combined with that rich, buttery taste, makes it the perfect accompaniment to a cup of tea or coffee, a thoughtful homemade gift, or simply a delightful treat to brighten any day. It’s easy to make, uses accessible ingredients, and delivers an impressive result every single time.

Ingredients:
- 2 cups (4 sticks or 450g) unsalted butter, at room temperature
- 1 cup (200g) packed light or dark brown sugar, depending on your preferred depth of caramel flavor
- 1 teaspoon pure vanilla extract, for that comforting aromatic note
- 1/2 teaspoon fine sea salt, to balance the sweetness and enhance the buttery richness
- 3 1/2 cups (420g) all-purpose flour, spooned and leveled, for the perfect delicate crumb
- 1/2 cup (60g) cornstarch or rice flour (optional, but highly recommended for an even more tender texture)
Equipment You’ll Need:
- Large mixing bowl
- Electric hand mixer or stand mixer with paddle attachment
- Rubber spatula
- Measuring cups and spoons
- Sifter or fine-mesh sieve
- Baking sheets (at least two, preferably light-colored)
- Parchment paper or silicone baking mats
- Rolling pin (if not pressing into a pan)
- Sharp knife or pizza cutter for cutting
- Wire cooling rack
Preparing for the Best Brown Sugar Shortbread:
Before diving into the delightful process of making your Brown Sugar Shortbread, a little preparation goes a long way. I always find that having everything ready makes the experience much more enjoyable and ensures the best results. This recipe for Brown Sugar Shortbread truly shines when all the elements are in harmony.
- Bring Butter to Room Temperature: This is perhaps the most crucial first step. I make sure my unsalted butter has truly reached room temperature. It shouldn’t be melted, but soft enough that my finger leaves an impression easily. This typically takes about 1-2 hours on the counter, depending on your kitchen’s temperature. If your butter is too cold, it won’t cream properly with the sugar, leading to a denser shortbread. If it’s too warm, the dough might become greasy. This perfect consistency is key to achieving that signature melt-in-your-mouth Brown Sugar Shortbread texture.
- Measure All Ingredients: I meticulously measure out all my ingredients – the brown sugar, vanilla extract, salt, all-purpose flour, and cornstarch. Having everything pre-measured, a process often called “mise en place,” means I can move smoothly from one step to the next without interruption. This also prevents me from accidentally omitting an ingredient or making a last-minute measurement error.
- Sift Dry Ingredients: For an exceptionally light and tender Brown Sugar Shortbread, I always take the extra minute to sift together my all-purpose flour and cornstarch (if using) into a separate bowl. This not only removes any lumps but also aerates the flour, which contributes to a more delicate crumb structure. If you don’t have a sifter, a fine-mesh sieve works just as well. I then add the fine sea salt to this mixture, ensuring it’s evenly distributed.
- Prepare Your Baking Sheets: I line two large baking sheets with parchment paper or silicone baking mats. This prevents sticking and makes for easy cleanup. The parchment paper also makes it easier to transfer the shortbread after baking and during the cooling process. Ensuring your baking sheets are ready before you even start mixing the dough is a small step that saves time and stress later on.
- Preheat Oven (Later): While I don’t preheat my oven just yet (the dough will need to chill), I keep in mind that I’ll be setting it to 325°F (160°C) later. Knowing this helps me anticipate the next phase of the baking process.
Making the Brown Sugar Shortbread Dough:
Now for the heart of the recipe: creating the rich, fragrant dough for our Brown Sugar Shortbread. This stage is where the magic truly begins, transforming simple ingredients into a luxurious foundation.
- Cream the Butter and Brown Sugar: In my large mixing bowl, I combine the perfectly softened unsalted butter and the packed brown sugar. If you prefer a lighter, more delicate caramel note, opt for light brown sugar. For a deeper, more molasses-rich flavor, dark brown sugar is the way to go – it truly accentuates the “Brown Sugar Shortbread” essence. Using my electric mixer with the paddle attachment (or a sturdy hand mixer), I start on low speed to incorporate the two, then increase to medium-high. I beat this mixture for a good 3 to 5 minutes, sometimes even a bit longer. The goal here is to achieve a wonderfully light, fluffy, and visibly paler mixture. You’ll notice the texture becoming incredibly airy as the sugar crystals cut into the butter, creating tiny air pockets. This aeration is absolutely vital for a tender shortbread, so don’t rush this step!
- Add Vanilla Extract: Once the butter and sugar are beautifully creamed, I pour in the pure vanilla extract. I beat it on medium speed for just another 30 seconds or so, until it’s fully incorporated and its aromatic goodness has permeated the mixture. The vanilla adds a comforting warmth that complements the brown sugar perfectly in our Brown Sugar Shortbread.
- Gradually Add Dry Ingredients: With the mixer on its lowest speed, I begin to add the sifted flour and cornstarch (and salt) mixture to the wet ingredients. I add it about a third at a time, mixing only until just combined after each addition. The key here is to avoid overmixing. Overmixing develops the gluten in the flour, which can lead to a tough, rather than tender, shortbread. I often stop mixing when there are still a few streaks of flour visible, then finish incorporating it gently with a rubber spatula. This gentle approach ensures our Brown Sugar Shortbread remains delicate and crumbly. The dough will be thick and somewhat crumbly, but it should hold together when pressed.
- Bring Dough Together: At this point, I remove the bowl from the mixer and use my hands to gently bring the dough together. I press it against the sides of the bowl to ensure all the dry ingredients are incorporated and form a cohesive ball. It might seem a little crumbly at first, but the warmth from your hands will help the butter come together, creating a perfectly pliable dough for our Brown Sugar Shortbread.
Shaping and Chilling Your Brown Sugar Shortbread:
Shaping and chilling are essential steps that determine the final look and texture of your delightful Brown Sugar Shortbread. Don’t be tempted to skip the chilling – it’s crucial for preventing spread and achieving that crisp, buttery edge.
- Prepare for Shaping: I usually divide my dough into two equal portions. This makes it easier to work with, especially if I’m rolling it out. I lightly flour my work surface and my rolling pin, though often with this rich dough, too much flour isn’t necessary. Alternatively, I sometimes press the dough directly into an ungreased 8×8 inch square baking pan, which yields beautiful uniform squares. For a traditional round shape, I’d press one half of the dough into a 9-inch round tart pan with a removable bottom, or simply shape it into a disc.
- Roll Out the Dough: If I’m aiming for cut-out shortbread, I take one portion of the dough and gently roll it out to an even thickness, typically about 1/2 inch (1.25 cm). I try my best to keep the edges as straight as possible to minimize scraps. Sometimes, I find it easiest to roll the dough between two sheets of parchment paper. This prevents sticking and makes for easy transfer. I then use a sharp knife or a pizza cutter to cut the dough into desired shapes – traditional fingers, squares, or even decorative shapes with cookie cutters. For a classic shortbread finger, I cut the rolled dough into strips about 1 inch wide and 2-3 inches long.
- Arrange on Baking Sheets: I carefully transfer the cut shortbread pieces onto the prepared baking sheets, leaving about 1 inch between each piece. While shortbread doesn’t spread much, a little space allows for even baking. If I’ve pressed the dough into a pan, I use a fork to prick the entire surface of the dough several times. This allows steam to escape and prevents the shortbread from puffing up unevenly. I also lightly score the shortbread in the pan with a knife or pizza cutter, making sure not to cut all the way through, just enough to mark where I’ll cut them after baking. This pre-scoring helps create clean breaks later.
- Chill the Dough: This is a non-negotiable step for truly excellent Brown Sugar Shortbread. I place the baking sheets with the shaped shortbread into the refrigerator for at least 30 minutes, or even up to an hour. If I’ve used a pan, the whole pan goes into the fridge. Chilling allows the butter to firm up again, which helps the shortbread maintain its shape beautifully during baking and prevents excessive spreading. It also results in a more tender, crisp crumb. While the dough is chilling, this is a perfect time to preheat your oven.
Baking Your Perfect Brown Sugar Shortbread:
The moment of truth! Baking your Brown Sugar Shortbread correctly is key to achieving that coveted golden-brown edge and perfectly tender interior. Pay close attention to your oven and the visual cues.
- Preheat Oven: Once the shortbread has chilled for its designated time, I preheat my oven to 325°F (160°C). It’s important to give your oven ample time to reach and stabilize at this temperature, usually about 15-20 minutes after it signals it’s preheated. A properly preheated oven ensures even baking from the start.
- Bake the Shortbread: I carefully transfer the chilled baking sheets to the preheated oven. If baking multiple sheets, I place one on the middle rack and another on the rack just below or above, ensuring they have enough space for air circulation. I typically bake the shortbread for 20 to 25 minutes. However, baking times can vary significantly depending on your oven and the thickness of your shortbread. I start checking around the 18-minute mark.
- Look for Visual Cues: The shortbread is done when the edges are just beginning to turn a very light golden brown, and the center still looks pale but set. You do not want to deeply brown shortbread. The brown sugar in this recipe will give it a slightly richer color than traditional shortbread, but overbaking will result in a hard, dry biscuit instead of a tender, crumbly one. The subtle browning around the edges indicates that the sugars have caramelized beautifully and the butter has rendered to perfection, promising that classic Brown Sugar Shortbread taste.
- Rotate Baking Sheets (Optional but Recommended): If I’m baking more than one sheet at a time, or if I know my oven has hot spots, I usually rotate the baking sheets halfway through the baking time (after about 10-12 minutes). This ensures more even baking and consistent color across all my delicious Brown Sugar Shortbread pieces.
- Score (if baked in a pan): If you’ve baked your Brown Sugar Shortbread in a pan, as soon as it comes out of the oven, while it’s still warm, I immediately re-cut along those pre-scored lines with a sharp knife or pizza cutter. This is much easier to do when the shortbread is warm and slightly pliable. If you wait until it cools completely, it will be much harder to cut cleanly and might even crack.
Cooling and Storing Your Brown Sugar Shortbread:
Patience is a virtue, especially when it comes to cooling your freshly baked Brown Sugar Shortbread. Proper cooling and storage are key to maintaining its exquisite texture and ensuring it stays fresh for as long as possible.
- Cool on Baking Sheets (Briefly): Once I remove the shortbread from the oven, I let it cool on the baking sheets for about 5 to 10 minutes. This brief cooling period on the warm sheets allows the shortbread to firm up slightly, making it less prone to breaking when handled. It also allows the residual heat from the baking sheet to gently continue the cooking process, further enhancing the crispness of our Brown Sugar Shortbread.
- Transfer to Wire Rack: After the initial cooling on the baking sheets, I very carefully transfer the Brown Sugar Shortbread to a wire cooling rack to cool completely. If I’ve baked it in a pan, I gently lift the parchment paper (along with the shortbread) out of the pan and place the entire slab on the wire rack. I then separate the individual pieces once it’s completely cool. Cooling on a wire rack allows air to circulate all around the shortbread, preventing condensation from forming on the bottom, which could make it soggy. It’s crucial for achieving that desirable crisp yet tender texture in every bite of Brown Sugar Shortbread.
- Ensure Complete Cooling: It’s incredibly important that the Brown Sugar Shortbread cools completely before storing or serving. This can take anywhere from 1 to 2 hours, depending on your kitchen temperature and the thickness of your shortbread. Rushing this step and storing warm shortbread can lead to condensation, which will make your shortbread lose its crispness and potentially become stale more quickly. I promise, the wait is worth it for a truly perfect Brown Sugar Shortbread experience.
- Storing Your Brown Sugar Shortbread: Once completely cooled, I store my Brown Sugar Shortbread in an airtight container at room temperature. Layering pieces with parchment paper can help prevent them from sticking together. Stored properly, this delicious Brown Sugar Shortbread will remain wonderfully fresh and crisp for up to 1 week. If you live in a very humid environment, you might find it loses a little crispness after a few days, but it will still be incredibly flavorful.
- Freezing for Longer Storage: For longer storage, Brown Sugar Shortbread freezes exceptionally well. I arrange the completely cooled shortbread in a single layer on a baking sheet and freeze until solid, about 1-2 hours. Once frozen, I transfer the pieces to a freezer-safe airtight container or heavy-duty freezer bag, separating layers with parchment paper. It can be stored in the freezer for up to 2-3 months. To enjoy, simply thaw at room temperature for an hour or so, and it will taste just as fresh as the day it was baked! This is a fantastic way to always have some delightful Brown Sugar Shortbread on hand for unexpected guests or a sudden craving.
Tips for Perfect Brown Sugar Shortbread:
Achieving the perfect Brown Sugar Shortbread is a joy, and with a few extra tips, you can elevate your baking to a truly professional level. These insights come from my own experiences and help ensure consistently delicious results every time you make this wonderful treat.
- Butter Quality Matters: Since butter is such a star in shortbread, I always recommend using high-quality unsalted butter. European-style butters, with their higher fat content, can impart an even richer flavor and superior texture to your Brown Sugar Shortbread. The nuances in butter quality truly shine through in such a simple, butter-forward recipe.
- Don’t Skimp on the Chilling: I cannot emphasize enough the importance of chilling the dough. It’s not just about preventing spread; it allows the butter to re-solidify, creating a more tender and crisp final product. A well-chilled dough is also much easier to handle, cut, and ensures your Brown Sugar Shortbread holds its shape beautifully. If your kitchen is warm, or if you feel the dough is becoming too soft during handling, don’t hesitate to pop it back into the fridge for 10-15 minutes.
- Watch Your Oven: Every oven is a little different, and temperature fluctuations can impact your shortbread. I suggest investing in an oven thermometer to ensure your oven is truly heating to the temperature you set. Baking Brown Sugar Shortbread at a slightly lower temperature (325°F/160°C) for a longer period helps achieve a delicate texture without excessive browning. Keep a close eye on the edges for that subtle golden hue rather than relying solely on time.
- Experiment with Brown Sugar: While the recipe calls for light or dark brown sugar, don’t be afraid to experiment. Dark brown sugar will give a deeper, more molasses-rich flavor and a slightly chewier edge to your Brown Sugar Shortbread, while light brown sugar offers a milder, sweeter caramel note. Both are fantastic, so choose based on your preference!
- Gentle Mixing is Key: Overmixing is the enemy of tender shortbread. Once the flour is added, I mix only until just combined. Developing too much gluten will make your Brown Sugar Shortbread tough and bready, losing that signature crumbly, melt-in-your-mouth texture that we all love. A light hand here makes all the difference.
- Salt is Essential: Don’t skip the salt! A small amount of fine sea salt not only balances the sweetness of the brown sugar but also enhances all the other flavors, particularly the rich buttery notes. It makes the overall taste of your Brown Sugar Shortbread much more complex and satisfying.
- Consider Cornstarch or Rice Flour: The addition of cornstarch (or rice flour) is optional, but it’s a trick I learned that significantly contributes to a more tender, almost melt-away texture. These starches inhibit gluten development even further, making your Brown Sugar Shortbread incredibly delicate. If you have it, I highly recommend including it.
- Even Thickness: Whether you’re rolling out the dough or pressing it into a pan, strive for an even thickness. This ensures that all pieces of your Brown Sugar Shortbread bake uniformly, preventing some pieces from being undercooked while others are overbaked. A rolling pin with thickness guides can be very helpful here.
Conclusion:
And there you have it, my friends! After walking you through the incredibly simple steps, I sincerely hope you’re as excited as I am about this utterly delightful recipe. This isn’t just any shortbread; it’s a game-changer, a perfect blend of crispness and tender crumb that truly melts in your mouth, leaving behind a subtle, yet profound, caramel-like sweetness. The magic of brown sugar transforms a classic into something truly extraordinary, adding a depth of flavor that a simple white sugar shortbread just can’t quite achieve. I’ve always been a firm believer that the simplest ingredients often yield the most profound culinary joys, and this recipe is a testament to that philosophy. You don’t need fancy equipment or a chef’s pedigree to create something truly spectacular; just a few pantry staples and a little love will get you there. This
Brown Sugar Shortbread
stands as a shining example of how humble ingredients can come together to create an experience that feels both luxurious and comforting, a treat that transcends the ordinary.
So, you’ve baked a batch, and now what? While these buttery, sweet squares are utterly divine on their own, perhaps with a cup of freshly brewed tea or a rich, dark coffee, don’t be afraid to let your culinary imagination run wild. They make an exceptional accompaniment to any dessert plate. Imagine crumbling a few pieces over a scoop of vanilla bean ice cream, allowing the warmth of the shortbread to create a delightful contrast with the cold cream. For a truly decadent experience, try dipping them into a rich, homemade chocolate ganache or a salted caramel sauce – the flavors are simply out of this world. Consider them a sophisticated upgrade to your holiday cookie platters, or even as a thoughtful, edible gift when neatly packaged. For those feeling a little adventurous, you could introduce a touch of citrus zest, like orange or lemon, into the dough for a bright, aromatic twist, or perhaps a pinch of ground cardamom or cinnamon to elevate the warm, sweet notes of the brown sugar. Another fantastic variation I adore involves pressing a few mini chocolate chips or finely chopped nuts into the top before baking for added texture and flavor. You could even create elegant mini sandwiches by spreading a thin layer of raspberry jam or lemon curd between two shortbread pieces. The possibilities are genuinely endless, and each variation offers a unique way to enjoy this already perfect treat. They also make an excellent base for mini fruit tarts or a delightful crust for individual cheesecakes. Trust me, once you make them, you’ll find countless excuses to incorporate them into your dessert repertoire.
My greatest hope is that you’ll take this recipe, make it your own, and fall in love with it just as deeply as I have. There’s something incredibly satisfying about pulling a tray of freshly baked treats from the oven, the aroma filling your home with warmth and promise. This isn’t just about following instructions; it’s about the joy of creation, the simple pleasure of sharing something delicious you’ve made with your own hands. I truly believe that every kitchen holds the potential for magic, and this Brown Sugar Shortbread recipe is a wonderful way to tap into that. Don’t hesitate, don’t overthink it – just gather your ingredients and give it a try this week! I am absolutely confident that you’ll be delighted by the results. And once you’ve experienced the sheer delight of these golden squares, please, please come back and share your experience with me! I’d love to hear about your baking adventures, any variations you tried, or simply how much you and your loved ones enjoyed them. Your feedback and stories are what make this culinary journey truly special. Happy baking, everyone, and may your kitchens always be filled with delicious aromas and happy memories!
Brown Sugar Shortbread
A simple yet profoundly satisfying confection that promises a moment of pure bliss with every bite. This Brown Sugar Shortbread balances buttery richness with a hint of warm, caramelized sweetness, offering a delicate melt-in-your-mouth texture.
Ingredients
-
3/4 cup (1.5 sticks; 170g) unsalted butter, softened
-
1 cup (200g) packed light or dark brown sugar
-
1 1/2 teaspoons pure vanilla extract
-
2 1/4 cups (281g) all-purpose flour, spooned & leveled
-
1/4 teaspoon salt
-
1/2 cup (100g) coarse sugar (optional, for topping)
Instructions
-
Step 1
Prepare: Ensure unsalted butter has truly reached room temperature. Measure out all ingredients. Sift the all-purpose flour and salt together into a separate bowl. Line two large baking sheets with parchment paper or silicone baking mats. -
Step 2
Cream Butter & Brown Sugar: In a large mixing bowl, combine the softened unsalted butter and packed brown sugar. Using an electric mixer with the paddle attachment, cream on medium-high speed for 3-5 minutes until the mixture is wonderfully light, fluffy, and visibly paler, creating tiny air pockets for a tender shortbread. -
Step 3
Add Vanilla: Pour in the pure vanilla extract and beat on medium speed for just another 30 seconds or so, until fully incorporated and its aromatic goodness has permeated the mixture. -
Step 4
Gradually Add Dry Ingredients: With the mixer on its lowest speed, gradually add the sifted flour and salt mixture to the wet ingredients, adding about a third at a time. Mix only until just combined after each addition, avoiding overmixing to prevent a tough shortbread. Finish incorporating gently with a rubber spatula if needed. The dough will be thick and somewhat crumbly, but should hold together when pressed. Bring the dough together into a cohesive ball with your hands. -
Step 5
Shape Dough: Divide the dough into two equal portions. On a lightly floured work surface or between two sheets of parchment paper, gently roll out one portion to an even thickness of about 1/2 inch (1.25 cm). Cut into desired shapes (e.g., traditional fingers, squares) with a sharp knife or cookie cutters. Alternatively, press the dough directly into an ungreased 8×8 inch square baking pan, prick the entire surface with a fork, and lightly score the shortbread with a knife or pizza cutter for clean breaks after baking. Optionally, sprinkle the top with coarse sugar for added crunch and sweetness. -
Step 6
Chill the Dough: Carefully transfer the cut shortbread pieces onto the prepared baking sheets, leaving about 1 inch between each piece. If using a pan, place the entire pan into the refrigerator. Chill the dough for at least 30 minutes, or even up to an hour. This non-negotiable step allows the butter to firm up, preventing spreading and resulting in a more tender, crisp crumb. -
Step 7
Bake the Shortbread: While the dough is chilling, preheat your oven to 325°F (160°C). Transfer the chilled baking sheets to the preheated oven. Bake for 20 to 25 minutes, checking around the 18-minute mark. The shortbread is done when the edges are just beginning to turn a very light golden brown and the center still looks pale but set. Avoid deep browning. If you’ve baked in a pan, immediately re-cut along the pre-scored lines with a sharp knife or pizza cutter as soon as it comes out of the oven, while it’s still warm. -
Step 8
Cool & Store: Let the shortbread cool on the baking sheets for about 5 to 10 minutes. Then, carefully transfer to a wire cooling rack to cool completely (1-2 hours). Ensure complete cooling before storing or serving to maintain crispness. Store completely cooled Brown Sugar Shortbread in an airtight container at room temperature for up to 1 week. For longer storage, freeze completely cooled shortbread in a freezer-safe airtight container, separating layers with parchment paper, for up to 2-3 months. Thaw at room temperature for an hour or so before enjoying.
Important Information
Nutrition Facts (Per Serving)
It is important to consider this information as approximate and not to use it as definitive health advice.
Allergy Information
Please check ingredients for potential allergens and consult a health professional if in doubt.
Leave a Comment