

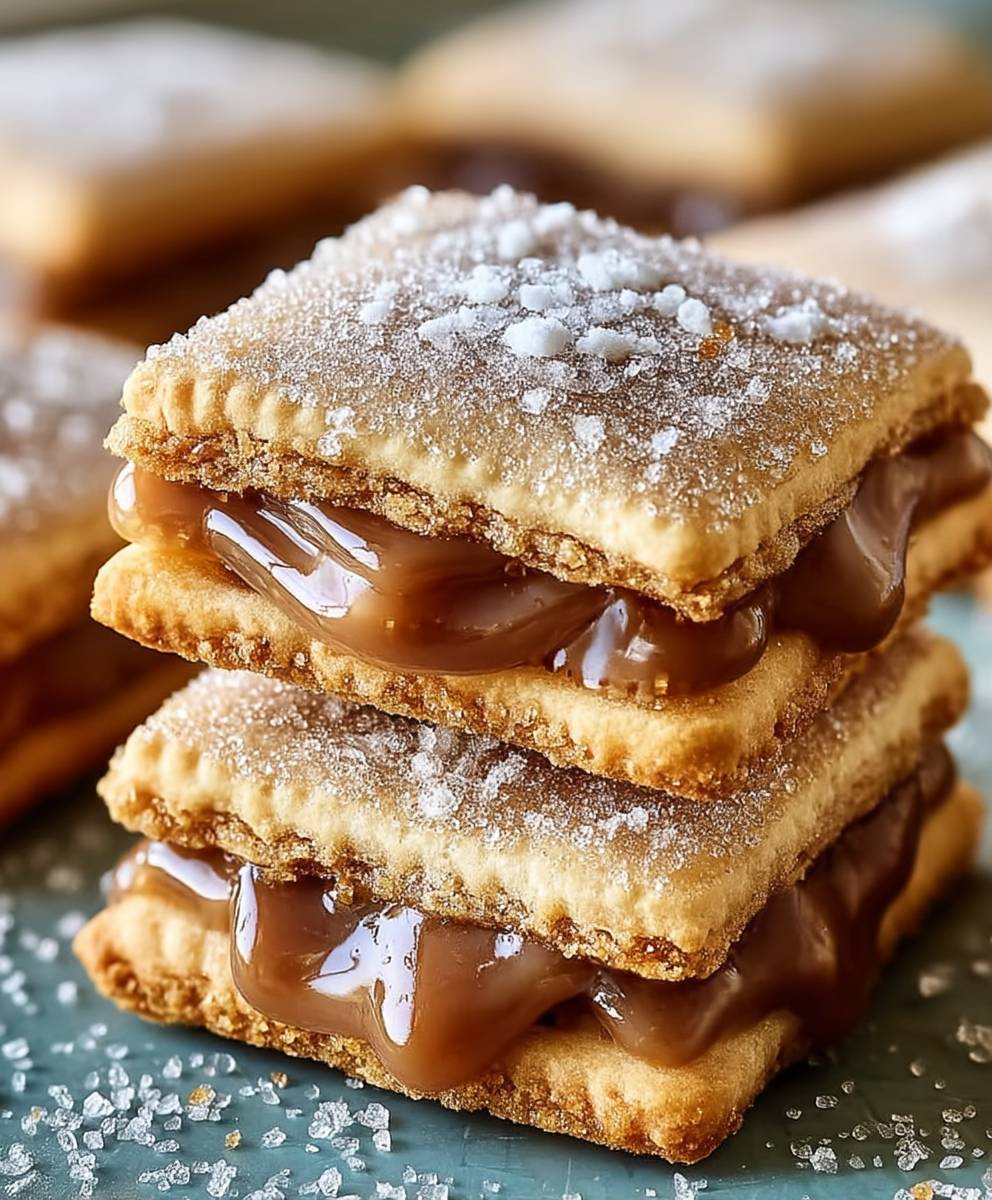
Brown Sugar Pop Tart Cookies: Prepare to be transported back to your childhood, but with a sophisticated, grown-up twist! Remember the joy of unwrapping a warm, frosted Pop Tart? Now, imagine that same comforting flavor in a soft, chewy cookie. These aren’t just cookies; they’re a nostalgic hug in every bite.
The inspiration behind these delightful treats comes from the iconic Pop Tart, a breakfast staple that has fueled countless mornings since its introduction in the 1960s. While the original Pop Tart offered a quick and convenient start to the day, these Brown Sugar Pop Tart Cookies elevate the experience, offering a homemade touch and an explosion of flavor that’s simply irresistible.
What makes these cookies so beloved? It’s the perfect combination of textures and tastes. The soft, buttery cookie base, infused with the rich, caramel-like notes of brown sugar, is complemented by a sweet, slightly tangy glaze that mimics the classic Pop Tart frosting. They are incredibly easy to make, requiring minimal ingredients and effort, making them perfect for a quick weeknight treat or a fun baking project with the kids. So, ditch the store-bought pastries and indulge in the homemade goodness of these unforgettable cookies. You won’t regret it!

Ingredients:
- For the Cookie Dough:
- 2 ½ cups all-purpose flour
- 1 teaspoon baking powder
- ½ teaspoon baking soda
- ½ teaspoon salt
- 1 cup (2 sticks) unsalted butter, softened
- ¾ cup granulated sugar
- ¾ cup packed light brown sugar
- 2 large eggs
- 1 teaspoon vanilla extract
- For the Brown Sugar Filling:
- ½ cup (1 stick) unsalted butter, softened
- ½ cup packed light brown sugar
- 2 tablespoons all-purpose flour
- 1 tablespoon milk
- ½ teaspoon vanilla extract
- ¼ teaspoon ground cinnamon
- Pinch of salt
- For the Glaze:
- 1 ½ cups powdered sugar
- 3-4 tablespoons milk
- ¼ teaspoon vanilla extract
- Optional Sprinkles:
- Your favorite sprinkles for decoration
Preparing the Cookie Dough
- Combine Dry Ingredients: In a medium bowl, whisk together the flour, baking powder, baking soda, and salt. This ensures that the leavening agents are evenly distributed throughout the dough, leading to a more consistent rise and texture in the cookies. Set this bowl aside for later.
- Cream Butter and Sugars: In a large bowl (or the bowl of a stand mixer), cream together the softened butter, granulated sugar, and brown sugar until light and fluffy. This process is crucial for incorporating air into the dough, which contributes to the cookies’ tenderness. Creaming should take about 3-5 minutes on medium speed. You’ll know it’s ready when the mixture is noticeably lighter in color and has a fluffy texture.
- Add Eggs and Vanilla: Beat in the eggs one at a time, making sure each egg is fully incorporated before adding the next. Then, stir in the vanilla extract. The eggs provide structure and richness to the dough, while the vanilla extract enhances the overall flavor profile.
- Gradually Add Dry Ingredients: Gradually add the dry ingredients to the wet ingredients, mixing on low speed until just combined. Be careful not to overmix the dough, as this can develop the gluten in the flour, resulting in tough cookies. Mix until the flour is almost completely incorporated, then stop and scrape down the sides of the bowl to ensure everything is evenly mixed.
- Chill the Dough: Divide the dough in half, flatten each half into a disc, wrap tightly in plastic wrap, and refrigerate for at least 1 hour, or preferably 2 hours. Chilling the dough is essential for preventing the cookies from spreading too much during baking. It also allows the flavors to meld together and makes the dough easier to handle. You can even chill the dough overnight for even better results.
Making the Brown Sugar Filling
- Combine Filling Ingredients: In a medium bowl, combine the softened butter, brown sugar, flour, milk, vanilla extract, cinnamon, and salt. Mix with an electric mixer or a sturdy spoon until smooth and well combined. The filling should have a thick, spreadable consistency. If it seems too thick, add a tiny splash more milk. If it seems too thin, add a tiny bit more flour.
Assembling and Baking the Cookies
- Preheat Oven and Prepare Baking Sheets: Preheat your oven to 375°F (190°C). Line two baking sheets with parchment paper or silicone baking mats. This will prevent the cookies from sticking and make cleanup easier.
- Roll Out the Dough: On a lightly floured surface, roll out one disc of chilled dough to about ?-inch thickness. Use a cookie cutter (approximately 3-inch square or rectangle) to cut out cookies. Re-roll scraps as needed. You can use a pizza cutter to make perfect squares if you don’t have a square cookie cutter.
- Assemble the Cookies: Place half of the cut-out cookies onto the prepared baking sheets. These will be the bottoms of your pop tart cookies. Spread a thin layer of the brown sugar filling evenly over each cookie, leaving a small border around the edges.
- Top with Second Cookie: Roll out the second disc of chilled dough and cut out cookies as before. Carefully place these cookies on top of the filled cookies, gently pressing the edges together to seal. You can use a fork to crimp the edges for a more authentic pop tart look and to ensure a good seal.
- Poke Holes (Important!): Use a toothpick or fork to poke several small holes in the top of each cookie. This will allow steam to escape during baking and prevent the cookies from puffing up too much and potentially bursting.
- Bake the Cookies: Bake for 8-10 minutes, or until the edges are lightly golden brown. Keep a close eye on them, as they can burn easily. The baking time may vary depending on your oven, so start checking them at 8 minutes.
- Cool the Cookies: Remove the baking sheets from the oven and let the cookies cool on the baking sheets for a few minutes before transferring them to a wire rack to cool completely.
Making the Glaze and Decorating
- Prepare the Glaze: In a small bowl, whisk together the powdered sugar, milk, and vanilla extract until smooth. Add more milk, one teaspoon at a time, until you reach your desired consistency. The glaze should be thick enough to coat the cookies but thin enough to spread easily.
- Glaze the Cookies: Once the cookies are completely cool, spread the glaze evenly over the top of each cookie.
- Add Sprinkles (Optional): Immediately sprinkle your favorite sprinkles over the glaze before it sets. This will ensure that the sprinkles adhere properly.
- Let the Glaze Set: Allow the glaze to set completely before serving or storing the cookies. This will take about 30 minutes to an hour.
Tips for Success:
- Don’t Overmix the Dough: Overmixing develops the gluten in the flour, resulting in tough cookies. Mix until just combined.
- Chill the Dough: Chilling the dough is crucial for preventing the cookies from spreading too much during baking.
- Seal the Edges Well: Make sure to seal the edges of the cookies well to prevent the filling from leaking out during baking.
- Poke Holes: Don’t forget to poke holes in the top of the cookies to allow steam to escape.
- Cool Completely: Allow the cookies to cool completely before glazing to prevent the glaze from melting.
Storage Instructions:
Store the cookies in an airtight container at room temperature for up to 3-4 days. They can also be frozen for longer storage. To freeze, wrap the cookies individually in plastic wrap and then place them in a freezer-safe container. Thaw at room temperature before serving.
Conclusion:
So, there you have it! These Brown Sugar Pop Tart Cookies are truly something special, and I genuinely believe they deserve a spot in your regular baking rotation. Why? Because they perfectly capture that nostalgic Pop-Tart flavor we all secretly crave, but in a warm, chewy, and utterly irresistible cookie form. Forget the store-bought version; these are a thousand times better, and you control every single ingredient that goes into them. Plus, the aroma that fills your kitchen while they bake is pure bliss!
These aren’t just cookies; they’re an experience. They’re a little bit of childhood magic, a whole lot of deliciousness, and a guaranteed crowd-pleaser. The combination of the brown sugar cookie base, the sweet and gooey filling, and that simple yet satisfying glaze is just *chef’s kiss*.
But the best part? They’re incredibly versatile! While I’m partial to the classic brown sugar flavor, don’t be afraid to experiment. Imagine a strawberry jam filling for a fruity twist, or maybe a chocolate hazelnut spread for a decadent treat. You could even add a sprinkle of sea salt on top of the glaze to balance the sweetness. The possibilities are endless!
Serving Suggestions and Variations:
* Warm and Cozy: Serve these cookies warm, straight from the oven, with a scoop of vanilla ice cream. The contrast of temperatures and textures is divine!
* Elevated Dessert: Crumble a cookie over a bowl of yogurt or oatmeal for a touch of sweetness and a delightful crunch.
* Party Perfect: These cookies are fantastic for parties and gatherings. They’re easy to transport and always a hit with guests of all ages.
* Gift Giving: Package a batch of these cookies in a cute box or tin for a thoughtful and homemade gift.
* Flavor Variations: As mentioned before, experiment with different fillings! Try raspberry jam, apricot preserves, or even a peanut butter filling. You can also add spices like cinnamon or nutmeg to the cookie dough for extra warmth. Consider using different extracts in the glaze, such as almond or vanilla bean paste, to enhance the flavor profile.
* Glaze Alternatives: If you’re not a fan of glaze, you can dust the cookies with powdered sugar or leave them plain.
* Add Sprinkles: For a more festive look, add sprinkles to the glaze before it sets.
I’ve poured my heart into perfecting this recipe, and I’m so excited for you to try it. I truly believe that once you bake these Brown Sugar Pop Tart Cookies, you’ll never look at store-bought Pop-Tarts the same way again. They are a delightful treat that brings joy with every bite.
So, what are you waiting for? Gather your ingredients, preheat your oven, and get ready to embark on a baking adventure. I promise you won’t regret it! And when you do, please, please, please share your experience with me! I’d love to hear what you think, what variations you tried, and how much everyone loved them. Tag me in your photos on social media, leave a comment below, or send me an email. I can’t wait to see your creations! Happy baking!
Brown Sugar Pop Tart Cookies: The Ultimate Recipe & Baking Guide
Buttery cookie crust filled with sweet brown sugar, topped with vanilla glaze and sprinkles. A fun twist on a classic breakfast!
Ingredients
- 2 ½ cups all-purpose flour
- 1 teaspoon baking powder
- ½ teaspoon baking soda
- ½ teaspoon salt
- 1 cup (2 sticks) unsalted butter, softened
- ¾ cup granulated sugar
- ¾ cup packed light brown sugar
- 2 large eggs
- 1 teaspoon vanilla extract
- ½ cup (1 stick) unsalted butter, softened
- ½ cup packed light brown sugar
- 2 tablespoons all-purpose flour
- 1 tablespoon milk
- ½ teaspoon vanilla extract
- ¼ teaspoon ground cinnamon
- Pinch of salt
- 1 ½ cups powdered sugar
- 3-4 tablespoons milk
- ¼ teaspoon vanilla extract
- Your favorite sprinkles for decoration
Instructions
- Combine Dry Ingredients: In a medium bowl, whisk together the flour, baking powder, baking soda, and salt. Set aside.
- Cream Butter and Sugars: In a large bowl (or stand mixer), cream together the softened butter, granulated sugar, and brown sugar until light and fluffy (3-5 minutes).
- Add Eggs and Vanilla: Beat in the eggs one at a time, then stir in the vanilla extract.
- Gradually Add Dry Ingredients: Gradually add the dry ingredients to the wet ingredients, mixing on low speed until just combined. Do not overmix.
- Chill the Dough: Divide the dough in half, flatten each half into a disc, wrap tightly in plastic wrap, and refrigerate for at least 1 hour, or preferably 2 hours (or overnight).
- Combine Filling Ingredients: In a medium bowl, combine the softened butter, brown sugar, flour, milk, vanilla extract, cinnamon, and salt. Mix until smooth and well combined.
- Preheat Oven and Prepare Baking Sheets: Preheat oven to 375°F (190°C). Line two baking sheets with parchment paper or silicone baking mats.
- Roll Out the Dough: On a lightly floured surface, roll out one disc of chilled dough to about ?-inch thickness. Use a cookie cutter (approximately 3-inch square or rectangle) to cut out cookies. Re-roll scraps as needed.
- Assemble the Cookies: Place half of the cut-out cookies onto the prepared baking sheets. Spread a thin layer of the brown sugar filling evenly over each cookie, leaving a small border around the edges.
- Top with Second Cookie: Roll out the second disc of chilled dough and cut out cookies as before. Carefully place these cookies on top of the filled cookies, gently pressing the edges together to seal. Use a fork to crimp the edges.
- Poke Holes: Use a toothpick or fork to poke several small holes in the top of each cookie.
- Bake the Cookies: Bake for 8-10 minutes, or until the edges are lightly golden brown.
- Cool the Cookies: Remove from oven and let cool on baking sheets for a few minutes before transferring to a wire rack to cool completely.
- Prepare the Glaze: In a small bowl, whisk together the powdered sugar, milk, and vanilla extract until smooth. Add more milk, one teaspoon at a time, until you reach your desired consistency.
- Glaze the Cookies: Once the cookies are completely cool, spread the glaze evenly over the top of each cookie.
- Add Sprinkles (Optional): Immediately sprinkle your favorite sprinkles over the glaze before it sets.
- Let the Glaze Set: Allow the glaze to set completely before serving or storing the cookies (about 30 minutes to an hour).
Notes
- Don’t Overmix the Dough: Overmixing develops the gluten in the flour, resulting in tough cookies. Mix until just combined.
- Chill the Dough: Chilling the dough is crucial for preventing the cookies from spreading too much during baking.
- Seal the Edges Well: Make sure to seal the edges of the cookies well to prevent the filling from leaking out during baking.
- Poke Holes: Don’t forget to poke holes in the top of the cookies to allow steam to escape.
- Cool Completely: Allow the cookies to cool completely before glazing to prevent the glaze from melting.
- Storage Instructions: Store the cookies in an airtight container at room temperature for up to 3-4 days. They can also be frozen for longer storage. To freeze, wrap the cookies individually in plastic wrap and then place them in a freezer-safe container. Thaw at room temperature before serving.

Leave a Comment