

Brooklyn Blackout Cake: just the name evokes images of rich, dark chocolate decadence, doesn’t it? This isn’t just any chocolate cake; it’s a historical masterpiece, a testament to a bygone era, and a flavor explosion all rolled into one. Prepare to be transported back to the 1940s, a time when Ebinger’s Bakery reigned supreme in Brooklyn, and their signature Brooklyn Blackout Cake was the talk of the town.
This cake wasn’t just a dessert; it was a symbol of local pride, named in honor of the blackout drills conducted during World War II. Imagine a cake so intensely chocolatey, it mirrored the darkness of those wartime nights! Ebinger’s jealously guarded their recipe, and its disappearance after the bakery closed in the 1970s only added to its mystique.
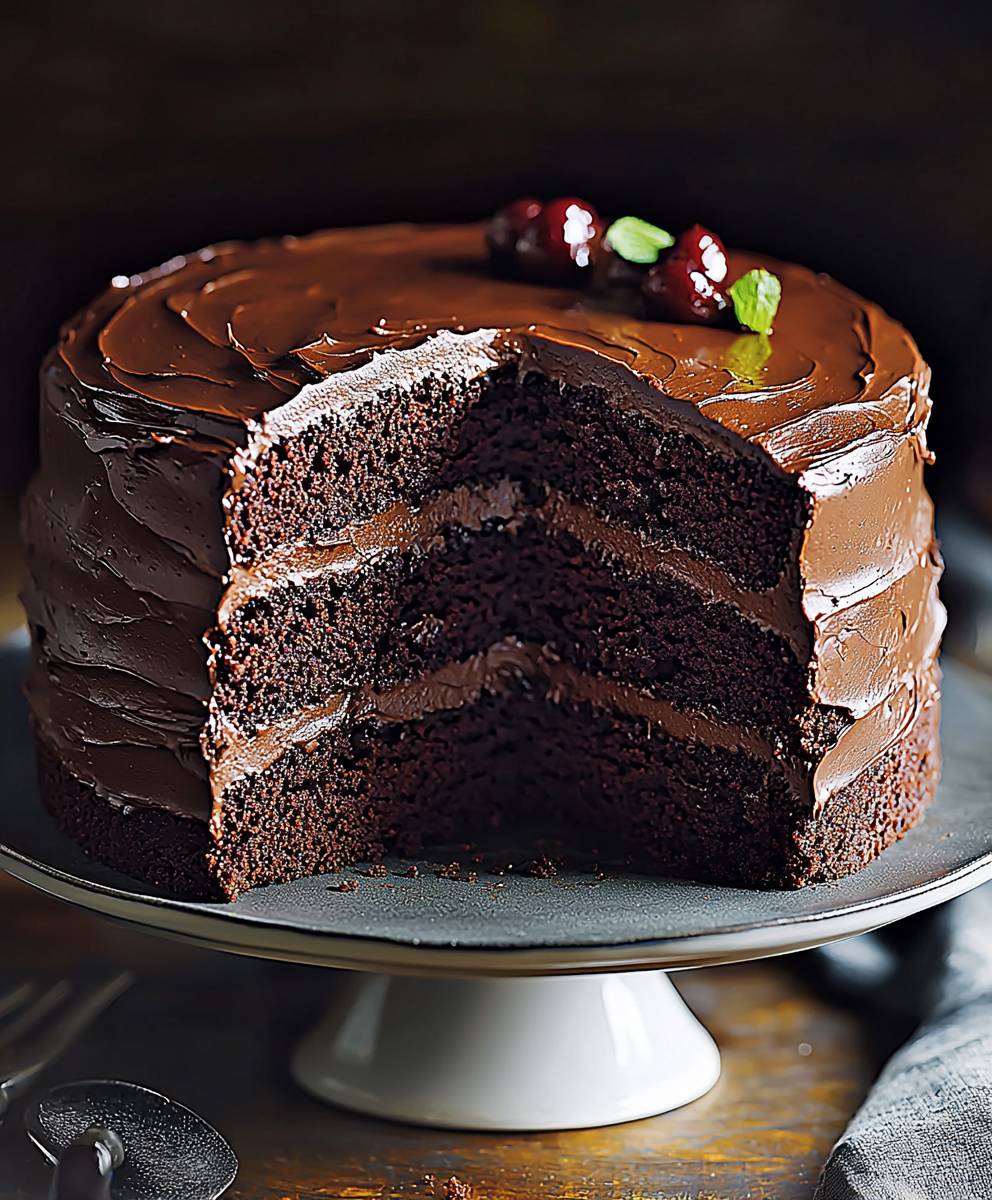
But why is this cake so beloved, even decades later? It’s the perfect combination of textures: moist, dark chocolate cake layers, a creamy chocolate pudding filling, and a generous coating of chocolate cake crumbs. The deep, intense chocolate flavor is undeniably satisfying, and the slight bitterness balances the sweetness perfectly. It’s a showstopper that’s surprisingly easy to make at home, allowing you to recreate a piece of Brooklyn history in your own kitchen. Get ready to experience a chocolate lover’s dream come true!

Ingredients:
- For the Cake:
- 2 cups all-purpose flour
- 2 cups granulated sugar
- ¾ cup unsweetened cocoa powder (Dutch-process preferred)
- 1 ½ teaspoons baking powder
- 1 ½ teaspoons baking soda
- 1 teaspoon salt
- 1 cup buttermilk
- ½ cup vegetable oil
- 2 large eggs
- 2 teaspoons vanilla extract
- 1 cup boiling water
- 2 ounces bittersweet chocolate, melted and cooled
- For the Chocolate Pudding Filling:
- 3 cups whole milk
- ¾ cup granulated sugar
- ½ cup unsweetened cocoa powder (Dutch-process preferred)
- ¼ cup cornstarch
- ¼ teaspoon salt
- 4 large egg yolks
- 4 ounces bittersweet chocolate, chopped
- 2 tablespoons unsalted butter
- 1 teaspoon vanilla extract
- For the Chocolate Crumb Topping:
- 1 ½ cups all-purpose flour
- ¾ cup granulated sugar
- ½ cup unsweetened cocoa powder (Dutch-process preferred)
- ¾ cup (1 ½ sticks) cold unsalted butter, cut into cubes
- ¼ teaspoon salt
- For the Chocolate Ganache (Optional):
- 8 ounces bittersweet chocolate, chopped
- 1 cup heavy cream
Preparing the Cake Layers:
- Preheat and Prep: First things first, preheat your oven to 350°F (175°C). Grease and flour two 9-inch round cake pans. I like to use parchment paper rounds in the bottom of the pans to ensure the cakes release cleanly. This step is crucial, trust me!
- Dry Ingredients: In a large bowl, whisk together the flour, sugar, cocoa powder, baking powder, baking soda, and salt. Make sure everything is evenly distributed. This ensures a consistent rise and flavor throughout the cake.
- Wet Ingredients: In a separate bowl, whisk together the buttermilk, oil, eggs, and vanilla extract. Don’t over-whisk at this stage; just combine until everything is incorporated.
- Combine Wet and Dry: Gradually add the wet ingredients to the dry ingredients, mixing on low speed until just combined. Be careful not to overmix! Overmixing can lead to a tough cake.
- Add Boiling Water and Melted Chocolate: Slowly pour in the boiling water while mixing on low speed. The batter will be thin, but don’t worry, that’s normal. Then, add the cooled melted chocolate and mix until just combined. The melted chocolate adds richness and depth of flavor.
- Divide and Bake: Divide the batter evenly between the prepared cake pans. Bake for 30-35 minutes, or until a wooden skewer inserted into the center comes out clean. Keep an eye on them; oven times can vary.
- Cool Completely: Let the cakes cool in the pans for 10 minutes before inverting them onto a wire rack to cool completely. Make sure they are completely cool before frosting, or the frosting will melt.
Making the Chocolate Pudding Filling:
- Combine Dry Ingredients: In a medium saucepan, whisk together the sugar, cocoa powder, cornstarch, and salt. This helps prevent lumps from forming later.
- Add Milk and Egg Yolks: Gradually whisk in the milk until smooth. Then, whisk in the egg yolks. The egg yolks add richness and help thicken the pudding.
- Cook and Thicken: Cook over medium heat, stirring constantly, until the mixture comes to a simmer and thickens. This usually takes about 5-7 minutes. Don’t stop stirring, or the pudding might scorch!
- Remove from Heat: Remove the saucepan from the heat and stir in the chopped chocolate and butter until melted and smooth. The chocolate adds intense flavor, and the butter adds a silky texture.
- Add Vanilla: Stir in the vanilla extract.
- Cool and Chill: Pour the pudding into a bowl, cover with plastic wrap (pressing the plastic wrap directly onto the surface of the pudding to prevent a skin from forming), and refrigerate for at least 2 hours, or until completely chilled. Chilling is essential for the pudding to set properly.
Preparing the Chocolate Crumb Topping:
- Combine Dry Ingredients: In a medium bowl, whisk together the flour, sugar, cocoa powder, and salt.
- Cut in Butter: Cut in the cold butter using a pastry blender or your fingertips until the mixture resembles coarse crumbs. The butter needs to be cold to create the right texture.
- Chill (Optional): For best results, chill the crumb mixture in the refrigerator for at least 30 minutes before using. This helps the crumbs stay distinct and not melt too quickly when applied to the cake.
Assembling the Brooklyn Blackout Cake:
- Level the Cakes: If necessary, level the tops of the cake layers using a serrated knife. This ensures a flat surface for frosting.
- First Layer: Place one cake layer on a serving plate or cake stand.
- Pudding Filling: Spread half of the chilled chocolate pudding evenly over the first cake layer.
- Second Layer: Top with the second cake layer.
- More Pudding: Spread the remaining chocolate pudding evenly over the top of the second cake layer.
- Crumb Topping: Generously sprinkle the chocolate crumb topping over the pudding. Make sure to cover the entire surface.
- Chill: Refrigerate the cake for at least 1 hour before serving. This allows the pudding to set completely and the flavors to meld together.
Optional: Making the Chocolate Ganache:
- Heat Cream: Place the heavy cream in a saucepan and heat over medium heat until it just begins to simmer. Do not boil.
- Pour over Chocolate: Pour the hot cream over the chopped chocolate in a heatproof bowl.
- Let Sit: Let the mixture sit for 1 minute to allow the heat to melt the chocolate.
- Whisk: Whisk gently until the chocolate is completely melted and the ganache is smooth and glossy.
- Cool Slightly: Let the ganache cool slightly before pouring or spreading it over the cake. You can use it to drizzle over the crumb topping or spread it over the entire cake before adding the crumbs.
Tips for Success:
- Use Dutch-process cocoa powder: It has a richer, smoother flavor and a darker color.
- Don’t overbake the cake: Overbaked cake will be dry.
- Chill the pudding and crumb topping: This helps them set properly and prevents them from melting.
- Be patient: Allow the cake to chill completely before serving for the best flavor and texture.
Variations:
- Add coffee: Dissolve 1-2 teaspoons of instant coffee granules in the boiling water for a mocha flavor.
- Use different chocolate: Experiment with different types of chocolate in the pudding and ganache.
- Add nuts: Sprinkle chopped nuts over the crumb topping for added texture and flavor.
Conclusion:
This Brooklyn Blackout Cake isn’t just a dessert; it’s a decadent experience, a journey back in time to a classic New York bakery. The rich, dark chocolate cake layers, intensely flavored chocolate pudding filling, and the generous coating of chocolate cake crumbs create a symphony of textures and tastes that will leave you utterly speechless. If you’re a chocolate lover, this is, without a doubt, the ultimate indulgence you’ve been searching for. Why is this a must-try? Because it’s more than just a cake. It’s a celebration of chocolate in its purest, most unadulterated form. The deep, complex flavors are a testament to the quality of ingredients and the careful attention to detail in every step of the recipe. From the perfectly moist cake layers to the silky smooth pudding, every element works in harmony to create a truly unforgettable dessert. It’s the kind of cake that makes you close your eyes and savor every single bite. It’s the kind of cake that you’ll want to make again and again, not just for special occasions, but for any time you need a little bit of chocolatey happiness in your life. But the best part? It’s surprisingly easy to make! While it might look intimidating, the recipe is straightforward and the results are absolutely worth the effort. I’ve broken down each step to ensure success, even for beginner bakers. Plus, the satisfaction of creating something so beautiful and delicious from scratch is incredibly rewarding. Looking for serving suggestions? A simple dusting of powdered sugar is a classic touch, or you could add a dollop of freshly whipped cream for a lighter contrast to the richness of the cake. For an extra touch of elegance, consider garnishing with fresh raspberries or strawberries. And if you’re feeling adventurous, a scoop of vanilla ice cream alongside a slice of this Brooklyn Blackout Cake is pure heaven. Want to put your own spin on it? Consider adding a hint of espresso powder to the cake batter for an even deeper chocolate flavor. Or, for a nutty twist, incorporate chopped walnuts or pecans into the cake crumb coating. You could even experiment with different types of chocolate in the pudding filling, such as dark chocolate for an intense flavor or milk chocolate for a sweeter, more classic taste. A layer of ganache between the cake and the pudding would also be a welcome addition for the serious chocolate lover. I truly believe that this Brooklyn Blackout Cake will become a new favorite in your household. It’s the perfect dessert for birthdays, holidays, or any occasion that calls for a little bit of chocolatey magic. So, what are you waiting for? Gather your ingredients, preheat your oven, and get ready to embark on a baking adventure. I promise you won’t regret it! And most importantly, I want to hear about your experience! Did you try the recipe? What did you think? Did you make any variations? Share your photos and stories in the comments below. I can’t wait to see your creations and hear all about your baking adventures. Happy baking! Print
Brooklyn Blackout Cake: A Decadent History and Recipe
- Total Time: 180 minutes
- Yield: 10–12 servings 1x
Description
Moist chocolate cake layers with rich chocolate pudding filling and chocolate crumb topping. Optional chocolate ganache.
Ingredients
- 2 cups all-purpose flour
- 2 cups granulated sugar
- ¾ cup unsweetened cocoa powder (Dutch-process preferred)
- 1 ½ teaspoons baking powder
- 1 ½ teaspoons baking soda
- 1 teaspoon salt
- 1 cup buttermilk
- ½ cup vegetable oil
- 2 large eggs
- 2 teaspoons vanilla extract
- 1 cup boiling water
- 2 ounces bittersweet chocolate, melted and cooled
- 3 cups whole milk
- ¾ cup granulated sugar
- ½ cup unsweetened cocoa powder (Dutch-process preferred)
- ¼ cup cornstarch
- ¼ teaspoon salt
- 4 large egg yolks
- 4 ounces bittersweet chocolate, chopped
- 2 tablespoons unsalted butter
- 1 teaspoon vanilla extract
- 1 ½ cups all-purpose flour
- ¾ cup granulated sugar
- ½ cup unsweetened cocoa powder (Dutch-process preferred)
- ¾ cup (1 ½ sticks) cold unsalted butter, cut into cubes
- ¼ teaspoon salt
- 8 ounces bittersweet chocolate, chopped
- 1 cup heavy cream
Instructions
- Preheat your oven to 350°F (175°C). Grease and flour two 9-inch round cake pans. Use parchment paper rounds in the bottom of the pans.
- In a large bowl, whisk together the flour, sugar, cocoa powder, baking powder, baking soda, and salt.
- In a separate bowl, whisk together the buttermilk, oil, eggs, and vanilla extract.
- Gradually add the wet ingredients to the dry ingredients, mixing on low speed until just combined.
- Slowly pour in the boiling water while mixing on low speed. Add the cooled melted chocolate and mix until just combined.
- Divide the batter evenly between the prepared cake pans. Bake for 30-35 minutes, or until a wooden skewer inserted into the center comes out clean.
- Let the cakes cool in the pans for 10 minutes before inverting them onto a wire rack to cool completely.
- In a medium saucepan, whisk together the sugar, cocoa powder, cornstarch, and salt.
- Gradually whisk in the milk until smooth. Then, whisk in the egg yolks.
- Cook over medium heat, stirring constantly, until the mixture comes to a simmer and thickens (5-7 minutes).
- Remove the saucepan from the heat and stir in the chopped chocolate and butter until melted and smooth.
- Stir in the vanilla extract.
- Pour the pudding into a bowl, cover with plastic wrap (pressing the plastic wrap directly onto the surface of the pudding), and refrigerate for at least 2 hours, or until completely chilled.
- In a medium bowl, whisk together the flour, sugar, cocoa powder, and salt.
- Cut in the cold butter using a pastry blender or your fingertips until the mixture resembles coarse crumbs.
- Chill the crumb mixture in the refrigerator for at least 30 minutes before using.
- If necessary, level the tops of the cake layers using a serrated knife.
- Place one cake layer on a serving plate or cake stand.
- Spread half of the chilled chocolate pudding evenly over the first cake layer.
- Top with the second cake layer.
- Spread the remaining chocolate pudding evenly over the top of the second cake layer.
- Generously sprinkle the chocolate crumb topping over the pudding.
- Refrigerate the cake for at least 1 hour before serving.
- Place the heavy cream in a saucepan and heat over medium heat until it just begins to simmer. Do not boil.
- Pour the hot cream over the chopped chocolate in a heatproof bowl.
- Let the mixture sit for 1 minute to allow the heat to melt the chocolate.
- Whisk gently until the chocolate is completely melted and the ganache is smooth and glossy.
- Let the ganache cool slightly before pouring or spreading it over the cake.
Notes
- Use Dutch-process cocoa powder for a richer flavor.
- Don’t overbake the cake.
- Chill the pudding and crumb topping.
- Allow the cake to chill completely before serving.
- Add coffee for a mocha flavor.
- Experiment with different chocolate types.
- Sprinkle chopped nuts over the crumb topping.
- Prep Time: 45 minutes
- Cook Time: 35 minutes


Leave a Comment