

Black velvet cake is a decadent dessert that has captured the hearts of many with its rich, velvety texture and deep, dark flavor. Originating from the early 20th century, this cake is often associated with special occasions and celebrations, making it a beloved choice for birthdays, weddings, and holidays. The unique combination of cocoa powder and buttermilk gives black velvet cake its signature moistness and a subtle chocolatey taste that is simply irresistible.
What I love most about black velvet cake is how it strikes the perfect balance between indulgence and comfort. The cake’s soft, tender crumb pairs beautifully with a luscious cream cheese frosting, creating a delightful contrast that keeps you coming back for more. Whether you’re a seasoned baker or a novice in the kitchen, this recipe is not only easy to follow but also guarantees a show-stopping dessert that will impress your family and friends. Join me as we dive into the world of black velvet cake and discover why this dessert has become a timeless favorite!

Ingredients:
- 2 cups all-purpose flour
- 1 ½ cups granulated sugar
- ¾ cup unsweetened cocoa powder
- 1 ½ teaspoons baking powder
- 1 ½ teaspoons baking soda
- 1 teaspoon salt
- 2 large eggs
- 1 cup whole milk
- ½ cup vegetable oil
- 2 teaspoons vanilla extract
- 1 cup boiling water
- 1 tablespoon white vinegar
For the Cream Cheese Frosting:
- 8 oz cream cheese, softened
- ½ cup unsalted butter, softened
- 4 cups powdered sugar
- 2 teaspoons vanilla extract
- 1-2 tablespoons milk (as needed for consistency)
Preparing the Batter
1. Preheat your oven to 350°F (175°C). I like to prepare my pans while the oven is heating up. Grease and flour two 9-inch round cake pans. You can also line the bottoms with parchment paper for easier removal later. 2. In a large mixing bowl, combine the dry ingredients: 2 cups of all-purpose flour, 1 ½ cups of granulated sugar, ¾ cup of unsweetened cocoa powder, 1 ½ teaspoons of baking powder, 1 ½ teaspoons of baking soda, and 1 teaspoon of salt. Whisk them together until they are well combined. This step is crucial as it ensures that the leavening agents are evenly distributed throughout the flour. 3. In another bowl, crack in 2 large eggs and whisk them lightly. Then add 1 cup of whole milk, ½ cup of vegetable oil, and 2 teaspoons of vanilla extract. Mix these wet ingredients together until they are well blended. 4. Now, pour the wet ingredients into the bowl with the dry ingredients. Using a hand mixer or a whisk, mix them together on medium speed until just combined. Be careful not to overmix; a few lumps are perfectly fine. 5. Next, carefully stir in 1 tablespoon of white vinegar. This will react with the baking soda and help the cake rise beautifully. 6. Finally, add 1 cup of boiling water to the batter. This step is what gives the black velvet cake its moist texture. The batter will be quite thin, but thats exactly what we want!Baking the Cake
7. Divide the batter evenly between the two prepared cake pans. I like to use a kitchen scale to ensure they are equal, but you can also eyeball it. 8. Place the pans in the preheated oven and bake for 30-35 minutes, or until a toothpick inserted into the center comes out clean. Keep an eye on them, as oven temperatures can vary. 9. Once baked, remove the cakes from the oven and let them cool in the pans for about 10 minutes. Then, carefully turn them out onto a wire rack to cool completely. This is an important step; if you frost the cakes while they are still warm, the frosting will melt and slide off.Making the Cream Cheese Frosting
10. While the cakes are cooling, lets whip up the cream cheese frosting. In a large mixing bowl, combine 8 oz of softened cream cheese and ½ cup of softened unsalted butter. Using a hand mixer, beat them together until smooth and creamy. 11. Gradually add in 4 cups of powdered sugar, one cup at a time, mixing on low speed until combined. This helps to prevent a sugar cloud from forming! 12. Once all the powdered sugar is incorporated, add in 2 teaspoons of vanilla extract. If the frosting is too thick, you can add 1-2 tablespoons of milk to reach your desired consistency. I like my frosting to be spreadable but not too runny.Assembling the Cake
13. Once the cakes are completely cool, its time to assemble! Place one layer of the cake on a serving plate or a cake stand. Spread a generous amount of cream cheese frosting on top of the first layer. I usually go for about 1 cup of frosting, but you can adjust based on your preference. 14. Carefully place the second layer of cake on top of the frosted layer. Now, its time to frost the top and sides of the cake. Use a spatula to spread the frosting evenly. Dont worry about
Conclusion:
In summary, this black velvet cake is an absolute must-try for anyone looking to impress their friends and family with a stunning dessert thats as delicious as it is beautiful. The rich, velvety texture combined with the subtle cocoa flavor creates a unique experience that will have everyone coming back for seconds. Whether youre celebrating a special occasion or simply indulging in a sweet treat, this cake is sure to be a showstopper. For serving suggestions, I love pairing this cake with a light cream cheese frosting or a simple whipped cream to balance the richness. You can also get creative by adding a layer of raspberry or cherry filling for a fruity twist, or even a drizzle of chocolate ganache for those who cant resist an extra chocolate kick. If youre feeling adventurous, try incorporating different flavors into the batter, like a hint of espresso or a splash of vanilla extract, to make it your own. I encourage you to give this black velvet cake recipe a try and share your experience with me! Id love to hear how it turns out for you and any variations you decide to experiment with. Remember, baking is all about having fun and making it your own, so dont hesitate to get creative. Happy baking! Print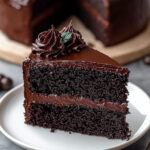
Black Velvet Cake: A Decadent Dessert Recipe You Must Try
- Total Time: 55 minutes
- Yield: 10–12 slices 1x
Description
Indulge in a rich and moist Black Velvet Cake, beautifully complemented by a creamy cream cheese frosting. This delightful dessert is perfect for any occasion and is sure to impress your guests!
Ingredients
- 2 cups all-purpose flour
- 1 ½ cups granulated sugar
- ¾ cup unsweetened cocoa powder
- 1 ½ teaspoons baking powder
- 1 ½ teaspoons baking soda
- 1 teaspoon salt
- 2 large eggs
- 1 cup whole milk
- ½ cup vegetable oil
- 2 teaspoons vanilla extract
- 1 cup boiling water
- 1 tablespoon white vinegar
- 8 oz cream cheese, softened
- ½ cup unsalted butter, softened
- 4 cups powdered sugar
- 2 teaspoons vanilla extract
- 1–2 tablespoons milk (as needed for consistency)
Instructions
- Preheat your oven to 350°F (175°C). Grease and flour two 9-inch round cake pans, or line the bottoms with parchment paper.
- In a large mixing bowl, whisk together the dry ingredients: flour, sugar, cocoa powder, baking powder, baking soda, and salt.
- In another bowl, whisk the eggs, then add milk, vegetable oil, and vanilla extract. Mix until well blended.
- Pour the wet ingredients into the dry ingredients and mix on medium speed until just combined. Do not overmix.
- Stir in the white vinegar, then carefully add the boiling water to the batter. The batter will be thin.
- Divide the batter evenly between the prepared cake pans.
- Bake for 30-35 minutes, or until a toothpick inserted into the center comes out clean. Let the cakes cool in the pans for 10 minutes, then transfer to a wire rack to cool completely.
- For the frosting, beat together the softened cream cheese and butter until smooth. Gradually add powdered sugar, mixing on low speed until combined.
- Add vanilla extract and adjust consistency with milk if needed.
- Once the cakes are cool, place one layer on a serving plate and frost the top. Add the second layer and frost the top and sides of the cake.
- Decorate as desired and serve.
Notes
- Ensure the cakes are completely cool before frosting to prevent melting.
- Feel free to customize the frosting with additional flavors or toppings.
- Prep Time: 20 minutes
- Cook Time: 35 minutes
Leave a Comment