

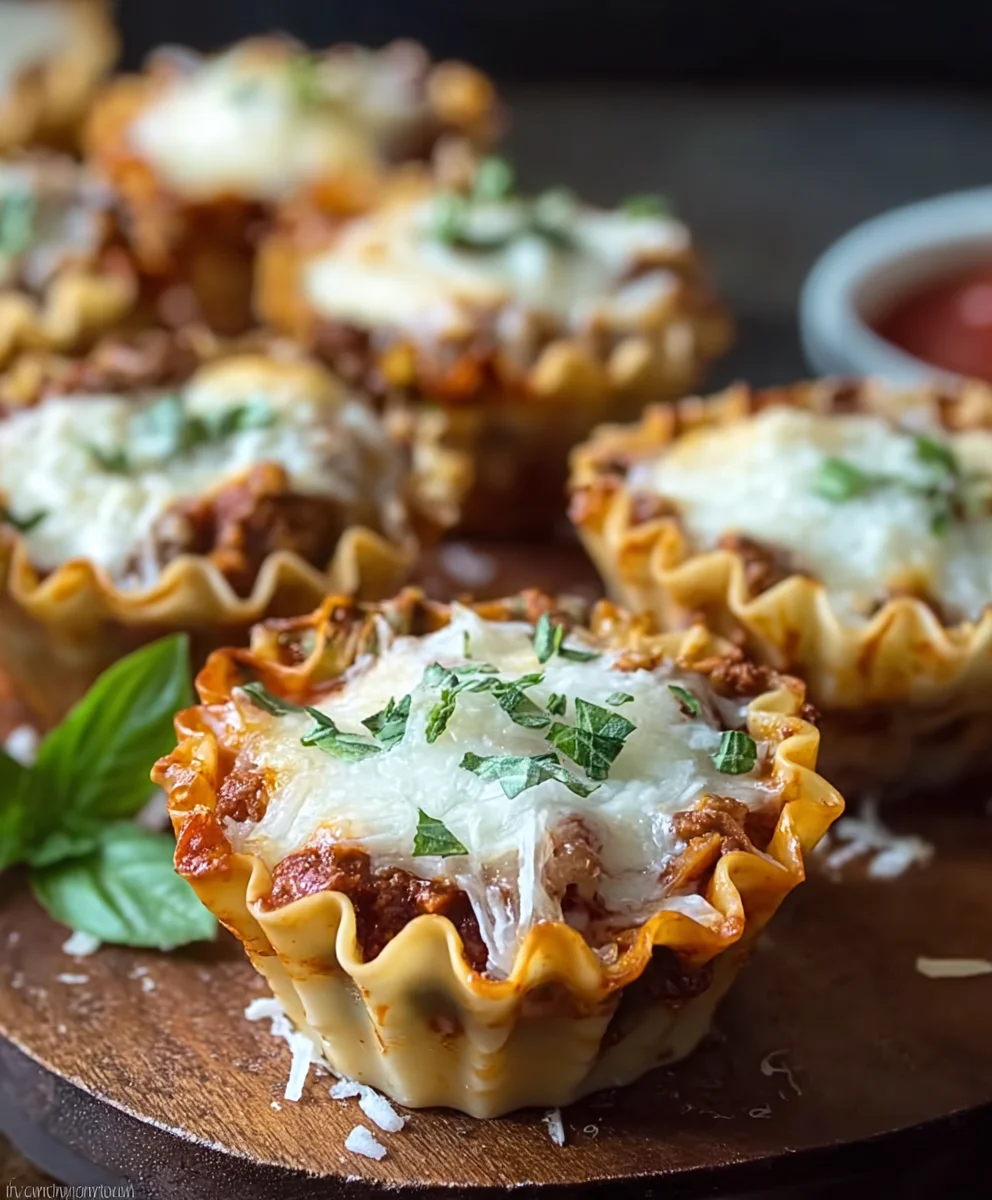
Petite Lasagna Cups are an absolute game-changer in the kitchen, offering all the comforting, layered goodness of a traditional Italian lasagna in an irresistibly cute, individual portion.
I still remember the first time I realized the genius of transforming a beloved classic into something so perfectly manageable – it truly elevates everyday dining and party planning alike. While the sprawling, hearty lasagna hails from the rich culinary traditions of Italy, evolving over centuries into the baked pasta dish we adore today, these delightful cups bring a modern, convenient twist to the table. People simply adore them not just for their charming presentation, but because they deliver that perfect harmony of savory meat or vegetable sauce, tender pasta, and a blend of creamy, melted cheeses in every single bite. They eliminate the messy serving often associated with a full pan, making them ideal for everything from busy weeknight dinners to elegant appetizer spreads. Preparing these Petite Lasagna Cups is a wonderfully satisfying experience, promising a delicious outcome that everyone will rave about. Get ready to bake a little piece of joy!

Ingredients:
- For the Meat Sauce (Ragu):
- 1 tablespoon olive oil
- 1 medium yellow onion, finely diced
- 2 cloves garlic, minced
- 1 pound lean ground beef (or a mix of beef and Italian sausage for extra flavor)
- 1 (28 ounce) can crushed tomatoes
- 1/2 cup dry red wine (like Merlot or Cabernet Sauvignon, optional but highly recommended)
- 1/4 cup tomato paste
- 1 teaspoon dried oregano
- 1/2 teaspoon dried basil
- 1/4 teaspoon red pepper flakes (optional, for a little kick)
- Salt and freshly ground black pepper to taste
- 1/4 cup fresh parsley, chopped (for garnish, optional)
- For the Creamy Bechamel Sauce:
- 4 tablespoons unsalted butter
- 4 tablespoons all-purpose flour
- 3 cups whole milk, warmed gently
- 1/2 teaspoon salt
- 1/4 teaspoon white pepper (or black pepper if white isn’t available)
- Pinch of freshly grated nutmeg
- For the Lasagna Cups Assembly:
- 12-15 lasagna noodles (oven-ready or regular, pre-cooked according to package directions)
- 1 1/2 cups ricotta cheese
- 1 large egg
- 1/4 cup grated Parmesan cheese, plus extra for topping
- 1/4 cup fresh parsley, finely chopped (optional, for ricotta mixture)
- Salt and freshly ground black pepper to taste
- 2 cups shredded mozzarella cheese
Preparation Phase 1: Crafting the Rich Meat Sauce (Ragu)
- Sautéing the Aromatics: My journey to creating these delightful Petite Lasagna Cups always begins with a robust and flavorful meat sauce. First, grab a large, heavy-bottomed pot or Dutch oven and set it over medium heat. Add the olive oil. Once it’s shimmering, toss in your finely diced yellow onion. We’re looking for that beautiful translucent stage, where the onion softens and its sweetness starts to emerge, which usually takes about 5-7 minutes. Stir occasionally to prevent burning.
- Introducing the Garlic and Meat: Next, add the minced garlic to the softened onions. Let it cook for just about 1 minute, until it becomes wonderfully fragrant. We don’t want it to brown, as burnt garlic can taste bitter. Immediately after, add the ground beef (and Italian sausage, if you’re using it, for that extra layer of savory depth). Break up the meat with a wooden spoon as it cooks. Continue to cook until the meat is thoroughly browned and no pink remains. This step is crucial for developing deep flavor in our Petite Lasagna Cups.
- Draining and Deglazing: Once the meat is nicely browned, carefully drain off any excess fat from the pot. This prevents the sauce from becoming greasy. Return the pot to the heat. Now, if you’re using red wine, this is the magical moment: pour it into the pot. Use your wooden spoon to scrape up any browned bits that have stuck to the bottom of the pot. These bits, called “fond,” are packed with flavor and will significantly enrich your sauce. Let the wine simmer and reduce for about 2-3 minutes, allowing most of the alcohol to evaporate while leaving behind its complex notes.
- Building the Sauce Base: Stir in the tomato paste. Cook it for another 1-2 minutes, stirring constantly. Cooking the tomato paste briefly helps to deepen its flavor and mellow out its acidity. Then, pour in the crushed tomatoes. Add the dried oregano, dried basil, and red pepper flakes (if you like a little warmth). Season generously with salt and freshly ground black pepper. Give everything a good stir to combine.
- Simmering for Perfection: Bring the sauce to a gentle simmer. Once it’s bubbling lightly, reduce the heat to low, cover the pot, and let it cook for at least 1 hour. I often let mine simmer for 1.5 to 2 hours, stirring occasionally. The longer it simmers, the more the flavors meld and deepen, creating a truly rich and irresistible ragu that forms the heart of our Petite Lasagna Cups. If the sauce becomes too thick, you can add a splash of water or broth. Taste and adjust seasonings as needed before you proceed; it should be perfectly balanced.
Preparation Phase 2: Whipping Up the Creamy Bechamel Sauce
- Creating the Roux: In a separate medium-sized saucepan, melt the unsalted butter over medium heat. Once the butter is fully melted and slightly foamy, sprinkle in the all-purpose flour. Immediately begin whisking constantly. This mixture, known as a roux, is the base of our Bechamel. Continue to whisk for 1-2 minutes. We’re aiming for a pale, golden-blonde roux, not a dark one, as we want to maintain the light color of the Bechamel for our Petite Lasagna Cups. The constant whisking prevents lumps and ensures the flour cooks out, removing any raw flour taste.
- Gradually Adding Milk: Now for the trickiest part, but it’s totally manageable! Gradually pour the warmed whole milk into the roux, a little bit at a time, while continuously whisking. I find it easiest to add about 1/2 cup of milk, whisk until it’s fully incorporated and smooth, then add another 1/2 cup. This gradual addition prevents lumps from forming and helps create a beautifully smooth sauce. It might look thick and clumpy at first, but keep whisking! It will smooth out as more milk is incorporated.
- Thickening and Seasoning: Once all the milk has been added, continue to cook the sauce over medium heat, whisking constantly, until it thickens to your desired consistency. It should be thick enough to coat the back of a spoon, but still pourable. This usually takes about 5-8 minutes. As it thickens, stir in the salt, white pepper (or black pepper), and a pinch of freshly grated nutmeg. Nutmeg is a classic addition to Bechamel and adds a wonderful warmth and depth that complements the other flavors in our Petite Lasagna Cups perfectly. Remove the Bechamel from the heat and set aside. If it cools too much and thickens excessively, you can gently reheat it over low heat with a splash of milk, whisking until smooth again.
Preparation Phase 3: Noodle and Assembly Prep for Your Petite Lasagna Cups
-
Preparing the Lasagna Noodles: This step depends on the type of lasagna noodles you’re using.
- For Regular Lasagna Noodles: Bring a large pot of salted water to a rolling boil. Carefully add the lasagna noodles and cook according to package directions until they are al dente. You want them pliable but not mushy. Drain them well and immediately lay them out flat on a clean kitchen towel or parchment paper to prevent them from sticking together. Once slightly cooled, cut each noodle into smaller squares. For standard size muffin tins, I find that cutting each long noodle into three equal segments crosswise, and then cutting those segments in half lengthwise, often gives you six smaller rectangular pieces per noodle. Experiment to find the size that best fits your muffin tin, ensuring they will line the cups without too much overlap or gaping.
- For Oven-Ready Lasagna Noodles: These are a fantastic shortcut! You won’t need to pre-cook them. Just take them directly from the package and cut them into appropriate sizes for your muffin tin, similar to the method described above for regular noodles. Because they absorb liquid as they bake, ensure your sauces are adequately moist.
A little tip: Having slightly more noodle pieces than muffin cups is always a good idea in case one breaks or you need an extra small piece to fill a gap.
- Preparing the Ricotta Mixture: In a medium bowl, combine the ricotta cheese, one large egg, 1/4 cup of grated Parmesan cheese, and the finely chopped fresh parsley (if using). Season with a pinch of salt and freshly ground black pepper. Mix everything thoroughly until well combined. The egg acts as a binder, helping the ricotta hold its shape beautifully within our Petite Lasagna Cups, and preventing it from being too crumbly after baking.
- Prepping Your Muffin Tin: Lightly grease a 12-cup standard muffin tin with cooking spray or a little olive oil. This is crucial for easy removal of your finished Petite Lasagna Cups. If you have a non-stick tin, it’s still a good idea to grease it for extra assurance. A heavy-duty muffin tin will conduct heat more evenly and help with browning the edges of the noodles.
- Lining the Muffin Cups: Take your cut lasagna noodle pieces. For each muffin cup, carefully line the bottom and sides with one or two pieces of noodle, overlapping slightly if necessary, to create a “cup” or “basket” for our lasagna layers. The goal is to cover as much of the muffin cup interior as possible, providing a sturdy structure for your Petite Lasagna Cups. Don’t worry if it’s not perfectly seamless; the layers will hold everything together.
-
Layering the Petite Lasagna Cups – The Fun Part! Now, let’s build these beauties. This is where the magic truly happens!
- First Layer (Sauce): Spoon a small dollop (about 1 tablespoon) of the meat sauce into the bottom of each noodle-lined muffin cup. This provides a flavorful base and helps prevent the ricotta from sticking too much.
- Second Layer (Ricotta): Next, add a generous spoonful (about 1 1/2 tablespoons) of the ricotta mixture over the meat sauce. Gently spread it out a bit with the back of the spoon.
- Third Layer (Mozzarella): Sprinkle a small amount of shredded mozzarella cheese over the ricotta. We’re building flavor and structure layer by layer.
- Fourth Layer (More Sauce): Add another spoonful of the meat sauce, ensuring it’s evenly distributed over the cheese.
- Fifth Layer (Bechamel): Drizzle a teaspoon or so of the creamy Bechamel sauce over the meat sauce layer. The Bechamel adds a luxurious, velvety texture and richness that truly elevates these Petite Lasagna Cups.
- Sixth Layer (Noodle Top): Carefully place another small piece of lasagna noodle on top of the Bechamel. This acts as a separator and provides another sturdy layer.
- Repeat Layers (Optional, for height): If your muffin cups are deep enough and you have enough ingredients, you can repeat steps (a) through (e) once more, or at least add another layer of ricotta and meat sauce, followed by mozzarella. I love to make them tall and substantial!
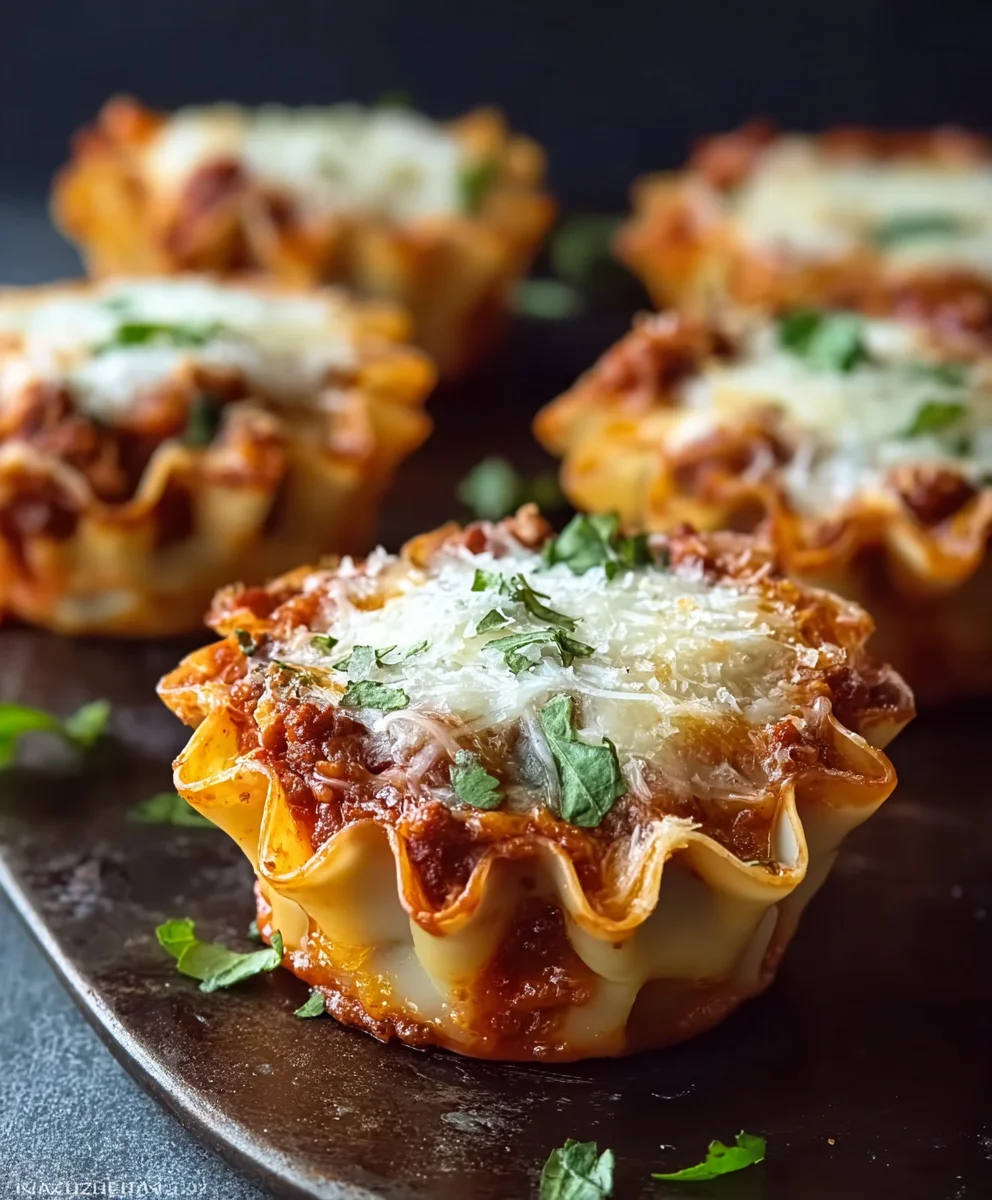
- Final Layer (Cheese Crown): Finish each Petite Lasagna Cup with a generous sprinkle of shredded mozzarella cheese and a little extra grated Parmesan cheese on top. This will melt into a golden, bubbly crust during baking, making them absolutely irresistible.
Cooking and Finishing Your Petite Lasagna Cups
- Preheating the Oven: Preheat your oven to 375°F (190°C). Ensuring the oven is at the correct temperature before placing your Petite Lasagna Cups inside is essential for even cooking and proper browning.
- Baking to Golden Perfection: Carefully transfer the filled muffin tin to the preheated oven. Bake for 25-30 minutes, or until the cheese on top is melted, bubbly, and beautifully golden brown, and the edges of the noodles are slightly crispy. You should see the sauce gently bubbling around the edges. The aromas filling your kitchen at this point will be simply divine, signaling that your Petite Lasagna Cups are almost ready! Keep an eye on them, as oven temperatures can vary.
- The Crucial Resting Period: Once baked, remove the muffin tin from the oven. This step is often overlooked but is incredibly important for any baked pasta dish, especially our Petite Lasagna Cups. Let the lasagna cups rest in the muffin tin for at least 10-15 minutes before attempting to remove them. During this resting period, the sauces will set, the cheese will firm up slightly, and the layers will become more cohesive. This significantly reduces the chance of them falling apart when you take them out, ensuring they maintain their perfect individual cup shape.
- Gentle Removal and Serving: After resting, carefully run a thin knife or a small offset spatula around the edges of each Petite Lasagna Cup to loosen it from the muffin tin. Gently lift each cup out and transfer it to a serving platter. If any cheese has overflowed and stuck, a gentle nudge with the knife should free it.
- Garnish and Enjoy: For a final flourish, you can sprinkle a little fresh chopped parsley over your magnificent Petite Lasagna Cups before serving. They are wonderful served hot, either as an appetizer, a side dish, or a light main course with a fresh green salad. These individual portions are fantastic for meal prepping, entertaining, or simply enjoying a perfectly portioned lasagna without the fuss of a large casserole. I absolutely adore how these Petite Lasagna Cups turn out every single time, offering all the comforting flavors of traditional lasagna in a convenient, charming package. Enjoy every single bite!
Conclusion:
And there you have it, my friends! We’ve journeyed through the simple steps to create a truly remarkable dish, and I genuinely hope you’re feeling as inspired as I am about it. This isn’t just another recipe; it’s a delightful reimagining of a beloved classic, tailored for modern life without sacrificing an ounce of flavor or comfort. I’ve poured my heart into perfecting these Petite Lasagna Cups, and I promise you, they are an absolute game-changer in your kitchen. They solve the age-old dilemma of craving homemade lasagna but dreading the extensive prep time and the messy, often uneven serving process of a traditional casserole. With these individual portions, you get all the cheesy, saucy, pasta-layered goodness in a perfectly contained, utterly adorable package.
What makes this recipe a true must-try isn’t just its convenience or its charm; it’s the incredible versatility and the sheer joy it brings to the table. Imagine a weeknight dinner that feels special but comes together with surprising ease, or an appetizer that disappears faster than you can say “more, please!” This recipe is robust enough to satisfy the heartiest appetites yet elegant enough for a sophisticated gathering. It’s the kind of dish that garners compliments and requests for the recipe, every single time. Trust me when I say, once you try these, you’ll wonder how you ever lived without them! The balance of rich marinara, creamy ricotta, savory meat (or your preferred veggie filling), and perfectly al dente pasta, all baked to a golden perfection, is simply irresistible. It’s comfort food elevated, offering warmth, satisfaction, and a touch of culinary flair.
Elevate Your Dining Experience: Serving Suggestions & Flavorful Variations
Now that you’ve mastered the basic recipe, let’s talk about how you can truly make these Petite Lasagna Cups your own. For a complete and utterly delightful meal, I love serving these alongside a crisp, fresh green salad tossed with a light vinaigrette. A side of warm garlic bread or focaccia is also an excellent companion, perfect for soaking up any extra sauce. If you’re hosting a more casual get-together, a simple bowl of olives or some cherry tomatoes on the side can complete the spread beautifully. But the true magic lies in the endless variations you can explore! Don’t feel constrained by my recommendations; let your culinary imagination run wild.
Consider swapping out the traditional ground beef for Italian sausage, ground turkey, or even a mix of mushrooms and spinach for a delectable vegetarian option. For cheese lovers, a blend of provolone, fontina, or even smoked mozzarella can add wonderful new dimensions to the flavor profile. Imagine a version with grilled chicken and pesto instead of marinara for a lighter, brighter taste! Or, for a spicier kick, try adding a pinch of red pepper flakes to your sauce or a dash of hot Italian sausage. Gluten-free pasta cups are readily available, making this a fantastic option for those with dietary restrictions. You can also experiment with different herbs – fresh basil is always a winner, but a sprinkle of oregano or a pinch of marjoram could add a unique twist. For an extra touch of decadence, a drizzle of high-quality balsamic glaze over the top just before serving can truly elevate the experience, both visually and gastronomically. These Petite Lasagna Cups are incredibly forgiving and adaptable, inviting you to experiment and tailor them to your personal preferences and the ingredients you have on hand.
Your Turn! I Can’t Wait to Hear From You
My greatest hope is that this recipe inspires you to get into your kitchen, roll up your sleeves, and create something truly delicious. There’s an immense satisfaction that comes from preparing a meal with your own hands, and I promise you, these Petite Lasagna Cups deliver that feeling in spades. I’m absolutely confident that you, your family, and your guests will fall in love with them just as much as I have. So, what are you waiting for? Gather your ingredients, follow these simple steps, and embark on a delightful culinary adventure. I am genuinely eager to hear about your experience. Did you try any exciting variations? What did your family think? Did they become a new favorite in your household? Please, share your stories, your photos, and any creative modifications you come up with in the comments section below or tag me on your favorite social media platform. Your feedback and creativity not only make my day but also inspire countless other home cooks in our wonderful community. Happy cooking, and bon appétit!
Petite Lasagna Cups
Petite Lasagna Cups are a delightful way to enjoy the classic flavors of lasagna in a convenient, perfectly portioned size. These cups are made by layering cooked lasagna noodles, a rich beef and marinara sauce, and a creamy ricotta and mozzarella cheese mixture in a muffin tin. Baked to golden perfection, these lasagna cups are ideal for serving at dinner parties, family meals, or as a fun and tasty snack. The recipe is versatile and can be easily customized with different fillings or toppings to suit your preferences. Serve them fresh out of the oven for a warm, comforting meal that everyone will love.
Ingredients
-
1 tbsp olive oil
-
1 medium yellow onion, diced
-
2 cloves garlic, minced
-
1 lb lean ground beef
-
1 (28 oz) can crushed tomatoes
-
1/2 cup beef broth (or non-alcoholic red wine substitute)
-
1/4 cup tomato paste
-
1 tsp dried oregano
-
1/2 tsp dried basil
-
1/4 tsp red pepper flakes (optional)
-
Salt and black pepper to taste
-
4 tbsp unsalted butter
-
4 tbsp all-purpose flour
-
3 cups whole milk, warmed
-
1/2 tsp salt
-
1/4 tsp white pepper
-
Pinch of nutmeg
-
12-15 lasagna noodles (oven-ready or pre-cooked)
-
1 1/2 cups ricotta cheese
-
1 large egg
-
1/4 cup grated Parmesan cheese, plus extra for topping
-
1/4 cup fresh parsley, chopped (optional)
-
2 cups shredded mozzarella cheese
Instructions
-
Step 1
In a large pot, sauté diced onion in olive oil for 5-7 mins until translucent. Add minced garlic (1 min), then ground beef. Brown meat, drain fat. Add 1/2 cup beef broth (or non-alcoholic red wine substitute), scraping up browned bits. Simmer for 2-3 mins. Stir in tomato paste (1-2 mins). Add crushed tomatoes, oregano, basil, red pepper flakes, salt, and pepper. Bring to a simmer, then cover and cook on low for 1-2 hours, stirring occasionally. Adjust seasoning. -
Step 2
In a medium saucepan, melt butter over medium heat. Whisk in flour for 1-2 mins to create a pale roux. Gradually whisk in warmed whole milk until smooth. Cook, whisking constantly, for 5-8 mins until thickened. Stir in salt, white pepper, and nutmeg. Remove from heat. -
Step 3
For regular noodles, cook al dente, drain, and cut into smaller squares to fit muffin cups (e.g., 6 pieces per noodle). For oven-ready, cut directly from package to size. In a separate bowl, combine ricotta cheese, egg, 1/4 cup Parmesan, optional chopped parsley, salt, and pepper. Mix well. -
Step 4
Lightly grease a 12-cup muffin tin. Line each cup with 1-2 cut noodle pieces to form a ‘cup’. Spoon ~1 tbsp meat sauce into each noodle cup. Add ~1.5 tbsp ricotta mixture. Sprinkle mozzarella. Add another spoonful of meat sauce. Drizzle ~1 tsp Bechamel sauce. Place a small noodle piece on top. *Optional: repeat layers if desired.* Finish with a generous sprinkle of mozzarella and extra Parmesan cheese. -
Step 5
Preheat oven to 375°F (190°C). Bake for 25-30 minutes, or until cheese is melted, bubbly, and golden brown. -
Step 6
Remove from oven and let rest in the muffin tin for 10-15 minutes. Gently loosen edges with a knife or spatula and transfer to a serving platter. Garnish with fresh parsley if desired. Serve hot.
Important Information
Nutrition Facts (Per Serving)
It is important to consider this information as approximate and not to use it as definitive health advice.
Allergy Information
Please check ingredients for potential allergens and consult a health professional if in doubt.

Leave a Comment