

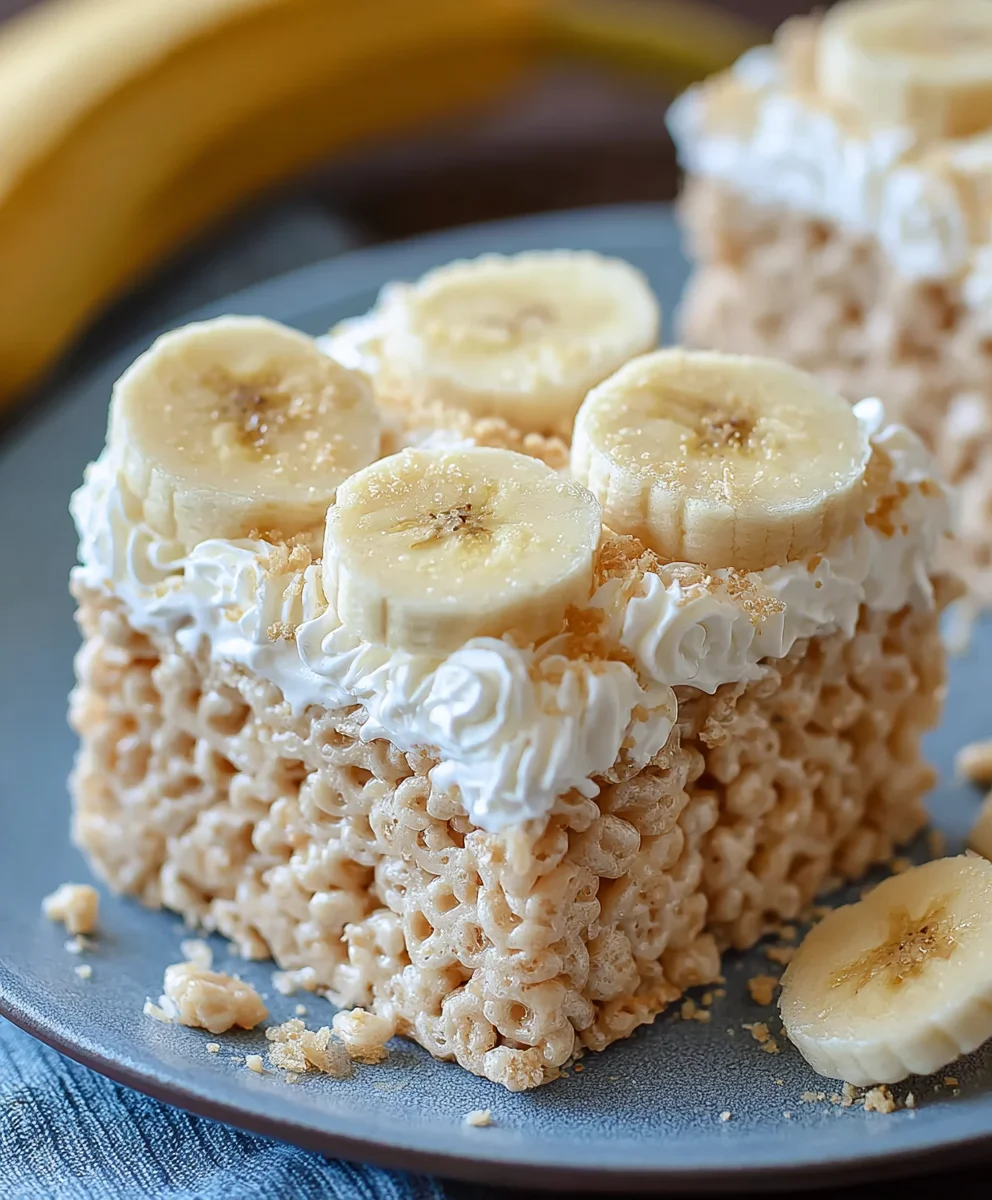
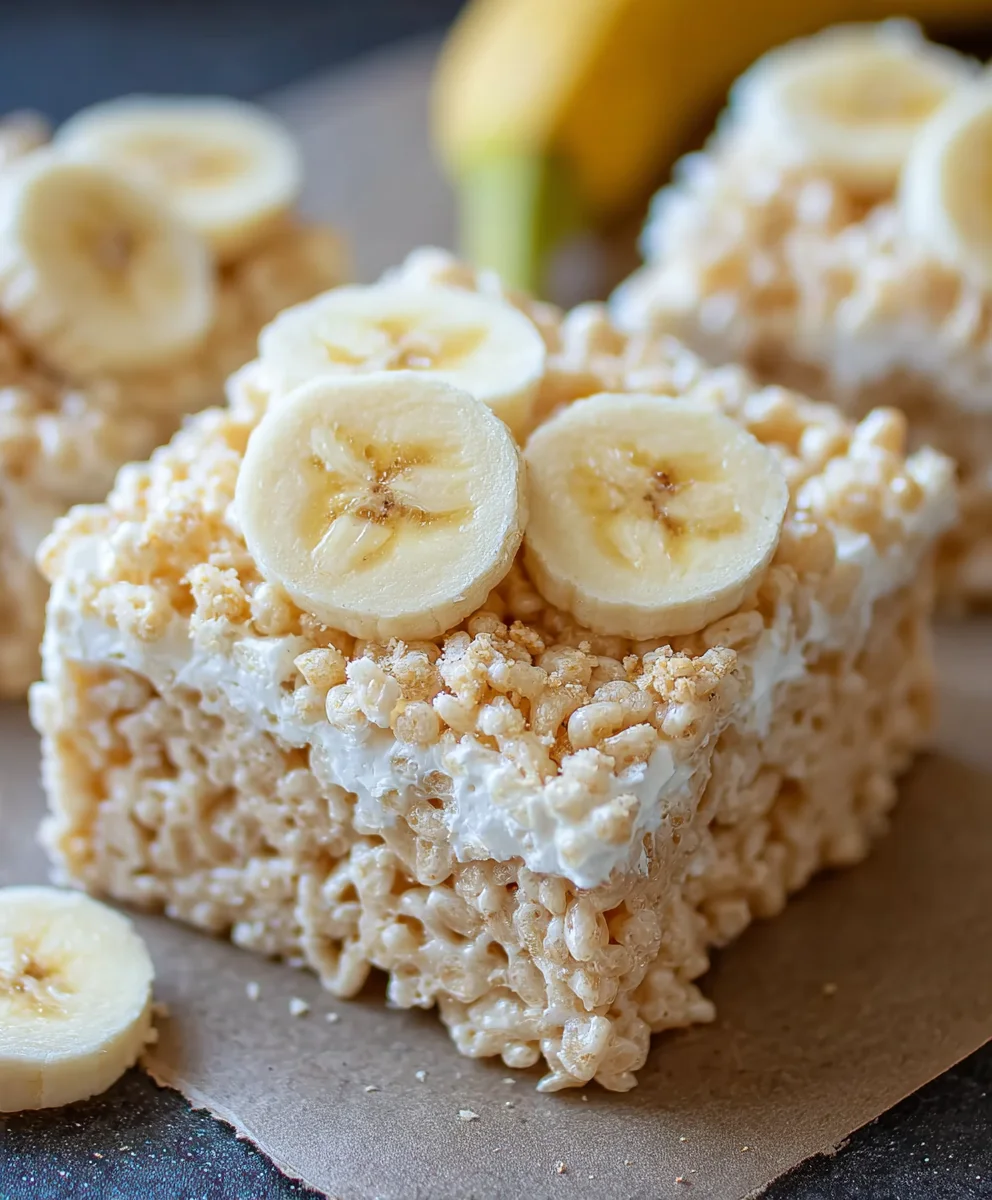
Banana Pudding Rice Krispie Treats are about to become your new favorite no-bake dessert, a truly delightful twist that perfectly marries two beloved classics. Imagine the creamy, comforting sweetness of traditional banana pudding, complete with crushed vanilla wafer crumbles, ingeniously folded into the irresistible, chewy, and crispy texture of classic marshmallow cereal treats. This isn’t just a snack; it’s a nostalgic journey wrapped in a surprisingly simple, utterly delicious package.
The timeless charm of banana pudding, a cherished staple across countless Southern tables, lies in its harmonious layers of sweet bananas, vanilla wafers, and velvety custard. We’ve taken that revered flavor profile and beautifully reimagined it, blending its comforting essence with the universal appeal of a crispy cereal treat. It’s a modern ode to comfort food, offering all the familiar warmth and nostalgic flavor without ever needing to turn on the oven.
People absolutely adore this clever creation because it delivers on multiple fronts: it’s incredibly easy to prepare, requires no baking whatsoever, and wonderfully satisfies that craving for something uniquely sweet and satisfying. The playful contrast between the soft, sweet banana notes, the satisfying crunch of the wafers, and the gooey, chewy marshmallow binding makes every single bite an adventure. Whether you’re a long-time fan of traditional banana pudding or simply seeking an exciting new twist on a classic treat, these Banana Pudding Rice Krispie Treats offer an unparalleled combination of flavor and fun that’s truly perfect for any occasion.

Ingredients:
- 1/2 cup (1 stick) unsalted butter: I always reach for unsalted butter when baking and making treats like these “Banana Pudding Rice Krispie Treats.” It gives me full control over the saltiness, ensuring our treats aren’t overly savory. You want good quality butter here, as it’s a foundational flavor and texture component.
- 1 (10-ounce) package mini marshmallows: These are my go-to for melting because they melt so much more evenly and quickly than their larger counterparts. If you only have large marshmallows, that’s perfectly fine! Just keep an eye on them and be prepared for a slightly longer melting time. This quantity is crucial for that perfect gooey consistency in our “Banana Pudding Rice Krispie Treats.”
- 6 cups Rice Krispies cereal: The star of the show! Make sure it’s fresh for optimal crispness. Stale cereal will result in a less satisfying texture, and we definitely want that signature snap, crackle, and pop in every bite of our “Banana Pudding Rice Krispie Treats.”
- 1 (3.4-ounce) package instant banana pudding mix: This is where the magic happens and where we get that unmistakable banana pudding flavor! Make sure it’s instant pudding, not the cook-and-serve kind. The powder itself will be incorporated into our marshmallow mixture, infusing every nook and cranny with delicious banana goodness.
- 1/2 cup cold milk (any percentage): This milk is specifically for preparing a small, very concentrated batch of banana pudding that we’ll layer into our treats. Using cold milk helps the instant pudding set up quickly and smoothly.
- 2-3 tablespoons additional instant banana pudding mix (for layering): This extra bit of dry pudding mix is key for dusting between layers, enhancing the banana flavor, and giving a subtle, delightful textural contrast.
- 2 cups crushed vanilla wafers: Oh, the classic companion to banana pudding! These will be layered throughout and on top of our “Banana Pudding Rice Krispie Treats” to provide that iconic crunch and flavor. You can crush them coarsely for bigger pieces or finely for a more integrated texture, depending on your preference. I usually place them in a zip-top bag and gently smash them with a rolling pin.
-
Optional garnishes:
- 1-2 fresh ripe bananas, thinly sliced: If you want to lean into the fresh fruit aspect, a layer of thinly sliced bananas can be a beautiful and delicious addition. Just be mindful that they can brown over time, so if you’re making these ahead, you might want to add them just before serving or brush them with a tiny bit of lemon juice.
- Whipped cream or cool whip: For serving, a dollop of fresh whipped cream or a swirl of Cool Whip really takes these “Banana Pudding Rice Krispie Treats” over the top, mimicking a classic banana pudding parfait.
- Extra vanilla wafers for topping: A few whole or broken vanilla wafers artfully placed on top make for a lovely presentation.
Preparation & Gathering Your Tools: Setting the Stage for Success
Before we dive into the fun stuff, I like to get all my ducks in a row. This ensures a smooth and stress-free process, which is especially important when working with warm, gooey mixtures that set quickly.
- Prepare your baking pan: First things first, grab a 9×13-inch baking pan. This size is ideal for yielding nice, thick, and satisfying “Banana Pudding Rice Krispie Treats.” I always recommend lining it with parchment paper, leaving an overhang on the sides. This creates a convenient sling, making it incredibly easy to lift the entire batch out of the pan once it’s set, allowing for clean, precise cuts. If you don’t have parchment, you can generously spray the pan with non-stick cooking spray, but trust me, parchment is a game-changer here.
- Measure your cereal: Pour your 6 cups of Rice Krispies cereal into a very large heatproof bowl. When I say large, I mean it! You’ll need plenty of room for mixing without spilling, as we’ll be adding a good amount of gooey marshmallow mixture to it. Set this bowl aside for now.
- Crush your wafers: Take about 2 cups of vanilla wafers and crush them. You can do this by placing them in a large zip-top bag and gently rolling over them with a rolling pin or the bottom of a heavy glass. I prefer a mix of fine crumbs and slightly larger pieces for textural interest, so don’t feel the need to pulverize them into dust. Set these aside in a separate small bowl.
- Separate your pudding mix: Divide your 3.4-ounce package of instant banana pudding mix. You’ll need about 2 tablespoons of the dry mix for sprinkling and the rest of the package (approximately 1/4 cup plus 2 tablespoons, or just eyeball it) will be added to our marshmallow mixture. Don’t worry about being absolutely precise with the dry mix for now; the main goal is to infuse that banana flavor throughout.
Crafting the Velvety Banana Pudding Base: The Heart of the Flavor
This is where we prepare a small, concentrated batch of actual banana pudding that will be layered into our treats, giving them that authentic, creamy banana pudding experience beyond just the flavor in the Krispies.
- Prepare the concentrated pudding: In a small bowl, whisk together 1/2 cup of cold milk with about 2 tablespoons of the instant banana pudding mix (from the separate amount you reserved for layering). Whisk vigorously for about 2 minutes, or until the mixture thickens significantly. You’re aiming for a very thick, almost spreadable consistency. It won’t be as pourable as regular pudding, and that’s exactly what we want. This intense banana flavor will be a delightful surprise in every bite of your “Banana Pudding Rice Krispie Treats.” Set this aside to firm up a bit more while we work on the main mixture.
Creating the Gooey Marshmallow Foundation: The Binder of Deliciousness
Now, let’s get to the truly gooey part! This step requires a little attention to detail to ensure your marshmallows melt perfectly without becoming too stiff or chewy.
- Melt the butter: In a large non-stick pot or Dutch oven, melt the 1/2 cup (1 stick) of unsalted butter over medium-low heat. The key here is low heat. We want the butter to melt gently without browning too much. Using a larger pot gives us plenty of room to add the marshmallows and, eventually, the cereal.
-
Add the marshmallows: Once the butter is mostly melted, add the entire 10-ounce bag of mini marshmallows to the pot. Stir constantly with a silicone spatula or wooden spoon. Continue stirring over low heat until the marshmallows are completely melted and smooth. This is a critical step:
Do Not Overcook the Marshmallows!
If you cook them too long or at too high a heat, your “Banana Pudding Rice Krispie Treats” will turn out hard and brittle instead of perfectly soft and chewy. As soon as they are fully melted and there are no lumps, remove the pot from the heat immediately. You’ll notice a glossy, thick, and wonderfully sticky mixture.
- Infuse with banana flavor: While the pot is still off the heat, stir in the remaining dry instant banana pudding mix (from the main package, not the milk-thickened batch). Stir it in quickly and thoroughly until it’s fully incorporated into the melted marshmallow mixture. This will instantly give your gooey base that wonderful, fragrant banana flavor that defines our “Banana Pudding Rice Krispie Treats.” The warmth of the marshmallow will help dissolve the pudding powder slightly, distributing the flavor beautifully.
Combining the Stars: Cereal, Pudding, and Gooey Goodness
Now it’s time to bring everything together! This is a quick process, so make sure you have everything ready to go.
- Combine marshmallow mixture with cereal: Pour the warm, banana-infused marshmallow mixture directly over the 6 cups of Rice Krispies cereal in your large bowl. Work quickly but gently. Using your silicone spatula (or a buttered spatula to prevent sticking), fold the cereal into the marshmallow mixture until every single piece of cereal is evenly coated. Take your time to ensure even distribution, but don’t overmix, as that can crush the cereal. You want those distinct crisp edges for perfect “Banana Pudding Rice Krispie Treats.”
- Press half into the pan: Transfer about half of the cereal mixture into your prepared 9×13-inch pan. Using a piece of wax paper, parchment paper, or even a buttered spatula, gently press the mixture evenly into the bottom of the pan. Don’t press too hard, as compacting it too much can make the treats dense and hard. A gentle, even pressure is all you need to form a nice base layer for your “Banana Pudding Rice Krispie Treats.”
Layering, Topping, and Elevating Your Treats: Building Flavor and Texture
This is where the layers come into play, creating a truly dynamic and authentic “Banana Pudding Rice Krispie Treats” experience.
- Add a layer of crushed wafers: Sprinkle about half of your crushed vanilla wafers evenly over the pressed cereal base. These provide that classic crunchy texture and sweet, vanilla flavor that we adore in traditional banana pudding.
- Spread the concentrated pudding: Carefully and gently, dollop spoonfuls of your thick, prepared banana pudding (the one mixed with milk) over the wafer layer. Then, using an offset spatula or the back of a spoon, gently spread it out to form a thin, even layer. It will be thick, so take your time to avoid disturbing the wafer layer too much. This layer is crucial for that authentic banana pudding creaminess.
- Sprinkle dry pudding mix: Lightly sprinkle about 1 tablespoon of the reserved dry banana pudding mix over the creamy pudding layer. This intensifies the banana flavor and adds a subtle, fine texture.
- Optional banana slices: If you’re using fresh banana slices, arrange about half of them evenly over the pudding layer. Remember, if you’re making these ahead, the bananas might brown, so this is best for serving within a few hours.
- Top with remaining cereal mixture: Carefully spoon the remaining half of the Rice Krispies mixture over the layered pudding, wafers, and optional bananas. Use the wax paper or buttered spatula again to gently press this top layer down. Again, gentle pressure is key to maintain that light, airy crispness.
- Final layers of wafers and pudding powder: Sprinkle the remaining crushed vanilla wafers over the top layer of cereal. Then, dust with the final 1 tablespoon of dry banana pudding mix. This creates a beautiful, rustic top finish and ensures every bite of your “Banana Pudding Rice Krispie Treats” is bursting with flavor.
- Optional fresh banana slices for garnish: If you reserved some fresh banana slices, you can arrange them on top now for a visually stunning finish, especially if serving immediately.
The Grand Finale: Chilling, Cutting, and Enjoying Your Masterpiece
Patience, my friends, is a virtue, especially when it comes to allowing these magnificent “Banana Pudding Rice Krispie Treats” to set up properly.
- Chill time is crucial: Once your masterpiece is assembled, place the pan in the refrigerator for at least 2-3 hours. This chilling time is absolutely essential. It allows the marshmallow mixture to firm up, the pudding layers to set, and all the flavors to meld beautifully. If you try to cut them too soon, they’ll be too soft and might fall apart. For the best results and cleanest cuts, I often let them chill overnight.
- Cut and serve: Once fully chilled and firm, use the parchment paper overhang to lift the entire slab of “Banana Pudding Rice Krispie Treats” out of the pan and onto a cutting board. Using a large, sharp knife (you can lightly spray it with cooking spray to prevent sticking if needed), cut the treats into 12-16 squares or rectangles, depending on your desired serving size. I find that squares around 2×2 inches are perfect for a satisfying bite.
- Garnish and enjoy: Serve your magnificent “Banana Pudding Rice Krispie Treats” as is, or with a dollop of whipped cream or Cool Whip and a fresh vanilla wafer for that ultimate dessert experience. The contrast between the crisp cereal, creamy pudding, and crunchy wafers is simply divine.
Tips, Tricks, and Creative Variations for Your Banana Pudding Rice Krispie Treats: Making Them Uniquely Yours
I absolutely adore this recipe because it takes a beloved classic and transforms it into something new and exciting. Here are some of my favorite tips and ways to customize your “Banana Pudding Rice Krispie Treats” to truly make them your own.
Storage for Optimal Freshness:
To keep your “Banana Pudding Rice Krispie Treats” at their absolute best, store them in an airtight container at room temperature for up to 2-3 days. If you’ve added fresh bananas, I highly recommend refrigerating them, but be aware that the cereal might soften slightly due to the moisture from the fruit and pudding. For peak crispness, try to enjoy them within a day or two of making them. If you prefer them chilled, that’s perfectly fine, but the cereal will lose some of its snap. I often find a happy medium by taking them out of the fridge about 15-20 minutes before serving to let them come closer to room temperature.
Making Ahead for Convenience:
These are fantastic for making ahead! You can prepare the entire batch of “Banana Pudding Rice Krispie Treats” up to a day in advance. Just be sure to omit any fresh banana slices until just before serving to prevent browning and excess moisture. Store them in an airtight container in the refrigerator, and then just lift, cut, and serve when you’re ready to impress your guests.
Elevating the Vanilla Wafer Experience:
While classic vanilla wafers are traditional, don’t be afraid to experiment! Golden Oreos, crushed Graham crackers, or even shortbread cookies could offer a delightful twist. For an extra touch of indulgence, try dipping half of your vanilla wafers in melted white chocolate before crushing and layering them. It adds a subtle richness that complements the banana beautifully.
Adding a Touch of Freshness (with a caveat):
If you’re dead set on incorporating fresh bananas directly into the treats, consider tossing the sliced bananas with a tiny bit of lemon juice or even pineapple juice before layering them. This helps to slow down the browning process. However, for maximum visual appeal and flavor integrity, I often recommend adding fresh banana slices as a garnish right before serving rather than embedding them directly into the treats for extended periods.
Drizzle for Extra Indulgence:
Who doesn’t love a drizzle? Once your “Banana Pudding Rice Krispie Treats” are set and cut, consider a light drizzle of caramel sauce, melted white chocolate, or even a classic chocolate syrup. A sprinkle of sea salt flakes over a caramel drizzle would be an incredible sweet and salty contrast!
Individual Servings for Parties:
Instead of a large pan, you could press the mixture into muffin tins lined with paper liners or into individual silicone molds. This creates adorable, perfectly portioned “Banana Pudding Rice Krispie Treats” that are ideal for parties or bake sales. You’ll just need to adjust the layering slightly for smaller vessels.
Making Them Even Richer:
For an extra decadent version, consider adding a thin layer of cream cheese frosting (like a very thin no-bake cheesecake layer) between the bottom Rice Krispie layer and the pudding layer. Whip together 4 oz softened cream cheese, 1/4 cup powdered sugar, and 2 tablespoons of milk until smooth and spread thinly. This would push these “Banana Pudding Rice Krispie Treats” into a whole new level of dessert bliss.
Gluten-Free Friendly:
Good news! This recipe can easily be made gluten-free. Just ensure you’re using a certified gluten-free Rice Krispies cereal and check the labels on your marshmallows and vanilla wafers (there are many delicious gluten-free wafer options available now!). The instant pudding mix is typically gluten-free, but always double-check the ingredient list to be safe.
The Nostalgia Factor:
What I truly love about these “Banana Pudding Rice Krispie Treats” is how they instantly transport me back to childhood. The classic flavors of banana pudding—creamy, sweet, with that unmistakable vanilla wafer crunch—are all here, but with the playful, crispy texture of a Rice Krispie treat. It’s a genius combination that appeals to everyone, whether they’re a seasoned banana pudding enthusiast or just looking for a fun, new treat. There’s something incredibly comforting about these familiar flavors in a new format, making them an instant hit for any gathering or a delightful pick-me-up on a quiet afternoon. They embody that perfect balance of comfort and innovation, truly making them a standout dessert.
No matter how you choose to make or serve them, these “Banana Pudding Rice Krispie Treats” are sure to be a beloved addition to your recipe repertoire. They’re fun to make, even more fun to eat, and truly encapsulate the joy of a classic dessert reimagined.
Conclusion:
And there you have it, my friends! We’ve journeyed through the simple, joyful process of creating something truly spectacular. I truly believe that this recipe for homemade treats isn’t just another dessert; it’s an experience, a delightful fusion that brings together the best of two beloved classics. Imagine the creamy, comforting sweetness of a classic banana pudding, perfectly intertwined with the satisfying crunch and chew of a nostalgic Rice Krispie Treat. This isn’t just a snack; it’s a celebration of texture and flavor that promises to put a smile on everyone’s face, from the pickiest eaters to the most discerning dessert connoisseurs. Its effortless preparation means you can whip up a batch in a flash, making it an ideal last-minute treat for unexpected guests or a spontaneous craving. I’ve found it to be an absolute game-changer for gatherings, consistently eliciting gasps of delight and requests for the recipe.
I highly recommend serving these delectable squares slightly chilled. The cool temperature really enhances the banana pudding flavor, making it feel even more like a refreshing, classic dessert. However, if you prefer a softer, chewier texture, letting them come to room temperature for about 15-20 minutes before serving can be equally delightful. For an extra touch of indulgence, consider a few simple garnishes. A dollop of freshly whipped cream on top of each square, perhaps dusted with a tiny sprinkle of cinnamon or a few mini chocolate chips, takes them to an entirely new level. Alternatively, a drizzle of caramel or a few crushed ‘Nilla wafers scattered over the top just before serving not only adds visual appeal but also an extra layer of flavor and crunch. They pair wonderfully with a tall glass of cold milk, a hot cup of coffee, or even as an exciting addition to a dessert buffet at your next backyard BBQ. Seriously, these treats are so versatile; they fit seamlessly into almost any occasion you can imagine, from a sophisticated brunch to a casual movie night with friends.
Unleash Your Creativity: Wonderful Variations to Try!
One of the things I love most about this recipe is its incredible adaptability. While the original is perfect, don’t hesitate to put your own spin on it! If you’re feeling adventurous, try swapping out the banana pudding mix for another flavor – butterscotch or even a chocolate fudge pudding could create an entirely new, equally irresistible treat. Imagine the rich, gooey delight of chocolate pudding infused Rice Krispie treats! You could also experiment with different add-ins. A handful of mini marshmallows stirred in at the end would add an extra layer of chewiness, or perhaps some white chocolate chips for a touch of added sweetness and creaminess. For those who love a nutty crunch, a sprinkle of finely chopped pecans or walnuts would be an excellent textural contrast. If you’re looking to make them extra special for a holiday, consider adding food coloring to the marshmallow mixture to match your theme – vibrant green for St. Patrick’s Day or festive red and green for Christmas! The possibilities are truly endless, and each variation offers a chance to discover a new favorite.
This is your moment to shine in the kitchen! I genuinely hope you’re feeling inspired to give these incredible Banana Pudding Rice Krispie Treats a try. Trust me when I say, once you experience that perfect blend of crunchy cereal, sweet banana pudding, and gooey marshmallow, you’ll wonder how you ever lived without them. They are undeniably easy, incredibly satisfying, and destined to become a staple in your recipe repertoire. Please don’t keep your culinary adventures to yourself! I would absolutely love to hear all about your experience. Did you stick to the original, or did you venture into exciting new variations? What kind of reactions did you get from your family and friends? Share your photos, your triumphs, and any clever twists you came up with. Your feedback and creativity inspire me and our entire community of home bakers. So go ahead, gather your ingredients, get sticky, and create some delicious memories!
Banana Pudding Rice Krispie Treats: Easy No-Bake Recipe!
Banana Pudding Rice Krispie Treats are a delightful no-bake dessert, marrying the creamy, comforting sweetness of traditional banana pudding with the irresistible, chewy, and crispy texture of classic marshmallow cereal treats. This easy recipe offers all the familiar warmth and nostalgic flavor without turning on the oven, perfect for any occasion.
Ingredients
-
1/2 cup (1 stick) unsalted butter
-
1 (10-ounce) package mini marshmallows
-
6 cups Rice Krispies cereal
-
1 (3.4-ounce) package instant banana pudding mix
-
1/2 cup cold milk
-
2 cups crushed vanilla wafers
-
Optional: 1-2 fresh ripe bananas, thinly sliced
-
Optional: Whipped cream or Cool Whip for serving
-
Optional: Extra vanilla wafers for topping
Instructions
-
Step 1
Line a 9×13-inch baking pan with parchment paper, leaving an overhang. Set aside 6 cups Rice Krispies cereal in a very large bowl. Crush 2 cups vanilla wafers (mix of fine and larger pieces); set aside in a separate small bowl. -
Step 2
Prepare pudding layers: From the 1 (3.4-ounce) package instant banana pudding mix, set aside 2 tablespoons for the thick pudding and another 2 tablespoons for sprinkling. In a small bowl, whisk 1/2 cup cold milk with the 2 tablespoons of pudding mix until thick (approx. 2 minutes). Set aside. -
Step 3
Melt marshmallows: In a large non-stick pot or Dutch oven, melt 1/2 cup (1 stick) unsalted butter over medium-low heat. Add 1 (10-ounce) package mini marshmallows; stir constantly until completely melted and smooth. Immediately remove from heat to prevent hardening. -
Step 4
Infuse marshmallow base: Stir the remaining instant banana pudding mix (from the 3.4oz package, after reserving 4 tbsp for layering) into the melted marshmallows until fully incorporated. The warmth will help distribute the banana flavor. -
Step 5
Combine & Base Layer: Pour the warm, banana-infused marshmallow mixture over the 6 cups of Rice Krispies cereal in the large bowl. Fold quickly but gently with a silicone spatula until every piece of cereal is evenly coated. Transfer about half of the mixture into the prepared pan and gently press it evenly into the bottom. Do not compress too firmly. -
Step 6
Build Layers: Sprinkle about half of the crushed vanilla wafers evenly over the pressed cereal base. Carefully dollop and gently spread the thick prepared banana pudding (milk-mixed) over the wafer layer. Lightly sprinkle 1 tablespoon of the reserved dry banana pudding mix over the creamy pudding. (Optional: If using, arrange half of the thinly sliced fresh bananas evenly over the pudding layer.) -
Step 7
Top Layer: Carefully spoon the remaining half of the Rice Krispies mixture over the layered pudding, wafers, and optional bananas. Gently press this top layer down. Sprinkle the remaining crushed vanilla wafers over the top layer of cereal, then dust with the final 1 tablespoon of dry banana pudding mix. (Optional: Arrange any reserved fresh banana slices on top for garnish, if serving immediately.) -
Step 8
Chill & Serve: Place the pan in the refrigerator for at least 2-3 hours, or overnight, until fully chilled and firm. Use the parchment paper overhang to lift the entire slab onto a cutting board. Using a large, sharp knife, cut into 12-16 squares or rectangles. Serve as is, or with a dollop of whipped cream or Cool Whip and an extra vanilla wafer for the ultimate dessert experience.
Important Information
Nutrition Facts (Per Serving)
It is important to consider this information as approximate and not to use it as definitive health advice.
Allergy Information
Please check ingredients for potential allergens and consult a health professional if in doubt.

Leave a Comment