

Baked One Pot Mac Cheese: Is there anything more comforting than a creamy, cheesy bowl of macaroni and cheese? I think not! But what if I told you that you could achieve that ultimate comfort food experience with minimal effort and only one pot to clean? Prepare to have your weeknights transformed with this incredibly easy and utterly delicious recipe.
Macaroni and cheese, in its various forms, has been a beloved dish for centuries. While its exact origins are debated, versions of pasta baked with cheese have been enjoyed since the medieval period. It gained significant popularity in America thanks to Thomas Jefferson, who brought back a pasta machine from Europe and served a macaroni and cheese casserole at a state dinner in 1802. Since then, it has evolved into a staple of American cuisine, a symbol of home-cooked goodness, and a guaranteed crowd-pleaser.
People adore mac and cheese for its rich, satisfying flavor and its wonderfully creamy texture. It’s the perfect blend of simplicity and indulgence. This Baked One Pot Mac Cheese recipe takes all the best aspects of classic mac and cheese and streamlines the process. No more boiling pasta separately, no more complicated cheese sauces. Just throw everything into one pot, bake, and enjoy! It’s the ultimate weeknight dinner solution, perfect for busy families or anyone craving a comforting and satisfying meal without the fuss.

Ingredients:
- Pasta: 1 pound elbow macaroni
- Butter: 1/2 cup (1 stick), unsalted
- All-Purpose Flour: 1/2 cup
- Milk: 4 cups whole milk
- Heavy Cream: 1 cup
- Sharp Cheddar Cheese: 4 cups, shredded (about 1 pound)
- Monterey Jack Cheese: 2 cups, shredded (about 1/2 pound)
- Parmesan Cheese: 1/2 cup, grated
- Salt: 2 teaspoons, or to taste
- Black Pepper: 1 teaspoon, or to taste
- Garlic Powder: 1/2 teaspoon
- Onion Powder: 1/2 teaspoon
- Optional Topping: 1 cup panko breadcrumbs, 2 tablespoons melted butter
Preparing the Cheese Sauce:
- Melt the Butter: Preheat your oven to 350°F (175°C). In a large, oven-safe pot or Dutch oven (at least 6 quarts), melt the butter over medium heat on the stovetop. Make sure the butter is completely melted and shimmering.
- Make a Roux: Add the flour to the melted butter and whisk constantly for about 2-3 minutes. This creates a roux, which will thicken the cheese sauce. It should be smooth and pale golden in color. Be careful not to burn the roux, as this will affect the flavor of the mac and cheese.
- Gradually Add the Milk: Slowly pour in the milk, about 1 cup at a time, whisking continuously to prevent lumps from forming. Make sure each addition of milk is fully incorporated before adding the next. This step is crucial for a smooth and creamy sauce.
- Incorporate the Heavy Cream: Stir in the heavy cream. This will add richness and depth to the sauce. Whisk until everything is well combined.
- Simmer the Sauce: Bring the sauce to a gentle simmer, stirring occasionally, until it thickens slightly. This should take about 5-7 minutes. The sauce should be thick enough to coat the back of a spoon.
- Season the Sauce: Remove the pot from the heat and stir in the salt, black pepper, garlic powder, and onion powder. Adjust the seasonings to your liking. Remember that the cheese will also add saltiness, so don’t over-season at this stage.
Adding the Cheese and Pasta:
- Add the Cheese: Gradually add the shredded cheddar cheese, Monterey Jack cheese, and grated Parmesan cheese to the sauce, stirring constantly until the cheese is completely melted and the sauce is smooth and creamy. Add the cheese in batches to ensure it melts evenly and doesn’t clump together.
- Cook the Pasta: While you are preparing the cheese sauce, cook the elbow macaroni according to the package directions, but cook it for 2 minutes *less* than the recommended time. The pasta will continue to cook in the oven, so undercooking it slightly will prevent it from becoming mushy. Drain the pasta well.
- Combine Pasta and Sauce: Add the drained pasta to the cheese sauce and stir until the pasta is evenly coated. Make sure all the pasta is submerged in the sauce.
Baking the Mac and Cheese:
- Prepare for Baking: If you haven’t already, ensure your mac and cheese is in an oven-safe pot or Dutch oven. If not, transfer the mixture to a greased 9×13 inch baking dish.
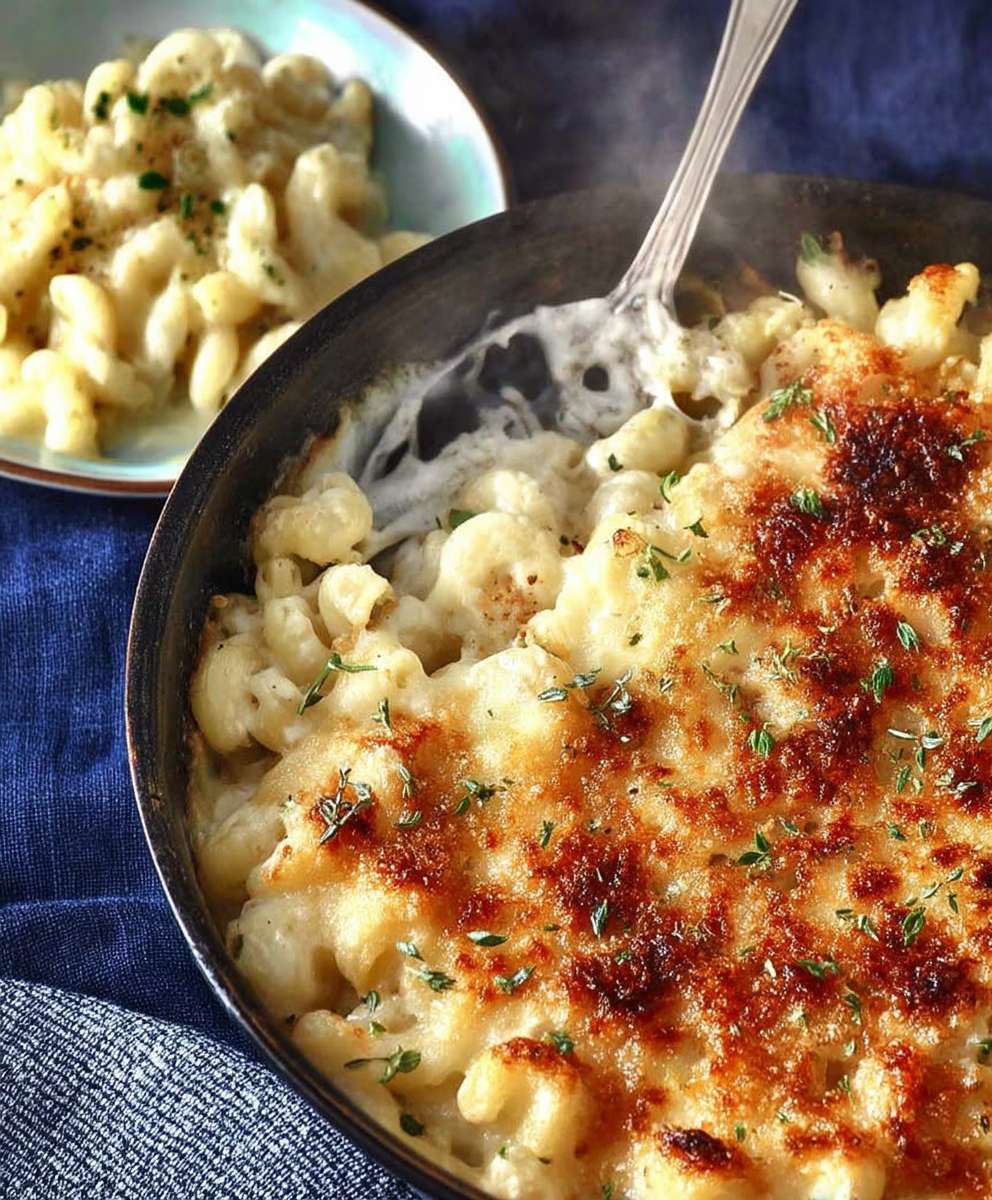
- Add Optional Topping (if using): In a small bowl, combine the panko breadcrumbs and melted butter. Sprinkle the mixture evenly over the top of the mac and cheese. This will create a golden, crispy crust.
- Bake: Bake in the preheated oven for 20-25 minutes, or until the mac and cheese is bubbly and the topping (if using) is golden brown. The internal temperature should reach 165°F (74°C).
- Rest: Remove the mac and cheese from the oven and let it rest for 5-10 minutes before serving. This allows the sauce to thicken slightly and the flavors to meld together.
Tips for the Best Baked Mac and Cheese:
- Use High-Quality Cheese: The quality of the cheese will greatly impact the flavor of your mac and cheese. Use good-quality cheddar and Monterey Jack cheese for the best results. Pre-shredded cheese often contains cellulose, which can prevent it from melting smoothly. Shred your own cheese for a creamier sauce.
- Don’t Overcook the Pasta: Undercooking the pasta slightly is crucial to prevent it from becoming mushy during baking.
- Adjust the Seasoning: Taste the sauce before adding the pasta and adjust the seasoning as needed. Remember that the cheese will add saltiness, so don’t over-season.
- Customize the Cheese: Feel free to experiment with different types of cheese. Gruyere, fontina, and gouda are all great options.
- Add-Ins: Get creative with add-ins! Cooked bacon, ham, vegetables (like broccoli or peas), or even a sprinkle of hot sauce can add extra flavor and texture.
- Make Ahead: You can assemble the mac and cheese ahead of time and store it in the refrigerator for up to 24 hours. Add a few extra minutes to the baking time if baking from cold.
- Reheating: Reheat leftover mac and cheese in the oven at 350°F (175°C) until heated through. You may need to add a splash of milk to prevent it from drying out. You can also reheat it in the microwave, but it may not be as creamy.
Variations:
- Spicy Mac and Cheese: Add a pinch of cayenne pepper or a dash of hot sauce to the cheese sauce for a spicy kick. You can also use pepper jack cheese for extra heat.
- Lobster Mac and Cheese: Add cooked lobster meat to the mac and cheese for a luxurious twist.
- Vegetarian Mac and Cheese: Add roasted vegetables like broccoli, cauliflower, or butternut squash to the mac and cheese for a healthy and flavorful meal.
- Bacon Mac and Cheese: Cook bacon until crispy and crumble it over the top of the mac and cheese before baking. You can also add bacon pieces to the cheese sauce.
- Crab Mac and Cheese: Fold in cooked crab meat for a decadent seafood version.
Troubleshooting:
- Lumpy Cheese Sauce: If your cheese sauce is lumpy, try using an immersion blender to smooth it out. You can also strain the sauce through a fine-mesh sieve.
- Dry Mac and Cheese: If your mac and cheese is too dry, add a splash of milk or cream before baking.
- Mushy Pasta: Make sure to undercook the pasta slightly before adding it to the cheese sauce.
- Bland Mac and Cheese: Taste the sauce and adjust the seasoning as needed. You may need to add more salt, pepper, garlic powder, or onion powder.
Serving Suggestions:
- Serve the baked mac and cheese as a main course or a side dish.
- Pair it with a simple salad or roasted vegetables.
- It’s also great with grilled chicken, steak, or pork.
- For a potluck or party, serve the mac and cheese in a slow cooker to keep it warm.
Conclusion:
So there you have it! This Baked One Pot Mac Cheese is more than just a recipe; it’s a weeknight savior, a comfort food champion, and a guaranteed crowd-pleaser. I truly believe this is a must-try for anyone who loves creamy, cheesy goodness without the fuss of multiple pots and pans. The simplicity of the one-pot method combined with the rich, baked finish makes it utterly irresistible.
Why is it a must-try? Because it’s ridiculously easy! Seriously, you’re looking at minimal prep time and cleanup. Plus, the flavor is incredible. The cheese melts into a velvety sauce that coats every single noodle, creating a symphony of cheesy perfection in every bite. It’s the kind of dish that will have everyone asking for seconds (and the recipe!). And let’s be honest, who doesn’t love a good mac and cheese? This version elevates the classic to a whole new level of deliciousness.
But the best part? It’s incredibly versatile! Feel free to get creative with your toppings and add-ins.
Serving Suggestions and Variations:
* Spice it up! Add a pinch of cayenne pepper or a dash of hot sauce to the cheese sauce for a little kick.
* Veggie boost: Stir in some steamed broccoli florets, peas, or roasted vegetables like butternut squash or Brussels sprouts for added nutrients and flavor.
* Protein power: Crumble some cooked bacon, sausage, or shredded chicken into the mac and cheese before baking for a heartier meal.
* Crusty topping: Mix breadcrumbs with melted butter and sprinkle over the top before baking for a golden, crunchy crust. Panko breadcrumbs work especially well!
* Cheese lover’s dream: Experiment with different cheese combinations! Gruyere, fontina, or even a little bit of blue cheese can add a unique and delicious twist.
* Gourmet touch: Drizzle with truffle oil after baking for an extra touch of luxury.
* Make it ahead: Assemble the mac and cheese in the baking dish and refrigerate it for up to 24 hours before baking. Just add a few extra minutes to the baking time.
* Individual portions: Bake the mac and cheese in individual ramekins for a fun and elegant presentation.
I encourage you to try this Baked One Pot Mac Cheese recipe as soon as possible. I’m confident that you’ll love it as much as I do. It’s the perfect dish for a cozy night in, a potluck gathering, or a quick and easy weeknight dinner. It’s also a great way to get kids involved in the kitchen. They’ll love helping you measure the ingredients and stir everything together.
Once you’ve made it, I’d absolutely love to hear about your experience! Did you try any of the variations I suggested? Did you add your own special touch? What did your family and friends think? Share your photos and stories in the comments below. I’m always looking for new ideas and inspiration, and I can’t wait to see what you create! Happy cooking! Don’t forget to rate the recipe if you enjoyed it! Your feedback helps others discover this amazing dish. I hope this becomes a staple in your household, just like it is in mine. Enjoy!
Baked One Pot Mac Cheese: The Ultimate Comfort Food Recipe
Creamy, cheesy baked mac and cheese! Classic comfort food with a rich cheese sauce featuring cheddar, Monterey Jack, and Parmesan, baked to bubbly perfection.
Ingredients
- 1 pound elbow macaroni
- 1/2 cup (1 stick) unsalted butter
- 1/2 cup all-purpose flour
- 4 cups whole milk
- 1 cup heavy cream
- 4 cups shredded sharp cheddar cheese (about 1 pound)
- 2 cups shredded Monterey Jack cheese (about 1/2 pound)
- 1/2 cup grated Parmesan cheese
- 2 teaspoons salt, or to taste
- 1 teaspoon black pepper, or to taste
- 1/2 teaspoon garlic powder
- 1/2 teaspoon onion powder
- 1 cup panko breadcrumbs
- 2 tablespoons melted butter
Instructions
- Melt the Butter: Preheat your oven to 350°F (175°C). In a large, oven-safe pot or Dutch oven (at least 6 quarts), melt the butter over medium heat on the stovetop. Make sure the butter is completely melted and shimmering.
- Make a Roux: Add the flour to the melted butter and whisk constantly for about 2-3 minutes. This creates a roux, which will thicken the cheese sauce. It should be smooth and pale golden in color. Be careful not to burn the roux.
- Gradually Add the Milk: Slowly pour in the milk, about 1 cup at a time, whisking continuously to prevent lumps from forming. Make sure each addition of milk is fully incorporated before adding the next.
- Incorporate the Heavy Cream: Stir in the heavy cream. Whisk until everything is well combined.
- Simmer the Sauce: Bring the sauce to a gentle simmer, stirring occasionally, until it thickens slightly (about 5-7 minutes). The sauce should be thick enough to coat the back of a spoon.
- Season the Sauce: Remove the pot from the heat and stir in the salt, black pepper, garlic powder, and onion powder. Adjust the seasonings to your liking.
- Add the Cheese: Gradually add the shredded cheddar cheese, Monterey Jack cheese, and grated Parmesan cheese to the sauce, stirring constantly until the cheese is completely melted and the sauce is smooth and creamy. Add the cheese in batches to ensure it melts evenly.
- Cook the Pasta: While you are preparing the cheese sauce, cook the elbow macaroni according to the package directions, but cook it for 2 minutes less than the recommended time. Drain the pasta well.
- Combine Pasta and Sauce: Add the drained pasta to the cheese sauce and stir until the pasta is evenly coated.
- Prepare for Baking: If you haven’t already, ensure your mac and cheese is in an oven-safe pot or Dutch oven. If not, transfer the mixture to a greased 9×13 inch baking dish.
- Add Optional Topping (if using): In a small bowl, combine the panko breadcrumbs and melted butter. Sprinkle the mixture evenly over the top of the mac and cheese.
- Bake: Bake in the preheated oven for 20-25 minutes, or until the mac and cheese is bubbly and the topping (if using) is golden brown. The internal temperature should reach 165°F (74°C).
- Rest: Remove the mac and cheese from the oven and let it rest for 5-10 minutes before serving.
Notes
- Use high-quality cheese for the best flavor. Shred your own cheese for a creamier sauce.
- Don’t overcook the pasta.
- Adjust the seasoning to your liking.
- Customize the cheese with Gruyere, fontina, or gouda.
- Add cooked bacon, ham, vegetables, or hot sauce for extra flavor.
- Assemble the mac and cheese ahead of time and store it in the refrigerator for up to 24 hours.
- Reheat leftover mac and cheese in the oven at 350°F (175°C) until heated through. You may need to add a splash of milk to prevent it from drying out.


Leave a Comment