

Baked Chicken Nuggets: Forget the drive-thru! Are you craving that crispy, golden goodness of chicken nuggets but want a healthier, homemade version? Then you’ve come to the right place. I’m about to share my foolproof recipe for perfectly baked chicken nuggets that will have everyone, from picky toddlers to discerning adults, reaching for seconds (and thirds!).
While the exact origins of the chicken nugget are debated, its popularity exploded in the latter half of the 20th century, becoming a staple of fast-food culture. But let’s be honest, those commercially produced nuggets often leave something to be desired in terms of ingredients and nutritional value. That’s where this recipe shines!
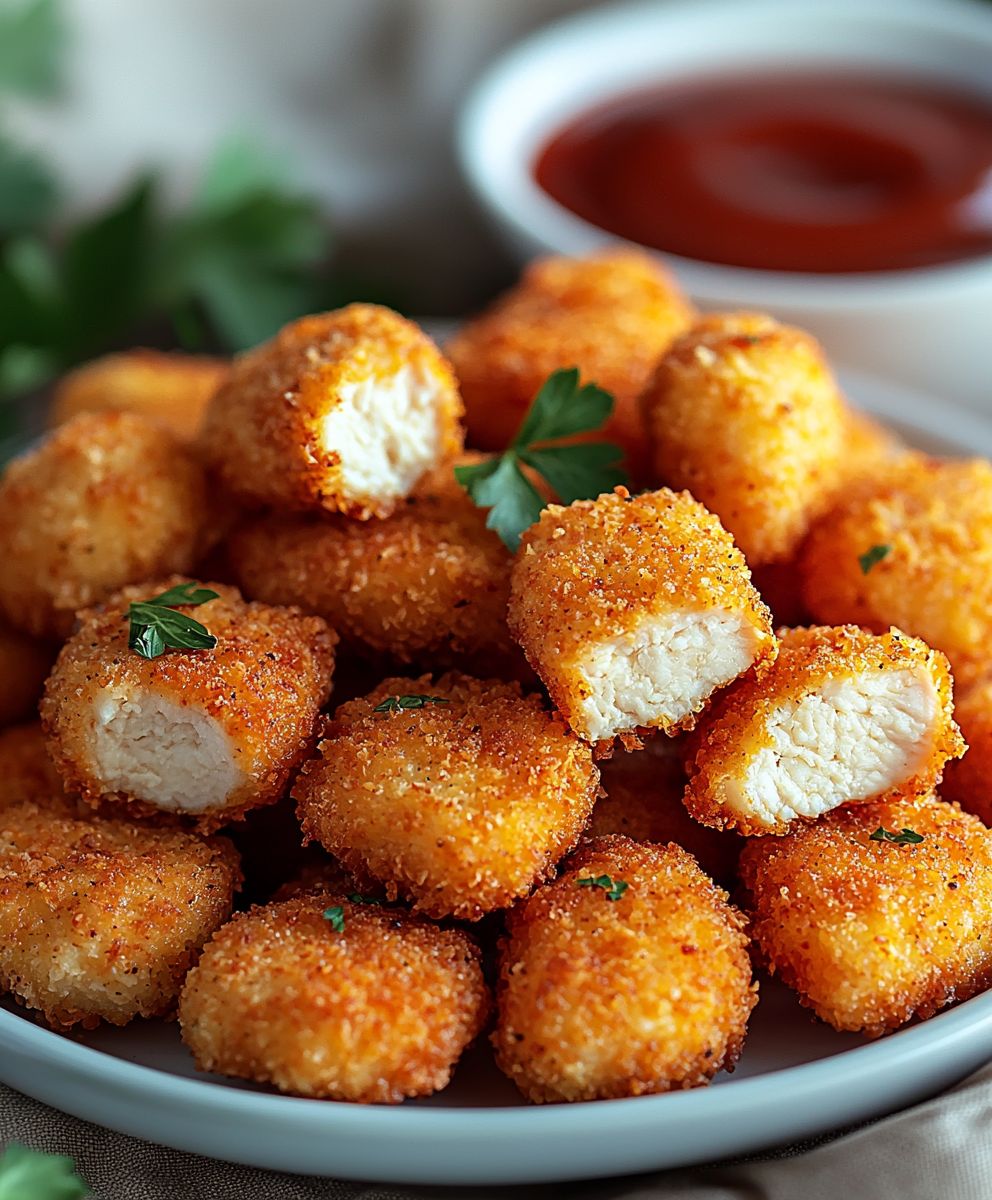
People adore chicken nuggets for their satisfying crunch, tender interior, and undeniable kid-friendly appeal. My baked version delivers all that and more, without the excessive oil and questionable additives. The secret? A perfectly seasoned breadcrumb coating and a baking technique that ensures crispy perfection every time. Get ready to enjoy a batch of these irresistible, healthier baked chicken nuggets!

Ingredients:
- 1.5 lbs boneless, skinless chicken breasts, cut into 1-inch pieces
- 1 cup buttermilk
- 1 teaspoon salt
- 1/2 teaspoon black pepper
- 1/2 teaspoon garlic powder
- 1/2 teaspoon onion powder
- 1/4 teaspoon paprika
- 1/4 teaspoon cayenne pepper (optional, for a little kick!)
- 1 1/2 cups panko breadcrumbs
- 1/2 cup grated Parmesan cheese
- 1/4 cup all-purpose flour
- 2 tablespoons olive oil
- Cooking spray
Preparing the Chicken:
Okay, let’s get started! First, we need to get our chicken ready for its buttermilk bath. This is what’s going to make it super tender and juicy.
-
Cut the chicken: Take your chicken breasts and cut them into bite-sized, 1-inch pieces. Try to keep them relatively uniform in size so they cook evenly. Nobody wants a nugget that’s raw in the middle!
-
Buttermilk marinade: In a medium bowl, whisk together the buttermilk, salt, pepper, garlic powder, onion powder, paprika, and cayenne pepper (if you’re using it). This is where all the flavor starts!
-
Marinate the chicken: Add the chicken pieces to the buttermilk mixture, making sure they’re all coated. Cover the bowl with plastic wrap and refrigerate for at least 30 minutes, or even better, for 2-4 hours. The longer it marinates, the more tender and flavorful the chicken will be. I usually aim for at least an hour if I have the time.
Preparing the Breadcrumb Coating:
While the chicken is marinating, let’s get the breadcrumb coating ready. This is what gives our nuggets that crispy, golden-brown exterior.
-
Combine dry ingredients: In a shallow dish or pie plate, combine the panko breadcrumbs, Parmesan cheese, and all-purpose flour. Mix well to ensure everything is evenly distributed. The Parmesan adds a nice savory flavor, and the flour helps the breadcrumbs adhere to the chicken.
-
Season the breadcrumbs: You can add a pinch of salt, pepper, or even a little more garlic powder to the breadcrumb mixture if you like. Taste it and adjust to your preference. Remember, this is where a lot of the final flavor comes from!
Coating and Baking the Chicken Nuggets:
Now for the fun part coating the chicken and getting it ready for the oven!
-
Preheat the oven: Preheat your oven to 400°F (200°C). Make sure your oven is fully preheated before you start baking. This will help the nuggets cook evenly and get nice and crispy.
-
Prepare the baking sheet: Line a baking sheet with parchment paper. This will prevent the nuggets from sticking and make cleanup a breeze. Spray the parchment paper with cooking spray. This is crucial for getting a crispy bottom on the nuggets.
-
Coat the chicken: Remove the chicken pieces from the buttermilk marinade, letting any excess drip off. Dredge each piece in the breadcrumb mixture, pressing gently to make sure the breadcrumbs adhere well. You want a nice, even coating on all sides.
-
Arrange on baking sheet: Place the coated chicken nuggets on the prepared baking sheet in a single layer, making sure they’re not touching. This will allow them to bake evenly and get crispy all around.
-
Drizzle with olive oil: Drizzle the olive oil evenly over the chicken nuggets. This will help them brown and crisp up in the oven. You can also use cooking spray if you prefer, but I find that olive oil gives them a better flavor and texture.
-
Bake: Bake for 15-20 minutes, or until the chicken is cooked through and the breadcrumbs are golden brown and crispy. The internal temperature of the chicken should reach 165°F (74°C). Use a meat thermometer to check for doneness. If the nuggets are browning too quickly, you can loosely tent the baking sheet with foil.
-
Flip (Optional): For extra even browning, flip the nuggets halfway through the baking time.
-
Rest: Let the nuggets rest for a few minutes before serving. This allows the juices to redistribute, resulting in a more tender and flavorful nugget.
Serving Suggestions:
These baked chicken nuggets are delicious on their own, but they’re even better with your favorite dipping sauces! Here are a few ideas:
- Ketchup
- Mustard (honey mustard is my personal favorite!)
- Barbecue sauce
- Ranch dressing
- Sweet and sour sauce
- Honey
You can also serve them as part of a meal with sides like:
- French fries
- Sweet potato fries
- Coleslaw
- Mac and cheese
- Salad
- Steamed vegetables
Tips and Variations:
Here are a few extra tips and ideas to customize your baked chicken nuggets:
-
Spice it up: Add more cayenne pepper or a pinch of chili powder to the breadcrumb mixture for a spicier kick.
-
Add herbs: Mix in some dried herbs like oregano, thyme, or rosemary to the breadcrumb mixture for extra flavor.
-
Use different cheese: Experiment with different types of cheese in the breadcrumb mixture, such as cheddar, mozzarella, or Monterey Jack.
-
Make it gluten-free: Use gluten-free panko breadcrumbs and gluten-free all-purpose flour to make this recipe gluten-free.
-
Air Fryer Option: You can also cook these in an air fryer! Preheat your air fryer to 375°F (190°C). Place the coated chicken nuggets in the air fryer basket in a single layer, making sure they’re not touching. Cook for 8-10 minutes, flipping halfway through, until the chicken is cooked through and the breadcrumbs are golden brown and crispy.
-
Make Ahead: You can prepare the chicken nuggets ahead of time and store them in the refrigerator until you’re ready to bake them. Just make sure to cover them tightly to prevent them from drying out. You can also freeze the uncooked nuggets. Place them on a baking sheet lined with parchment paper and freeze until solid. Then, transfer them to a freezer bag or container. When you’re ready to bake them, you can bake them directly from frozen, but you may need to add a few extra minutes to the baking time.
-
Don’t overcrowd the pan: Overcrowding the baking sheet will steam the chicken instead of baking it, resulting in less crispy nuggets. Bake in batches if necessary.
-
Panko is key: Panko breadcrumbs are larger and flakier than regular breadcrumbs, which gives the nuggets a much crispier texture. I highly recommend using panko for this recipe.
-
Adjust baking time: Baking times may vary depending on your oven. Keep an eye on the nuggets and adjust the baking time as needed to ensure they’re cooked through and golden brown.
Enjoy your homemade baked chicken nuggets! They’re a healthier and tastier alternative to store-bought nuggets, and they’re sure to be a hit with kids and adults alike.
Conclusion:
And there you have it! These baked chicken nuggets are truly a game-changer. Forget the greasy, processed versions this recipe delivers all the satisfying crunch and flavor you crave, without any of the guilt. I genuinely believe this is a must-try for anyone looking for a healthier, tastier, and more convenient way to enjoy a classic comfort food.
Why is it a must-try, you ask? Well, beyond the obvious health benefits of baking instead of frying, the flavor profile is simply outstanding. The combination of the crispy coating and the juicy, tender chicken inside is a match made in culinary heaven. Plus, it’s incredibly versatile and adaptable to your own preferences.
Think of the possibilities! For a classic pairing, serve these nuggets with your favorite dipping sauces. Ketchup, honey mustard, barbecue sauce, or even a creamy ranch dressing are all fantastic choices. If you’re feeling adventurous, try a spicy sriracha mayo or a tangy sweet and sour sauce.
But the fun doesn’t stop there! These baked chicken nuggets are also amazing in wraps and salads. Slice them up and toss them into a Caesar salad for a protein-packed lunch, or wrap them in a warm tortilla with lettuce, tomato, and your favorite sauce for a quick and easy dinner.
Looking for variations? Absolutely! Feel free to experiment with different seasonings in the breadcrumb mixture. Add a pinch of smoked paprika for a smoky flavor, or a dash of cayenne pepper for a little heat. You could even try using different types of breadcrumbs, such as panko breadcrumbs for an extra crispy coating.
For a gluten-free option, simply substitute the regular breadcrumbs with gluten-free breadcrumbs or crushed gluten-free crackers. The possibilities are truly endless!
And if you’re short on time, you can even prepare the nuggets ahead of time. Simply bread them and store them in the refrigerator for up to 24 hours before baking. This makes them perfect for busy weeknights or when you’re expecting guests.
I’m so confident that you’ll love this recipe, and I can’t wait to hear what you think! So, go ahead and give these baked chicken nuggets a try. I promise you won’t be disappointed.
Don’t forget to share your creations with me! I’d love to see your photos and hear about your variations. Tag me on social media and let me know how they turned out. Did you try a different dipping sauce? Did you add a special seasoning? I’m always looking for new and exciting ways to enjoy this recipe.
Happy cooking, and I hope you enjoy these delicious and healthy nuggets as much as I do! I’m sure this recipe will become a staple in your household, just as it has in mine. Enjoy the crispy, flavorful goodness of homemade baked chicken nuggets!
Baked Chicken Nuggets: The Crispiest, Healthier Recipe
Crispy baked chicken nuggets, a healthier and delicious homemade alternative to store-bought. Marinated in buttermilk and coated in panko, they're tender, juicy, and flavorful, perfect for all ages.
Ingredients
- 1.5 lbs boneless, skinless chicken breasts, cut into 1-inch pieces
- 1 cup buttermilk
- 1 teaspoon salt
- 1/2 teaspoon black pepper
- 1/2 teaspoon garlic powder
- 1/2 teaspoon onion powder
- 1/4 teaspoon paprika
- 1/4 teaspoon cayenne pepper (optional)
- 1 1/2 cups panko breadcrumbs
- 1/2 cup grated Parmesan cheese
- 1/4 cup all-purpose flour
- 2 tablespoons olive oil
- Cooking spray
Instructions
- Cut chicken breasts into 1-inch pieces.
- In a medium bowl, whisk together the buttermilk, salt, pepper, garlic powder, onion powder, paprika, and cayenne pepper (if using).
- Add the chicken pieces to the buttermilk mixture, making sure they’re all coated. Cover and refrigerate for at least 30 minutes, or up to 4 hours.
- In a shallow dish, combine the panko breadcrumbs, Parmesan cheese, and all-purpose flour. Mix well. Season with salt, pepper, or garlic powder to taste.
- Preheat oven to 400°F (200°C).
- Line a baking sheet with parchment paper and spray with cooking spray.
- Remove chicken from buttermilk, letting excess drip off. Dredge each piece in the breadcrumb mixture, pressing gently to adhere.
- Place coated chicken on the prepared baking sheet in a single layer.
- Drizzle olive oil evenly over the chicken nuggets.
- Bake for 15-20 minutes, or until the chicken is cooked through (internal temperature of 165°F/74°C) and the breadcrumbs are golden brown. Flip halfway through for even browning (optional).
- Let the nuggets rest for a few minutes before serving.
Notes
- Spice it up: Add more cayenne pepper or a pinch of chili powder to the breadcrumb mixture for a spicier kick.
- Add herbs: Mix in some dried herbs like oregano, thyme, or rosemary to the breadcrumb mixture for extra flavor.
- Use different cheese: Experiment with different types of cheese in the breadcrumb mixture, such as cheddar, mozzarella, or Monterey Jack.
- Make it gluten-free: Use gluten-free panko breadcrumbs and gluten-free all-purpose flour to make this recipe gluten-free.
- Air Fryer Option: Preheat your air fryer to 375°F (190°C). Place the coated chicken nuggets in the air fryer basket in a single layer, making sure they’re not touching. Cook for 8-10 minutes, flipping halfway through, until the chicken is cooked through and the breadcrumbs are golden brown and crispy.
- Make Ahead: You can prepare the chicken nuggets ahead of time and store them in the refrigerator until you’re ready to bake them. Just make sure to cover them tightly to prevent them from drying out. You can also freeze the uncooked nuggets. Place them on a baking sheet lined with parchment paper and freeze until solid. Then, transfer them to a freezer bag or container. When you’re ready to bake them, you can bake them directly from frozen, but you may need to add a few extra minutes to the baking time.
- Don’t overcrowd the pan: Overcrowding the baking sheet will steam the chicken instead of baking it, resulting in less crispy nuggets. Bake in batches if necessary.
- Panko is key: Panko breadcrumbs are larger and flakier than regular breadcrumbs, which gives the nuggets a much crispier texture. I highly recommend using panko for this recipe.
- Adjust baking time: Baking times may vary depending on your oven. Keep an eye on the nuggets and adjust the baking time as needed to ensure they’re cooked through and golden brown.

Leave a Comment