

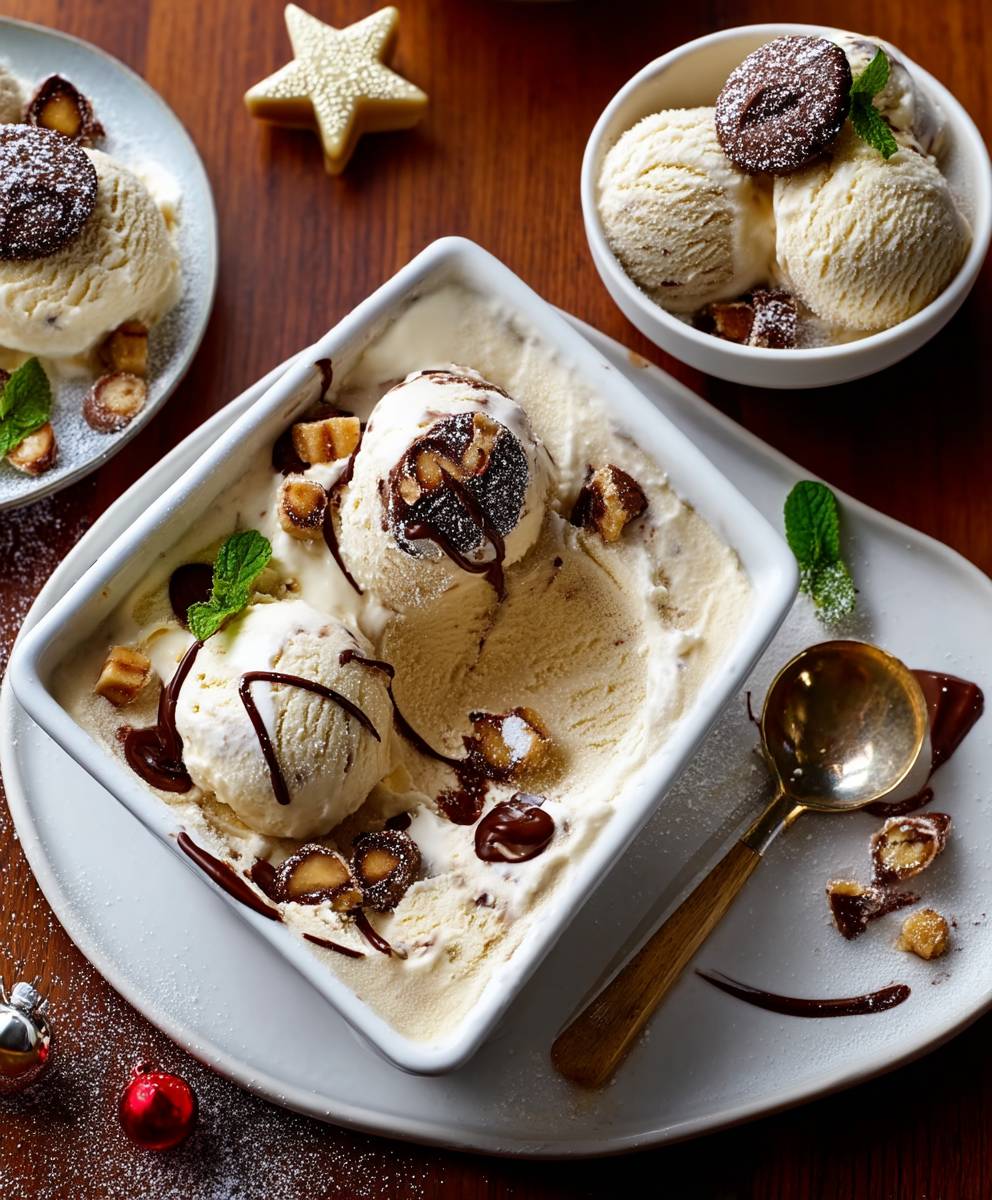
Baileys ice cream, a symphony of creamy indulgence and Irish whiskey warmth, is the dessert you didn’t know you needed but will quickly become obsessed with. Imagine a velvety smooth ice cream, infused with the unmistakable notes of Baileys Irish Cream, melting on your tongue. It’s a sophisticated treat that elevates any occasion, from a cozy night in to a celebratory gathering.
While ice cream itself boasts a history stretching back centuries, the addition of liqueurs like Baileys is a more modern innovation, a testament to our ever-evolving culinary creativity. Baileys Irish Cream, first introduced in 1974, quickly became a global phenomenon, and it was only a matter of time before its distinctive flavor found its way into desserts. The result? A decadent fusion that perfectly balances sweetness with a hint of spirited sophistication.
People adore Baileys ice cream for its luxurious texture and complex flavor profile. The creamy base provides a comforting foundation, while the Baileys adds a delightful warmth and a subtle boozy kick. It’s a treat that’s both familiar and exciting, offering a unique twist on a classic dessert. Plus, it’s incredibly easy to make at home, allowing you to enjoy this delightful indulgence whenever the craving strikes. Get ready to experience ice cream like never before!

Ingredients:
- 2 cups heavy cream
- 1 cup whole milk
- ¾ cup granulated sugar
- ? teaspoon salt
- 6 large egg yolks
- ½ cup Baileys Irish Cream liqueur
- 1 teaspoon vanilla extract
Preparing the Custard Base:
This is the most crucial part of making truly decadent ice cream. Don’t skip any steps, and be patient! A well-made custard base is the key to a smooth, creamy texture.
- Combine the Cream, Milk, Sugar, and Salt: In a medium saucepan, whisk together the heavy cream, whole milk, granulated sugar, and salt. Place the saucepan over medium heat and stir occasionally until the sugar is completely dissolved and the mixture is steaming gently. Do not let it boil! We’re just warming it up to help the sugar dissolve and infuse the flavors.
- Temper the Egg Yolks: While the cream mixture is heating, prepare the egg yolks. In a separate medium bowl, whisk the egg yolks until they are slightly pale and smooth. This helps to prevent them from scrambling when you add the hot cream mixture.
- Slowly Add the Hot Cream Mixture to the Egg Yolks: This is the tempering process, and it’s essential to prevent scrambled eggs in your ice cream! Slowly drizzle about ½ cup of the hot cream mixture into the egg yolks while whisking constantly and vigorously. This gradually raises the temperature of the egg yolks, preventing them from cooking too quickly. Continue adding the hot cream mixture in a slow, steady stream, whisking constantly until about half of the cream mixture has been incorporated.
- Return the Mixture to the Saucepan: Pour the tempered egg yolk mixture back into the saucepan with the remaining cream mixture. Place the saucepan back over medium-low heat.
- Cook the Custard Base: Cook the custard base, stirring constantly with a heat-resistant spatula or wooden spoon, until it thickens enough to coat the back of the spoon. This usually takes about 5-10 minutes. To test for doneness, dip the back of the spoon into the custard and run your finger across the coated surface. If the line remains distinct and doesn’t run back together, the custard is ready. Be very careful not to overcook the custard, or it will curdle. The ideal temperature is around 170-175°F (77-79°C). If you have a thermometer, use it!
- Strain the Custard Base: Immediately remove the saucepan from the heat and pour the custard base through a fine-mesh sieve into a clean bowl. This will remove any cooked egg bits and ensure a perfectly smooth texture.
- Cool the Custard Base: Cover the bowl tightly with plastic wrap, pressing the plastic wrap directly onto the surface of the custard to prevent a skin from forming. Refrigerate the custard base for at least 4 hours, or preferably overnight. This allows the flavors to meld and the custard to chill completely, which is crucial for proper freezing.
Adding the Baileys and Freezing:
Now for the fun part! Adding the Baileys Irish Cream and churning the ice cream.
- Stir in the Baileys and Vanilla: Once the custard base is thoroughly chilled, remove it from the refrigerator. Stir in the Baileys Irish Cream liqueur and vanilla extract. Taste and adjust the amount of Baileys to your liking, keeping in mind that the flavor will mellow slightly during freezing.
- Churn the Ice Cream: Pour the Baileys-infused custard base into your ice cream maker. Churn according to the manufacturer’s instructions. The churning time will vary depending on your ice cream maker, but it usually takes about 20-30 minutes. The ice cream is ready when it has a soft-serve consistency.
- Harden the Ice Cream: Transfer the churned ice cream to an airtight container. Press a piece of plastic wrap directly onto the surface of the ice cream to prevent ice crystals from forming. Freeze for at least 2-3 hours, or preferably overnight, to allow the ice cream to harden completely.
Serving and Storage:
The final touches! Serving your homemade Baileys ice cream and storing any leftovers.
- Scoop and Serve: Remove the ice cream from the freezer about 5-10 minutes before serving to allow it to soften slightly. Scoop into bowls or cones and enjoy!
- Optional Toppings: For an extra touch of indulgence, top with chocolate shavings, whipped cream, a drizzle of Baileys, or a sprinkle of cocoa powder.
- Storage: Store any leftover ice cream in an airtight container in the freezer for up to 2 weeks. After that, the texture may start to deteriorate.
Tips for Perfect Baileys Ice Cream:
- Use High-Quality Ingredients: The better the quality of your ingredients, the better your ice cream will taste. Use fresh, high-fat heavy cream and whole milk for the best results.
- Don’t Overcook the Custard: Overcooked custard will curdle and result in a grainy ice cream. Use a thermometer to ensure the custard reaches the correct temperature (170-175°F or 77-79°C).
- Chill the Custard Thoroughly: Chilling the custard base for at least 4 hours, or preferably overnight, is crucial for proper freezing and a smooth texture.
- Adjust the Baileys to Your Taste: The amount of Baileys Irish Cream liqueur can be adjusted to your liking. Start with ½ cup and add more if desired, but be careful not to add too much, as it can affect the freezing process.
- Don’t Overfill the Ice Cream Maker: Overfilling the ice cream maker can prevent the ice cream from churning properly. Follow the manufacturer’s instructions for the maximum fill line.
- Harden the Ice Cream Completely: Hardening the ice cream in the freezer for at least 2-3 hours is essential for a firm, scoopable texture.
- Prevent Ice Crystals: Pressing a piece of plastic wrap directly onto the surface of the ice cream before freezing helps to prevent ice crystals from forming.
Troubleshooting:
- Grainy Ice Cream: This is usually caused by overcooked custard or not chilling the custard base thoroughly. Make sure to cook the custard to the correct temperature and chill it for at least 4 hours.
- Icy Ice Cream: This can be caused by not using enough fat in the recipe or by temperature fluctuations in the freezer. Use high-fat heavy cream and whole milk, and store the ice cream in an airtight container in the coldest part of the freezer.
- Soft Ice Cream: This can be caused by not churning the ice cream long enough or by not hardening it in the freezer for long enough. Churn the ice cream until it has a soft-serve consistency, and then harden it in the freezer for at least 2-3 hours.
Conclusion:
So there you have it! This Baileys ice cream recipe is more than just a dessert; it’s an experience. It’s the perfect blend of creamy indulgence and that unmistakable Baileys Irish Cream warmth, making it a truly unforgettable treat. I genuinely believe this is a must-try recipe for anyone who loves ice cream, Baileys, or simply appreciates a touch of sophisticated sweetness. The ease of preparation combined with the incredible flavor payoff makes it a winner in my book, and I’m confident it will be in yours too.
But the fun doesn’t stop there! Think of this recipe as a fantastic base for endless variations. Want to elevate it even further? Consider adding some chopped dark chocolate or espresso beans for a mocha-inspired twist. A swirl of salted caramel would also be absolutely divine. For a more festive feel, fold in crushed peppermint candies during the last few minutes of churning. And if you’re feeling adventurous, try infusing the cream with cinnamon sticks or star anise for a warm, spiced flavor profile.
Serving suggestions are just as versatile. Of course, it’s delicious all on its own, scooped into a bowl or cone. But imagine it as part of an ice cream sundae, drizzled with hot fudge and topped with whipped cream and a cherry. Or, pair it with a warm brownie or slice of apple pie for an extra decadent dessert. For a truly grown-up treat, try serving a scoop alongside a shot of espresso or a glass of Irish coffee. It’s also fantastic in milkshakes! Blend it with some extra Baileys and a splash of milk for the ultimate boozy shake. You could even use it to make ice cream sandwiches with chocolate wafers or homemade cookies. The possibilities are truly endless!
I’ve poured my heart into perfecting this recipe, and I’m so excited for you to try it. I truly believe that homemade ice cream is a labor of love, and this Baileys ice cream is no exception. It’s a wonderful way to treat yourself, impress your friends and family, or simply enjoy a moment of pure bliss.
Don’t be intimidated by the idea of making ice cream from scratch. This recipe is surprisingly simple, and the results are well worth the effort. Just follow the instructions carefully, and you’ll be rewarded with a creamy, dreamy, and utterly delicious dessert.
So, what are you waiting for? Gather your ingredients, dust off your ice cream maker, and get ready to embark on a culinary adventure. I promise you won’t regret it! And most importantly, I’d absolutely love to hear about your experience. Did you try any variations? What were your favorite serving suggestions? Share your photos and stories in the comments below! Let’s create a community of Baileys ice cream enthusiasts and inspire each other with our delicious creations. Happy churning! I can’t wait to see what you come up with. Enjoy!
Baileys Ice Cream: The Ultimate Indulgent Dessert Recipe
Rich and creamy homemade Baileys Irish Cream Ice Cream with a smooth custard base infused with Baileys flavor.
Ingredients
- 2 cups heavy cream
- 1 cup whole milk
- ¾ cup granulated sugar
- ? teaspoon salt
- 6 large egg yolks
- ½ cup Baileys Irish Cream liqueur
- 1 teaspoon vanilla extract
Instructions
- Combine Cream, Milk, Sugar, and Salt: In a medium saucepan, whisk together the heavy cream, whole milk, granulated sugar, and salt. Place over medium heat and stir occasionally until sugar is dissolved and mixture is steaming gently (do not boil).
- Temper Egg Yolks: In a separate medium bowl, whisk egg yolks until slightly pale and smooth.
- Temper Egg Yolks: Slowly drizzle about ½ cup of the hot cream mixture into the egg yolks while whisking constantly and vigorously. Continue adding the hot cream mixture in a slow, steady stream, whisking constantly until about half of the cream mixture has been incorporated.
- Return to Saucepan: Pour the tempered egg yolk mixture back into the saucepan with the remaining cream mixture. Place the saucepan back over medium-low heat.
- Cook Custard Base: Cook, stirring constantly with a heat-resistant spatula or wooden spoon, until it thickens enough to coat the back of the spoon (about 5-10 minutes). To test, dip the back of the spoon into the custard and run your finger across the coated surface. If the line remains distinct, the custard is ready. The ideal temperature is around 170-175°F (77-79°C). Be very careful not to overcook the custard, or it will curdle.
- Strain Custard Base: Immediately remove from heat and pour the custard base through a fine-mesh sieve into a clean bowl.
- Cool Custard Base: Cover the bowl tightly with plastic wrap, pressing the plastic wrap directly onto the surface of the custard to prevent a skin from forming. Refrigerate for at least 4 hours, or preferably overnight.
- Stir in Baileys and Vanilla: Once chilled, remove from refrigerator. Stir in the Baileys Irish Cream liqueur and vanilla extract. Taste and adjust the amount of Baileys to your liking.
- Churn Ice Cream: Pour the Baileys-infused custard base into your ice cream maker. Churn according to the manufacturer’s instructions (usually about 20-30 minutes) until it has a soft-serve consistency.
- Harden Ice Cream: Transfer the churned ice cream to an airtight container. Press a piece of plastic wrap directly onto the surface of the ice cream to prevent ice crystals from forming. Freeze for at least 2-3 hours, or preferably overnight, to allow the ice cream to harden completely.
- Scoop and Serve: Remove the ice cream from the freezer about 5-10 minutes before serving to allow it to soften slightly. Scoop into bowls or cones and enjoy!
- Optional Toppings: For an extra touch of indulgence, top with chocolate shavings, whipped cream, a drizzle of Baileys, or a sprinkle of cocoa powder.
- Storage: Store any leftover ice cream in an airtight container in the freezer for up to 2 weeks. After that, the texture may start to deteriorate.
Notes
- Use high-quality ingredients for the best flavor.
- Don’t overcook the custard, or it will curdle. Use a thermometer to ensure the custard reaches the correct temperature (170-175°F or 77-79°C).
- Chill the custard thoroughly for a smooth texture.
- Adjust the Baileys to your taste, but be careful not to add too much, as it can affect the freezing process.
- Don’t overfill the ice cream maker.
- Harden the ice cream completely for a firm, scoopable texture.
- Press a piece of plastic wrap directly onto the surface of the ice cream before freezing to prevent ice crystals from forming.

Leave a Comment