

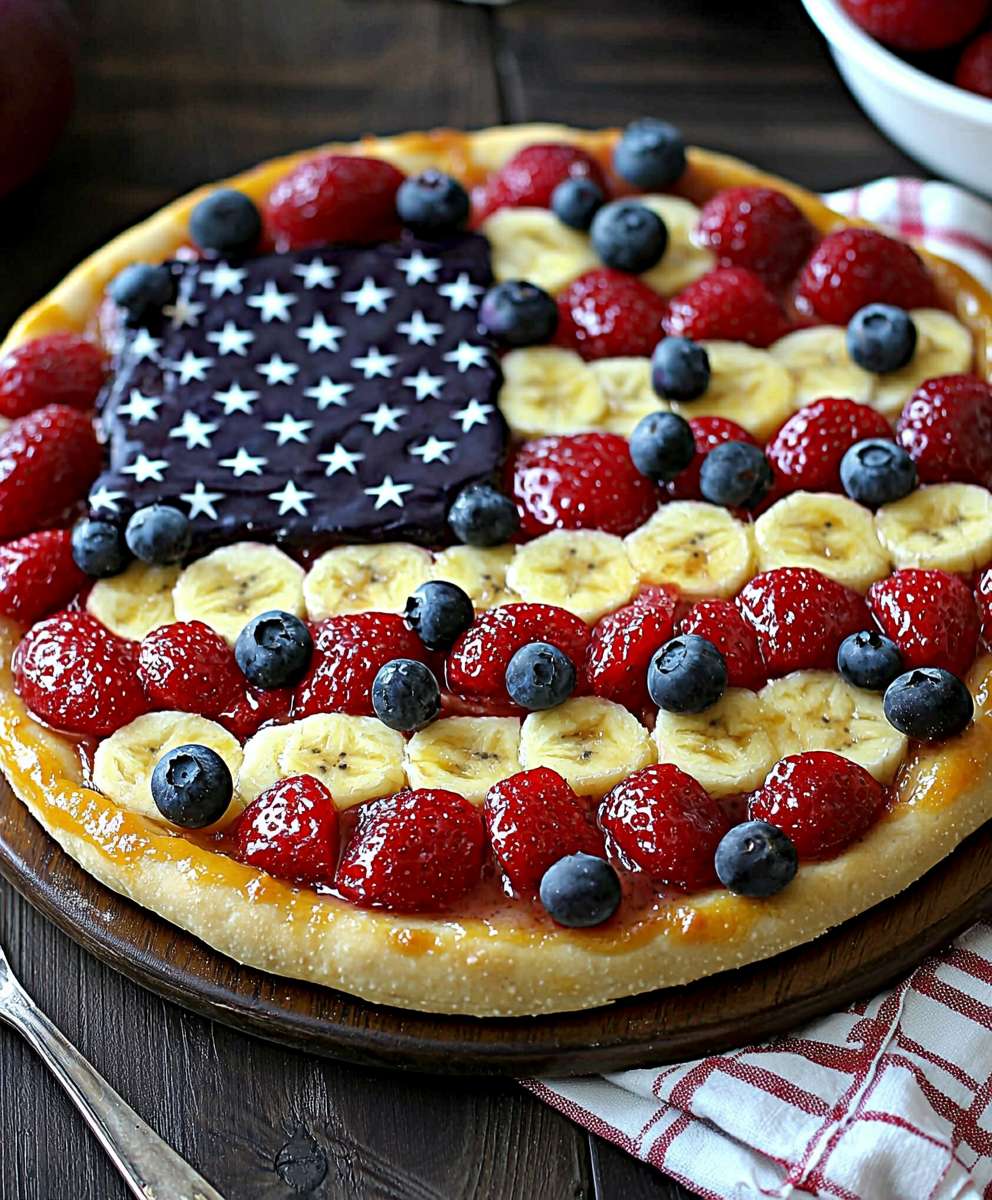
American Flag Fruit Pizza: Is there a more festive and delicious way to celebrate a patriotic holiday than with a vibrant, eye-catching dessert? I think not! This delightful treat isn’t just a feast for the eyes; it’s a symphony of flavors and textures that will have everyone reaching for seconds (and maybe even thirds!).
While the exact origins of fruit pizza are a bit hazy, it gained popularity in the latter half of the 20th century as a fun and creative way to showcase fresh, seasonal fruits. The “pizza” concept makes it inherently shareable and perfect for gatherings, and the soft, sweet “crust” combined with the creamy “sauce” and juicy fruit toppings creates a truly irresistible combination.
What makes this American Flag Fruit Pizza so universally loved? It’s the perfect balance of sweet and tangy, the satisfying crunch of the crust against the smooth cream cheese frosting, and the burst of flavor from the fresh berries. Plus, it’s incredibly easy to customize with your favorite fruits and decorations. Whether you’re celebrating the 4th of July, Memorial Day, or just want a fun and festive dessert, this American Flag Fruit Pizza is guaranteed to be a crowd-pleaser. So, let’s get baking and create a patriotic masterpiece that’s as delicious as it is beautiful!

Ingredients:
- For the Sugar Cookie Crust:
- 3 cups all-purpose flour
- 1 teaspoon baking powder
- 1/2 teaspoon baking soda
- 1/4 teaspoon salt
- 1 cup (2 sticks) unsalted butter, softened
- 1 1/2 cups granulated sugar
- 1 large egg
- 1 teaspoon vanilla extract
- For the Cream Cheese Frosting:
- 8 ounces cream cheese, softened
- 1/2 cup (1 stick) unsalted butter, softened
- 3-4 cups powdered sugar, sifted
- 1 teaspoon vanilla extract
- 2 tablespoons milk (or more, as needed for consistency)
- For the Fruit Toppings:
- 2 cups fresh strawberries, hulled and sliced
- 1 cup fresh blueberries
- Optional: Other red and blue fruits like raspberries or blackberries
Preparing the Sugar Cookie Crust:
- Combine Dry Ingredients: In a medium bowl, whisk together the flour, baking powder, baking soda, and salt. Make sure everything is evenly distributed for a consistent rise and texture. This prevents pockets of baking soda or powder that can affect the taste.
- Cream Butter and Sugar: In a large bowl (or the bowl of a stand mixer), cream together the softened butter and granulated sugar until light and fluffy. This usually takes about 3-5 minutes. Scrape down the sides of the bowl occasionally to ensure everything is evenly incorporated. The creaming process is crucial for incorporating air into the dough, which contributes to a tender crust.
- Add Egg and Vanilla: Beat in the egg and vanilla extract until well combined. Don’t overmix at this stage, just until everything is incorporated. Overmixing can develop the gluten in the flour, leading to a tougher crust.
- Gradually Add Dry Ingredients: Gradually add the dry ingredients to the wet ingredients, mixing on low speed until just combined. Be careful not to overmix. Mix until the flour is just incorporated and no streaks of flour remain. Overmixing will result in a tough cookie crust.
- Chill the Dough: Wrap the dough in plastic wrap and chill in the refrigerator for at least 30 minutes. This allows the gluten to relax and prevents the cookie from spreading too much during baking. Chilling also makes the dough easier to handle. You can chill the dough for up to 24 hours.
- Preheat Oven and Prepare Baking Sheet: Preheat your oven to 350°F (175°C). Line a large baking sheet with parchment paper. Parchment paper prevents the cookie from sticking and makes cleanup easier.
- Roll Out the Dough: On a lightly floured surface, roll out the dough into a large circle or rectangle, about 1/4 inch thick. The shape doesn’t have to be perfect, as it will be covered with frosting and fruit. If the dough is sticking, add a little more flour to your rolling surface.
- Transfer to Baking Sheet: Carefully transfer the rolled-out dough to the prepared baking sheet. If the dough tears, simply patch it up with your fingers.
- Bake the Crust: Bake for 12-15 minutes, or until the edges are lightly golden brown. Keep a close eye on it, as baking times can vary depending on your oven. The center of the crust should be set but still slightly soft.
- Cool Completely: Let the crust cool completely on the baking sheet before frosting. This is important to prevent the frosting from melting. You can transfer the baking sheet to a wire rack to speed up the cooling process.
Preparing the Cream Cheese Frosting:
- Cream Cheese and Butter: In a large bowl (or the bowl of a stand mixer), cream together the softened cream cheese and butter until smooth and creamy. Make sure both the cream cheese and butter are at room temperature for the best results. This will prevent lumps in your frosting.
- Add Powdered Sugar: Gradually add the sifted powdered sugar, one cup at a time, mixing on low speed until combined. Sifting the powdered sugar helps to prevent lumps in the frosting. Start with 3 cups and add more if needed to reach your desired consistency.
- Add Vanilla and Milk: Stir in the vanilla extract and milk. Add more milk, one tablespoon at a time, until the frosting reaches a smooth and spreadable consistency. The amount of milk needed will depend on the humidity and the consistency of your cream cheese.
- Taste and Adjust: Taste the frosting and adjust the sweetness as needed by adding more powdered sugar. You can also add a pinch of salt to balance the sweetness.
Assembling the Fruit Pizza:
- Frost the Crust: Once the sugar cookie crust is completely cool, spread the cream cheese frosting evenly over the top. Use an offset spatula or a knife to create a smooth and even layer.
- Arrange the Strawberries: Arrange the sliced strawberries in rows to create the red stripes of the American flag. Start at one edge of the pizza and work your way across, leaving space for the blueberry section.
- Arrange the Blueberries: In the upper left corner of the pizza, arrange the blueberries in a rectangular shape to represent the stars on the American flag. You can use a small cookie cutter to create a more defined rectangle if desired.
- Optional: Add Other Fruits: If desired, you can add other red and blue fruits, such as raspberries or blackberries, to enhance the design.
- Chill Before Serving: Chill the fruit pizza in the refrigerator for at least 30 minutes before serving. This will allow the frosting to set and the flavors to meld together. Chilling also makes the pizza easier to slice.
- Slice and Serve: Slice the fruit pizza into wedges or squares and serve immediately. Enjoy!
Conclusion:
This American Flag Fruit Pizza isn’t just a dessert; it’s a showstopper, a conversation starter, and a delicious way to celebrate any patriotic holiday or summer gathering. The combination of the sweet sugar cookie crust, the creamy, tangy cream cheese frosting, and the burst of fresh, juicy berries is simply irresistible. It’s a guaranteed crowd-pleaser that’s surprisingly easy to make, even if you’re not a seasoned baker. I know what you might be thinking: “Another fruit pizza recipe?” But trust me, this one is different. The perfectly balanced sweetness, the vibrant colors, and the fun, festive design elevate it beyond your average fruit pizza. It’s a dessert that looks as good as it tastes, and that’s a winning combination in my book. Plus, it’s a fantastic way to get your kids involved in the kitchen. They’ll love arranging the berries to create the flag design, and you’ll love that they’re eating something relatively healthy (okay, maybe not *completely* healthy, but definitely better than a slice of cake!). But the best part? This recipe is incredibly versatile. Feel free to experiment with different fruits based on what’s in season or what you have on hand. Blueberries and raspberries are the classic choices for the flag design, but you could also use strawberries, blackberries, or even kiwi for a pop of green. For the white stripes, consider using sliced bananas or white chocolate shavings for an extra touch of sweetness. Serving suggestions? This American Flag Fruit Pizza is perfect as is, but you could also add a dollop of whipped cream or a scoop of vanilla ice cream for an extra indulgent treat. It’s also fantastic served with a glass of lemonade or iced tea on a hot summer day. And if you have any leftovers (though I highly doubt you will!), store them in the refrigerator for up to two days. The crust might soften slightly, but it will still taste delicious. Don’t be intimidated by the flag design; it’s much easier than it looks! Simply start with the blueberry square in the upper left corner, then arrange the raspberry stripes, alternating with the cream cheese frosting. You can even use a ruler or a toothpick to help you create straight lines. The most important thing is to have fun and let your creativity shine. I truly believe that this American Flag Fruit Pizza will become a new family favorite. It’s the perfect dessert to bring to a potluck, a barbecue, or any summer celebration. It’s also a great way to show your patriotic spirit and impress your friends and family with your baking skills. So, what are you waiting for? Grab your ingredients, preheat your oven, and get ready to create a masterpiece! I’m confident that you’ll love this recipe as much as I do. And when you do, please come back and share your experience in the comments below. I’d love to hear how it turned out, what variations you tried, and what your family and friends thought. Happy baking! I can’t wait to see your beautiful creations! Print
American Flag Fruit Pizza: A Festive & Delicious Recipe
- Total Time: 60 minutes
- Yield: 1 large fruit pizza 1x
Description
A festive and delicious sugar cookie fruit pizza decorated with strawberries and blueberries to resemble the American flag. Perfect for summer holidays!
Ingredients
- 3 cups all-purpose flour
- 1 teaspoon baking powder
- 1/2 teaspoon baking soda
- 1/4 teaspoon salt
- 1 cup (2 sticks) unsalted butter, softened
- 1 1/2 cups granulated sugar
- 1 large egg
- 1 teaspoon vanilla extract
- 8 ounces cream cheese, softened
- 1/2 cup (1 stick) unsalted butter, softened
- 3–4 cups powdered sugar, sifted
- 1 teaspoon vanilla extract
- 2 tablespoons milk (or more, as needed for consistency)
- 2 cups fresh strawberries, hulled and sliced
- 1 cup fresh blueberries
- Optional: Other red and blue fruits like raspberries or blackberries
Instructions
- Combine Dry Ingredients: In a medium bowl, whisk together the flour, baking powder, baking soda, and salt. Make sure everything is evenly distributed for a consistent rise and texture. This prevents pockets of baking soda or powder that can affect the taste.
- Cream Butter and Sugar: In a large bowl (or the bowl of a stand mixer), cream together the softened butter and granulated sugar until light and fluffy. This usually takes about 3-5 minutes. Scrape down the sides of the bowl occasionally to ensure everything is evenly incorporated. The creaming process is crucial for incorporating air into the dough, which contributes to a tender crust.
- Add Egg and Vanilla: Beat in the egg and vanilla extract until well combined. Don’t overmix at this stage, just until everything is incorporated. Overmixing can develop the gluten in the flour, leading to a tougher crust.
- Gradually Add Dry Ingredients: Gradually add the dry ingredients to the wet ingredients, mixing on low speed until just combined. Be careful not to overmix. Mix until the flour is just incorporated and no streaks of flour remain. Overmixing will result in a tough cookie crust.
- Chill the Dough: Wrap the dough in plastic wrap and chill in the refrigerator for at least 30 minutes. This allows the gluten to relax and prevents the cookie from spreading too much during baking. Chilling also makes the dough easier to handle. You can chill the dough for up to 24 hours.
- Preheat Oven and Prepare Baking Sheet: Preheat your oven to 350°F (175°C). Line a large baking sheet with parchment paper. Parchment paper prevents the cookie from sticking and makes cleanup easier.
- Roll Out the Dough: On a lightly floured surface, roll out the dough into a large circle or rectangle, about 1/4 inch thick. The shape doesn’t have to be perfect, as it will be covered with frosting and fruit. If the dough is sticking, add a little more flour to your rolling surface.
- Transfer to Baking Sheet: Carefully transfer the rolled-out dough to the prepared baking sheet. If the dough tears, simply patch it up with your fingers.
- Bake the Crust: Bake for 12-15 minutes, or until the edges are lightly golden brown. Keep a close eye on it, as baking times can vary depending on your oven. The center of the crust should be set but still slightly soft.
- Cool Completely: Let the crust cool completely on the baking sheet before frosting. This is important to prevent the frosting from melting. You can transfer the baking sheet to a wire rack to speed up the cooling process.
- Cream Cheese and Butter: In a large bowl (or the bowl of a stand mixer), cream together the softened cream cheese and butter until smooth and creamy. Make sure both the cream cheese and butter are at room temperature for the best results. This will prevent lumps in your frosting.
- Add Powdered Sugar: Gradually add the sifted powdered sugar, one cup at a time, mixing on low speed until combined. Sifting the powdered sugar helps to prevent lumps in the frosting. Start with 3 cups and add more if needed to reach your desired consistency.
- Add Vanilla and Milk: Stir in the vanilla extract and milk. Add more milk, one tablespoon at a time, until the frosting reaches a smooth and spreadable consistency. The amount of milk needed will depend on the humidity and the consistency of your cream cheese.
- Taste and Adjust: Taste the frosting and adjust the sweetness as needed by adding more powdered sugar. You can also add a pinch of salt to balance the sweetness.
- Frost the Crust: Once the sugar cookie crust is completely cool, spread the cream cheese frosting evenly over the top. Use an offset spatula or a knife to create a smooth and even layer.
- Arrange the Strawberries: Arrange the sliced strawberries in rows to create the red stripes of the American flag. Start at one edge of the pizza and work your way across, leaving space for the blueberry section.
- Arrange the Blueberries: In the upper left corner of the pizza, arrange the blueberries in a rectangular shape to represent the stars on the American flag. You can use a small cookie cutter to create a more defined rectangle if desired.
- Optional: Add Other Fruits: If desired, you can add other red and blue fruits, such as raspberries or blackberries, to enhance the design.
- Chill Before Serving: Chill the fruit pizza in the refrigerator for at least 30 minutes before serving. This will allow the frosting to set and the flavors to meld together. Chilling also makes the pizza easier to slice.
- Slice and Serve: Slice the fruit pizza into wedges or squares and serve immediately. Enjoy!
Notes
- For best results, make sure your butter and cream cheese are fully softened before starting the frosting.
- Chilling the dough is crucial for preventing the cookie crust from spreading too much during baking.
- Feel free to get creative with your fruit arrangement! You can use different patterns or designs to personalize your fruit pizza.
- This fruit pizza is best served fresh, as the cookie crust can become soggy over time.
- Prep Time: 30 minutes
- Cook Time: 12 minutes

Leave a Comment