

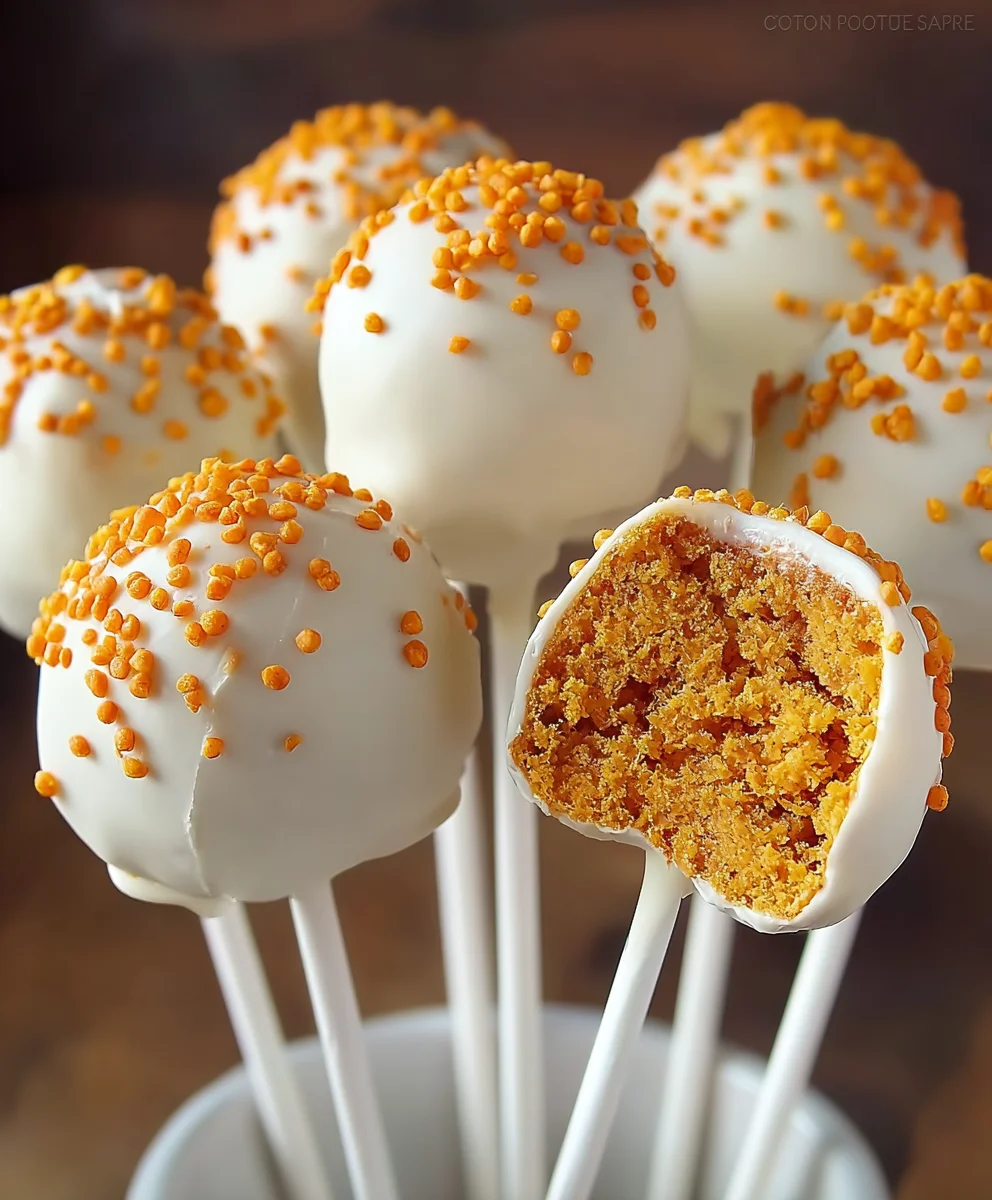
Easy Pumpkin Cake Pops are the quintessential treat that captures the very essence of autumn in a delightful, bite-sized package. As the leaves begin to turn and a crispness fills the air, our thoughts often drift to the comforting flavors of pumpkin and warming spices. While pumpkin pie remains a beloved classic, these adorable cake pops offer a playful and wonderfully convenient alternative, perfect for any fall gathering, a festive party, or a cozy evening at home. Imagine the delight on faces when these charming, individually portioned delights are presented!
Historically, pumpkin has been a staple in harvest celebrations for centuries, symbolizing abundance and the changing seasons across many cultures. Transforming this beloved ingredient into a cake pop elevates its appeal, marrying traditional autumnal flavors with modern confectionery artistry. People adore these treats for so many wonderful reasons. They boast a wonderfully moist, spiced pumpkin cake interior, encased in a smooth, often vibrant coating, creating a delightful textural contrast with every bite. The portability and individual serving size make them a no-fuss dessert, allowing guests to mingle and enjoy without the need for plates and forks. They are also incredibly versatile for decorating, letting your creativity shine!
I genuinely believe that mastering these Easy Pumpkin Cake Pops will bring immense joy to your kitchen and to everyone who tastes them. They are not just a dessert; they are a conversation starter, a festive centerpiece, and a testament to the simple, comforting pleasures of the season. Get ready to impress with these irresistible autumnal delights!

Ingredients:
- For the Pumpkin Cake Base:
- All-Purpose Flour: 2 ½ cups. I find this provides the perfect structure for a moist cake that crumbles beautifully.
- Granulated Sugar: 1 ½ cups. Just enough sweetness to complement the pumpkin without overpowering it.
- Light Brown Sugar (packed): ½ cup. This adds a lovely depth of flavor and moisture.
- Baking Powder: 2 teaspoons. For that perfect lift.
- Baking Soda: 1 teaspoon. Works with the pumpkin puree to create a tender crumb.
- Ground Cinnamon: 2 teaspoons. Essential for that warm, autumnal spice.
- Ground Nutmeg: 1 teaspoon. Adds another layer of classic pumpkin spice.
- Ground Ginger: ½ teaspoon. A little kick to round out the spices.
- Salt: ½ teaspoon. Balances all the flavors.
- Canned Pumpkin Puree: 1 (15-ounce) can, unsweetened. Make sure it’s puree, not pie filling!
- Large Eggs: 3, at room temperature. They bind everything together.
- Vegetable Oil: ½ cup. Contributes to the cake’s incredible moisture.
- Buttermilk: ½ cup, at room temperature. The acidity tenderizes the cake crumb beautifully.
- Vanilla Extract: 2 teaspoons. A must-have flavor enhancer.
- For the Cream Cheese Frosting (Binder):
- Unsalted Butter: ½ cup (1 stick), softened. For richness and creaminess.
- Cream Cheese: 4 ounces, softened. The star of the show for a tangy, delicious binder. Make sure it’s full-fat for the best texture.
- Powdered Sugar: 2 cups, sifted. To ensure a smooth, lump-free frosting. You might need a little more or less depending on desired consistency.
- Vanilla Extract: 1 teaspoon.
- Pinch of Salt: Just a tiny bit to cut through the sweetness.
- For Coating and Decorating:
- Candy Melts (Orange or White): 2 (12-ounce) bags. Orange is classic for pumpkin, but white can be tinted or drizzled. I usually opt for high-quality melts for a smooth finish.
- Lollipop Sticks: Approximately 40-50, 6-inch length.
- Shortening or Coconut Oil: 1-2 teaspoons (optional, for thinning candy melts). This is a trick I use to get a perfectly smooth, dippable consistency.
- Sprinkles: Autumnal mix, orange, brown, or gold (optional, but highly recommended for visual appeal).
- Additional Candy Melts (Brown or Green): For drizzles or decorative elements (optional).
Baking the Moist Pumpkin Cake Base
Let’s kick things off by baking the foundation of our delightful Easy Pumpkin Cake Pops – a super moist pumpkin cake. Trust me, starting with a delicious cake makes all the difference!
- Preheat and Prepare: First things first, preheat your oven to a cozy 350°F (175°C). Then, grab a 9×13 inch baking pan. I like to grease it well and then dust it with a little flour, or you can line it with parchment paper for easy removal. This ensures your beautiful cake won’t stick!
- Whisk Dry Ingredients: In a large mixing bowl, I combine all my dry ingredients. That’s the all-purpose flour, granulated sugar, light brown sugar, baking powder, baking soda, ground cinnamon, ground nutmeg, ground ginger, and salt. Give them a good whisk for about 30 seconds to a minute until they are thoroughly combined. This step is crucial for an even distribution of leavening and spices throughout the cake. You don’t want a bite that’s super spicy and another that’s bland!
- Combine Wet Ingredients: In a separate, medium-sized bowl, I whisk together the canned pumpkin puree, large eggs, vegetable oil, buttermilk, and vanilla extract. Whisk them until they are smooth and well-incorporated. Make sure your eggs and buttermilk are at room temperature; this helps them combine more easily with the other ingredients and results in a better cake texture.
- Marry Wet and Dry: Now, it’s time to bring everything together. Pour the wet ingredients into the dry ingredients. With a rubber spatula or an electric mixer on low speed, mix until just combined. The key here is not to overmix! Overmixing develops the gluten in the flour too much, leading to a tough cake. A few lumps are perfectly fine and will disappear during baking. I usually stop mixing as soon as I no longer see streaks of dry flour.
- Pour and Bake: Pour your beautifully mixed batter into the prepared 9×13 inch baking pan, spreading it evenly with your spatula. Pop it into the preheated oven and bake for about 30-35 minutes. You’ll know it’s done when a wooden skewer or toothpick inserted into the center comes out clean or with just a few moist crumbs attached.
- Cool Completely: Once baked, remove the cake from the oven and let it cool in the pan on a wire rack for about 10-15 minutes. After that, carefully invert the cake onto the wire rack to cool completely. This step is absolutely critical! Attempting to crumble or mix a warm cake will result in a greasy, mushy mess, not the firm cake pop dough we’re aiming for. I usually let mine cool for at least 2-3 hours, or even overnight if time allows.
Creating the Perfect Cake Pop Dough
This is where the magic really begins! We’re transforming our lovely pumpkin cake into the moldable dough for our Easy Pumpkin Cake Pops.
- Crumble the Cake: Once your pumpkin cake is completely cool, transfer it to a large mixing bowl. Using your hands, crumble the cake into very fine crumbs. I like to really get in there and break up any larger pieces. You want a consistent, fine crumb that will mix well with the frosting. If you have a stand mixer with a paddle attachment, you can use that on low speed for a few minutes to break it down, but I find my hands do the best job here for ensuring no large chunks remain.
- Prepare the Cream Cheese Frosting: While you’re crumbling the cake, you can whip up your frosting binder. In a separate bowl, using an electric mixer, beat the softened unsalted butter and softened cream cheese together on medium speed until smooth and creamy, about 2-3 minutes. Scrape down the sides of the bowl. Gradually add the sifted powdered sugar, beating on low speed until combined, then increase to medium and beat until light and fluffy. Stir in the vanilla extract and a tiny pinch of salt. You want this frosting to be quite thick, so resist the urge to add milk or extra liquid.
- Combine Cake Crumbs and Frosting: Now for the fun part! Add about half of your prepared cream cheese frosting to the crumbled cake. Using your hands (the best tools for this job!), mix and knead the frosting into the cake crumbs until everything is thoroughly combined and forms a cohesive “dough.” The goal is a consistency similar to play-dough – firm enough to hold its shape but still moist. If it feels too dry, add a little more frosting, one tablespoon at a time, until you reach that perfect moldable texture. If it’s too wet, you can add a tablespoon or two of extra cake crumbs (if you have them) or a bit of powdered sugar, but try to avoid this by adding frosting slowly.
- Form the Cake Balls: Using a small cookie scoop (about 1.5 tablespoons, roughly 1 ounce of mixture), scoop out portions of the cake pop dough. Roll each portion between your palms to form a smooth, dense ball. Aim for uniform size for consistent cooking and dipping. Place the formed cake balls onto a baking sheet lined with parchment paper.
- Chill for Firmness: This is a crucial step for achieving perfect Easy Pumpkin Cake Pops. Once all your cake balls are formed, place the baking sheet in the refrigerator and chill them for at least 30-60 minutes, or in the freezer for about 15-20 minutes. Chilling makes them much easier to handle, prevents them from falling apart on the stick, and helps the coating adhere smoothly. They need to be firm to the touch.
Preparing for the Dip: Sticks and Coating
We’re almost ready for the grand finale – dipping and decorating! Proper preparation here ensures a smooth, beautiful finish for your Easy Pumpkin Cake Pops.
- Melt the Candy Melts: Place your chosen candy melts (orange or white) into a microwave-safe bowl. I usually start with one bag at a time. Microwave on 50% power for 30-second intervals, stirring thoroughly after each interval. It’s important to go low and slow to prevent the melts from overheating, which can cause them to seize or become thick and clumpy. Continue until the melts are smooth and fully melted. If the melted coating seems too thick for dipping, you can stir in 1-2 teaspoons of shortening or coconut oil, a tiny bit at a time, until it reaches a thinner, pourable consistency. Avoid adding water or milk, as this will cause the melts to seize completely! If using white melts and you want to color them, use oil-based candy colors, not gel or liquid food coloring.
- Prepare Your Dipping Station: Set up your workspace. You’ll need your chilled cake balls, lollipop sticks, the melted candy coating, and another baking sheet lined with parchment paper or a block of styrofoam (or even a cardboard box with holes poked in it) to hold the dipped pops upright as they set.
Dipping and Decorating Your Easy Pumpkin Cake Pops
This is where your Easy Pumpkin Cake Pops truly come to life! Patience and a steady hand are your best friends here.
- Secure the Sticks: Take a lollipop stick and dip about ¼ inch of the tip into the melted candy coating. Immediately insert the coated tip into the center of a chilled cake ball, pushing it about halfway through. This acts as “glue” to secure the stick. Gently push to avoid cracking the cake ball. Repeat this for all your cake balls. Once all sticks are inserted, return the cake pops to the refrigerator for another 5-10 minutes to allow the candy coating on the stick to set completely. This ensures the cake ball won’t slip off the stick during dipping.
- The Dipping Process: Remove a few cake pops from the refrigerator at a time to keep the others cold. Hold a cake pop by its stick and submerge the entire cake ball into the melted candy coating, ensuring it’s completely covered. Do not swirl or twist excessively, as this can cause the cake ball to fall off.
- Tap Off Excess Coating: Once submerged, gently lift the cake pop out of the coating. Hold it over the bowl and gently tap the stick against the edge of the bowl. This helps to remove any excess coating, creating a smooth, even layer. You can also gently spin the pop as you tap to help the excess drip off. Keep tapping until the dripping slows to a stop. A thin, even coating is key for a professional look.
- Apply Sprinkles (If Using): If you’re adding sprinkles, do this immediately after dipping and tapping, while the coating is still wet. Hold the pop over a small bowl of sprinkles and either gently roll the pop in the sprinkles or sprinkle them over the pop.
- Set the Cake Pops: Insert the dipped and decorated cake pop into your styrofoam block or stand upright on your parchment-lined baking sheet (if you’re okay with one flat side). Allow the coating to set completely at room temperature, which usually takes about 15-30 minutes, depending on the thickness of the coating and your room temperature. You can also place them back in the refrigerator for faster setting, especially if your kitchen is warm.
- Advanced Decorating (Optional):
- Drizzles: Once the main coating is set, you can melt a different color of candy melts (like brown for a chocolate drizzle, or green for a pumpkin stem look). Transfer the melted coating to a piping bag with a tiny snip off the end or a Ziploc bag with a corner snipped. Drizzle decoratively over the set cake pops.
- Fondant Accents: For an extra special touch, you can use small pieces of green or brown fondant to create little pumpkin stems or leaves once the main coating is dry.
- Face Details: With a very fine brush and food-safe edible markers or thinned royal icing, you can draw cute pumpkin faces or other designs on the set cake pops for a truly custom look.
Tips for Success with Your Easy Pumpkin Cake Pops
Making cake pops can be a little finicky at first, but with these tips, your Easy Pumpkin Cake Pops will be a roaring success every time!
- Temperature Control is Key: Ensure your cake is completely cool before crumbling, and that your cake balls are well-chilled before dipping. If the cake balls are too warm, they’ll fall apart in the warm coating. If the coating is too hot, it can melt the cake ball.
- Work in Batches: Don’t try to dip all your cake pops at once. Remove a small batch from the fridge, dip them, and then return them to chill if needed while you work on the next batch. This helps maintain the crucial cold temperature of the cake balls.
- Melt Your Coating Properly: As mentioned, low and slow is the way to go with candy melts. If they seize, sometimes adding a little more shortening can save them, but often they’re beyond repair. It’s better to be patient. You can also use a double boiler over simmering water for a more controlled melt.
- Consistency of Coating: Your melted candy coating should be smooth and thin enough to drip easily, but not so thin that it’s transparent. If it’s too thick, add a tiny bit of shortening or coconut oil until it reaches the right consistency.
- Tap, Tap, Tap: Don’t skip the tapping step! It’s essential for getting rid of excess coating and ensuring a smooth finish. Be gentle but firm.
- Patience with Setting: Allow your cake pops ample time to set. Rushing this step can lead to smudged decorations or the coating not fully hardening.
- Storage: Once fully set, store your Easy Pumpkin Cake Pops in an airtight container. They can be kept at room temperature for 1-2 days, but I prefer to keep them in the refrigerator for up to a week, especially with the cream cheese frosting. If you’ve made a huge batch, they also freeze beautifully for up to a month in an airtight container; just let them thaw in the refrigerator before serving.
- Get Creative with Decorations: Don’t limit yourself to just sprinkles! Edible glitter, different colored drizzles, or even small edible candy decorations can really elevate your cake pops. Have fun with it!
- Practice Makes Perfect: If your first few cake pops aren’t perfect, don’t worry! It takes a little practice to get the dipping technique just right. You’ll get better with each one.
Enjoy making and sharing your incredibly delicious and festive Easy Pumpkin Cake Pops!
<h2>Conclusion:</h2>
<p>Well, friends, we’ve reached the sweet end of our culinary journey, and I genuinely hope you’re as excited as I am about what we’ve discovered. If you’ve been searching for that perfect, adorable, and utterly delicious treat that brings a smile to everyone’s face, then look no further. This recipe isn’t just another dessert; it’s a testament to how simple ingredients, a dash of creativity, and a little love can transform into something truly magical. I truly believe these cake pops are destined to become a staple in your autumnal baking repertoire, and honestly, you might find yourself making them year-round!</p>
<p>Why are these cake pops an absolute must-try? For starters, they are an ingenious way to capture the essence of fall in a delightful, bite-sized package. The warm, comforting spices mingle perfectly with the sweet, earthy pumpkin, creating a flavor profile that is both nostalgic and incredibly satisfying. Imagine the cozy scent of cinnamon and nutmeg wafting through your kitchen as these bake – it’s an experience in itself! Beyond the incredible taste, their individual portion size makes them incredibly versatile. No need for plates or forks; just grab and enjoy. They’re perfect for bustling holiday parties where finger foods reign supreme, or for those quiet evenings when you just want a small, sweet indulgence without the commitment of a whole cake. Plus, let’s be honest, there’s something inherently joyful about a cake on a stick, isn’t there? It taps into that playful, inner child in all of us, making dessert an adventure.</p>
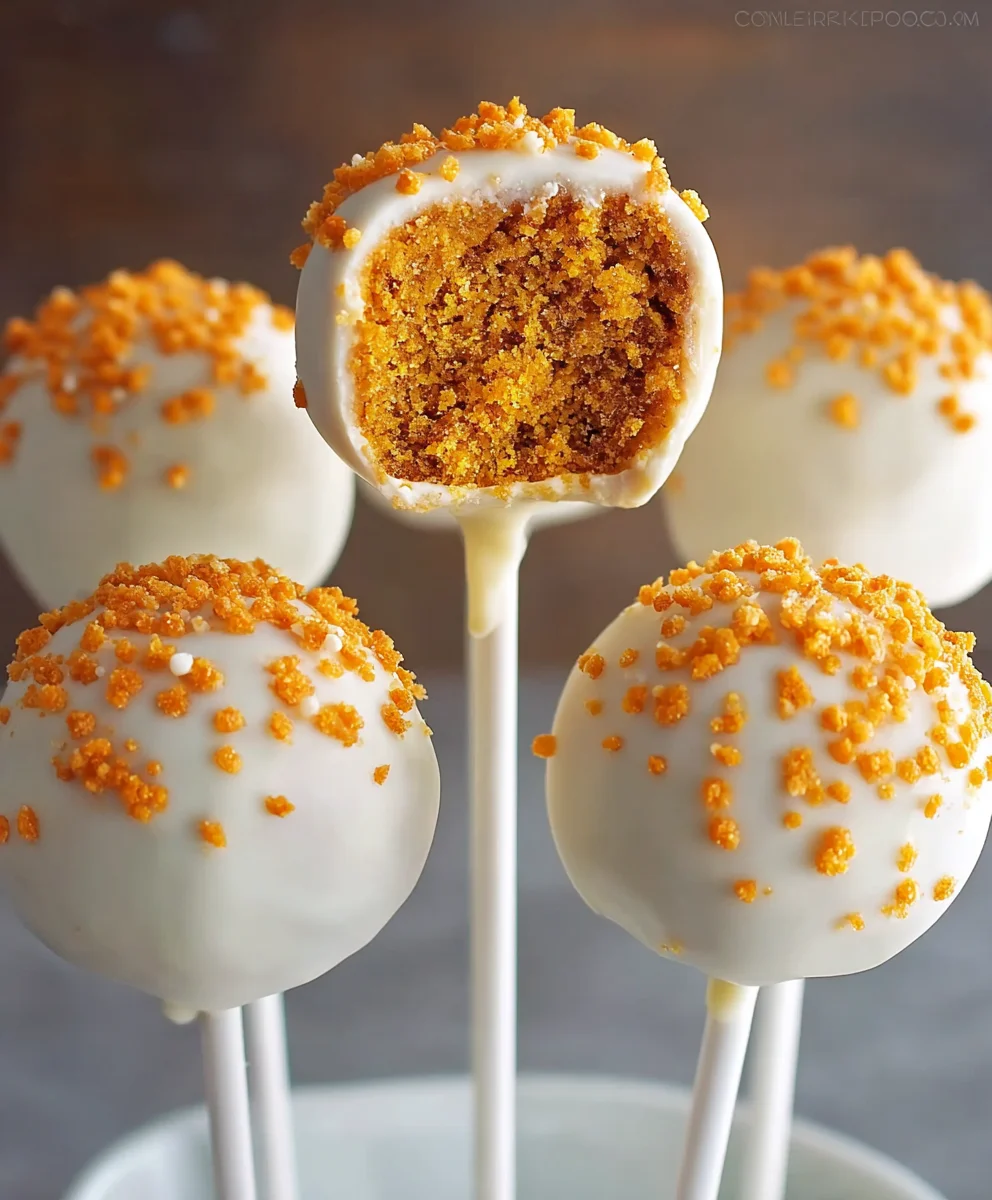
<p>Their visual appeal is undeniable. Small, perfectly spherical, and customizable, they are guaranteed to be the star of any dessert table. Kids adore them, adults are charmed by them, and everyone appreciates the thoughtful effort (even if the process itself is surprisingly straightforward!). The moist, tender crumb of the cake combined with a smooth, luxurious frosting creates a texture sensation that is simply irresistible. Every bite is a harmonious blend of flavors and textures, making them surprisingly sophisticated despite their playful appearance. They truly embody everything wonderful about homemade treats: warmth, comfort, and a touch of whimsy.</p>
<h4>Serving Suggestions and Creative Variations:</h4>
<p>Now, while these cake pops are absolutely divine on their own, a little creativity can elevate them even further. For a classic look, coat them in melted white chocolate tinted with a few drops of orange food coloring – it really makes that pumpkin theme pop! Or, for a more decadent twist, dip them in dark chocolate and then drizzle with white chocolate for a sophisticated contrast. Don’t be shy with the toppings! A sprinkle of cinnamon sugar, crushed pecans, or even some festive fall-themed sprinkles can add both texture and visual interest. Imagine serving these alongside a steaming mug of spiced apple cider or a rich, dark coffee – pure bliss!</p>
<p>Thinking about variations? While the pumpkin flavor is the star, you could experiment with adding a tiny pinch of ground ginger or cardamom to the cake batter for an extra layer of spice. For a truly indulgent treat, consider swirling a bit of maple extract into your frosting mixture before blending it with the cake crumbs. If you’re feeling extra ambitious, you could even try dipping half the cake pop in white chocolate and the other half in milk chocolate for a striking two-tone effect. They make fantastic edible gifts, individually wrapped in small cellophane bags with a festive ribbon, perfect for hostess gifts, teacher appreciation, or just a sweet surprise for a friend. Imagine them gracing a dessert platter for Thanksgiving, or simply being enjoyed during a cozy movie night at home.</p>
<h4>Your Turn!</h4>
<p>I’m genuinely excited for you to give this recipe a try. I promise you, diving into the world of making these <strong>Easy Pumpkin Cake Pops</strong> will be a rewarding experience from start to finish. There’s a special kind of satisfaction that comes from creating something so beautiful and delicious with your own hands. Don’t be intimidated by the process; it’s far simpler than it looks, and the results are consistently impressive. I’d absolutely love to hear about your adventures in the kitchen! Please, please, please share your creations with me. What coatings did you choose? What sprinkles caught your eye? Did you come up with any clever variations of your own? Your experiences and photos inspire me and our entire community of baking enthusiasts. So go on, gather your ingredients, turn on some music, and let the magic happen. Happy baking, and happy sharing!</p>
Easy Pumpkin Cake Pops
A delicious recipe
Ingredients
-
Ingredient 1
-
Ingredient 2
-
Ingredient 3
Instructions
-
Step 1
Step 1 -
Step 2
Step 2 -
Step 3
Step 3
Important Information
Nutrition Facts (Per Serving)
It is important to consider this information as approximate and not to use it as definitive health advice.
Allergy Information
Please check ingredients for potential allergens and consult a health professional if in doubt.

Leave a Comment