

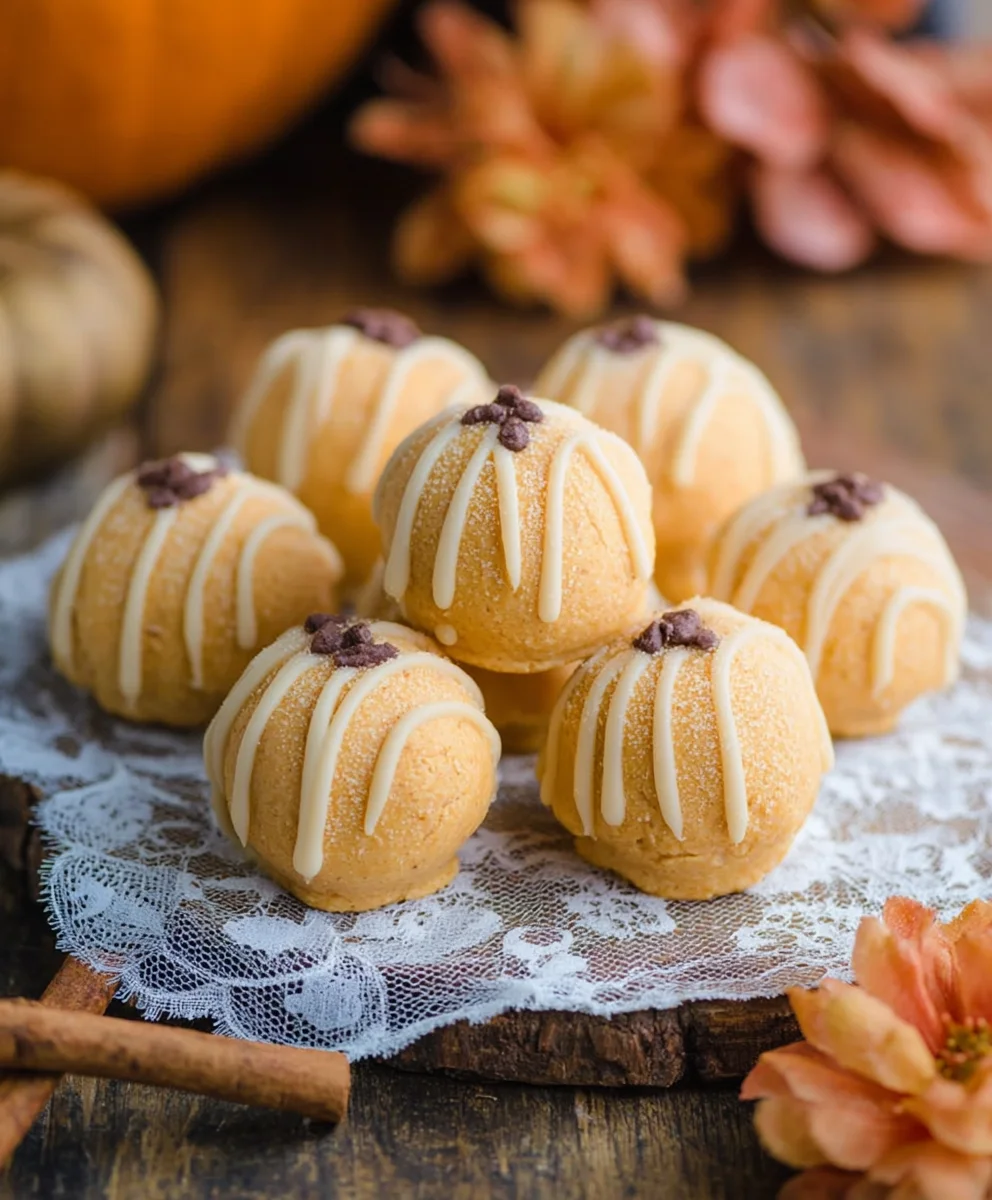
Pumpkin Cheesecake Truffles are an exquisite delight that perfectly encapsulates the essence of the fall season. Imagine capturing the comforting, aromatic warmth of a classic pumpkin pie and the luxurious creaminess of a New York-style cheesecake, then transforming it into a convenient, bite-sized indulgence. These treats represent a modern celebration of autumn’s bounty, offering a sophisticated twist on beloved seasonal flavors that resonate with the coziness and festive spirit of cooler months. While the tradition of pumpkin-based desserts stretches back centuries, evolving through colonial America and into our modern holiday tables, these particular truffles elevate the experience into something truly special.
Why We Adore These Seasonal Delights
I find that people absolutely adore this dish not just for its incredibly balanced taste – a harmonious blend of sweet pumpkin, tangy cream cheese, and a perfect medley of autumnal spices – but also for its irresistibly smooth, melt-in-your-mouth texture. Their elegant presentation and effortless portion control make them an ideal choice for entertaining, a delightful addition to a dessert platter, or simply a well-deserved personal treat. Each exquisite Pumpkin Cheesecake Truffle promises a moment of pure, unadulterated seasonal bliss, making them an instant favorite for anyone seeking a touch of autumn magic.

Ingredients:
Creating these delightful Pumpkin Cheesecake Truffles requires a few key components, divided into the truffle base and the decadent coating. I always recommend using high-quality ingredients for the best flavor and texture outcome.
-
For the Pumpkin Cheesecake Truffle Base:
- 16 ounces (2 blocks) full-fat cream cheese, softened: It’s absolutely crucial that your cream cheese is at room temperature. This ensures a silky-smooth, lump-free base when mixing. I usually take it out of the fridge at least an hour or two before I plan to start.
- 1 cup (about 240g) canned pumpkin puree: Make sure you are using 100% pure pumpkin puree and not pumpkin pie filling, which contains added spices and sugar that would alter our carefully balanced flavors. If your pumpkin puree seems very watery, gently press out any excess moisture with a paper towel or by letting it drain in a fine-mesh sieve for about 15-20 minutes.
- 1 ½ cups (180g) powdered sugar (confectioners’ sugar): This adds sweetness and helps thicken the base. Sifting it isn’t strictly necessary for truffles, but it can help prevent lumps, especially if your powdered sugar has been sitting for a while.
- 1 ½ cups (150g) graham cracker crumbs: You can buy pre-crushed graham cracker crumbs, or for a fresher taste, crush your own whole graham cracker sheets using a food processor or by placing them in a Ziploc bag and crushing them with a rolling pin. This adds a lovely subtle texture and helps bind our truffles.
- 1 ½ teaspoons pumpkin pie spice: This blend of cinnamon, ginger, nutmeg, and cloves is the heart of our pumpkin flavor. Feel free to adjust to your personal preference – if you love a stronger spice profile, go for 2 teaspoons!
- 1 teaspoon pure vanilla extract: A good quality vanilla extract always enhances the overall flavor profile.
- ¼ teaspoon fine sea salt: A small pinch of salt balances the sweetness and brings out all the other flavors beautifully. Don’t skip it!
-
For the Coating:
- 16 ounces high-quality white chocolate melting wafers or bars: I highly recommend using good quality melting wafers (like Ghirardelli, Guittard, or Callebaut) designed for melting, as they tend to melt smoother and set firmer than regular white chocolate chips. If using bars, chop them finely for even melting.
- 1 tablespoon coconut oil or vegetable shortening (optional, but recommended): This helps thin the chocolate slightly, making it easier to dip the truffles and creating a smoother, glossier finish. It also helps prevent the chocolate from seizing.
- 2 ounces dark chocolate (60-70% cacao), melting wafers or bar (optional, for drizzle): A little dark chocolate drizzle adds a beautiful contrast and an extra layer of flavor.
-
Optional Garnishes:
- Finely chopped pecans or walnuts
- A light dusting of ground cinnamon or extra pumpkin pie spice
- Edible glitter for a festive touch
Preparing the Pumpkin Cheesecake Base
The first step in crafting our irresistible Pumpkin Cheesecake Truffles is to create a rich, smooth, and perfectly spiced pumpkin cheesecake mixture. This foundation is key to their incredible flavor and texture.
- Ensure Cream Cheese is Perfectly Softened: Before you even think about turning on your mixer, take your two blocks of full-fat cream cheese out of the refrigerator and let them sit on your countertop for at least 1-2 hours. This step is absolutely critical. If your cream cheese isn’t completely at room temperature and soft, you’ll end up with a lumpy base, and no amount of mixing will fix it perfectly. You want it pliable to the touch, almost like soft butter. Similarly, ensure your canned pumpkin puree is also at room temperature if it was refrigerated, though it typically comes at room temperature. If, as mentioned in the ingredients, your pumpkin puree seems very wet, gently press it between a few layers of paper towels or let it drain in a fine-mesh sieve to remove excess moisture. A drier puree results in a firmer, more stable truffle base.
- Cream the Softened Cream Cheese: In a large mixing bowl, preferably using a stand mixer fitted with the paddle attachment, or with a robust electric hand mixer, begin to beat the softened cream cheese on medium speed. You want to beat it for about 2-3 minutes until it transforms into a wonderfully smooth, light, and airy consistency. This aeration is incredibly important; it ensures a luscious texture for our Pumpkin Cheesecake Truffles and prevents any unappetizing cream cheese lumps from forming in the final product. Make sure to scrape down the sides and bottom of the bowl frequently with a rubber spatula to ensure everything is evenly incorporated.
- Incorporate the Pumpkin and Sweeteners: Once your cream cheese is beautifully smooth, add the 1 cup of pumpkin puree, 1 ½ cups of powdered sugar, 1 ½ teaspoons of pumpkin pie spice, 1 teaspoon of vanilla extract, and ¼ teaspoon of fine sea salt to the bowl. Start mixing on low speed to avoid a cloud of powdered sugar, then gradually increase to medium speed. Continue to beat the mixture until all the ingredients are thoroughly combined and the mixture is completely smooth and uniform in color. This usually takes another 2-3 minutes. Again, don’t forget to pause and scrape down the sides of the bowl to catch any unincorporated ingredients. You’re looking for a vibrant orange, creamy mixture that smells wonderfully of pumpkin and spice.
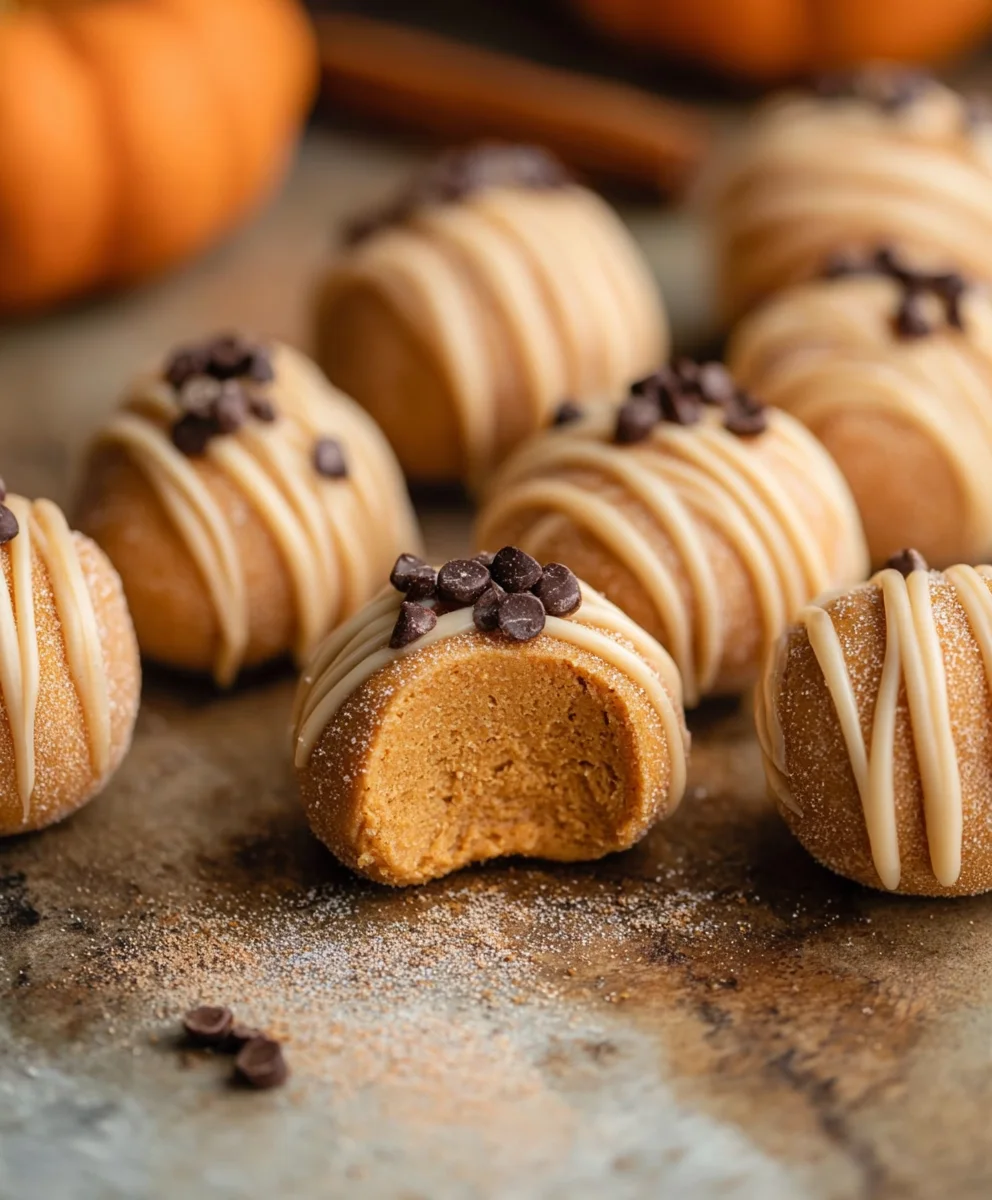
- Fold in the Graham Cracker Crumbs: Now, it’s time to gently incorporate the graham cracker crumbs. Reduce the mixer speed to low, or better yet, remove the bowl from the mixer and use your rubber spatula for this step. Add the 1 ½ cups of graham cracker crumbs to the pumpkin cheesecake mixture. Gently fold the crumbs into the mixture until they are just combined. Be careful not to overmix at this stage. Overmixing can develop the gluten in the graham crackers (if any significant amount) and make your mixture tough, or it can crush the crumbs too much, losing that subtle textural element. You want the crumbs to be evenly distributed, adding body and a pleasant, slightly grainy texture to the truffle base. The mixture should now be thick and moldable, but still creamy.
- Initial Chill for Firmness: This is another crucial chilling step. Once your truffle base is fully mixed, cover the bowl tightly with plastic wrap. Place it in the refrigerator for a minimum of 2-3 hours, or ideally, overnight. This chilling period is absolutely essential. It allows the mixture to firm up considerably, making it much easier to scoop and roll into perfect truffle spheres without them becoming too sticky or falling apart. A well-chilled base is the secret to beautifully shaped Pumpkin Cheesecake Truffles. Don’t rush this part; patience here will be rewarded!
Forming and Chilling the Truffles
Once your pumpkin cheesecake base has had ample time to firm up, we’re ready for the fun part: shaping these delicious morsels! Proper forming and a second chill are key for a smooth coating process.
- Prepare Your Workstation: Line one or two large baking sheets with parchment paper or silicone baking mats. This non-stick surface will prevent your truffles from sticking and make them easy to lift once coated. Have a small cookie scoop (about 1-inch or 1.5-inch diameter, typically yielding about a tablespoon of mixture) ready. This helps ensure your truffles are uniform in size, which is important for even chilling and coating. I also like to have a small bowl of powdered sugar or even just a little water nearby to lightly moisten my hands if the mixture starts to get too sticky while rolling.
- Scoop and Roll the Truffles: Remove your chilled pumpkin cheesecake mixture from the refrigerator. Using your small cookie scoop, portion out even amounts of the mixture. Gently roll each portion between your palms to form smooth, round balls. Try to keep them as uniform in size as possible. If the mixture starts to stick to your hands, you can lightly dust your palms with a tiny bit of powdered sugar, or lightly dampen them with water. Work relatively quickly to prevent the mixture from warming up too much from the heat of your hands, which can make them harder to handle. As you roll them, place the finished spheres onto your prepared baking sheets, leaving a small space between each one. You should be able to get approximately 30-36 truffles, depending on the size you make them.
- Second Chill for Firmness Before Coating: Once all your truffles are rolled and arranged on the baking sheets, place the entire baking sheet(s) back into the refrigerator. This second chilling period is extremely important and cannot be skipped. Allow the truffles to chill for at least 30-60 minutes, or even longer if your kitchen is warm. They need to be very firm and cold throughout their core before you attempt to dip them in the melted chocolate. If they are not cold enough, they will soften too quickly in the warm chocolate, potentially collapsing or leaving an uneven coating. A firm, cold truffle will hold its shape beautifully as it’s dipped, ensuring a smooth, crisp shell for your finished Pumpkin Cheesecake Truffles. You can even pop them in the freezer for 15-20 minutes for an extra firm result, just be careful not to freeze them solid.
Coating and Finishing the Pumpkin Cheesecake Truffles
The final, exciting stage transforms our pumpkin cheesecake spheres into elegant, finished Pumpkin Cheesecake Truffles with a crisp chocolate shell and beautiful garnishes.
-
Melt the White Chocolate Coating: While your truffles are getting their final chill, prepare your white chocolate coating. You have two main methods for melting chocolate:
- Double Boiler Method (Recommended for best results): Set up a double boiler by placing a heatproof bowl (glass or metal) over a saucepan containing about an inch or two of simmering water. Ensure the bottom of the bowl does not touch the water. Add your 16 ounces of high-quality white chocolate melting wafers or finely chopped bars to the bowl. Stir continuously with a rubber spatula as the chocolate melts, until it is completely smooth and glossy. Crucially, avoid any water or steam getting into the chocolate, as this will cause it to seize and become thick and grainy. Once melted, remove the bowl from the heat. If using, stir in the 1 tablespoon of coconut oil or vegetable shortening. This will thin the chocolate slightly and give it a beautiful, flowing consistency, making dipping much easier and resulting in a smoother, shinier finish on your Pumpkin Cheesecake Truffles.
- Microwave Method (With Caution): Place your white chocolate in a microwave-safe bowl. Microwave in 30-second intervals, stirring thoroughly after each interval. White chocolate can scorch very easily, so it’s vital to stir even if it doesn’t look melted on the surface. Continue until the chocolate is almost entirely melted, then stir vigorously to melt the remaining small chunks with the residual heat. Stir in the coconut oil or shortening if desired. Be extra vigilant not to overheat it.
Your melted chocolate should be fluid but not too hot. If it feels too warm, let it cool for a few minutes before dipping, otherwise, it could melt your truffles.
- Dip the Truffles: Remove your very firm and cold pumpkin cheesecake truffles from the refrigerator. Place one truffle into the bowl of melted white chocolate. Using a dipping fork or a regular fork, gently roll the truffle in the chocolate until it is completely coated. Lift the truffle out of the chocolate, allowing any excess to drip back into the bowl. You can lightly tap the fork against the edge of the bowl to help remove extra chocolate, ensuring a thin, even coat.
- Place on Prepared Sheet and Garnish: Carefully transfer the coated truffle from the fork back onto your parchment-lined baking sheet. Before the chocolate sets (which happens quickly when it hits the cold truffle!), immediately sprinkle your chosen garnish, if using. Finely chopped pecans or walnuts, a delicate dusting of ground cinnamon or extra pumpkin pie spice, or even some festive edible glitter work wonderfully. Repeat this process with all the remaining truffles, working efficiently but carefully. If your chocolate starts to thicken too much, gently warm it again using your preferred method, stirring well.
- Optional Dark Chocolate Drizzle: If you’re adding a dark chocolate drizzle, melt your 2 ounces of dark chocolate using either the double boiler or microwave method as described above. Once melted and smooth (no need for coconut oil or shortening here unless it’s extremely thick), transfer the melted dark chocolate to a small piping bag with a very small tip, or even a Ziploc bag with a tiny corner snipped off. Drizzle the dark chocolate decoratively over the white chocolate-coated truffles, moving your hand back and forth over the rows of truffles. This adds an elegant touch and a lovely flavor contrast.
- Final Chill to Set: Once all your Pumpkin Cheesecake Truffles are dipped and garnished, place the baking sheets back into the refrigerator. Allow them to chill for at least 30 minutes, or until the chocolate coating is completely set and firm to the touch. This ensures a crisp, satisfying shell and prevents any smudging when handling.
- Storage: These delightful Pumpkin Cheesecake Truffles need to be stored in an airtight container in the refrigerator. They will stay fresh and delicious for up to 1 week. For the best flavor and texture, I like to let them sit at room temperature for about 10-15 minutes before serving, just to take the chill off slightly, which really enhances their creamy texture and allows the flavors to shine. Enjoy your homemade pumpkin treats!
Conclusion:
Well, my friends, we’ve reached the sweet finale of our culinary journey, and I genuinely hope you’re feeling as excited as I am about these incredible treats. If there’s one recipe you absolutely, positively need to add to your fall baking repertoire this season, it’s these delightful Pumpkin Cheesecake Truffles. Why are they a must-try? Because they masterfully combine everything you adore about a rich, creamy pumpkin cheesecake into a bite-sized, incredibly decadent package. Imagine the velvety smooth texture of cream cheese, perfectly spiced with the warm embrace of cinnamon, nutmeg, and ginger, all mingling with the earthy sweetness of pumpkin puree. Then, picture that exquisite filling enrobed in a crisp shell of your favorite chocolate, whether it’s classic dark, smooth milk, or even a vibrant white chocolate. The contrast in textures – the yielding interior against the snappy exterior – is nothing short of pure bliss. It’s a symphony of fall flavors, but without the fuss of baking an entire cheesecake. These truffles are not just desserts; they are miniature moments of joy, designed to impress with minimal effort.
I can confidently say that these aren’t just good; they’re unforgettable. They’re the kind of treat that disappears from a dessert platter in minutes, eliciting gasps of delight and requests for the recipe. They encapsulate the essence of autumn in a way that feels both gourmet and comforting. Whether you’re a seasoned baker looking for a quick, show-stopping dessert or a novice eager to create something truly impressive, this recipe offers a foolproof path to success. The beauty lies in its simplicity; no fancy equipment or complex techniques are required. Just a few accessible ingredients, a little mixing, chilling, and dipping, and you’re well on your way to creating something truly magical. They are perfect for holiday gatherings, a cozy evening by the fire, or simply as a well-deserved treat after a long day. I promise, the reward for your minimal effort will be a taste experience that brightens your day and warms your soul.
Elevate Your Truffle Experience: Serving Suggestions & Variations
Now that you’re armed with the knowledge to create these masterpieces, let’s talk about how to make them even more special. While they are utterly perfect on their own, a few creative touches can truly elevate the experience. For a simple yet elegant presentation, arrange your finished truffles on a tiered dessert stand or a rustic wooden board, perhaps dusted lightly with a bit of cocoa powder or a sprinkle of finely chopped pecans. They make an exquisite addition to any holiday dessert spread, alongside apple pie or cranberry tarts, offering a unique, handheld option that guests will adore. Imagine them served with a steaming mug of spiced cider or a rich, dark roast coffee for an afternoon indulgence. For a touch of sophistication, consider pairing them with a small glass of dessert wine, like a late-harvest Riesling, whose sweetness would beautifully complement the pumpkin and spice notes.
But why stop there? Let’s explore some delightful variations! If you’re feeling adventurous, try rolling a few of your truffles in different coatings before the final chocolate dip. Finely crushed ginger snaps, toasted coconut flakes, or a blend of cinnamon sugar could add an exciting textural and flavor dimension. For those who love a bit of crunch, finely chopped candied pecans or walnuts can be mixed into the cheesecake filling itself, or sprinkled on top of the wet chocolate coating for visual appeal and an added bite. You could also experiment with different chocolate types for the coating – a dark chocolate coating would provide a sophisticated bitterness that contrasts beautifully with the sweet filling, while a white chocolate coating could be tinted with food coloring to create festive orange or even green truffles for Halloween or Christmas. For a truly unique twist, infuse your chocolate coating with a hint of orange zest or a tiny dash of cayenne pepper for a subtle warming kick. And if dipping feels like too much work, simply press the mixture into a parchment-lined pan, chill thoroughly, and cut into squares or bars for a delightful “Pumpkin Cheesecake Bar” experience. The possibilities are truly endless, limited only by your imagination!
Your Turn to Create and Share!
My culinary adventurer, I’ve shared all my secrets for these delectable Pumpkin Cheesecake Truffles, and now it’s your turn to bring them to life in your own kitchen. I promise you, the joy of creating these beautiful, flavorful bites is only surpassed by the pleasure of tasting them. Don’t be intimidated; this recipe is designed for success, and I genuinely believe anyone can master it. So, gather your ingredients, put on some festive music, and let your kitchen fill with the wonderful aromas of autumn. Once you’ve made them, I would absolutely love to hear about your experience! Did you try a fun variation? What was your favorite part of the process? Did they disappear as quickly from your table as they do from mine? Please, don’t keep your triumphs to yourself! Share your creations and your stories. Snap a photo of your magnificent truffles, tell us about your serving ideas, and let us know how much you (and your lucky tasters!) enjoyed them. Your feedback and creativity inspire us all. Happy baking, and enjoy every single, glorious bite!
Pumpkin Cheesecake Truffles
A delicious recipe
Ingredients
-
Ingredient 1
-
Ingredient 2
-
Ingredient 3
Instructions
-
Step 1
Step 1 -
Step 2
Step 2 -
Step 3
Step 3
Important Information
Nutrition Facts (Per Serving)
It is important to consider this information as approximate and not to use it as definitive health advice.
Allergy Information
Please check ingredients for potential allergens and consult a health professional if in doubt.
Leave a Comment