

Christmas Cookie Frosting is, for many of us, the very essence of holiday joy, transforming simple baked goods into edible masterpieces. I remember vividly the excitement as a child, waiting for my turn to meticulously apply shimmering colors and sparkling sprinkles to freshly baked gingerbread men and sugar stars. This isn’t just about adding sweetness; it’s about crafting memories, continuing cherished family traditions, and infusing every bite with festive cheer. The act of decorating Christmas cookies has been a beloved ritual for centuries, with origins tracing back to medieval Europe where spiced biscuits were used as decorative edible art during winter celebrations. What makes the perfect Christmas Cookie Frosting so universally adored is its incredible versatility – it’s not merely a topping, but a canvas. Whether you prefer the crisp snap of royal icing, the creamy texture of buttercream, or the vibrant sheen of a simple glaze, the right frosting elevates a good cookie to an unforgettable one, making each bite a delicious celebration of the season.

Ingredients:
For the Classic Sugar Cookies:
- 2 ½ cups (300g) All-Purpose Flour, plus more for dusting
- 1 teaspoon Baking Powder
- ½ teaspoon Salt
- 1 cup (226g) Unsalted Butter, softened to room temperature
- 1 ½ cups (300g) Granulated Sugar
- 2 large Eggs
- 2 teaspoons Pure Vanilla Extract
- ¼ teaspoon Almond Extract (optional, but lovely!)
For the Perfect Christmas Cookie Frosting (Royal Icing):
- 4 cups (480g) Powdered Sugar (Confectioners’ Sugar), sifted
- 3 tablespoons Meringue Powder (do NOT substitute with raw egg whites for safety and stability)
- ½ – ¾ cup Warm Water, divided
- 1 teaspoon Pure Vanilla Extract (or other flavorings like almond, peppermint)
- Pinch of Salt
- Gel Food Coloring (red, green, white, etc., specifically for icing)
Equipment You’ll Need:
- Stand mixer with paddle attachment (highly recommended!)
- Large mixing bowls
- Measuring cups and spoons
- Sifter
- Rolling pin
- Christmas-themed cookie cutters
- Baking sheets
- Parchment paper or silicone baking mats
- Wire cooling rack
- Piping bags (disposable or reusable)
- Piping tips (small round tips like #1, #2, #3 are great for detailing)
- Squeeze bottles (for flooding)
- Toothpicks or scribes (for spreading icing and fixing air bubbles)
- Air-tight containers for storing cookies and frosting
Preparing the Classic Sugar Cookies:
My baking journey often begins with a simple, delicious base, and for our stunning Christmas cookies, there’s nothing better than a reliable sugar cookie. This recipe results in a cookie that holds its shape beautifully and tastes absolutely wonderful, making it the perfect canvas for our Christmas Cookie Frosting.
- Combine Dry Ingredients: In a medium bowl, I like to whisk together the 2 ½ cups of all-purpose flour, 1 teaspoon of baking powder, and ½ teaspoon of salt. Giving these a good whisk ensures everything is evenly distributed, which is crucial for a consistent cookie texture. Set this aside for a moment.
- Cream Butter and Sugar: Now, in the bowl of my stand mixer fitted with the paddle attachment, I’ll add the 1 cup of softened unsalted butter and 1 ½ cups of granulated sugar. I beat these together on medium speed until the mixture is light and fluffy, usually about 3-5 minutes. This creaming process incorporates air, giving the cookies a lovely tender crumb. Make sure to scrape down the sides of the bowl occasionally to ensure everything gets well combined.
- Add Wet Ingredients: Next, I crack in the two large eggs, one at a time, mixing well after each addition. Then, I stir in the 2 teaspoons of pure vanilla extract and, if I’m feeling fancy (which I usually am for Christmas cookies!), the ¼ teaspoon of almond extract. These extracts provide such a wonderful depth of flavor that really complements the sweet frosting.
- Gradually Add Dry to Wet: With the mixer on low speed, I slowly add the dry ingredient mixture to the wet ingredients, mixing just until combined. It’s important not to overmix here! Overmixing can develop the gluten in the flour too much, leading to tough cookies. As soon as you see no more streaks of flour, stop the mixer.
- Chill the Dough: This step is non-negotiable for perfectly shaped sugar cookies. I divide the dough in half, flatten each half into a disc, wrap them tightly in plastic wrap, and refrigerate for at least 2 hours. Honestly, overnight is even better if you have the time! Chilling makes the dough firm and much easier to roll out, preventing the cookies from spreading too much in the oven.
- Preheat Oven and Prep Baking Sheets: When I’m ready to bake, I preheat my oven to 375°F (190°C). I also line my baking sheets with parchment paper or silicone baking mats. This prevents sticking and makes cleanup a breeze.
- Roll and Cut Cookies: I take one disc of chilled dough out of the fridge (leaving the other one in to stay cold) and place it on a lightly floured surface. I dust my rolling pin with a little flour too. Roll the dough to about ¼-inch thickness. Now for the fun part! Use your festive Christmas cookie cutters to cut out shapes. I try to get them as close together as possible to minimize scraps, but don’t worry, you can re-roll the scraps once or twice. Carefully transfer the cut-out cookies to your prepared baking sheets, leaving about 1 inch between them.
- Bake the Cookies: Bake for 8-12 minutes, depending on the size of your cookies. I look for the edges to be lightly golden, but the centers should still be pale. My motto is, “Don’t overbake!” Overbaked cookies will be dry and hard, and we want soft, chewy perfection for our Christmas Cookie Frosting.
- Cool Completely: Let the cookies cool on the baking sheets for about 5 minutes before carefully transferring them to a wire rack to cool completely. This is crucial! You absolutely must have completely cooled cookies before applying any Christmas Cookie Frosting, otherwise, it will melt or run. Patience is a virtue, especially in cookie decorating!
Crafting the Perfect Christmas Cookie Frosting (Royal Icing):
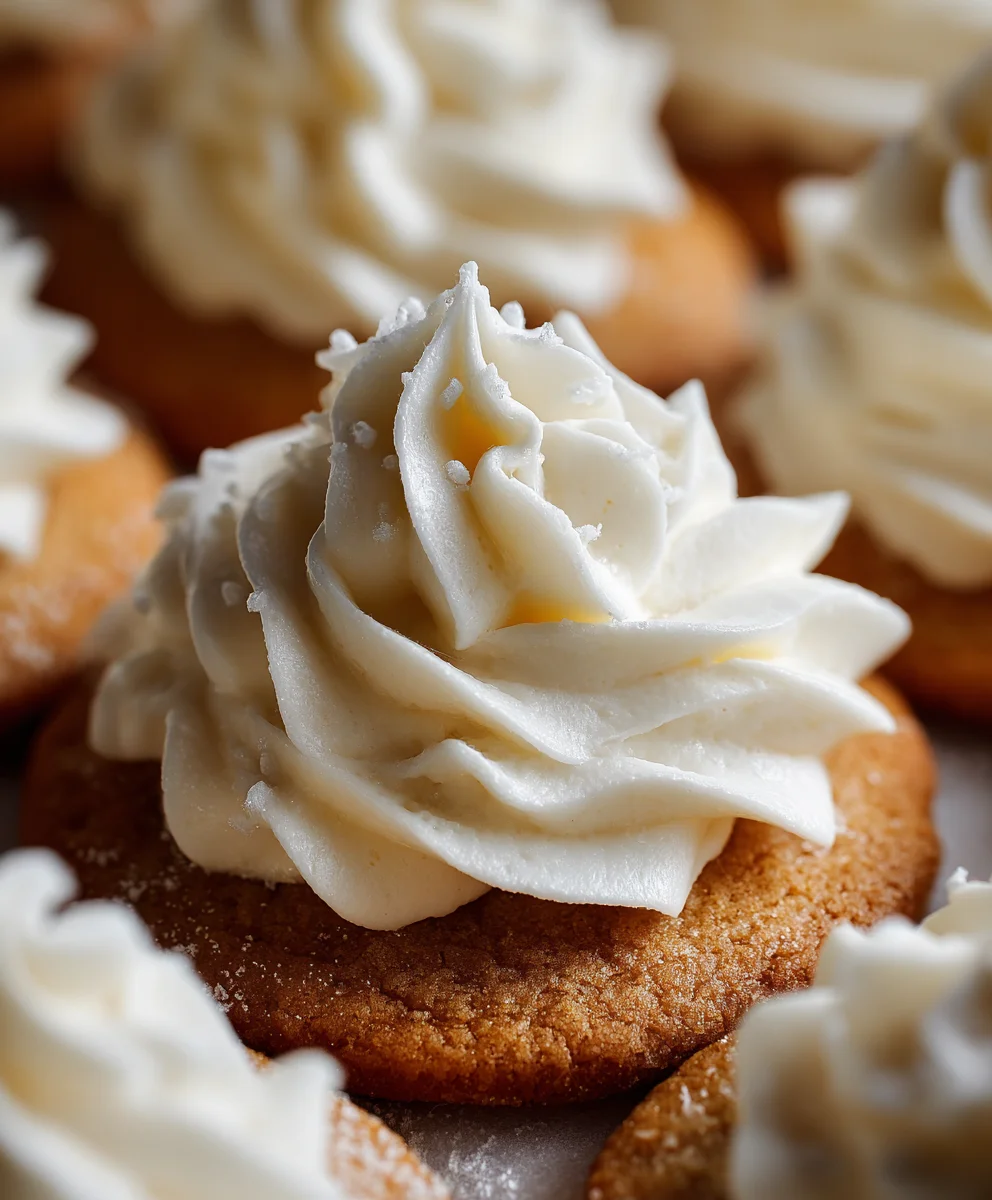
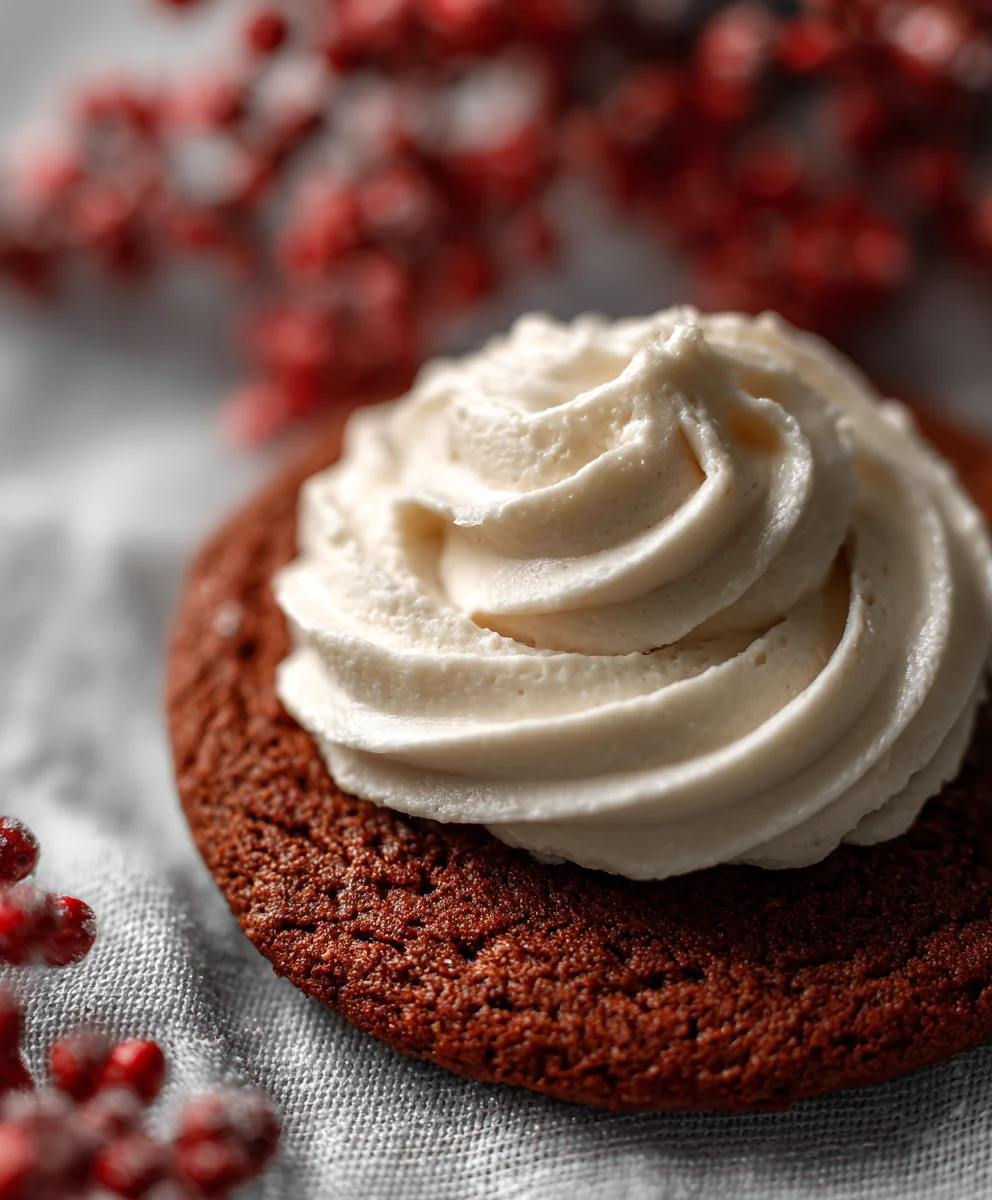
Now, let’s talk about the star of the show: the Christmas Cookie Frosting! For detailed and beautiful cookies that last, royal icing is my absolute favorite. It dries hard, creating a lovely shell that protects the cookie and allows for intricate designs. Don’t be intimidated; I’ll walk you through every step!
- Sift Powdered Sugar: First things first, I always sift my 4 cups of powdered sugar. This removes any lumps, which are the enemy of smooth icing. A fine-mesh sieve or sifter works perfectly.
- Combine Dry Frosting Ingredients: In the bowl of my stand mixer (or a large bowl if using a hand mixer), I combine the sifted powdered sugar and 3 tablespoons of meringue powder. I give them a good whisk for about 30 seconds to ensure the meringue powder is fully incorporated with the sugar. Meringue powder is essential; it provides stability, shine, and helps the icing dry hard.
- Add Wet Frosting Ingredients: Gradually, I add ½ cup of warm water to the sugar and meringue powder mixture. I also add 1 teaspoon of vanilla extract and a tiny pinch of salt (this really helps to balance the sweetness).
- Mix to Stiff Consistency: Using the paddle attachment on my stand mixer (or a hand mixer), I start mixing on low speed until everything is combined, then increase to medium-high speed. I beat the mixture for about 5-7 minutes, until it’s thick, glossy, and forms stiff peaks. You’re looking for a consistency where if you lift the paddle, the icing holds its shape. If it seems too thick, I add water just a teaspoon at a time until I reach this stage. Conversely, if it’s too thin, a tablespoon of extra sifted powdered sugar can help.
- Achieving Different Consistencies for Decorating: This is where the magic happens for detailed Christmas Cookie Frosting. You’ll need two main consistencies:
- Outline Consistency: This is your stiffer icing, perfect for creating borders and detailed work. It should hold its shape and not spread. When you lift a spoon, a ribbon of icing should fall back into the bowl and disappear in about 15-20 seconds. If it’s too thick, I add water drop by drop. If too thin, I add more sifted powdered sugar. I usually take a portion of my stiff icing and thin it down slightly for outlining.
- Flood Consistency: This is a thinner icing, used to fill in the outlined areas. It should be fluid enough to spread easily but not so thin that it runs off the cookie. When you lift a spoon, the ribbon of icing should fall back into the bowl and disappear in about 8-12 seconds. Again, adjust with tiny amounts of water or powdered sugar. This is often called “10-second icing” or “12-second icing.”
My tip: Always test your consistency on a spare cookie or a piece of parchment paper before committing to your masterpiece!
- Coloring the Frosting: I divide my royal icing into separate bowls for each color I plan to use. I only use gel food coloring because it provides vibrant colors without adding too much liquid, which can mess up your icing consistency. I dip a toothpick into the gel color and then into the icing, mixing thoroughly until I achieve the desired shade. Remember, a little gel color goes a long way! For crisp white icing, sometimes a tiny dot of violet gel color can counteract any yellow tones.
- Prepare Piping Bags: Now for the tools! I fit my piping bags with small round tips (like PME #1, #2, or Wilton #2, #3) for outlining and detailing. For flooding, I often use larger round tips (like PME #3 or #4) or simply cut a small hole at the end of the piping bag, or even use squeeze bottles, which are fantastic for flooding larger areas with flood consistency Christmas Cookie Frosting. I fill the bags no more than two-thirds full to make them easier to handle. Twist the top of the bag to prevent icing from oozing out.
Decorating Your Christmas Cookies:
This is the most exciting part, where our delicious cookies truly become festive works of art with the help of our vibrant Christmas Cookie Frosting!
- Outline the Cookies: I start with my outline consistency icing. Holding the piping bag at a 45-degree angle, I pipe a border around the edge of each cooled cookie. I try to keep my hand steady and apply even pressure. It’s okay if it’s not perfect; practice makes perfect, and remember, this is supposed to be fun! Let the outline dry for about 10-15 minutes. This creates a dam to hold in the flood icing.
- Flood the Cookies: Next, I take my flood consistency icing. Starting from the outside, just inside the outline, I pipe the flood icing to fill the entire outlined area. If you’re using squeeze bottles, it’s even easier! I use a toothpick or a scribe tool to gently spread the icing to the edges and pop any air bubbles. Smooth surfaces are key for a beautiful base for our Christmas Cookie Frosting designs.
- Dry the First Layer: This is a crucial step for achieving professional-looking cookies. I let the flooded cookies dry completely for at least 6-8 hours, or ideally overnight, before adding any further details. If you try to decorate on wet flood icing, your designs will sink or bleed. For best results, I use a dehydrator or a fan to speed up the drying process and give a nice, shiny finish.
- Add Details and Decorations: Once the base layer of flood icing is completely dry and hard, it’s time to get creative with your outline consistency Christmas Cookie Frosting!
- Piping Designs: I pipe intricate patterns like snowflakes, holly leaves, stripes, dots, or even personalized messages. Small round tips are fantastic for fine lines.
- Wet-on-Wet Technique: For a cool effect, while the flood icing is still wet (immediately after flooding, before drying), you can drop dots or pipe lines of another color onto it. Then, using a toothpick, gently drag through the wet icing to create marbled effects, hearts, or swirls. This is a quick way to add detail without waiting for layers to dry.
- Adding Sprinkles: If I want to add sprinkles, nonpareils, or sanding sugar, I do this while the flood icing is still wet, or I use a small dab of stiff icing as “glue” on dry icing for precise placement.
- Dimensional Details: For details that stand out, such as bows or stars, I use a thicker consistency of icing and pipe them directly onto the dry base. Sometimes, I even create these elements separately on parchment paper, let them dry, and then attach them to the cookie with a dab of royal icing.
- Final Drying: After all your beautiful decorations are complete, I let the cookies air dry for another 6-8 hours, or until all the Christmas Cookie Frosting is completely hard to the touch. This ensures they stack well and won’t get smudged.
Tips for Success and Storage:
Creating beautiful cookies with Christmas Cookie Frosting is a labor of love, and these tips will help you enjoy the process even more!
- Humidity is Your Friend’s Enemy: Royal icing hates humidity! If you live in a humid environment, it might take longer for your icing to dry, or it might not dry as hard. A fan or a dehydrator on a low setting can be a lifesaver.
- Keep Icing Covered: Always keep your royal icing covered tightly with plastic wrap when not in use. Even a few minutes exposed to air can cause a crust to form, which will clog your piping tips.
- Practice Makes Perfect: Don’t get discouraged if your first few cookies aren’t masterpieces. I encourage you to practice piping lines, dots, and curves on a piece of parchment paper. You’ll be amazed at how quickly you improve!
- Troubleshooting Consistency: If your icing is too thin, add more sifted powdered sugar. If it’s too thick, add water drop by drop. It’s easier to add than to take away!
- Storage of Cookies: Once completely dry, your beautifully frosted Christmas cookies can be stored in an airtight container at room temperature for up to 2-3 weeks. They can also be frozen for several months, which is fantastic for getting ahead during the busy holiday season. Just make sure they are fully dry before freezing, and thaw them at room temperature in their container to prevent condensation.
- Leftover Frosting: Leftover royal icing can be stored in an airtight container in the refrigerator for up to 2 weeks. When you’re ready to use it again, let it come to room temperature, stir it well, and adjust the consistency with a few drops of water if needed.
I hope you enjoy making these festive treats as much as I do. There’s truly something special about sharing homemade cookies adorned with beautiful Christmas Cookie Frosting during the holidays!
Conclusion:
As we wrap up our culinary journey with this incredible recipe, I truly hope you’re feeling inspired and ready to get into your kitchen. I can honestly say, from personal experience, that this isn’t just another recipe; it’s a game-changer. What truly makes this recipe a must-try is its remarkable balance of simplicity and sublime flavor. It takes everyday ingredients and transforms them into something extraordinary, proving that you don’t need complex techniques to achieve show-stopping results. The texture is consistently perfect – smooth, creamy, and delightful, making it an absolute joy to work with, whether you’re a seasoned baker or just starting your adventure. The flavor profile is versatile yet distinct, a comforting hug that enhances whatever it adorns without overpowering it. I promise you, once you taste the difference this recipe makes, you’ll wonder how you ever managed without it. It’s the kind of foundational recipe that empowers you to create beautiful, delicious treats with confidence and a smile, elevating your baking from good to truly memorable. This recipe is designed to bring joy and deliciousness to your table with minimal fuss, ensuring every bite is a delightful experience. It’s not just a topping; it’s the finishing touch that speaks volumes about your care and creativity in the kitchen.
But the magic doesn’t stop there! While this recipe truly shines in its primary role – and I’m sure you already know what I’m hinting at here – its versatility is something I simply can’t rave enough about. Beyond its star performance as a glorious Christmas Cookie Frosting, imagine its potential across your baking repertoire. Consider whipping up a batch to top a classic vanilla cupcake, providing that perfect cloud-like sweetness, or creating intricate designs for festive holiday cookies that will impress everyone. For a more sophisticated touch, thin it slightly with an extra splash of milk or cream and create an elegant drizzle for a lemon poppy seed loaf or even a batch of freshly baked scones, adding a professional finish. For those cooler evenings, a dollop melted into a mug of hot chocolate can elevate your cozy drink to an entirely new level of indulgence, turning a simple beverage into a luxurious treat. Think about flavour variations too: a teaspoon of almond extract can lend a delicate, nutty note, while a hint of orange zest can introduce a bright, zesty counterpoint, perfectly complementing a wide range of desserts. You could even incorporate a touch of melted dark chocolate for a rich, decadent chocolate version, or swirl in some fruit puree for a naturally colored and flavored variation perfect for spring desserts. The possibilities truly are endless, and this recipe provides the perfect canvas for your creative whims, allowing you to adapt it to any occasion or craving. Don’t be afraid to experiment and make it uniquely yours! It’s truly a versatile foundation for so many sweet delights.
Your Kitchen, Your Masterpiece!
Now, it’s your turn. I’ve shared my passion for this recipe, and now I’m eagerly anticipating yours. There’s something incredibly satisfying about creating something delicious with your own hands, and I genuinely believe this recipe offers that joyful experience in spades. So, please, gather your ingredients, clear your counter, and dive in! Don’t worry about perfection; focus on the process, the aromas filling your kitchen, and the sheer delight of tasting your homemade creation. This isn’t just about baking; it’s about making memories, whether you’re baking for yourself, your family, or sharing with friends. It’s about the smiles, the shared moments, and the simple pleasure of a beautifully made treat. Once you’ve whipped up your batch and perhaps even put your own personal spin on it, I would absolutely love to hear about your experience. Did you find a new favorite flavour combination? Did you use it in an unexpected way? Did it bring a smile to someone’s face? Your feedback and unique twists inspire not only me but also our entire community of fellow food enthusiasts. Please share your thoughts in the comments section below – tell me what you loved, what you tried differently, and how it turned out. Or, if you’re a social media savvy baker, snap a photo of your beautiful creations and tag me! Let’s celebrate the joy of delicious food together and inspire each other to keep creating. Happy baking, my friends!
Christmas Cookie Frosting
A delicious recipe
Ingredients
-
Ingredient 1
-
Ingredient 2
-
Ingredient 3
Instructions
-
Step 1
Step 1 -
Step 2
Step 2 -
Step 3
Step 3
Important Information
Nutrition Facts (Per Serving)
It is important to consider this information as approximate and not to use it as definitive health advice.
Allergy Information
Please check ingredients for potential allergens and consult a health professional if in doubt.


Leave a Comment