

Honey Sesame Chicken is more than just a meal; it’s a culinary experience that brings the beloved flavors of your favorite takeout right into your kitchen. Imagine sinking your teeth into perfectly crispy pieces of succulent chicken, generously coated in a glistening, sweet, and savory sauce, all adorned with a sprinkle of toasted sesame seeds. This iconic dish, a true staple in Chinese-American cuisine, has captivated palates worldwide with its irresistible combination of textures and tastes. It’s a dish that effortlessly blends the comfort of home cooking with the excitement of an exotic flavor profile.
I’ve always been fascinated by how a few simple ingredients can transform into something so profoundly satisfying. The magic of Honey Sesame Chicken lies in its delightful balance – the sticky sweetness of honey beautifully complements the savory notes of soy, while a hint of ginger and garlic adds a fragrant depth. It’s a dish that evokes comfort and joy, often reminiscent of weekend family dinners or a quick, delicious weeknight treat. People adore this recipe not only for its incredible flavor profile but also for its surprisingly straightforward preparation, allowing you to recreate a restaurant-quality meal with ease. Get ready to discover your new favorite way to enjoy chicken, a dish that truly hits all the right notes.

Ingredients:
- For the Chicken:
- 2 lbs (approx. 900g) boneless, skinless chicken thighs or breasts, cut into 1-inch (2.5 cm) pieces. I personally love using thighs for their succulence and flavor, but breasts work beautifully if you prefer leaner meat.
- 1 large egg, whisked
- 1/4 cup (60ml) soy sauce (I often opt for low-sodium, giving me more control over the final saltiness)
- 1 tablespoon fresh ginger, grated or finely minced
- 2 cloves garlic, minced
- 1 teaspoon sesame oil
- 1/2 teaspoon black pepper, freshly ground
- For the Coating:
- 1 cup (120g) all-purpose flour
- 1/2 cup (60g) cornstarch (this is key for that perfect crisp!)
- 1 teaspoon baking powder (a little secret for extra airy crispness!)
- 1/2 teaspoon salt
- 1/4 teaspoon black pepper
- For Frying:
- 4-6 cups (approx. 1-1.5 liters) neutral oil for frying, such as vegetable, canola, or peanut oil. Make sure you have enough to submerge the chicken pieces.
- For the Honey Sesame Sauce:
- 1/2 cup (120ml) honey (the star of our show for that gorgeous sweetness!)
- 1/4 cup (60ml) soy sauce
- 2 tablespoons rice vinegar (unseasoned is my go-to for balance)
- 1 tablespoon sesame oil (toasted, for maximum aroma)
- 2 tablespoons light brown sugar, packed (adds a lovely depth of sweetness)
- 1 tablespoon fresh ginger, grated or finely minced (don’t skimp on this for flavor!)
- 3 cloves garlic, minced
- 1/4 cup (60ml) water or chicken broth
- 2 tablespoons cornstarch (for thickening, creating that luscious glaze)
- For Garnish:
- 2 tablespoons toasted sesame seeds (a mix of white and black looks stunning!)
- 2-3 green onions, thinly sliced (for freshness and color)
- Optional for Serving:
- Cooked white or brown rice
- Steamed broccoli or stir-fried vegetables
Preparing the Chicken:
- Cut and Prepare the Chicken: First things first, let’s get our chicken ready! I always start by patting the chicken pieces completely dry with paper towels. This is a crucial step because excess moisture can prevent the marinade from properly adhering and can also lead to a less crispy result when frying. Once dry, if you’re using chicken breasts, make sure to cut them into uniform 1-inch pieces. For thighs, you might need to trim off any excess fat before dicing. Uniform pieces ensure even cooking, which is incredibly important for this dish. I aim for bite-sized pieces so they’re easy to enjoy.
- Marinate the Chicken: In a medium bowl, combine your prepped chicken pieces with the whisked egg, 1/4 cup soy sauce, grated ginger, minced garlic, and 1 teaspoon sesame oil. Sprinkle in the 1/2 teaspoon of black pepper. Give everything a really good toss to ensure every piece of chicken is thoroughly coated in this flavorful marinade. The egg in the marinade acts as a binder for the coating, and the soy sauce, ginger, and garlic infuse the chicken with an initial layer of savory goodness. I like to let it marinate for at least 15-20 minutes at room temperature, but if you have the time, covering it and refrigerating for up to an hour or even overnight can deepen the flavor significantly. Just remember to bring it back to room temperature for about 15 minutes before coating and frying.
- Prepare the Coating Mixture: While your chicken is soaking up all that delicious marinade, let’s get our dredging station ready. In a large, shallow dish or a wide bowl, whisk together the all-purpose flour, cornstarch, baking powder, 1/2 teaspoon salt, and 1/4 teaspoon black pepper. The cornstarch here is a game-changer – it contributes to an incredibly crispy exterior, and the baking powder adds a delightful lightness to the crust, making it less dense and more enjoyable. Make sure these dry ingredients are thoroughly combined to ensure an even coating.
- Coat the Chicken Pieces: Now for the fun part – coating! Working in batches, take a few pieces of marinated chicken and drop them into the dry coating mixture. Don’t overcrowd the dish; give each piece space. Use your hands or a fork to toss and press the flour mixture onto each piece of chicken until it’s completely and evenly coated. I really emphasize pressing the coating onto the chicken; this helps it adhere better and creates a thicker, crispier crust. Once coated, transfer the chicken pieces to a clean plate or a wire rack set over a baking sheet, shaking off any excess flour. Repeat this process until all your chicken is coated. Letting the coated chicken rest for 5-10 minutes on the rack can also help the coating adhere better before frying, reducing the chance of it falling off in the hot oil. This resting time allows the moisture from the chicken to hydrate the flour, creating a stickier bond.
Making the Honey Sesame Sauce:
- Combine Sauce Ingredients (Part 1): In a medium saucepan or a deep skillet, combine the honey, 1/4 cup soy sauce, rice vinegar, 1 tablespoon toasted sesame oil, light brown sugar, grated ginger, and minced garlic. Whisk these ingredients together until the brown sugar has dissolved. This is where the magic begins, creating the base for our incredible Honey Sesame Chicken sauce. I love how the aroma starts to fill the kitchen even at this stage.
- Prepare Cornstarch Slurry: In a small separate bowl, whisk together the 1/4 cup of water or chicken broth with the 2 tablespoons of cornstarch until no lumps remain. This is your cornstarch slurry, and it’s essential for thickening the sauce to that perfect glossy consistency. Make sure it’s completely smooth before adding it to the sauce.
- Simmer and Thicken the Sauce: Place the saucepan with your sauce mixture over medium heat. Bring it to a gentle simmer, stirring occasionally. Once it’s simmering, slowly pour in the cornstarch slurry while continuously whisking. This constant whisking is important to prevent lumps and ensure a smooth, even thickening. Continue to cook and whisk for 2-3 minutes, or until the sauce has visibly thickened to a syrupy glaze consistency. It should coat the back of a spoon. If you find it’s too thick, you can add a tiny splash more water or broth. If it’s not thick enough, you can quickly mix another small slurry (1 tsp cornstarch with 1 tsp cold water) and add it in, stirring well. Once thickened, remove the sauce from the heat. Taste and Adjust: This is a crucial step! Taste the sauce. Does it need a little more sweetness? Add a touch more honey or brown sugar. A bit more tang? A splash more rice vinegar. More umami? A tiny dash more soy sauce. I always fine-tune the flavors to my liking here. Remember, it’s all about balance in this delightful Honey Sesame Chicken.
Cooking the Honey Sesame Chicken:
- Heat the Frying Oil: Pour your chosen neutral oil into a large, heavy-bottomed pot or Dutch oven. I usually use about 4-6 cups, ensuring there’s at least 2-3 inches of oil depth for frying. Place the pot over medium-high heat. You want the oil to reach a temperature of 350-375°F (175-190°C). If you have a deep-fry thermometer, this is the time to use it for accuracy. If not, a good old-fashioned trick is to drop a tiny pinch of the coating flour into the oil. If it immediately sizzles and floats to the top, your oil is ready. Be patient, as getting the oil to the right temperature is key for beautifully crispy chicken. Too low, and the chicken will be greasy; too high, and the outside will burn before the inside cooks.
- Fry the Chicken in Batches: Carefully add the coated chicken pieces to the hot oil, working in small batches. This is vital to prevent overcrowding the pot, which would lower the oil temperature too much and result in soggy chicken. I typically fry about 8-10 pieces at a time, depending on the size of my pot. Fry the chicken for about 4-6 minutes per batch, turning occasionally, until it’s a beautiful golden brown and cooked through. The internal temperature should reach 165°F (74°C). The crust should be wonderfully crisp.
- Drain the Fried Chicken: As each batch finishes cooking, use a slotted spoon or spider strainer to carefully remove the chicken from the oil. Transfer the fried chicken to a wire rack set over a baking sheet lined with paper towels. The wire rack allows air to circulate around the chicken, helping to maintain its crispiness while any excess oil drips away. Continue frying the remaining chicken in batches, ensuring the oil temperature returns to the ideal range between each batch. Don’t worry if it looks like a lot of chicken; it’ll all come together perfectly for our Honey Sesame Chicken.
Combining and Serving:
- Toss with the Sauce: Once all the chicken is fried and resting, return your saucepan with the thickened honey sesame sauce to low heat for just a moment to loosen it slightly if it’s become too thick. Immediately add all the fried chicken pieces to the saucepan. Using tongs or a large spoon, gently toss the chicken, ensuring every single piece is thoroughly coated with that irresistible, glossy sauce. Work quickly here to maintain the chicken’s crispiness while evenly distributing the flavorful glaze. This is the moment when your crispy chicken transforms into the incredible Honey Sesame Chicken you’ve been working so hard on!
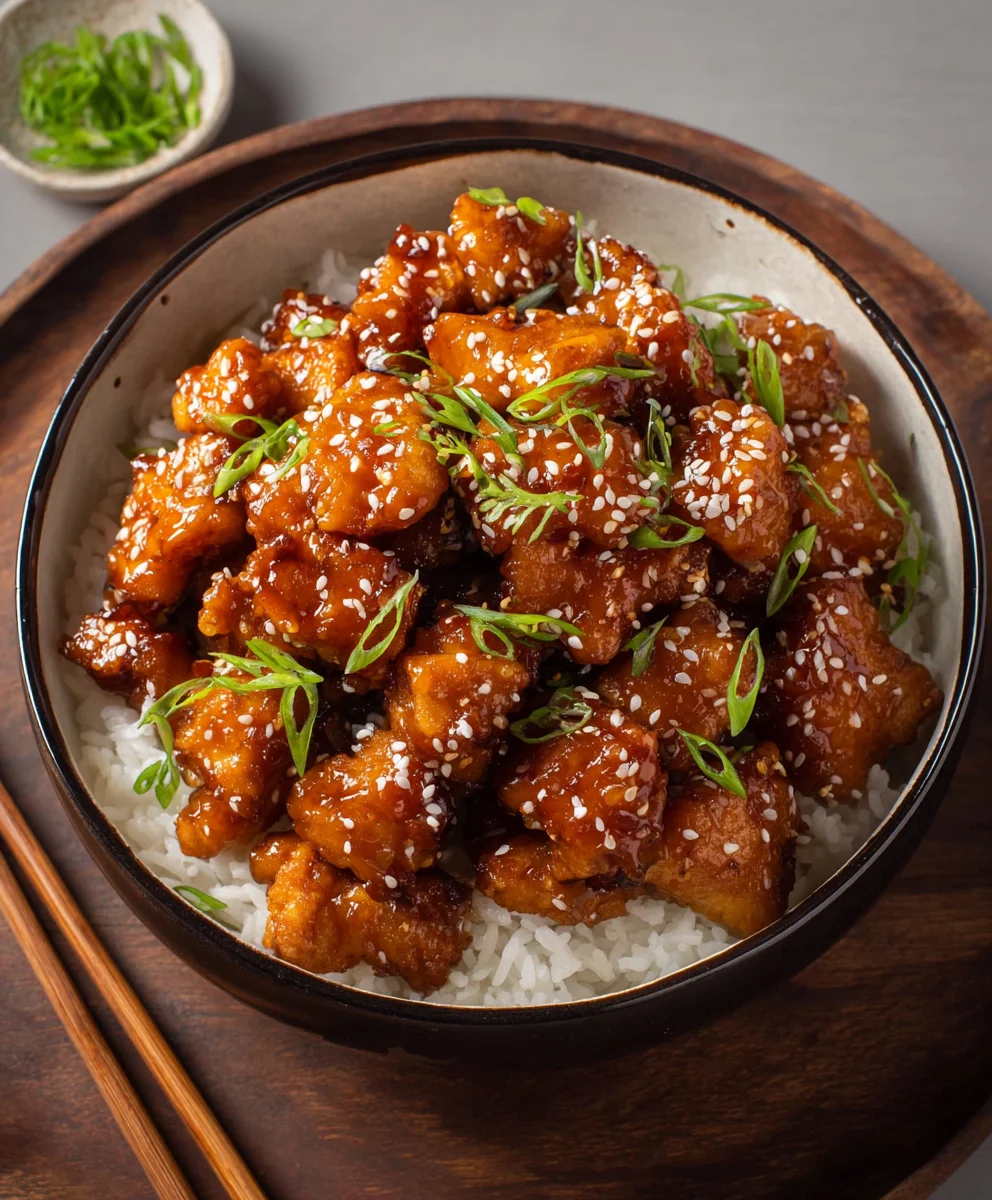
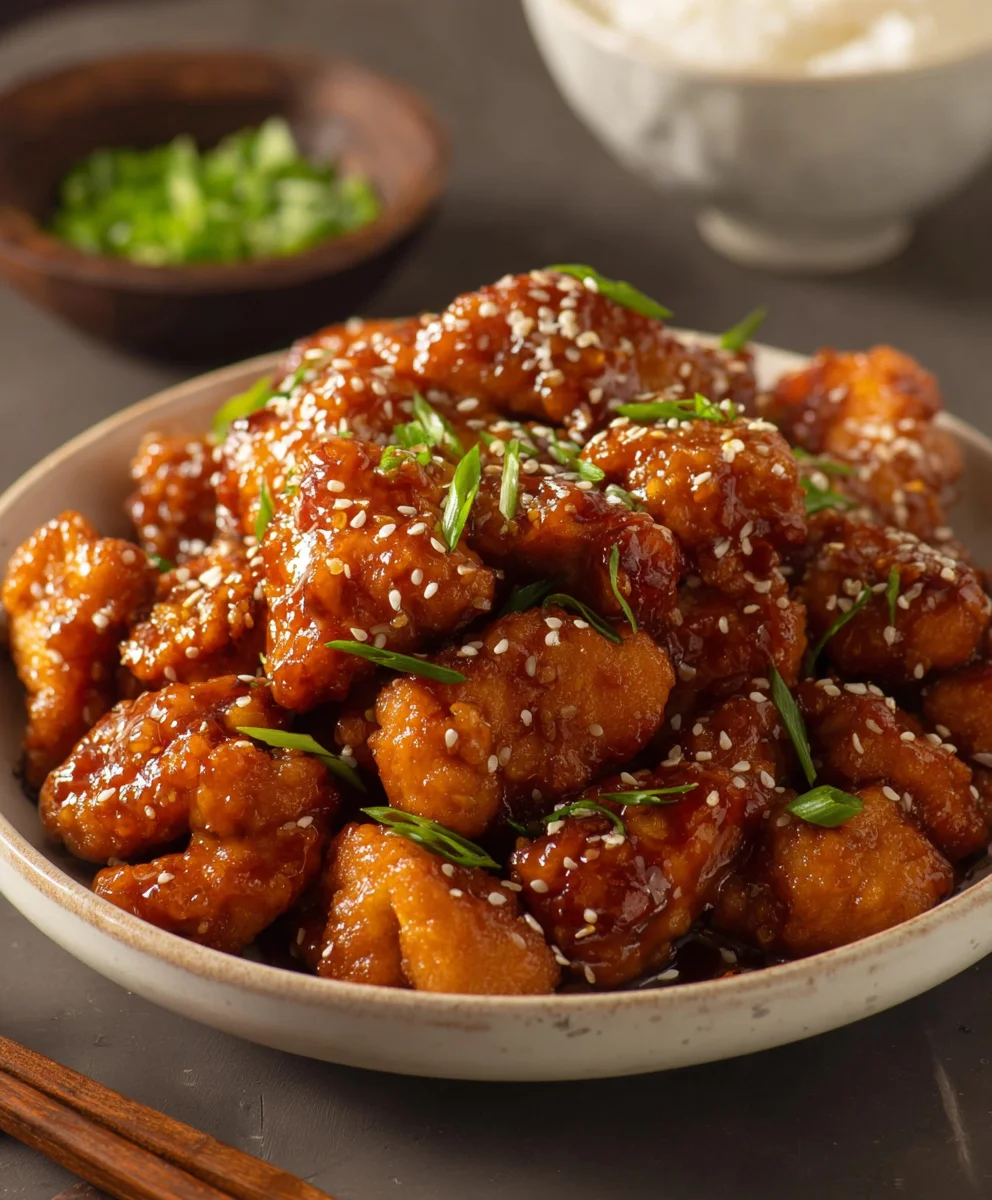
- Garnish and Serve Immediately: Transfer the sauced Honey Sesame Chicken to a serving platter. Generously sprinkle with the toasted sesame seeds and fresh, thinly sliced green onions. The sesame seeds add a delightful nutty crunch and visual appeal, while the green onions provide a burst of fresh flavor and color, really elevating the dish.
- Enjoy Your Creation: Serve your magnificent Honey Sesame Chicken immediately while it’s hot and the coating is at its crispiest! It pairs wonderfully with a side of fluffy white or brown rice to soak up all that extra sauce, and some steamed broccoli or stir-fried vegetables make for a perfectly balanced and delicious meal. I often prepare the rice and veggies while the chicken is frying, so everything is ready at the same time for a fresh, hot serving.
- Storage and Reheating (Optional but Handy!): If by some miracle you have any leftovers, store them in an airtight container in the refrigerator for up to 3-4 days. While the chicken won’t be as crispy upon reheating, the flavors will still be fantastic. To reheat, I suggest popping it into an air fryer at 350°F (175°C) for 5-7 minutes, or in an oven at 375°F (190°C) for 10-15 minutes, until heated through. This helps to restore some of the crispiness. A microwave can also work, but it won’t be as crispy.
Tips for the Perfect Honey Sesame Chicken:
- Double Fry for Extra Crispiness: For an unbelievably crispy texture, you can double-fry the chicken. Fry the chicken once for about 3-4 minutes until lightly golden and cooked through. Remove and drain. Let it rest for 10-15 minutes, then increase the oil temperature slightly to about 385°F (195°C) and fry again for 1-2 minutes until deeply golden brown and extra crispy. This second fry pushes out more moisture, resulting in an unparalleled crunch.
- Ingredient Quality Matters: While this recipe is forgiving, using fresh ginger and garlic, good quality soy sauce, and rich honey can truly elevate the final taste of your Honey Sesame Chicken.
- Don’t Rush the Sauce: Allow the sauce to simmer and thicken properly. A well-reduced, glossy sauce makes all the difference in coating the chicken perfectly. If it’s too thin, it won’t cling; if it’s too thick, it might be gummy.
- Meal Prep Hack: You can prepare the chicken pieces and have them marinated and coated ahead of time. Store the coated chicken on a wire rack in the fridge for a few hours, then just fry when you’re ready to eat. The sauce can also be made a day in advance and gently reheated.
- Spice it Up: If you enjoy a bit of heat, feel free to add a pinch of red pepper flakes to the sauce while it’s simmering. It adds a wonderful kick that complements the sweet and savory notes beautifully.
The Ultimate Weeknight Delight:
This Honey Sesame Chicken recipe is truly a labor of love that pays off with every single bite. The combination of crispy, tender chicken coated in a sticky, sweet, and savory glaze is simply irresistible. It’s a dish that looks impressive but is entirely achievable in your home kitchen, making it perfect for both special occasions and a fantastic weeknight meal. I encourage you to try it, experiment with the flavors to suit your palate, and enjoy the delicious results of your culinary efforts!
<h2>Conclusion:</h2>
<p>Well, friends, we’ve reached the end of our culinary journey for today, and I genuinely hope you’re as excited as I am about what we’ve just discussed! If there’s one recipe I could implore you to try this week, it would undoubtedly be this incredible <strong>Honey Sesame Chicken</strong>. It truly stands out as a triumph of flavor, an absolute celebration for your taste buds that will leave you wondering why you ever ordered takeout. What makes it a must-try, you ask? It’s that irresistible balance: the golden-crisp exterior of the chicken, perfectly coated in a glossy, sticky sauce that masterfully blends the sweet richness of honey with the nutty depth of sesame oil and the savory punch of soy. Every bite is a harmonious explosion, offering tender, juicy chicken enveloped in a glaze that’s both subtly sweet and wonderfully umami-rich. It’s comforting yet sophisticated, incredibly satisfying, and remarkably simple to bring to life in your own kitchen. I promise you, the aroma alone as it cooks will have everyone in your home gathering around, eager for dinner. This isn’t just another chicken dish; it’s an experience, a weeknight hero, and a testament to how simple ingredients can transform into something truly extraordinary. It’s perfect for those busy evenings when you crave something special without the fuss, and it’s equally impressive for entertaining guests. Trust me on this one, once you taste the homemade difference, there’s no going back.</p>
<h4>Elevate Your Meal: Serving Suggestions and Delicious Variations</h4>
<p>Now that you’re armed with the knowledge to create this culinary masterpiece, let’s talk about how to make it a complete feast. The classic pairing, and one I highly recommend, is serving your glistening <strong>Honey Sesame Chicken</strong> over a bed of fluffy, steamed white rice. The rice acts as a perfect canvas, soaking up every last drop of that delectable sauce. However, don’t feel limited! For a healthier twist, brown rice or even quinoa make excellent companions, adding a different texture and nutritional boost. If you’re a noodle lover, tossing it with some lo mein or rice noodles creates a fantastic one-bowl meal. And let’s not forget the vegetables! I love to serve it alongside some vibrant, stir-fried broccoli florets or crisp-tender snap peas and julienned carrots, perhaps lightly sautéed with a touch of garlic and a dash of soy sauce. The fresh crunch of vegetables provides a wonderful contrast to the tender chicken and rich sauce. For a slightly different flair, consider adding thinly sliced bell peppers or some water chestnuts directly into the pan during the last few minutes of cooking, allowing them to gently warm and absorb some of that incredible flavor. Feeling adventurous? You can easily adjust the spice level to your liking; a pinch of red pepper flakes added to the sauce, or a drizzle of sriracha at the table, will give it a fantastic kick. And for a truly restaurant-worthy presentation, always remember to garnish generously with extra toasted sesame seeds and freshly chopped green onions right before serving. These small touches not only add visual appeal but also contribute wonderful layers of flavor and texture. You could even experiment with swapping out the chicken for shrimp or firm tofu if you’re looking for an alternative protein, adapting the cooking times accordingly. The sauce is so versatile, it truly works wonders with many ingredients.</p>
<h4>Your Culinary Adventure Awaits!</h4>
<p>So there you have it, my friends. I’ve shared with you all the secrets to mastering what I believe will become a new favorite in your cooking repertoire. My biggest hope is that you don’t just read this recipe, but that you truly dive in and experience the joy of making this <strong>Honey Sesame Chicken</strong> for yourself. Gather your ingredients, put on your apron, and get ready to create something truly special. The satisfaction of seeing your family and friends enjoy a meal you’ve prepared with love is unparalleled. Don’t be shy; embrace the process, savor the aromas, and most importantly, delight in the incredible flavors. Once you’ve whipped up your own batch, I would absolutely love to hear about your experience! Did you stick to the recipe, or did you add your own creative twist? Perhaps you found a new favorite side dish, or maybe you spiced it up in a unique way. Your culinary adventures inspire me and our entire community. Please, share your photos, your triumphs, and even any questions you might have, in the comments section below or on social media. Let’s celebrate homemade deliciousness together! Happy cooking, and I can’t wait to hear all about your amazing <strong>Honey Sesame Chicken</strong> creations!</p>
Honey Sesame Chicken
A simplified take on the classic takeout favorite, featuring pan-fried crispy chicken coated in a savory sauce. Please note: This recipe is adapted to a specific ingredient list provided, which may differ from a traditional Honey Sesame Chicken recipe by not including honey, sesame oil, or fresh ginger/garlic for the sauce, providing a unique savory chicken experience.
Ingredients
-
1 ½ lb chicken breast or thighs, cut into 1-inch pieces
-
1 tsp chicken bouillon powder
-
½ tsp white pepper
-
1 tbsp water
-
2 large eggs
-
½ cup all-purpose flour
-
½ cup cornstarch
-
2 tsp baking powder
-
½ tsp salt
-
¼ cup water
-
2 tsp vegetable oil
-
3 tbsp light soy sauce
-
1 tbsp oyster sauce
-
2 tbsp rice vinegar
-
2 tbsp ketchup
Instructions
-
Step 1
Pat chicken dry. In a bowl, combine chicken with 1 egg, chicken bouillon powder, white pepper, and 1 tbsp water. Mix well and marinate for 15-20 minutes. -
Step 2
In a shallow dish, whisk together all-purpose flour, ½ cup cornstarch, baking powder, and ½ tsp salt until combined. -
Step 3
Whisk the remaining 1 egg in a separate bowl. Dip marinated chicken pieces into the whisked egg, then dredge thoroughly in the dry coating mixture, pressing to adhere. Place coated chicken on a wire rack. -
Step 4
In a small saucepan, whisk together 3 tbsp light soy sauce, oyster sauce, rice vinegar, ketchup, and ¼ cup water. Bring to a gentle simmer over medium heat. If a thicker sauce is desired, whisk 1 tsp cornstarch (from the coating mixture) with 1 tsp cold water, then add to the simmering sauce and stir continuously until it thickens to a glaze-like consistency. Remove from heat. -
Step 5
Heat 2 tsp vegetable oil in a large skillet or non-stick pan over medium-high heat. Working in batches, pan-fry chicken pieces for 4-6 minutes per side, or until golden brown, crispy, and cooked through (internal temperature reaches 165°F / 74°C). Drain any excess oil from the pan or transfer chicken to a paper towel-lined plate momentarily. -
Step 6
Add the pan-fried chicken directly into the saucepan with the prepared sauce. Toss gently but quickly to ensure all chicken pieces are evenly coated. Transfer to a serving platter and serve immediately, optionally garnished with toasted sesame seeds and sliced green onions (not included in ingredient list).
Important Information
Nutrition Facts (Per Serving)
It is important to consider this information as approximate and not to use it as definitive health advice.
Allergy Information
Please check ingredients for potential allergens and consult a health professional if in doubt.


Leave a Comment