

Reeses Cheese Ball Peanut Butter Bliss Dessert Recipe – these words alone promise an unforgettable treat, a symphony of flavors that will undoubtedly become the star of your next gathering. Have you ever wished for a dessert that combines the nostalgic comfort of your favorite candy with the elegance of a party-ready centerpiece, all with minimal effort? I certainly have, and I am absolutely thrilled to share a recipe that delivers precisely that, and so much more!
The Sweet Story Behind Dessert Cheese Balls
The dessert cheese ball concept has truly revolutionized how we approach sweet treats for entertaining. Gone are the days when “cheese ball” exclusively meant savory; now, it signifies a delightful, scoopable dip that transforms ordinary ingredients into extraordinary experiences. This particular iteration pays homage to the universally adored combination of rich chocolate and creamy peanut butter, popularized by the iconic Reese’s Peanut Butter Cups. It’s not just a dessert; it’s a celebration of pure indulgence, embodying a playful spirit that makes it perfect for any occasion, from casual family nights to elaborate holiday parties.
Why This Recipe is an Absolute Must-Make
People absolutely adore this dish for its incredible taste, featuring that perfect sweet and salty balance, its wonderfully smooth and spreadable texture, and its undeniable convenience. It’s a no-bake wonder that requires simple ingredients and minimal fuss, making it an ideal choice for busy hosts or anyone craving a quick yet impressive dessert. This Reeses Cheese Ball Peanut Butter Bliss Dessert Recipe isn’t merely a collection of instructions; it’s your secret weapon for creating memorable moments and satisfying every sweet tooth with a generous serving of pure, unadulterated bliss. Get ready to watch it disappear!

Ingredients:
- Two (2) 8-ounce packages (450g total) full-fat cream cheese, softened to room temperature
- One (1) cup (250g) creamy peanut butter (I prefer a classic, no-stir variety for consistency)
- One (1) cup (120g) powdered sugar (also known as confectioners’ sugar)
- One-half (½) cup (113g) unsalted butter, softened to room temperature
- One (1) teaspoon pure vanilla extract
- One and one-half (1½) cups (about 12-15 standard-sized, or 30-40 mini) Reese’s Peanut Butter Cups, finely chopped
- One (1) cup (170g) Reese’s Pieces candy, for coating
- One-quarter (¼) cup (about 4-5 standard-sized) Reese’s Peanut Butter Cups, reserved for garnish (optional, but highly recommended!)
- A selection of dippers: Vanilla wafers, graham cracker squares, pretzel sticks, apple slices, or even shortbread cookies
Equipment You’ll Need:
- Large mixing bowl
- Electric mixer (stand mixer with paddle attachment or hand mixer)
- Rubber spatula
- Plastic wrap
- Measuring cups and spoons
- Sharp knife and cutting board (for chopping candies)
- Serving platter
Phase 1: Preparing the Creamy Peanut Butter Base
- First things first, let’s get our foundational ingredients ready. Take your two 8-ounce packages of full-fat cream cheese out of the refrigerator at least an hour, or even two, before you plan to start mixing. It is absolutely essential that the cream cheese is fully softened to room temperature. If it’s too cold, it will be lumpy and difficult to incorporate smoothly, leading to a less-than-perfect creamy base for our “Reeses Cheese Ball Peanut Butter Bliss Dessert Recipe”. Similarly, ensure your ½ cup of unsalted butter is also at room temperature, soft enough to easily indent with your finger but not melted. This foundational step truly sets the stage for a smooth, homogenous mixture that will be the heart of your delicious dessert.
- In your large mixing bowl, preferably one compatible with an electric mixer, combine the softened cream cheese and the softened unsalted butter. Using your electric mixer on medium speed, beat these two ingredients together for about 2 to 3 minutes. Your goal here is to achieve a wonderfully light, fluffy, and completely smooth consistency. Scrape down the sides of the bowl frequently with your rubber spatula to ensure everything is getting evenly incorporated. We want absolutely no lumps of cream cheese or butter remaining; a silky, uniform texture is paramount for the ultimate “Reeses Cheese Ball Peanut Butter Bliss Dessert Recipe”. This initial creaming process also adds air to the mixture, making the final cheese ball delightfully airy, not dense.
- Once your cream cheese and butter mixture is beautifully smooth, it’s time to introduce the star flavor: peanut butter. Add the full cup of creamy peanut butter to the bowl. Continue to beat the mixture on medium speed for another 2 to 3 minutes. Again, frequent scraping of the bowl’s sides is key. You’ll observe the mixture transforming into a pale, creamy, and lusciously smooth peanut butter blend. It should smell absolutely divine at this point, a rich aroma of peanuts filling your kitchen. The consistency should be thick but easily spreadable, signaling that you’re well on your way to creating a fantastic “Reeses Cheese Ball Peanut Butter Bliss Dessert Recipe”.
Phase 2: Incorporating the Sweetness and Flavor
- Now it’s time to sweeten things up! Carefully add the one cup of powdered sugar to your peanut butter mixture. I recommend adding it gradually, or starting your mixer on a very low speed, to avoid a cloud of sugar puffing up and covering your kitchen (and yourself!). Once the sugar is mostly incorporated, increase the speed to medium and beat for another 1 to 2 minutes. The powdered sugar not only adds essential sweetness but also contributes to the smooth, melt-in-your-mouth texture of the cheese ball. It helps to thicken the mixture slightly, giving it the perfect scoopable consistency.
- Next up, for that touch of warmth and depth of flavor, add the one teaspoon of pure vanilla extract. Give the mixture one last gentle beat, just until the vanilla is fully incorporated. Be careful not to overmix at this stage; we’re just ensuring all the delicious flavors are evenly distributed throughout the base. At this point, you’ll have a wonderfully aromatic, sweet, and rich peanut butter cream cheese base. Take a moment to appreciate the smoothness and the enticing scent – it’s already tempting!
- Now for the fun part that truly makes this a “Reeses Cheese Ball Peanut Butter Bliss Dessert Recipe” – the chopped Reese’s Peanut Butter Cups. Take your 1½ cups of finely chopped Reese’s Peanut Butter Cups and add them to the bowl. Reduce your mixer speed to low, or better yet, switch to using your rubber spatula. Gently fold the chopped candy pieces into the mixture until they are evenly distributed. We don’t want to overmix here; the goal is to gently incorporate the candy, ensuring every bite of your cheese ball will have those delightful chunks of chocolate and peanut butter. The texture of these pieces adds a fantastic contrast to the creamy base.
Phase 3: Shaping and Chilling Your Reese’s Cheese Ball
- Once all your ingredients are beautifully combined and you have a thick, studded peanut butter mixture, it’s time to shape our “Reeses Cheese Ball Peanut Butter Bliss Dessert Recipe”. Using your rubber spatula, scrape all the mixture out of the bowl and onto a large piece of plastic wrap. Gather the plastic wrap around the mixture and gently begin to form it into a round, ball-like shape. Don’t worry about perfection at this stage; you can gently press and mold it through the plastic wrap. Aim for a relatively even sphere, roughly 5-6 inches in diameter.
- After you’ve shaped the mixture into a neat ball, seal the plastic wrap tightly around it. This is a critical step for both firming up the cheese ball and allowing the flavors to meld beautifully. Place the plastic-wrapped Reese’s cheese ball into the refrigerator. It needs to chill for a minimum of 2 hours, but honestly, for the best results, I recommend chilling it for 4 hours or even overnight. The longer chilling time allows the butter and cream cheese to firm up properly, making the cheese ball easier to handle and ensuring it holds its shape perfectly when served. It also gives all those incredible flavors a chance to fully develop and marry, leading to a truly blissful “Reeses Cheese Ball Peanut Butter Bliss Dessert Recipe”. Don’t rush this stage; patience here will be richly rewarded!
Phase 4: The Delicious Coating – Getting it Just Right
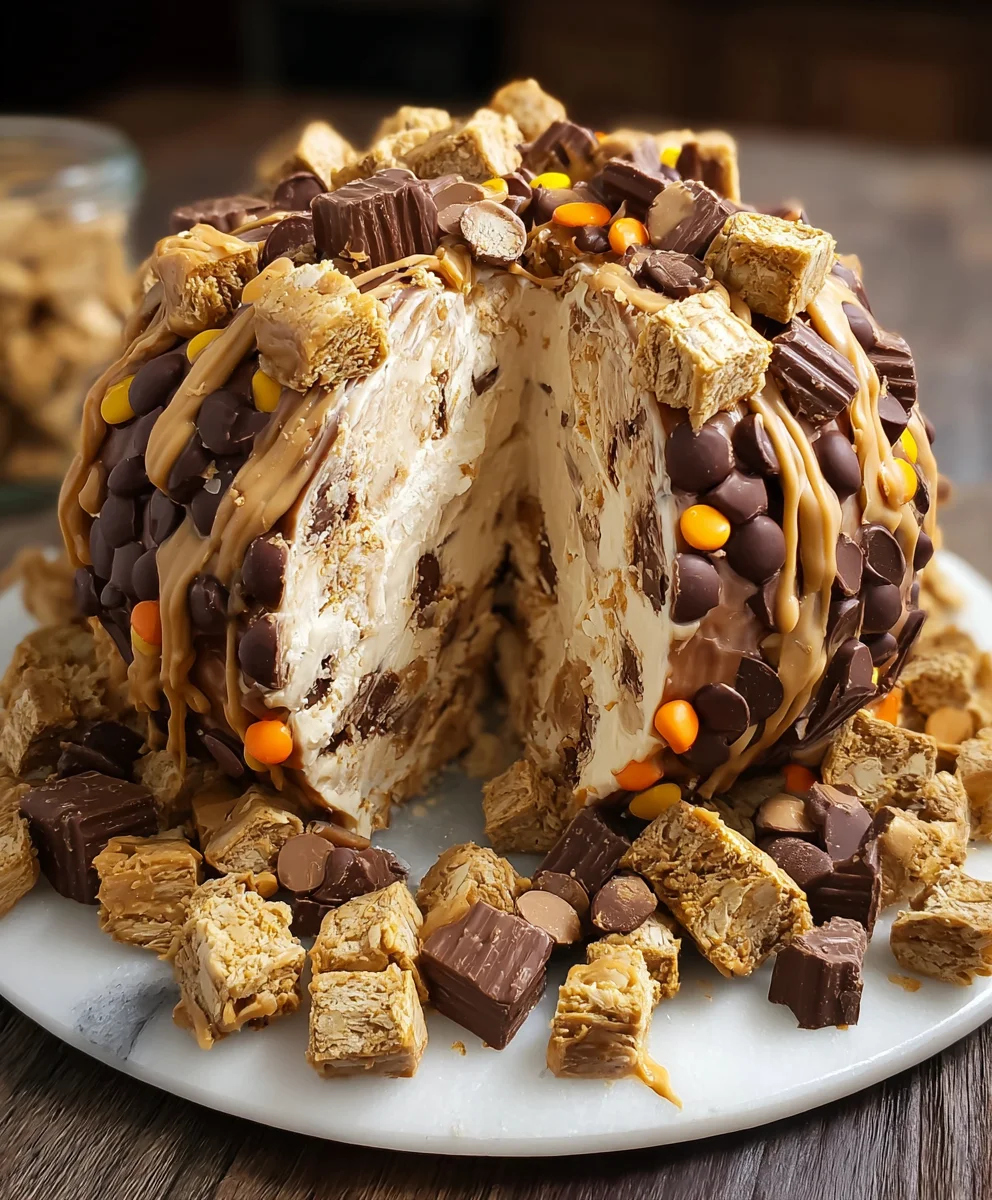
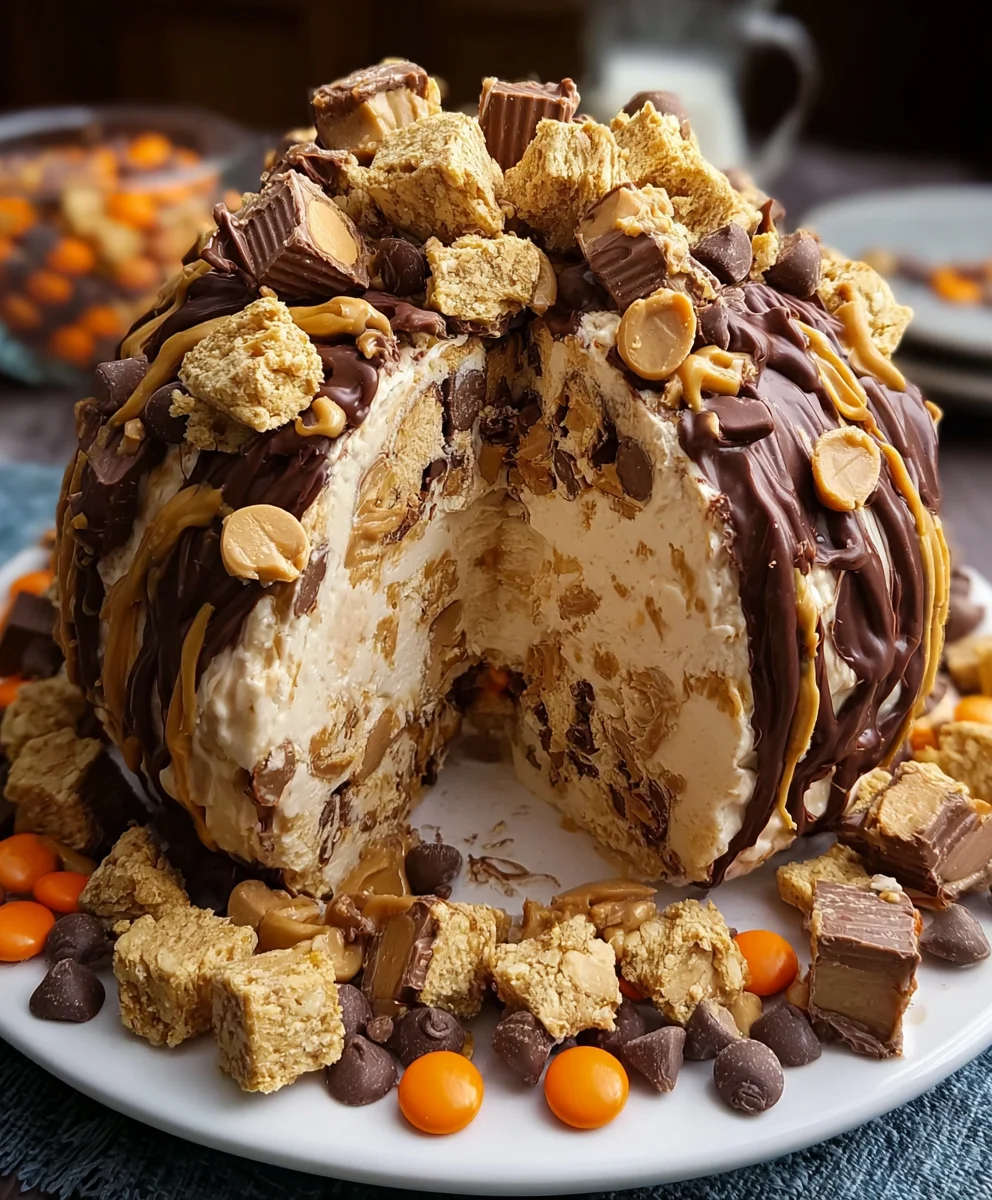
- Once your Reese’s cheese ball has thoroughly chilled and is firm to the touch, it’s time to prepare its glorious outer coating. On a clean plate or a shallow bowl, spread out the one cup of Reese’s Pieces candy. You can even give them a light crush with the back of a spoon if you prefer smaller, more uniform pieces, but I find leaving them mostly whole adds a delightful textural crunch. These vibrant orange and yellow candies will provide not only a beautiful visual appeal but also an extra burst of peanut butter flavor and a satisfying candy shell.
- Carefully unwrap your chilled Reese’s cheese ball from the plastic wrap. It should be quite firm now and easy to handle. Gently place the ball onto the plate with the Reese’s Pieces. Now, roll the cheese ball around, using your hands to gently press the candies onto its surface. Ensure every inch of the cheese ball is completely covered in the colorful Reese’s Pieces. You want a thick, even coating so that every scoop or slice gets that signature crunch and flavor. This coating is what truly transforms it into the iconic “Reeses Cheese Ball Peanut Butter Bliss Dessert Recipe”. If needed, use your hands to gently cup and reshape the ball as you roll it, ensuring it maintains a nice, round form.
- For an optional but highly recommended final touch, take your reserved ¼ cup of Reese’s Peanut Butter Cups and chop them into slightly larger, more decorative pieces. Arrange these chopped pieces artfully on top of the Reese’s Pieces coating, perhaps creating a small mound in the center or scattering them around the base. This not only adds an extra layer of visual appeal but also signals clearly what deliciousness lies within – a true “Reeses Cheese Ball Peanut Butter Bliss Dessert Recipe”. Once coated and garnished, transfer your stunning cheese ball to your chosen serving platter.
- At this point, you have a couple of options. You can serve your Reese’s cheese ball immediately, especially if it’s been chilling for a longer period. However, if you want to ensure it’s at its absolute peak firmness for serving, or if you’re not quite ready to serve, you can return it to the refrigerator for another 30 minutes to an hour. Just cover it loosely with plastic wrap to prevent it from drying out or absorbing any refrigerator odors. This extra chill time ensures the coating sets firmly and the cheese ball is perfectly solid for easy scooping.
Phase 5: Serving Your Peanut Butter Bliss
- Finally, the moment we’ve all been waiting for! Present your gorgeous “Reeses Cheese Ball Peanut Butter Bliss Dessert Recipe” on a beautiful serving platter. Arrange your selected dippers generously around the cheese ball. My personal favorites include crisp vanilla wafers for a classic sweet crunch, sturdy graham cracker squares for a comforting pairing, and slightly salty pretzel sticks which offer a wonderful sweet-and-salty contrast that enhances the peanut butter flavor. For a fresher option, crisp apple slices or pear slices also pair wonderfully, adding a nice tartness to cut through the richness.
- To serve, simply invite your guests to dive in with a spreading knife or a small spatula. Encourage them to scoop a generous portion onto their plate, ensuring they get a good mix of the creamy peanut butter base and the crunchy Reese’s Pieces coating. Then, they can use their chosen dipper to enjoy this incredibly indulgent and satisfying dessert. Each bite promises that unmistakable combination of sweet and salty, creamy and crunchy, all centered around the beloved flavors of Reese’s.
- Any leftover “Reeses Cheese Ball Peanut Butter Bliss Dessert Recipe” should be stored promptly in an airtight container in the refrigerator. When properly stored, it will remain fresh and delicious for up to 3-4 days. While it’s unlikely to last that long, it’s good to know you can enjoy this treat for a few days! If you find it becomes too firm in the refrigerator, simply let it sit at room temperature for 10-15 minutes before serving again to allow it to soften slightly, making it easier to scoop.
Tips for the Perfect Reese’s Cheese Ball Peanut Butter Bliss Dessert Recipe:
- Room Temperature is Key: I cannot stress this enough – ensure your cream cheese and butter are thoroughly softened to room temperature. This is the single most important factor for achieving a silky-smooth, lump-free base for your “Reeses Cheese Ball Peanut Butter Bliss Dessert Recipe”. If you forget, a quick trick is to microwave the cream cheese in 10-15 second bursts, being careful not to melt it. For butter, you can grate it on a box grater to speed up the softening process.
- Full-Fat Cream Cheese: Always opt for full-fat cream cheese for this recipe. Low-fat or “Neufchatel” cream cheese can result in a less rich flavor and a looser, watery consistency that won’t hold its shape as well, detracting from the true “Reeses Cheese Ball Peanut Butter Bliss Dessert Recipe” experience.
- Don’t Skip the Chill Time: The chilling process is not just about making the cheese ball firm. It also allows the flavors to deepen and meld together, resulting in a more complex and satisfying taste. Rushing this step will lead to a softer, potentially messy cheese ball that’s harder to coat and serve.
- Peanut Butter Choice: While I prefer creamy, no-stir peanut butter for consistency, you can experiment with natural peanut butter. If using natural peanut butter, ensure it’s well-stirred and fully emulsified before adding it to the mixture, as the separated oil can affect the final texture. Avoid crunchy peanut butter for the base, as the added nut pieces will alter the smooth consistency we’re aiming for.
- Customizing Your Mix-ins: Feel free to get creative with the internal mix-ins! While Reese’s Peanut Butter Cups are classic, you could also add a sprinkle of miniature chocolate chips, chopped salted peanuts for an extra crunch, or even a different type of chopped candy bar that complements peanut butter. However, for a true “Reeses Cheese Ball Peanut Butter Bliss Dessert Recipe”, stick with the iconic Reese’s products.
- Making Ahead: This “Reeses Cheese Ball Peanut Butter Bliss Dessert Recipe” is an excellent make-ahead dessert! You can prepare the cheese ball, shape it, and chill it (without the Reese’s Pieces coating) for up to 2-3 days in advance. When ready to serve, just coat it with the Reese’s Pieces and garnish. This makes entertaining a breeze!
- Presentation Matters: A beautifully presented cheese ball makes a big impression. Choose a nice platter, arrange your dippers attractively, and don’t forget that optional garnish of extra chopped Reese’s Peanut Butter Cups on top. A little bit of effort in presentation goes a long way.
- Troubleshooting – Too Soft: If your cheese ball feels too soft after the initial chill, don’t despair! Simply return it to the refrigerator for an additional hour or two. Sometimes kitchen temperatures or slight variations in ingredient temperatures can affect firmness. A longer chill will almost always resolve this.
Conclusion:
Well, my fellow dessert enthusiasts, we’ve reached the grand finale of our sweet adventure, and I truly hope you’re feeling inspired to roll up your sleeves and dive headfirst into creating something truly spectacular. This isn’t just any dessert; it’s a showstopper, a conversation starter, and quite frankly, a delicious dream come true that I’m confident will earn you rave reviews from everyone lucky enough to try a bite. We’re talking about that perfect marriage of creamy, tangy, sweet, and salty – a symphony of flavors and textures that simply defies expectations. It’s the kind of treat that looks incredibly impressive, yet is surprisingly simple to put together, making you look like a culinary genius without breaking a sweat. If there’s one recipe I could implore you to try this year, this is unequivocally it. It hits all the right notes for a party, a potluck, a holiday gathering, or even just a particularly indulgent Tuesday night.
What truly makes this Reeses Cheese Ball Peanut Butter Bliss Dessert Recipe an absolute must-try is its unparalleled ability to cater to that universal craving for peanut butter and chocolate, amplified to an extraordinary degree. It’s comforting yet exciting, familiar yet delightfully unique. The creamy base, infused with the rich, unmistakable taste of peanut butter, studded with those iconic mini Reese’s Pieces and chocolate chips, and then rolled in even more crunchy, colorful goodness, creates a textural playground that’s utterly addictive. Every scoop is a journey through velvety cream cheese, intense peanut butter, and the delightful crunch of chocolate-covered candy. It’s bold, it’s decadent, and it’s unbelievably satisfying. I promise you, once you taste this, your dessert game will never be the same. It brings joy, it brings smiles, and it creates those memorable moments around the dessert table that we all cherish.
Elevate Your Dessert Experience: Serving Suggestions & Variations
Now that you’re convinced of its deliciousness, let’s talk about how to present this masterpiece and even how to personalize it further. The beauty of this dessert cheese ball is its versatility!
- Classic Dippers: For that ultimate sweet and salty crunch, my absolute favorite pairing is mini pretzel twists or pretzel rods. The saltiness cuts through the richness of the cheese ball beautifully. Other fantastic options include graham crackers, vanilla wafers, shortbread cookies, or even apple slices and banana chips for a touch of fruitiness.
- Unexpected Pairings: Don’t be afraid to experiment! Try serving it with brownie brittle for an extra layer of chocolatey crunch, or even thin slices of brioche for a more sophisticated, bread-like vehicle.
- Party Platter Perfection: Arrange your cheese ball on a large platter surrounded by a colorful array of dippers. A few fresh mint leaves or a sprinkle of extra chopped Reese’s cups can add a beautiful visual touch.
Make It Your Own: Fun Variations to Try!
While the original Reeses Cheese Ball Peanut Butter Bliss Dessert Recipe is perfect as is, part of the fun of cooking is making a recipe your own! Here are some ideas:
- Candy Swaps: Not a Reese’s purist? No problem! You could easily substitute the Reese’s candy with chopped Snickers bars, Butterfinger pieces, M&M’s, or even chopped Oreos for a cookies-and-cream twist. The possibilities are endless!
- Nutty Additions: For an extra layer of texture and flavor, consider folding in a quarter cup of toasted pecans, walnuts, or even salted peanuts into the cheese ball mixture before chilling.
- Spiced Up: A tiny pinch of cinnamon or even a dash of pumpkin pie spice can add a subtle warmth, especially if you’re making this for a fall or winter gathering.
- Boozy Boost (Adults Only!): For a more grown-up version, a tablespoon of peanut butter whiskey or a coffee liqueur mixed into the cream cheese base can add an intriguing depth of flavor.
- Chocolate Drizzle: A simple drizzle of melted chocolate or caramel sauce over the top just before serving can elevate its presentation and add even more decadence.
So, there you have it, my friends. I truly hope I’ve convinced you to make this unforgettable dessert. It’s more than just a recipe; it’s an invitation to create joy, share happiness, and indulge in pure bliss. Please, please, please, try this Reeses Cheese Ball Peanut Butter Bliss Dessert Recipe! I am genuinely excited for you to experience the magic of it. Once you’ve whipped up your own irresistible creation, I would absolutely love to hear all about it. Share your photos, your serving ideas, your clever variations, and your feedback in the comments below. Let’s build a community of peanut butter and chocolate lovers who aren’t afraid to celebrate the sweeter side of life. Happy baking, and even happier eating!
Reeses Peanut Butter Bliss Cheese Ball Dessert Recipe
This peanut butter cheese ball delivers an indulgent explosion of flavors that transforms any gathering into a memorable occasion. Rich cream cheese blends seamlessly with smooth peanut butter while the colorful candy pieces create a stunning visual appeal that draws everyone to the dessert table. Each bite offers the perfect balance of creamy, sweet, and chocolatey notes with that unmistakable Reese’s peanut butter cup flavor that chocolate lovers crave. The beauty of this showstopper lies in its simplicity – a few minutes of preparation rewards you with a dessert that looks like you spent hours in the kitchen.
Ingredients
-
2 (8 oz) packages full-fat cream cheese, softened
-
1 cup creamy peanut butter
-
1 cup powdered sugar
-
½ cup unsalted butter, softened
-
1 tsp pure vanilla extract
-
1½ cups Reese’s Peanut Butter Cups, finely chopped
-
1 cup Reese’s Pieces candy, for coating
-
¼ cup Reese’s Peanut Butter Cups, for garnish (optional)
-
Dippers: Vanilla wafers, graham crackers, pretzel sticks, apple slices
Instructions
-
Step 1
In a large bowl, beat softened cream cheese and butter until light and fluffy (2-3 minutes). Add peanut butter and beat until smooth (2-3 minutes), scraping down the bowl sides. -
Step 2
Gradually add powdered sugar and beat until incorporated (1-2 minutes). Stir in vanilla extract. Gently fold in 1½ cups finely chopped Reese’s Peanut Butter Cups with a spatula. -
Step 3
Scrape the mixture onto a large piece of plastic wrap. Form it into a 5-6 inch round ball and seal the plastic wrap tightly. Chill in the refrigerator for at least 2 hours, or preferably 4 hours to overnight, until firm. -
Step 4
Spread 1 cup Reese’s Pieces candy on a clean plate or shallow bowl. Unwrap the chilled cheese ball and roll it in the Reese’s Pieces, gently pressing to coat completely. Optionally, garnish the top with ¼ cup chopped Reese’s Peanut Butter Cups. Transfer to a serving platter. -
Step 5
Arrange selected dippers (vanilla wafers, graham crackers, pretzel sticks, apple slices) around the cheese ball. Serve immediately or return to the refrigerator for an additional 30-60 minutes for peak firmness. Store any leftovers in an airtight container in the refrigerator for up to 3-4 days; let soften for 10-15 minutes before re-serving if too firm.
Important Information
Nutrition Facts (Per Serving)
It is important to consider this information as approximate and not to use it as definitive health advice.
Allergy Information
Please check ingredients for potential allergens and consult a health professional if in doubt.


Leave a Comment