

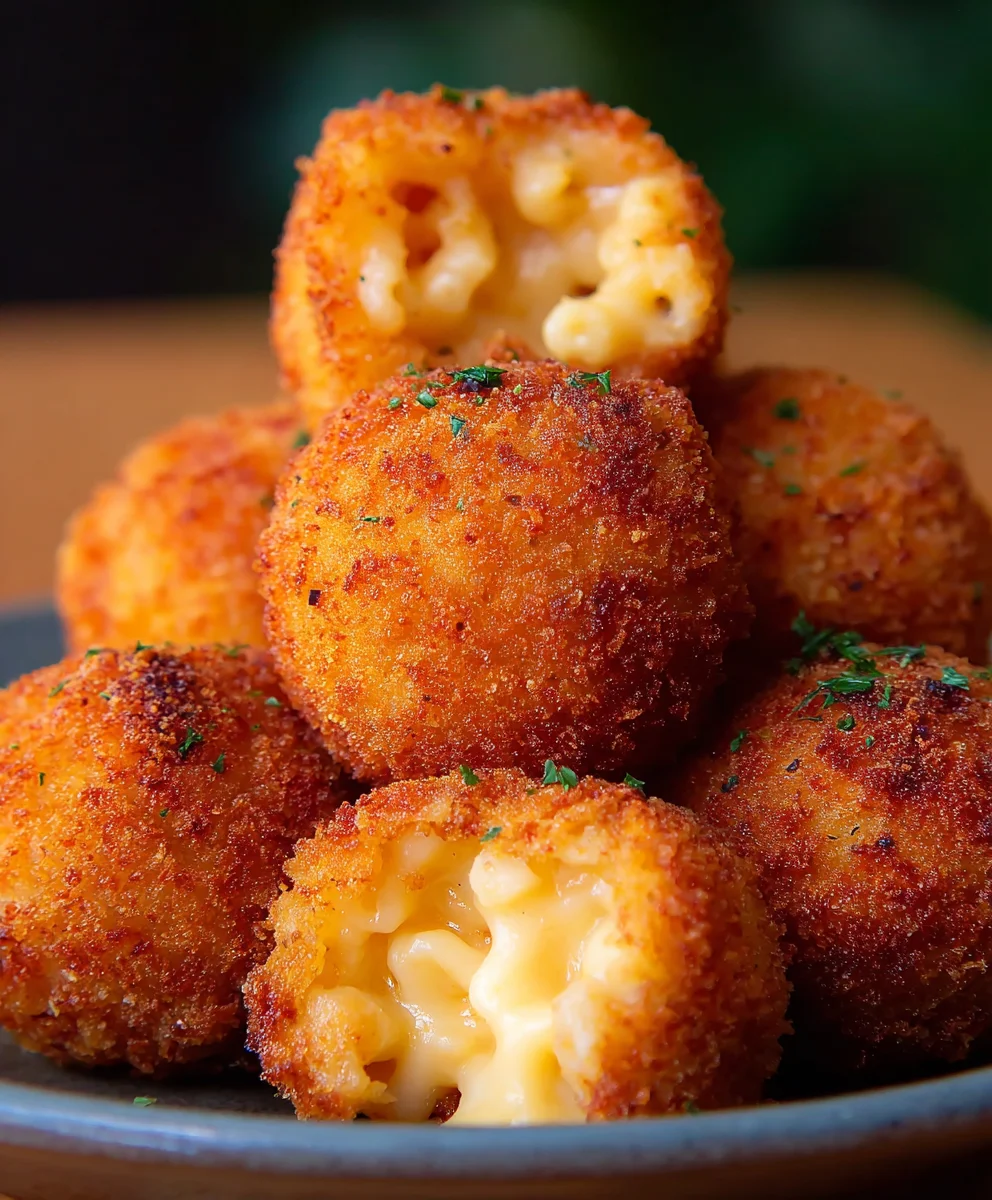
Crispy Fried Mac And Cheese Balls are more than just a snack; they’re a culinary revelation that transforms a beloved comfort classic into an irresistible, golden-brown delight. I’m talking about that perfect fusion where a rich, creamy, and wonderfully cheesy interior meets an impossibly golden and crunchy exterior. This ingenious creation takes the nostalgic warmth of homemade macaroni and cheese and elevates it into a bite-sized marvel, perfect for any occasion. From its humble origins as a simple side dish, mac and cheese has evolved, and these fried versions represent its modern, gourmet transformation—often a clever way to repurpose leftovers into a brand-new, sought-after appetizer. People adore this dish for its incredible textural contrast and the sheer indulgence of its cheesy core. There’s truly nothing quite like the satisfaction of biting into one of these perfectly golden spheres. Whether you’re hosting a party, craving a special treat, or simply looking for an innovative way to enjoy a classic, mastering the art of making Crispy Fried Mac And Cheese Balls will undoubtedly make you a kitchen hero. Get ready to impress your guests and yourself with this ultimate comfort food experience!

Ingredients:
- For the Creamy Macaroni and Cheese Base:
- 1 pound (about 450g) elbow macaroni or small shell pasta
- 6 tablespoons (85g) unsalted butter
- ½ cup (60g) all-purpose flour
- 4 cups (960ml) whole milk, warmed
- 1 teaspoon dry mustard powder (or 1 tablespoon Dijon mustard)
- ½ teaspoon garlic powder
- ¼ teaspoon freshly grated nutmeg
- 1 teaspoon fine sea salt, plus more for pasta water
- ½ teaspoon freshly ground black pepper
- 3 cups (340g) freshly grated sharp cheddar cheese
- 1 cup (115g) freshly grated Gruyere or Fontina cheese
- 4 ounces (113g) cream cheese, softened and cut into cubes
- Optional: A pinch of cayenne pepper or a dash of hot sauce for a subtle kick
- For the Crispy Breading:
- 1 ½ cups (180g) all-purpose flour, divided
- 2 teaspoons salt, divided
- 1 teaspoon black pepper, divided
- 1 teaspoon garlic powder, divided
- 4 large eggs, beaten
- 2 tablespoons whole milk or water (for egg wash)
- 4 cups (200g) Panko breadcrumbs (essential for crispiness!)
- 1 tablespoon Italian seasoning
- 1 teaspoon onion powder
- For Frying:
- 6-8 cups (about 1.5-2 liters) vegetable oil, canola oil, or peanut oil, for deep frying
- Optional: Flaky sea salt for finishing
- Optional: Fresh chopped parsley or chives, for garnish
Preparing the Creamy Macaroni and Cheese Base
- Cook the Macaroni: Bring a large pot of heavily salted water to a rolling boil over high heat. Add the elbow macaroni and cook according to package directions until it is just al dente – meaning it still has a slight bite to it. This is crucial because it will finish cooking as part of the cheese mixture, and we don’t want mushy pasta. Once cooked, drain the pasta thoroughly in a colander and set it aside. Do not rinse the pasta; the residual starch helps the sauce cling better.
- Make the Roux: In a large, heavy-bottomed pot or Dutch oven, melt the 6 tablespoons of unsalted butter over medium heat. Once the butter is fully melted and shimmering, sprinkle in ½ cup of all-purpose flour. Whisk continuously for 1 to 2 minutes, creating a smooth, pale golden paste known as a roux. This step cooks out the raw flour taste and forms the base for our thick, luscious cheese sauce. Keep the heat steady and do not let it brown too much.
- Build the Bechamel: Gradually whisk in the warmed whole milk, a little at a time, ensuring each addition is fully incorporated and smooth before adding more. Warming the milk slightly beforehand helps prevent lumps and speeds up the thickening process. Continue whisking constantly as you bring the mixture to a gentle simmer. Once it begins to simmer, reduce the heat to low and continue to cook, stirring frequently, for about 5-7 minutes, until the sauce has thickened considerably and coats the back of a spoon. It should be rich and velvety, providing a perfect foundation for our future Crispy Fried Mac And Cheese Balls.
- Add the Cheeses and Seasonings: Remove the pot from the heat. This is an important step as adding cheese directly to boiling liquid can make it seize and become grainy. Stir in the dry mustard powder (or Dijon), garlic powder, freshly grated nutmeg, 1 teaspoon of fine sea salt, and ½ teaspoon of freshly ground black pepper. Then, gradually add the grated sharp cheddar cheese, Gruyere (or Fontina), and the softened cubes of cream cheese. Stir continuously until all the cheeses are completely melted and the sauce is wonderfully smooth and creamy. The cream cheese adds an incredible richness and helps achieve an ultra-smooth, melty interior for our mac and cheese balls. Taste the sauce and adjust seasonings as needed. If you like a little extra warmth, now is the time to stir in a pinch of cayenne pepper or a dash of hot sauce.
- Combine and Cool: Add the drained elbow macaroni to the cheese sauce. Fold everything together gently but thoroughly, ensuring every piece of pasta is generously coated in the rich, creamy cheese sauce. The consistency should be thick enough that it holds its shape slightly.
- Crucial Chilling Step: Transfer the mac and cheese mixture to a large, shallow baking dish or a few smaller ones. Press it down firmly into an even layer. Cover the dish tightly with plastic wrap, pressing the wrap directly onto the surface of the mac and cheese to prevent a skin from forming. Refrigerate for a minimum of 4 hours, but ideally overnight. This chilling period is absolutely vital. It allows the mac and cheese to firm up significantly, making it much easier to scoop and shape into balls without them falling apart. This solidity is the first secret to perfect Crispy Fried Mac And Cheese Balls. If you skip or rush this step, your balls will be messy and difficult to work with.
Chilling and Shaping the Mac and Cheese Balls
- Scoop the Mac and Cheese: Once your mac and cheese base is thoroughly chilled and firm, it’s time to shape it. Using a cookie scoop (a 1.5 to 2-tablespoon scoop works best for appetizer-sized balls), scoop out portions of the cold mac and cheese. Uniformity in size is key for even cooking during frying.
- Shape the Balls: Gently but firmly roll each scooped portion between the palms of your hands to form tight, compact balls. The firmer and tighter the ball, the less likely it is to fall apart during the breading and frying process. Place the shaped balls onto a parchment paper-lined baking sheet.
- Second Chill (Pre-Freezing): Once all the mac and cheese has been rolled into balls, place the baking sheet in the freezer for about 30-60 minutes. This pre-freezing step helps the balls hold their shape even better when you move them through the breading station and provides an extra layer of structural integrity for the frying process. This ensures your Crispy Fried Mac And Cheese Balls maintain their spherical perfection.
Breading the Mac and Cheese Balls
-
Set Up Your Breading Stations: Prepare a three-station breading assembly line. This organized approach makes the process efficient and cleaner.
- Station 1 (Flour): On a shallow plate or in a wide, shallow bowl, combine 1 cup of all-purpose flour with 1 teaspoon of salt, ½ teaspoon of black pepper, and ½ teaspoon of garlic powder. Whisk these together until well combined.
- Station 2 (Egg Wash): In a second wide, shallow bowl, whisk together the 4 large eggs with 2 tablespoons of whole milk or water until smooth and thoroughly combined.
- Station 3 (Panko Breadcrumbs): On a third wide, shallow plate or bowl, combine the 4 cups of Panko breadcrumbs with the 1 tablespoon of Italian seasoning, 1 teaspoon of onion powder, 1 teaspoon of salt, ½ teaspoon of black pepper, and ½ teaspoon of garlic powder. Mix thoroughly to distribute the seasonings evenly. Panko breadcrumbs are essential here; their larger, flakier texture is what gives these mac and cheese balls their incredible, satisfying crunch.
-
Bread Each Mac and Cheese Ball: Working with one mac and cheese ball at a time, follow these steps precisely:
- Flour: Roll the ball gently in the seasoned flour, ensuring it’s completely coated. Tap off any excess flour – you want a light, even dusting, not a thick cakey layer.
- Egg Wash: Dip the floured ball into the egg wash, making sure it’s fully submerged and coated. Allow any excess egg to drip off for a couple of seconds.
- Panko: Transfer the egg-washed ball to the seasoned Panko breadcrumbs. Roll and press firmly into the Panko, using your hands to ensure a thick, even, and complete coating. Don’t be shy; really press the Panko onto the surface to ensure maximum crispiness when fried. The more Panko adheres, the crispier your Crispy Fried Mac And Cheese Balls will be.
- Final Chill: Place the fully breaded mac and cheese balls back onto a clean parchment-lined baking sheet. Once all the balls are breaded, return the baking sheet to the refrigerator for at least 30 minutes. This final chilling period allows the breading to set and adhere firmly to the mac and cheese, significantly reducing the chance of it separating during frying. At this point, you can also freeze the breaded balls for up to a month in an airtight container for future enjoyment; simply fry directly from frozen, adding a couple of extra minutes to the frying time.
Frying the Crispy Mac and Cheese Balls
- Prepare for Frying: Set up your frying station in a safe area. Pour 6-8 cups of vegetable, canola, or peanut oil into a large, heavy-bottomed pot, Dutch oven, or deep fryer. The oil should be deep enough to fully submerge the mac and cheese balls, typically 2-3 inches. Attach a deep-fry thermometer to the side of the pot. Place a wire rack over a few layers of paper towels near your frying station to drain the fried balls.
- Heat the Oil: Heat the oil over medium-high heat until it reaches a consistent temperature of 350-360°F (175-180°C). Maintaining the correct oil temperature is paramount for achieving truly Crispy Fried Mac And Cheese Balls. If the oil is too cool, the balls will absorb too much oil and become greasy. If it’s too hot, the exterior will burn before the interior cheese has a chance to fully melt and become gooey.
- Fry in Batches: Carefully lower 3-5 breaded mac and cheese balls into the hot oil using a slotted spoon or spider. Do not overcrowd the pot, as this will drastically lower the oil temperature and lead to uneven, greasy results. Give them enough space to fry properly.
- Cook to Golden Perfection: Fry the mac and cheese balls for about 3-5 minutes, turning them occasionally with the slotted spoon or spider to ensure even browning on all sides. They should transform into a beautiful, deep golden-brown color and boast an incredibly crispy exterior. You’ll know they are ready when they look perfectly crunchy and the internal cheese is piping hot and gloriously gooey (you might even see a tiny bit of cheese bubbling out!).
- Drain and Season: Once golden and crispy, carefully remove the mac and cheese balls from the oil using the slotted spoon or spider. Transfer them immediately to the prepared wire rack to drain any excess oil. While they are still hot, sprinkle them with a pinch of flaky sea salt. This little touch enhances their flavor and adds an extra textural dimension to the “Crispy Fried Mac And Cheese Balls”.
- Repeat and Maintain Temperature: Allow the oil temperature to return to 350-360°F (175-180°C) between batches before adding more mac and cheese balls. Continue frying in batches until all the balls are cooked.
Finishing Touches and Serving
- Garnish (Optional): For a pop of color and fresh flavor, sprinkle the hot Crispy Fried Mac And Cheese Balls with some freshly chopped parsley or chives just before serving.
- Serve Immediately: These delicious crispy bites are best enjoyed hot, straight out of the fryer, when the contrast between the molten, creamy cheese interior and the crunchy, golden exterior is at its peak. The cheese will be wonderfully stringy and the breading perfectly crisp.
- Dipping Sauces: While fantastic on their own, Crispy Fried Mac And Cheese Balls pair beautifully with a variety of dipping sauces. Consider serving them with a warm marinara sauce, a tangy ranch dressing, a spicy Sriracha aioli, a smoky BBQ sauce, or even a classic ketchup. You can elevate the experience by offering a homemade version of one of these sauces. No matter how you serve them, these crispy fried delights are guaranteed to be a hit!

Conclusion:
My culinary journey with these exceptional
Crispy Fried Mac And Cheese Balls
has truly been a revelation, and I am absolutely convinced that once you experience them, they will become an instant legend in your kitchen, just as they have in mine. This isn’t just another snack; it’s a celebration of comfort food elevated to an art form, a symphony of textures and flavors that dance on your palate. Imagine that initial, satisfying crunch as your teeth break through the golden, perfectly seasoned crust, giving way to an incredibly creamy, molten interior of rich, gooey mac and cheese. It’s an explosion of cheesy goodness, a warm hug for your soul, and frankly, a truly unforgettable bite. I’ve found that the simple act of preparing these brings a unique joy, and the sheer delight on the faces of friends and family when they taste them is utterly priceless. They are the ultimate party appetizer, a sensational side dish, or simply a luxurious treat for those moments when only pure indulgence will do.
Now, let’s talk about enhancing this already perfect experience. While these beauties are phenomenal on their own, a carefully chosen accompaniment can truly elevate them. For classic comfort, a vibrant, homemade marinara sauce offers a tangy counterpoint that cuts through the richness beautifully. If you’re craving something with a bit more zing, a zesty ranch or a creamy garlic aioli works wonders, adding a cool, herbaceous note. For those who appreciate a kick, a spicy sriracha aioli or a smoky chipotle mayo provides a delightful warmth and a touch of heat that complements the cheese magnificently. Don’t limit yourself to just dips; consider serving them alongside a crisp, refreshing green salad dressed with a light vinaigrette to balance the richness, or perhaps a tangy coleslaw. They also make an incredible companion to grilled chicken, a juicy burger, or even a tender steak, transforming an ordinary meal into something truly special.
But the adventure doesn’t have to stop there! I encourage you to unleash your inner chef and experiment with delightful variations that can make this recipe uniquely yours. For a different flavor profile, try incorporating a blend of cheeses into your mac and cheese base – perhaps some smoky gouda for depth, sharp cheddar for tang, or Monterey Jack for extra meltiness. A touch of pepper jack will introduce a subtle heat that really awakens the palate. Imagine mixing in some crispy, crumbled bacon bits, finely diced jalapeños for a spicy surprise, or even a hint of roasted garlic or smoked paprika into the mac and cheese mixture before chilling. For an extra layer of flavor and aroma, a sprinkle of fresh chives or finely chopped parsley can brighten up the dish. You could even play with the breading; adding a tablespoon of grated Parmesan cheese to your panko breadcrumbs will give you an even cheesier crust with an irresistible nutty undertone. While the deep-fried version is undeniably the pinnacle of crispy perfection, for those seeking a slightly lighter touch, I’ve had success with air-frying them to a golden crispness, offering a fantastic alternative without sacrificing too much of that desirable crunch.
Ultimately, my greatest hope is that you’ll feel inspired to roll up your sleeves and give these incredible
Crispy Fried Mac And Cheese Balls
a try. Don’t be intimidated by the frying process; it’s surprisingly straightforward, and the rewards are immeasurable. The joy of creating something so utterly delicious, so perfectly satisfying, is a culinary pleasure everyone deserves to experience. I truly believe that once you bite into that crispy, creamy, cheesy goodness, you’ll understand exactly why I’m so passionate about this recipe. Please, when you make them, I’d absolutely love to see your creations! Snap a photo, share your thoughts in the comments, tell me about any exciting variations you tried, or what dips became your personal favorite. Your feedback and culinary adventures inspire me and contribute to our wonderful community of food lovers. Let’s make some magic in the kitchen!
Crispy Fried Mac And Cheese Balls
These Crispy Fried Mac And Cheese Balls are a culinary revelation! A rich, creamy, cheesy interior meets an impossibly golden, crunchy exterior, elevating a classic into a bite-sized marvel. My brother brought these to his office holiday party, and his coworkers literally formed a line. His boss asked him to cater the next event just for these. Even my picky mother-in-law, who usually just picks at party food, ate six and asked for the recipe! Perfect for any occasion, they’re best fresh and hot, but can be prepped and chilled or frozen for convenience.
Ingredients
-
1 pound (450g) elbow macaroni or small shell pasta
-
6 tablespoons (85g) unsalted butter
-
½ cup (60g) all-purpose flour
-
4 cups (960ml) whole milk, warmed
-
1 teaspoon dry mustard powder (or 1 tablespoon Dijon mustard)
-
½ teaspoon garlic powder
-
¼ teaspoon freshly grated nutmeg
-
1 teaspoon fine sea salt, plus more for pasta water
-
½ teaspoon freshly ground black pepper
-
3 cups (340g) freshly grated sharp cheddar cheese
-
1 cup (115g) freshly grated Gruyere or Fontina cheese
-
4 ounces (113g) cream cheese, softened and cubed
-
Optional: Pinch of cayenne pepper or dash of hot sauce
-
1 ½ cups (180g) all-purpose flour, divided (1 cup for coating, ½ cup for seasoning)
-
2 teaspoons salt, divided (1 tsp for flour, 1 tsp for Panko)
-
1 teaspoon black pepper, divided (½ tsp for flour, ½ tsp for Panko)
-
1 teaspoon garlic powder, divided (½ tsp for flour, ½ tsp for Panko)
-
4 large eggs, beaten
-
2 tablespoons whole milk or water (for egg wash)
-
4 cups (200g) Panko breadcrumbs
-
1 tablespoon Italian seasoning
-
1 teaspoon onion powder
-
6-8 cups (1.5-2 liters) vegetable, canola, or peanut oil, for deep frying
-
Optional: Flaky sea salt for finishing
-
Optional: Fresh chopped parsley or chives, for garnish
Instructions
-
Step 1
Cook 1 lb macaroni in heavily salted water until al dente; drain. In a large pot, melt 6 tbsp butter, then whisk in ½ cup flour for 1-2 minutes to make a roux. Gradually whisk in 4 cups warmed milk, bringing to a simmer and cooking 5-7 minutes until thickened. Remove from heat; stir in mustard powder, ½ tsp garlic powder, nutmeg, 1 tsp salt, ½ tsp pepper. Gradually add cheddar, Gruyere/Fontina, and cream cheese until melted and smooth. Fold in drained macaroni. Taste and adjust seasonings (add cayenne/hot sauce if desired). -
Step 2
Transfer mac and cheese to a shallow dish, press firmly, and cover tightly with plastic wrap directly on the surface. Refrigerate for at least 4 hours, or ideally overnight, until very firm. This chilling is crucial for shaping. -
Step 3
Using a 1.5-2 tbsp scoop, portion the cold mac and cheese. Roll each portion firmly into a tight ball between your palms. Place shaped balls on a parchment-lined baking sheet and freeze for 30-60 minutes to firm them further. -
Step 4
Prepare three shallow bowls: 1) 1 cup flour, 1 tsp salt, ½ tsp pepper, ½ tsp garlic powder, whisked. 2) 4 large eggs, 2 tbsp milk/water, whisked. 3) 4 cups Panko breadcrumbs, 1 tbsp Italian seasoning, 1 tsp onion powder, 1 tsp salt, ½ tsp pepper, ½ tsp garlic powder, mixed well. Panko is essential for crispiness! -
Step 5
Working one at a time, roll each pre-frozen ball in seasoned flour (tap off excess), then dip in egg wash (let excess drip off), then press firmly into seasoned Panko breadcrumbs, ensuring a thick, even coating. Place breaded balls on a clean parchment-lined baking sheet. -
Step 6
Refrigerate breaded balls for at least 30 minutes to set the coating. For longer storage, freeze balls in an airtight container for up to a month; fry directly from frozen, adding a couple of extra minutes to cooking time. -
Step 7
Heat 6-8 cups vegetable oil in a deep pot to 350-360°F (175-180°C). Place a wire rack over paper towels nearby. Carefully lower 3-5 balls into the hot oil (do not overcrowd). Fry for 3-5 minutes, turning occasionally, until deep golden-brown and crispy, and cheese is gooey. Remove to the wire rack; sprinkle with flaky sea salt while hot. Allow oil to return to temperature between batches. -
Step 8
Garnish with fresh parsley or chives if desired. Serve hot with your favorite dipping sauces like marinara, ranch, Sriracha aioli, or BBQ sauce. Enjoy the ultimate contrast of molten cheese and a crunchy exterior!
Important Information
Nutrition Facts (Per Serving)
It is important to consider this information as approximate and not to use it as definitive health advice.
Allergy Information
Please check ingredients for potential allergens and consult a health professional if in doubt.
Leave a Comment