

Chocolate Chess Pie is more than just a dessert; it’s a beloved culinary cornerstone of Southern hospitality, a rich, fudgy dream lovingly baked into a flaky, buttery crust. From the very first spoonful, you’re transported to a simpler time, where comfort food reigns supreme and every bite is a testament to pure, unadulterated chocolate bliss. I’ve always been captivated by its humble origins and the sheer decadence it delivers with such simple ingredients.
Historically, chess pies emerged from the necessity and ingenuity of Southern kitchens, often relying on pantry staples like sugar, eggs, butter, and cornmeal or flour. The “chess” in its name is a charming mystery, with theories ranging from “it’s just pie” to a derivation of “cheese pie” (referring to the filling’s texture) or even “pie chest” where they were stored. Regardless of its etymology, what truly endures is the pie’s incredible taste and texture – a perfect harmony between a dense, moist brownie and a silky, sweet custard.
Why This Classic Chocolate Chess Pie Remains a Firm Favorite
People adore this particular pie for countless reasons. It’s incredibly easy to prepare, making it an ideal choice for both novice bakers and seasoned pros seeking a reliable crowd-pleaser. The filling, which bakes up with a distinct, slightly crackled top and a molten, intensely chocolatey interior, offers a textural experience unlike any other. It’s rich without being overly heavy, sweet without being cloying, and carries a depth of flavor that satisfies even the most ardent chocolate cravings. This classic Chocolate Chess Pie truly embodies the spirit of homemade goodness, offering a comforting and profoundly delicious experience that has been cherished for generations.

Ingredients:
- For the Chocolate Chess Pie Filling:
- 1 ½ cups granulated sugar
- ½ cup unsweetened cocoa powder (I love using a good quality Dutch-processed cocoa for an extra rich, dark chocolate flavor!)
- ¼ cup all-purpose flour
- ½ teaspoon salt (don’t skip this, it really balances the sweetness!)
- ½ cup (1 stick) unsalted butter, melted
- 2 large eggs, at room temperature
- 1 teaspoon pure vanilla extract (the good stuff makes a difference!)
- ¼ cup whole milk
- 1 tablespoon white vinegar (this is a classic chess pie secret for a slightly tangy balance and a tender texture!)
- For the Pie Crust:
- 1 (9-inch) unbaked pie crust (you can use a store-bought refrigerated pie crust for convenience, or your favorite homemade recipe. Just make sure it’s ready to be filled!)
- Optional for Serving:
- Freshly whipped cream
- Vanilla ice cream
- Fresh raspberries or strawberries
- A dusting of extra cocoa powder or powdered sugar
Crafting the Rich Chocolate Chess Pie Filling
Alright, let’s dive into making the star of the show – our incredibly rich and decadent Chocolate Chess Pie filling. This is where all the magic happens, transforming simple ingredients into a dessert that’s truly swoon-worthy.
- Prepare Your Oven and Pie Crust: First things first, let’s get our oven ready. Preheat your oven to 350°F (175°C). While it’s heating up, grab your unbaked 9-inch pie crust. If you’re using a store-bought crust from the refrigerator, let it sit out for about 10-15 minutes to come closer to room temperature, which makes it more pliable and less prone to cracking when you handle it. Carefully unroll it and fit it into your pie plate. Take a fork and gently prick the bottom and sides of the crust all over. This helps to prevent the crust from puffing up excessively during baking and ensures a nice, even foundation for our filling. We want to avoid a soggy bottom, and a few pricks go a long way in achieving that perfect crispness. Place the prepared pie crust on a baking sheet; this makes it much easier to transfer in and out of the oven once filled.
- Melt the Butter: In a small, microwave-safe bowl or a small saucepan over low heat, melt your ½ cup (1 stick) of unsalted butter. We want it completely melted but not browned or boiling. Once it’s liquid gold, set it aside to cool slightly. It’s important for the butter to be warm but not hot when we incorporate it with the eggs later, as hot butter can inadvertently cook the eggs and lead to a scrambled texture rather than a smooth filling.
- Whisk Together the Dry Ingredients: Now, let’s combine our dry components. In a large mixing bowl, measure out your 1 ½ cups of granulated sugar, ½ cup of unsweetened cocoa powder, ¼ cup of all-purpose flour, and ½ teaspoon of salt. I always recommend using a whisk for this step. Whisk these ingredients together thoroughly until they are completely combined and there are no lumps of cocoa powder or flour. You want a uniform, light brown, sandy mixture. Taking the time to properly whisk the dry ingredients ensures that the flour and cocoa are evenly distributed throughout the sugar, preventing pockets of unmixed ingredients and guaranteeing a perfectly smooth, consistent texture in your finished pie. This is a crucial step for that signature silky smooth chess pie texture!
- Combine the Wet Ingredients (Except Butter): In a separate medium-sized bowl, crack your two large eggs. If your eggs aren’t at room temperature, you can quickly bring them up to temp by placing them in a bowl of warm (not hot!) water for about 5-10 minutes. Room temperature eggs emulsify better and create a more uniform mixture. Add the 1 teaspoon of pure vanilla extract, ¼ cup of whole milk, and the 1 tablespoon of white vinegar to the eggs. Whisk these wet ingredients vigorously until everything is well combined and the mixture is light yellow and slightly frothy. The vinegar, while seemingly unusual, is a classic ingredient in chess pies. It provides a subtle tang that beautifully cuts through the richness and sweetness of the chocolate, preventing the pie from being overly cloying. It also contributes to the pie’s characteristic tender, almost custardy texture.
- Incorporate the Melted Butter: Now, we’ll slowly drizzle the slightly cooled melted butter into your wet ingredient mixture (eggs, milk, vanilla, vinegar) while continuously whisking. Pouring it in slowly and whisking constantly helps to emulsify the butter into the eggs and milk, creating a homogenous base. This prevents the butter from separating or pooling at the bottom of your filling, which could lead to an uneven texture in the baked pie. Continue whisking until the mixture is glossy and well combined.
- Combine Wet and Dry Mixtures: This is where our Chocolate Chess Pie filling truly comes to life! Pour the wet ingredient mixture (with the butter incorporated) directly into the large bowl containing your whisked dry ingredients. Now, using your whisk, gently mix everything together. Start slowly to avoid a cloud of cocoa powder, then gradually increase your speed. Whisk until the mixture is completely smooth and homogeneous. You should see a glossy, thick, dark chocolate batter. Make sure there are no streaks of dry ingredients remaining at the bottom or sides of the bowl. However, be careful not to overmix at this stage. Once the flour is incorporated, excessive mixing can develop the gluten too much, potentially leading to a tougher rather than tender pie. Just mix until everything is combined and beautifully smooth. The consistency should be pourable but noticeably thick and rich.
Assembling and Baking Your Chocolate Chess Pie
With our luscious Chocolate Chess Pie filling ready, it’s time to bring it all together and let the oven do its work. The baking process for a chess pie is quite specific, aiming for that perfect balance of a set, slightly crinkly top and a wonderfully rich, fudgy interior.
- Pour into the Pie Crust: Carefully pour the chocolate filling into your prepared unbaked pie crust. You’ll notice the filling is wonderfully thick and dark. Use a rubber spatula to scrape every last bit of that deliciousness from the bowl into the crust. Gently tap the pie plate on your counter a few times to release any air bubbles and ensure the filling settles evenly into the crust. The filling should reach almost to the top edge of the crust, leaving just a small lip for the crust to develop and prevent overflow.
-
Bake the Pie: Transfer your pie on its baking sheet to the preheated 350°F (175°C) oven. Place it on the middle rack for optimal, even baking. The initial baking time will be approximately 45-55 minutes. However, baking times can vary significantly based on your oven, so keep a close eye on it.
- Checking for Doneness: The pie is done when the edges are set, and the center still has a slight jiggle to it, similar to a very soft jello. The top surface of the pie will likely develop a beautiful, shiny, crackled crust – this is perfectly normal and characteristic of a traditional chess pie! A quick way to test is to gently shake the pie plate; if the edges are firm and only the very center quivers slightly, it’s ready. Avoid overbaking, as this can lead to a dry, crumbly texture rather than the desired fudgy, moist interior.
- Protecting the Crust: If you notice the edges of your pie crust are browning too quickly during baking, you can create a pie shield by loosely covering the edges with aluminum foil. This will protect the delicate crust from burning while allowing the filling to continue baking to perfection. This little trick is a baker’s best friend for ensuring a golden-brown crust, not a dark, burnt one.
- Initial Cooling: Once the pie is baked to perfection, carefully remove it from the oven using oven mitts. Leave it on the baking sheet for a few minutes before transferring it.
Cooling and Enjoying Your Masterpiece
The cooling phase is just as important as the baking for a Chocolate Chess Pie. This is where the pie truly sets, developing its rich, dense, and fudgy texture. Patience is key here, no matter how tempting that warm chocolate aroma is!
- Transfer to a Wire Rack: After its brief rest on the baking sheet, carefully transfer the pie, still in its pie plate, to a wire cooling rack. This allows air to circulate around the entire pie, ensuring even cooling and preventing the bottom crust from becoming soggy from trapped heat.
- Cool Completely: Now for the hardest part – patience! Allow the Chocolate Chess Pie to cool completely at room temperature for at least 3-4 hours, or even longer, up to 6 hours. This extended cooling time is absolutely crucial for the pie to set properly. If you cut into it too soon, the filling will be runny and not have the characteristic fudgy, dense texture we’re aiming for. As it cools, the internal structure will firm up, becoming that irresistible, rich custard-like consistency. You’ll notice the pie might slightly sink in the center as it cools, and those beautiful cracks on top will become more defined – all signs of a perfectly baked chess pie.
-
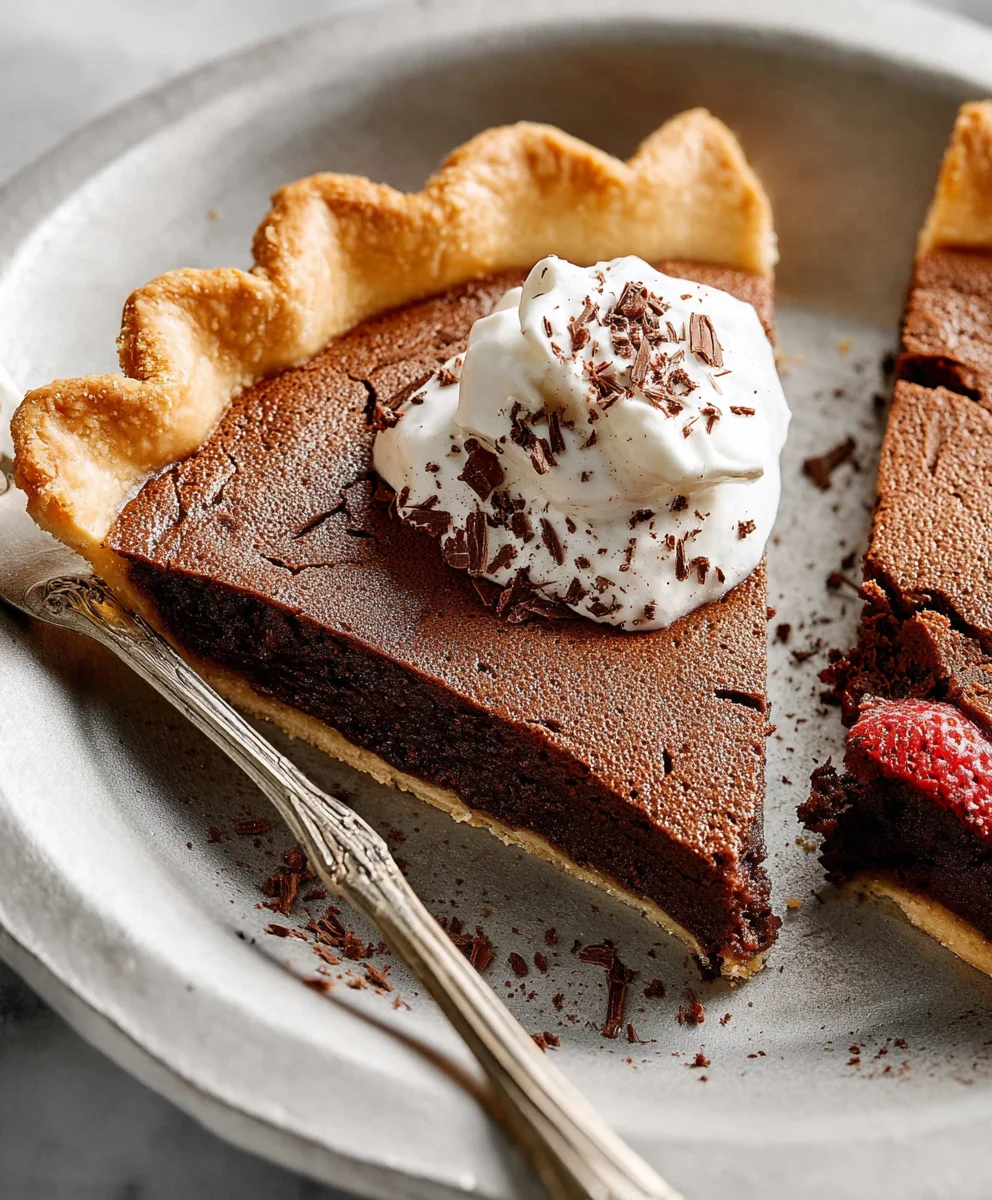
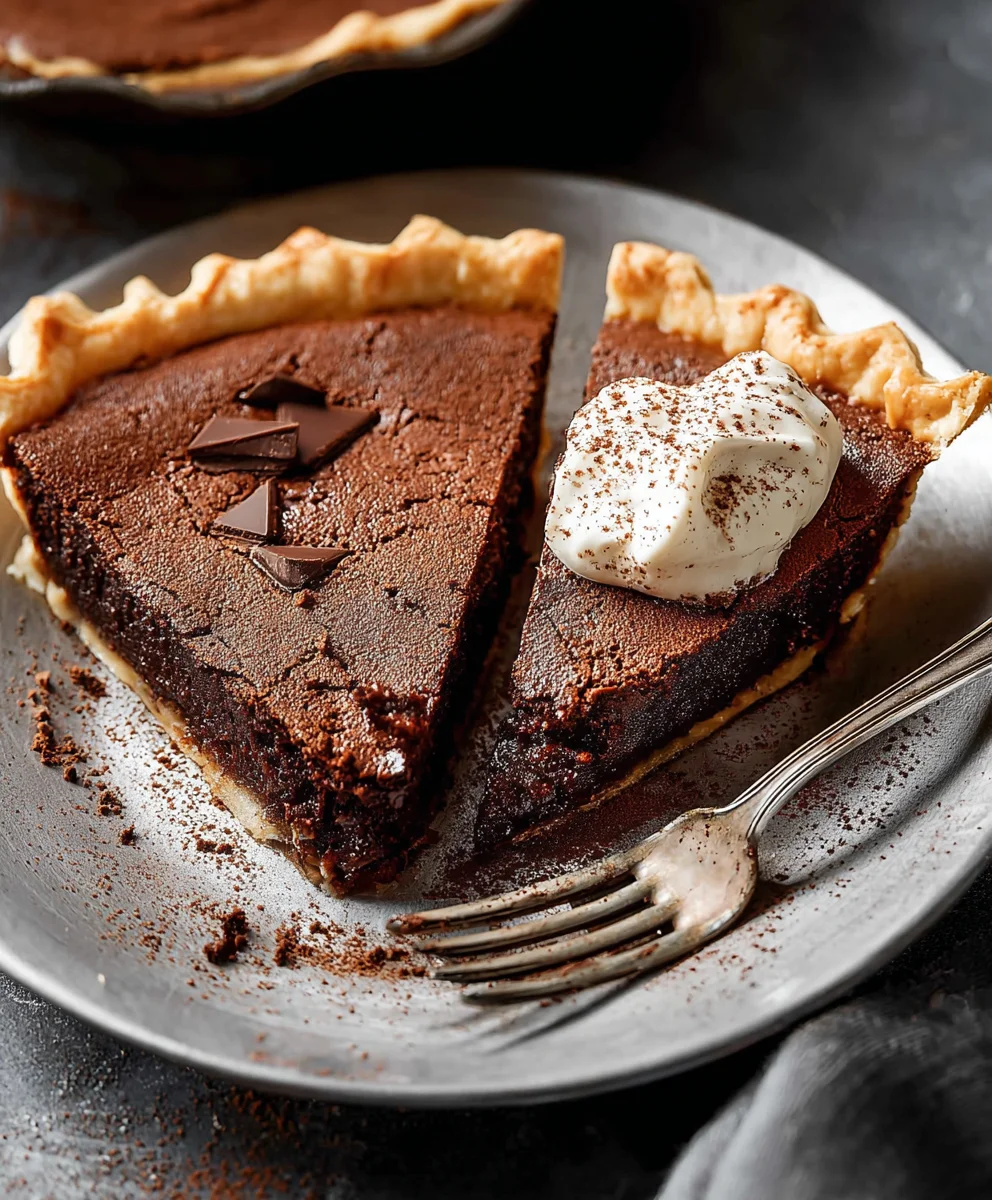
Serve and Enjoy: Once your Chocolate Chess Pie is completely cooled and beautifully set, it’s ready to be sliced and served! This pie is absolutely divine on its own, allowing its intense chocolate flavor to shine. However, for an extra touch of indulgence, I highly recommend serving it with a generous dollop of freshly whipped cream. The light, airy cream provides a wonderful contrast to the dense, rich pie. A scoop of good quality vanilla bean ice cream is another fantastic accompaniment, offering a delightful hot-and-cold sensation if the pie is served slightly warm (though I prefer it at room temperature!). For a burst of freshness and color, a few fresh raspberries or strawberries scattered on top can really elevate the presentation and add a lovely fruity tang.
This Chocolate Chess Pie is incredibly rich, so even a modest slice feels like a luxurious treat. It’s the kind of dessert that brings comfort and pure joy with every single bite. Store any leftover pie, covered loosely with plastic wrap, at room temperature for up to 2 days, or in the refrigerator for up to 4-5 days. While it’s delicious chilled, I personally find its flavors and texture are best when served at room temperature, allowing the chocolate to be truly expressive.
A Note on Texture: The beauty of a Chocolate Chess Pie lies in its unique texture. It’s denser and richer than a typical chocolate cream pie, almost like a cross between a fudge brownie and a custard. The top will have a thin, slightly crisp, crackled crust, while the interior is wonderfully gooey, sweet, and intensely chocolatey. This isn’t a light and airy dessert; it’s a wonderfully substantial and satisfying treat that truly lives up to its name as a southern classic. Each slice should be dense enough to hold its shape beautifully, offering a silky smooth mouthfeel that melts on your tongue. The deep chocolate flavor, enhanced by the subtle acidity of the vinegar and the warmth of vanilla, creates a complex and incredibly comforting dessert that’s perfect for any occasion, from a casual family dinner to a special holiday gathering. I just know you’re going to absolutely adore making and, more importantly, eating this pie!
Conclusion:
Well, my friends, we’ve journeyed through the simple magic of creating what I truly believe is one of the most comforting and utterly decadent desserts you could ever imagine. This isn’t just any pie; it’s a testament to the fact that sometimes, the most profound flavors come from the most straightforward ingredients. The reason I’m so passionate about this particular recipe, this incredible Chocolate Chess Pie, is because it delivers on so many levels. From that first glorious crackle of the top crust, yielding to an impossibly smooth, rich, and intensely chocolatey filling, you’ll understand exactly what I mean. It’s a dessert that speaks of home, of gatherings, of pure, unadulterated joy. It’s surprisingly easy to master, requiring no fancy techniques or obscure ingredients, yet it consistently produces a show-stopping result that will have everyone asking for your secret. The depth of flavor, the perfect balance of sweetness, and that signature fudgy texture make it an irresistible treat that stands out from the crowd. It’s not overly heavy, despite its richness, and it leaves a delightful, lingering chocolate essence on your palate. I promise you, once you taste a slice of this homemade wonder, you’ll find it hard to go back to ordinary desserts. It’s a true celebration of chocolate in its purest, most comforting form, and it’s become a staple in my own kitchen for very good reason.
Now, while this pie is absolutely phenomenal on its own, a perfect symphony of textures and tastes that requires no embellishment, part of the fun of baking is finding new ways to enjoy your creations.
Elevate Your Slice: Serving Suggestions & Creative Variations
For an extra touch of indulgence, I love to serve a warm slice with a generous scoop of vanilla bean ice cream. The contrast between the cool, creamy ice cream and the warm, fudgy pie is simply divine. Alternatively, a dollop of freshly whipped cream, perhaps infused with a hint of vanilla or a touch of coffee liqueur, adds a luxurious lightness that complements the pie beautifully. For those who appreciate a bit of zest, a scattering of fresh raspberries or sliced strawberries on the side can cut through the richness with a welcome burst of fruity acidity and vibrant color. A light dusting of cocoa powder or a few chocolate shavings on top can also add a professional and appealing finish, making each slice a true work of art.
But why stop there? Let’s talk about variations! If you’re feeling adventurous, consider stirring in a teaspoon of instant espresso powder with your cocoa. It won’t make the pie taste like coffee, but it will deepen and intensify the chocolate flavor in the most magnificent way, bringing out a complexity you might not expect. For a hint of spice, a tiny pinch of cayenne pepper can add a subtle warmth and complexity that’s truly unexpected and sophisticated, elevating the classic chocolate profile to something truly special – trust me on this one, it’s a game-changer! And if you’re working with a gluten-free diet, a store-bought gluten-free pie crust works wonderfully with this filling, ensuring everyone can enjoy a slice of this magic without compromise. You could also experiment with different extracts – a few drops of almond extract instead of vanilla can offer a delightful, nutty undertone, or even a touch of peppermint extract for a festive holiday twist that’s both refreshing and indulgent. Don’t be afraid to make this recipe your own; it’s robust enough to handle a little experimentation and customization. Imagine a drizzle of homemade salted caramel sauce over the top just before serving – pure bliss! The possibilities are truly endless when you have such a fantastic base to work with, allowing you to tailor this classic to suit any occasion, personal preference, or even seasonal theme.
So, I implore you, clear an afternoon, gather your ingredients, and give this recipe a try. You don’t need to be a seasoned baker to achieve spectacular results with this one. It’s a forgiving recipe that rewards you handsomely for your efforts, filling your home with the most incredible aroma and your belly with pure happiness. Once you’ve experienced the magic, I would absolutely love to hear about it! What did you pair it with? Did you try any of my variations, or did you come up with your own brilliant twist that you just have to share? Your experiences and culinary adventures truly inspire me and the entire community. Please, share your photos, your stories, and your triumphs in the comments below. Let’s celebrate the joy of baking together. Happy baking, my friends, and prepare to fall in love with your new favorite dessert!
Decadent Chocolate Chess Pie
A rich, fudgy dream baked into a flaky, buttery crust, this classic Chocolate Chess Pie embodies Southern hospitality. Featuring a slightly crackled top and molten, intensely chocolatey interior, it’s easy to prepare and a reliable crowd-pleaser. This recipe uses specific ingredient measurements for a dense, custardy texture, including both cocoa and bittersweet chocolate for deep flavor.
Ingredients
-
200g (1 ⅔ cups) all-purpose flour
-
½ teaspoon kosher salt (for crust)
-
140g (10 tablespoon) unsalted butter, cold (for crust)
-
1 cup ice water (for crust)
-
113g (8 tablespoon) unsalted butter (for filling)
-
56g (2 oz) bittersweet chocolate (for filling)
-
21g (¼ cup) dutch process cocoa powder (for filling)
-
1 teaspoon espresso powder (for filling)
-
½ teaspoon salt (for filling)
-
113g (½ cup) whole milk (for filling)
-
200g (1 cup) granulated sugar (for filling)
-
106g (½ cup) dark brown sugar (for filling)
-
25g (3 tablespoon) cornmeal (for filling)
-
4 eggs, room temp. (for filling)
Instructions
-
Step 1
In a bowl, combine 200g (1 ⅔ cups) all-purpose flour and ½ tsp kosher salt. Cut in 140g (10 tbsp) cold unsalted butter until pea-sized crumbs form. Gradually add 1 cup ice water, mixing until dough just comes together. Form into a disk, wrap, and chill for 30 minutes. Roll out and fit into a 9-inch pie plate; prick bottom/sides with a fork. Place on a baking sheet. -
Step 2
Preheat oven to 350°F (175°C). In a small saucepan or microwave-safe bowl, melt 113g (8 tbsp) unsalted butter with 56g (2 oz) bittersweet chocolate, stirring until smooth. Let cool slightly. -
Step 3
In a large mixing bowl, whisk 200g (1 cup) granulated sugar, 106g (½ cup) dark brown sugar, 21g (¼ cup) dutch process cocoa powder, 25g (3 tbsp) cornmeal, 1 tsp espresso powder, and ½ tsp salt until thoroughly combined. -
Step 4
In a separate medium-sized bowl, whisk 4 room temperature eggs and 113g (½ cup) whole milk. Slowly drizzle in the cooled melted chocolate-butter mixture while continuously whisking until glossy and well combined. -
Step 5
Pour the wet ingredient mixture into the large bowl containing your whisked dry ingredients. Whisk gently until the mixture is completely smooth and homogeneous, forming a thick, dark chocolate batter. Do not overmix. -
Step 6
Carefully pour the chocolate filling into your prepared unbaked pie crust. Bake for 45-55 minutes at 350°F (175°C) on the middle rack until the edges are set and the center still has a slight jiggle. If crust edges brown too quickly, shield them loosely with aluminum foil. -
Step 7
Remove the pie from the oven and let it cool completely on a wire rack at room temperature for at least 3-6 hours. This is crucial for the pie to set properly and achieve its fudgy texture. Once completely cooled and set, slice and serve. Store any leftover pie, covered, at room temperature for up to 2 days, or in the refrigerator for up to 4-5 days. Best served at room temperature.
Important Information
Nutrition Facts (Per Serving)
It is important to consider this information as approximate and not to use it as definitive health advice.
Allergy Information
Please check ingredients for potential allergens and consult a health professional if in doubt.

Leave a Comment