

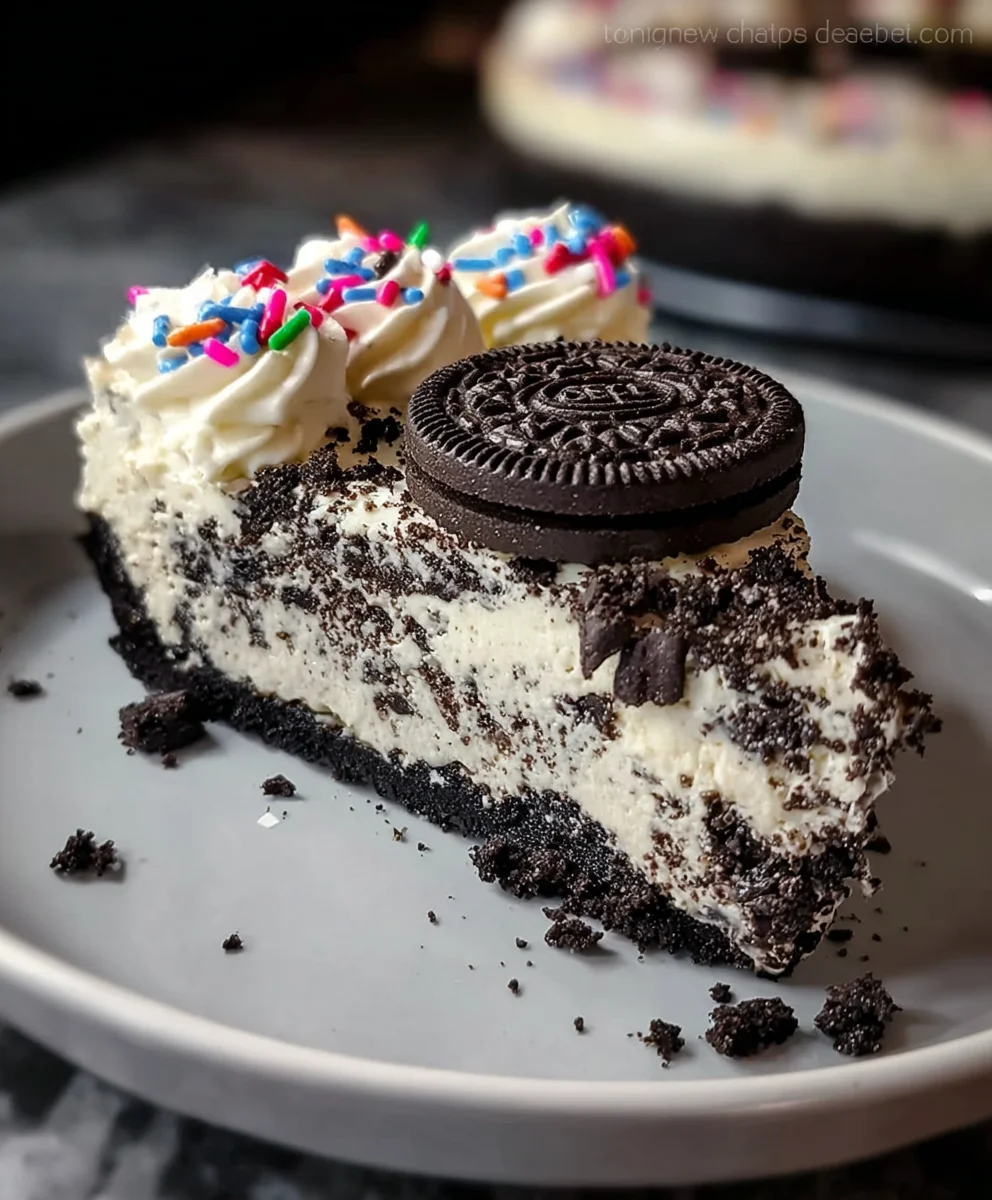
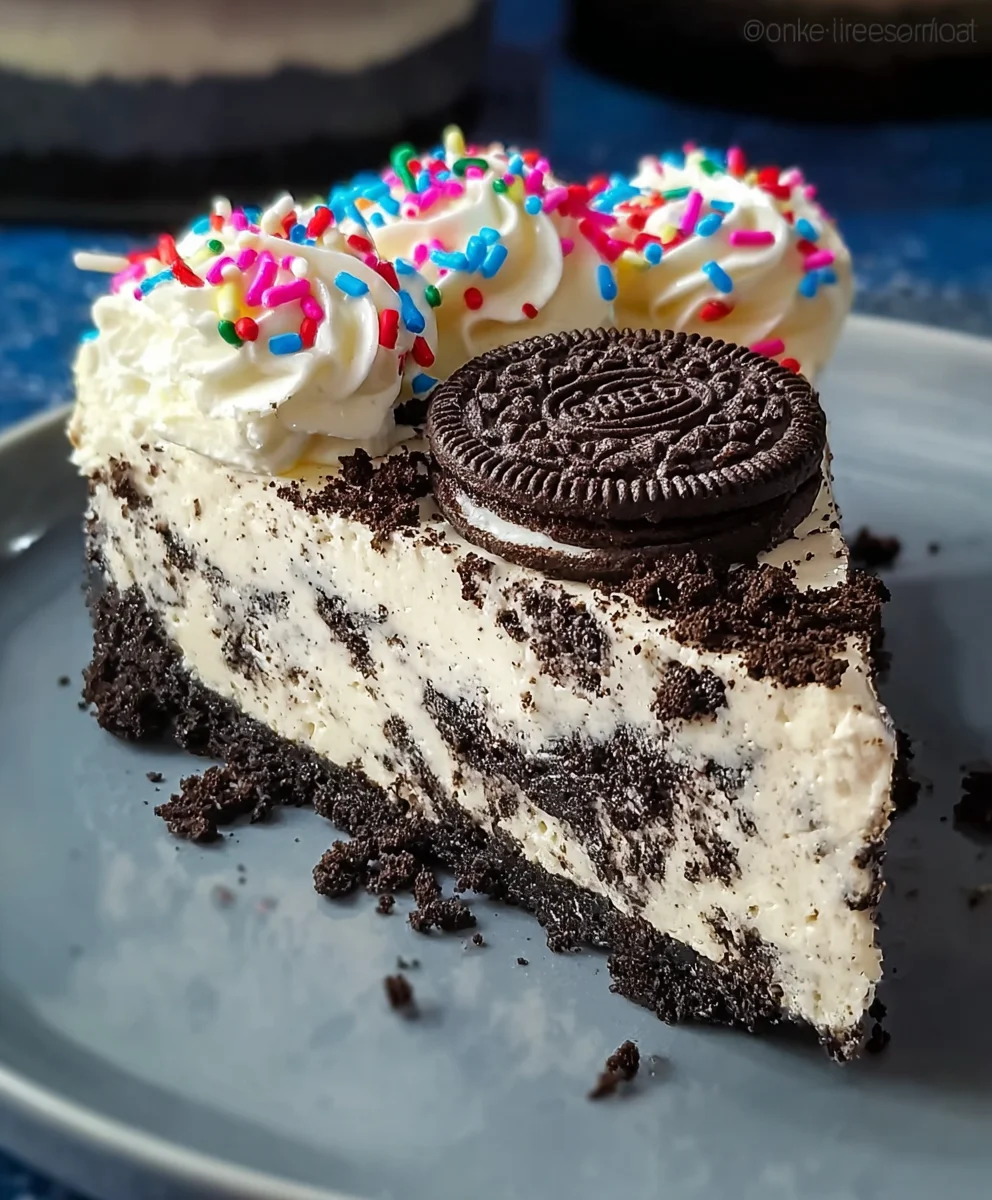
No Bake Oreo Cheesecake Sprinkles – doesn’t that just sound like pure, unadulterated joy in a dessert? I am absolutely thrilled to share a recipe that promises all the luxurious indulgence of a classic cheesecake with none of the fuss of baking. Imagine a velvety smooth, rich cream cheese filling, generously studded with chunks of America’s favorite cookie, all nestled upon a buttery, crunchy Oreo crust, and then crowned with a vibrant explosion of colorful sprinkles. It’s a dessert that not only captivates the taste buds but also brings an instant smile to your face with its playful presentation.
The beauty of no-bake desserts lies in their ingenious simplicity, a tradition born from the desire for delightful treats without needing an oven, perfect for warm days or busy schedules. While cheesecake itself boasts a history spanning centuries, its modern, no-bake counterpart, especially when combined with iconic Oreo cookies, represents a contemporary culinary marvel. People adore this dish not just for its incredible, harmonious blend of creamy, chocolatey, and crunchy textures, but also for its sheer convenience and celebratory appearance. Every bite of this No Bake Oreo Cheesecake Sprinkles offers a delightful contrast, making it an irresistible choice for any gathering or a special treat just for yourself.

Ingredients:
- For the Oreo Crust:
- 36 Oreo cookies (about 3 full rows from a standard family-size package), including the cream filling
- ½ cup (113 grams) unsalted butter, melted
- For the Creamy Cheesecake Filling:
- 24 ounces (680 grams) full-fat cream cheese, softened to room temperature
- 1 ½ cups (300 grams) granulated sugar
- 2 teaspoons pure vanilla extract
- ¼ teaspoon salt (enhances the flavors beautifully)
- 2 cups (480 ml) heavy cream (also known as heavy whipping cream), very cold
- 12 Oreo cookies, roughly chopped or crushed into small pieces (for mixing into the filling)
- For the Whipped Topping & Sprinkles Decoration:
- 1 cup (240 ml) heavy cream, very cold
- ¼ cup (30 grams) powdered sugar (confectioners’ sugar)
- ½ teaspoon pure vanilla extract
- ½ cup (approximately) festive rainbow sprinkles (the more, the merrier for our “No Bake Oreo Cheesecake Sprinkles”!)
- Optional: Mini Oreo cookies or additional chopped regular Oreos for garnish
- Optional: Chocolate syrup or ganache for drizzling
Preparing the Perfect Oreo Crust:
- Prepare Your Pan: First things first, grab a 9-inch springform pan. It’s truly the best choice for a cheesecake of this kind, as it allows for easy removal once your delicious No Bake Oreo Cheesecake Sprinkles is ready. If you don’t have parchment paper, lightly grease the bottom of the pan, but a parchment paper circle cut to fit the bottom is my preferred method to ensure no sticking at all. Secure the sides of the springform pan over the parchment circle.
-
Crush the Oreos: This is where the magic begins for our iconic Oreo crust. Take all 36 Oreo cookies, cream filling and all, and crush them. You have a few options here:
- Food Processor Method: This is by far the easiest and fastest. Place the cookies into a food processor and pulse until you have very fine crumbs. It should resemble coarse sand. This ensures a uniform and compact crust.
- Ziploc Bag Method: If you don’t have a food processor, no worries! Place the Oreos in a large, sturdy Ziploc bag (double bagging is a good idea to prevent tears). Use a rolling pin or the bottom of a heavy glass to crush them until they are fine crumbs. This method can be quite therapeutic!
You want about 3 cups of finely crushed Oreo crumbs.
- Melt the Butter: In a microwave-safe bowl or a small saucepan over low heat, melt the ½ cup of unsalted butter until it’s completely liquid. Ensure it’s not boiling, just smoothly melted.
- Combine and Press: Pour the melted butter over your finely crushed Oreo crumbs in a medium-sized bowl. Mix them thoroughly with a spoon or a sturdy spatula until all the crumbs are moistened and resemble wet sand. Every crumb needs to be coated with butter; this is what holds the crust together.
- Form the Crust: Transfer the buttery Oreo mixture into the prepared 9-inch springform pan. Using the bottom of a flat-bottomed glass or your clean hands, press the crumbs firmly and evenly across the bottom of the pan. The goal here is a compact, dense layer. Pressing it up the sides slightly (about ½ to 1 inch) is optional but adds a nice edge. A firm press ensures your crust doesn’t fall apart when slicing.
- Chill the Crust: Place the springform pan with the pressed crust into the refrigerator for at least 30 minutes. This chilling time is crucial as it allows the butter to solidify, binding the crumbs together and creating a sturdy foundation for your No Bake Oreo Cheesecake Sprinkles. Don’t skip this step!
Crafting the Creamy Cheesecake Filling:
- Prepare the Cream Cheese: In a large mixing bowl, using an electric mixer (either a stand mixer with a paddle attachment or a hand mixer), beat the softened cream cheese on medium speed for 2-3 minutes. You want it to be incredibly smooth, light, and completely free of lumps. This is a critical step for a silky-smooth cheesecake texture. If your cream cheese isn’t soft enough, it will be lumpy, and no amount of beating will fix it perfectly. Room temperature cream cheese is non-negotiable for the best results!
- Add Sweetness and Flavor: To the beaten cream cheese, add the granulated sugar, vanilla extract, and salt. Continue beating on medium speed for another 2-3 minutes, scraping down the sides of the bowl occasionally, until the mixture is well combined, creamy, and the sugar has largely dissolved. The mixture should appear lighter in color and fluffy. The salt might seem like an odd addition, but trust me, it perfectly balances the sweetness and enhances the cream cheese flavor.
- Whip the Heavy Cream: In a separate, very cold large mixing bowl (chilling your bowl and whisk attachments for 10-15 minutes beforehand in the freezer can help immensely), pour the 2 cups of very cold heavy cream. Begin whipping on low speed, gradually increasing to high speed. Beat until stiff peaks form. What does “stiff peaks” mean? When you lift the beater, the cream should stand up straight without flopping over. Be careful not to over-whip, or you’ll end up with butter! This step adds the essential lightness and airiness to our no-bake cheesecake.
- Gently Fold in Whipped Cream: Take about one-third of the whipped cream and gently fold it into the cream cheese mixture using a rubber spatula. Use a soft, circular motion, scraping from the bottom up, until just combined. Then, add the remaining whipped cream and continue to fold gently until no streaks of white cream are visible. Over-mixing at this stage will deflate the air you’ve incorporated, leading to a denser cheesecake. We want light and airy!
- Incorporate the Oreo Chunks: Now for the delicious Oreo surprise within the filling! Gently fold in the 12 roughly chopped or crushed Oreo cookies into the cheesecake mixture. You want visible chunks of Oreos here, adding texture and that signature chocolatey goodness that makes this “No Bake Oreo Cheesecake Sprinkles” so irresistible. Don’t pulverize them; embrace the chunks!
- Assemble the Cheesecake: Retrieve your chilled Oreo crust from the refrigerator. Carefully spoon or pour the creamy cheesecake filling over the crust, spreading it evenly with your spatula. Ensure the top is as smooth as possible for a beautiful presentation.
- Chilling is Key: This is perhaps the most important step for any no-bake cheesecake. Place the assembled cheesecake back into the refrigerator to chill for at least 6 hours, but preferably overnight (8-12 hours). This extended chilling time allows the cheesecake to set completely, becoming firm enough to slice cleanly. Rushing this step will result in a soft, messy cheesecake. Patience is a virtue for the perfect No Bake Oreo Cheesecake Sprinkles! I usually make mine the day before I plan to serve it.
Decorating Your No Bake Oreo Cheesecake with Sprinkles and More:
- Prepare the Whipped Topping: Once your cheesecake is thoroughly chilled and set, it’s time for the final flourish! In another very cold bowl, combine the 1 cup of very cold heavy cream, ¼ cup of powdered sugar, and ½ teaspoon of vanilla extract. Whip with an electric mixer on high speed until stiff peaks form, just like before. This creates a fluffy, slightly sweetened topping.
- Apply the Whipped Topping: You can spread this whipped cream over the top of the cheesecake using an offset spatula for a rustic look, or for a more elegant finish, transfer the whipped cream to a piping bag fitted with your favorite decorative tip (a star tip works wonderfully). Pipe swirls, rosettes, or a simple border around the edge of the cheesecake. This layer adds an extra touch of creamy indulgence.
- The Sprinkles Grand Finale: This is where the “Sprinkles” in “No Bake Oreo Cheesecake Sprinkles” truly comes to life! Generously scatter the festive rainbow sprinkles all over the whipped topping. Don’t be shy here; the more sprinkles, the more fun and celebratory your cheesecake will look. The vibrant colors contrast beautifully with the white cream and dark Oreo crust.
- Optional Garnishments: To take your cheesecake to the next level, consider adding mini Oreo cookies around the edge or in the center, or even some extra chopped regular Oreos. A drizzle of chocolate syrup or melted ganache over the top before adding the sprinkles also adds another layer of flavor and visual appeal. This allows you to customize your No Bake Oreo Cheesecake Sprinkles to your heart’s content.
- Serving Your Masterpiece: Carefully remove the sides of the springform pan. If you used parchment paper on the bottom, you can leave the cheesecake on the base or gently slide it onto a serving platter. Use a sharp knife dipped in hot water and wiped clean between each slice for the cleanest cuts. This makes a huge difference in presentation!
- Storage: Any leftover No Bake Oreo Cheesecake Sprinkles should be stored in an airtight container in the refrigerator for up to 3-4 days. While it might last longer, the whipped topping is best enjoyed fresh.
Enjoy every delightful, creamy, crunchy, and colorful bite of your homemade No Bake Oreo Cheesecake Sprinkles! It’s the perfect dessert for any occasion, combining beloved flavors with a fun, festive twist.
Conclusion:
Well, my friends, we’ve journeyed together through the simple yet utterly delightful process of creating a dessert that is poised to become your new go-to for just about any occasion. We’ve talked through every step, and I genuinely hope you’re feeling as excited as I am about the possibilities this recipe unlocks. What truly makes this dessert a standout isn’t just its incredible flavor profile – that classic, beloved combination of rich cream cheese, crunchy Oreo, and a playful shower of sprinkles – but its sheer accessibility. It’s the kind of treat that looks like you’ve slaved away in the kitchen for hours, when in reality, it’s a testament to the magic of minimal effort yielding maximum reward. This isn’t just a dessert; it’s a celebration of ease, joy, and irresistible indulgence, all rolled into one perfect bite that will undoubtedly leave everyone asking for the recipe.
Why This Recipe is an Absolute Must-Try
If you’re still pondering whether to add this gem to your culinary repertoire, let me assure you, the decision is an easy one. This recipe is a game-changer for so many reasons. First and foremost, the “no-bake” aspect alone makes it a hero in my book. No oven necessary means no worrying about preheating, precise baking times, or accidental scorching. It’s perfect for those scorching summer days when turning on the oven is unthinkable, or for when you simply crave a hassle-free dessert that delivers on taste. Imagine the relief of whipping up something spectacular without breaking a sweat! Beyond the convenience, the texture is divine – a creamy, dreamy cheesecake filling that melts in your mouth, perfectly contrasted by the familiar crunch of the Oreo crust. Then there’s the aesthetic appeal: those vibrant sprinkles aren’t just for show; they add a playful burst of color that makes this dessert incredibly inviting, especially for parties or family gatherings. It’s a dessert that appeals to all ages, bringing smiles and satisfied sighs with every spoonful. It’s also incredibly forgiving, making it ideal for novice bakers who might feel intimidated by more complex recipes. Trust me, you can’t really mess this one up, and that’s a beautiful thing. Its quick preparation time also means you can whip it up last minute for unexpected guests, making you the ultimate host without any added stress.
Elevate Your Dessert: Serving Suggestions and Variations
One of the things I absolutely adore about this recipe is its incredible versatility. While it’s utterly perfect as is, there are so many ways you can customize it to suit your taste, the occasion, or simply to use up what you have on hand. For a touch of elegance, consider serving individual portions in small ramekins or pretty dessert glasses; this makes for a stunning presentation at a dinner party, giving each guest their own delightful treat. You could drizzle a little chocolate sauce or a raspberry coulis over the top just before serving for an extra layer of flavor and visual appeal, elevating the dish without much effort. Want to add a fresh element? A dollop of freshly whipped cream and some sliced strawberries or blueberries would be absolutely divine, cutting through the richness beautifully and adding a burst of natural sweetness. For a different flavor profile, don’t shy away from experimenting with the cookie base. While Oreos are classic, imagine a ginger snap crust for a spicy kick, or even a shortbread crust for a more buttery, delicate flavor. You could also swirl in different extracts into the cheesecake mixture itself – a hint of almond, peppermint (especially around the holidays!), or even a touch of orange zest could transform the entire experience, offering a delightful surprise with every bite. And those sprinkles? Feel free to go wild! Theme them for holidays – red and green for Christmas, pastels for Easter, or even black and orange for Halloween. The possibilities are truly endless, allowing you to make this basic recipe uniquely yours every single time you prepare it. This adaptability ensures that your No Bake Oreo Cheesecake Sprinkles never gets boring and can be tailored to any moment, celebration, or craving you might have, making it a truly dynamic dessert.
Your Turn to Shine: Try It and Share!
Now that you’ve got all the tips, tricks, and inspiration, it’s truly your moment to shine in the kitchen. I wholeheartedly encourage you to roll up your sleeves, gather your ingredients, and give this incredible No Bake Oreo Cheesecake Sprinkles recipe a try. You’ll be amazed at how effortlessly it comes together and how unbelievably delicious the results are. It’s a dessert that promises to impress your guests, delight your family, and frankly, make your own taste buds sing with joy. This isn’t just about following instructions; it’s about creating memories, sharing deliciousness, and experiencing the sheer pleasure of a perfectly executed, hassle-free treat. It’s about that moment of satisfaction when you take your first bite and realize you’ve created something truly special with minimal fuss. Once you’ve whipped up your masterpiece, I would absolutely love to hear all about it! Did you try a fun variation? What did your family think? Did it become your new favorite? Please don’t keep your culinary triumphs to yourself! Share your photos, your stories, and your feedback in the comments below, or tag me on social media. Your experiences not only inspire me but also help our wonderful community of home bakers discover new ideas and feel confident in their own kitchens. So, go forth, create, and enjoy every single delightful bite. Happy no-baking!
No Bake Oreo Cheesecake Sprinkles
A quick and easy no-bake cheesecake featuring a buttery Oreo crust, creamy Oreo-studded filling, and a festive sprinkle topping. Perfect for any occasion!
Ingredients
-
36 Oreo cookies, with cream filling
-
½ cup (113g) unsalted butter, melted
-
24 oz (680g) full-fat cream cheese, softened
-
1 ½ cups (300g) granulated sugar
-
2 tsp pure vanilla extract
-
¼ tsp salt
-
2 cups (480ml) very cold heavy cream (for filling)
-
12 Oreo cookies, chopped/crushed (for filling)
-
1 cup (240ml) very cold heavy cream (for topping)
-
¼ cup (30g) powdered sugar
-
½ tsp pure vanilla extract (for topping)
-
½ cup rainbow sprinkles
-
Optional: Mini Oreos or chopped Oreos for garnish
-
Optional: Chocolate syrup/ganache for drizzling
Instructions
-
Step 1
Prepare a 9-inch springform pan with parchment paper on the bottom, or lightly grease. -
Step 2
Crush 36 Oreo cookies (with filling) into fine crumbs (about 3 cups) using a food processor or Ziploc bag and rolling pin. -
Step 3
Melt ½ cup unsalted butter. Combine with Oreo crumbs; mix until moistened. -
Step 4
Press crumb mixture firmly and evenly into the bottom of the prepared 9-inch springform pan. Chill for at least 30 minutes. -
Step 5
In a large bowl, beat 24 oz (680g) softened cream cheese until smooth and lump-free (2-3 minutes). -
Step 6
Add 1 ½ cups (300g) granulated sugar, 2 tsp vanilla extract, and ¼ tsp salt; beat for another 2-3 minutes until creamy and fluffy. -
Step 7
In a separate, cold bowl, whip 2 cups (480ml) very cold heavy cream until stiff peaks form. -
Step 8
Gently fold the whipped cream into the cream cheese mixture until just combined, avoiding over-mixing. -
Step 9
Gently fold in 12 chopped/crushed Oreo cookies into the filling. -
Step 10
Spoon filling over the chilled crust; spread evenly. -
Step 11
Chill cheesecake for at least 6 hours, preferably overnight (8-12 hours), until set. -
Step 12
For the topping, whip 1 cup (240ml) very cold heavy cream, ¼ cup (30g) powdered sugar, and ½ tsp vanilla extract until stiff peaks form. -
Step 13
Spread or pipe whipped topping over the chilled cheesecake. -
Step 14
Generously scatter ½ cup rainbow sprinkles over the whipped topping. Optional: Garnish with mini Oreos, extra chopped Oreos, or chocolate syrup. -
Step 15
Carefully remove springform sides. Slice with a hot, clean knife. Store leftovers in an airtight container in the refrigerator for 3-4 days.
Important Information
Nutrition Facts (Per Serving)
It is important to consider this information as approximate and not to use it as definitive health advice.
Allergy Information
Please check ingredients for potential allergens and consult a health professional if in doubt.


Leave a Comment