

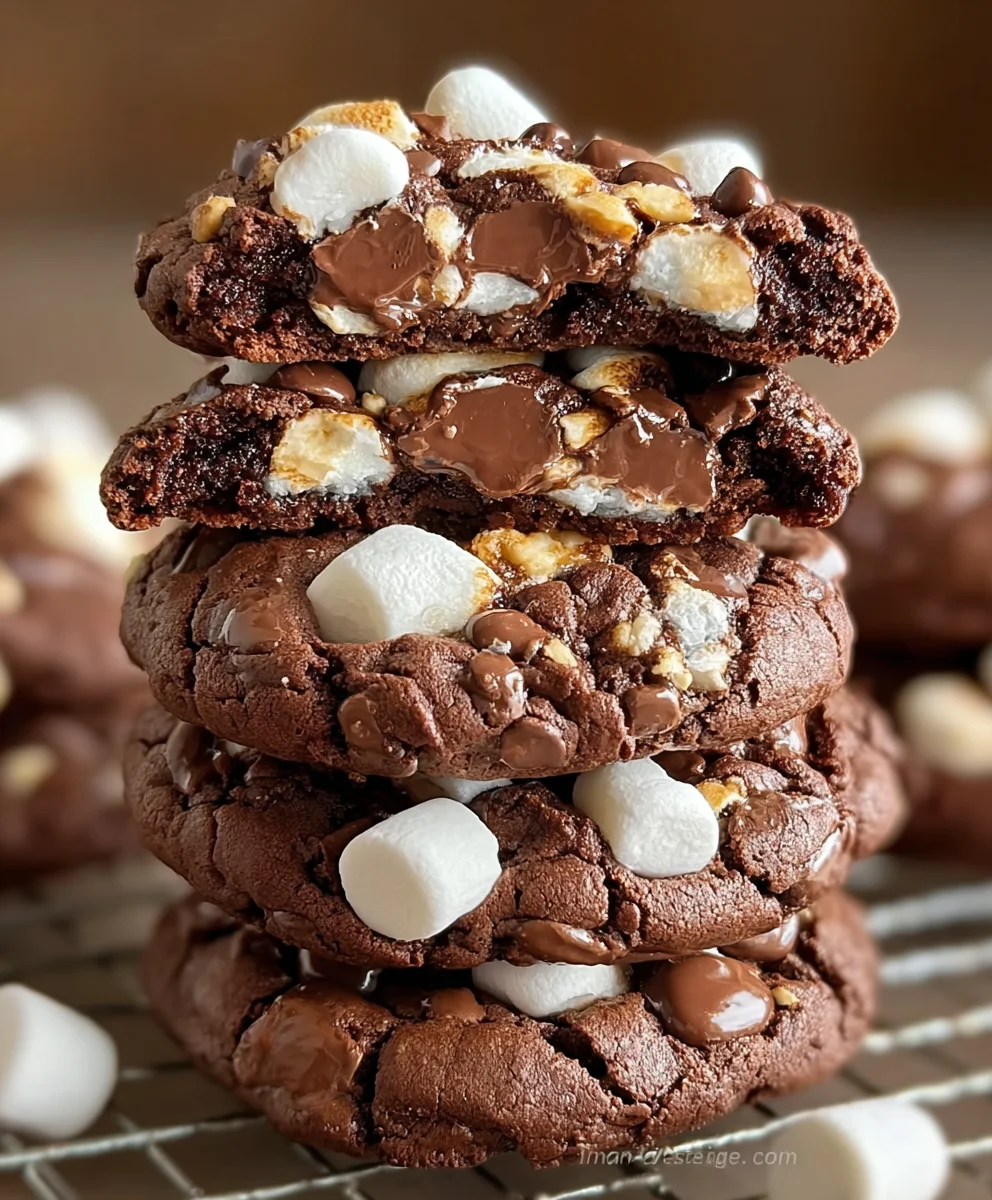
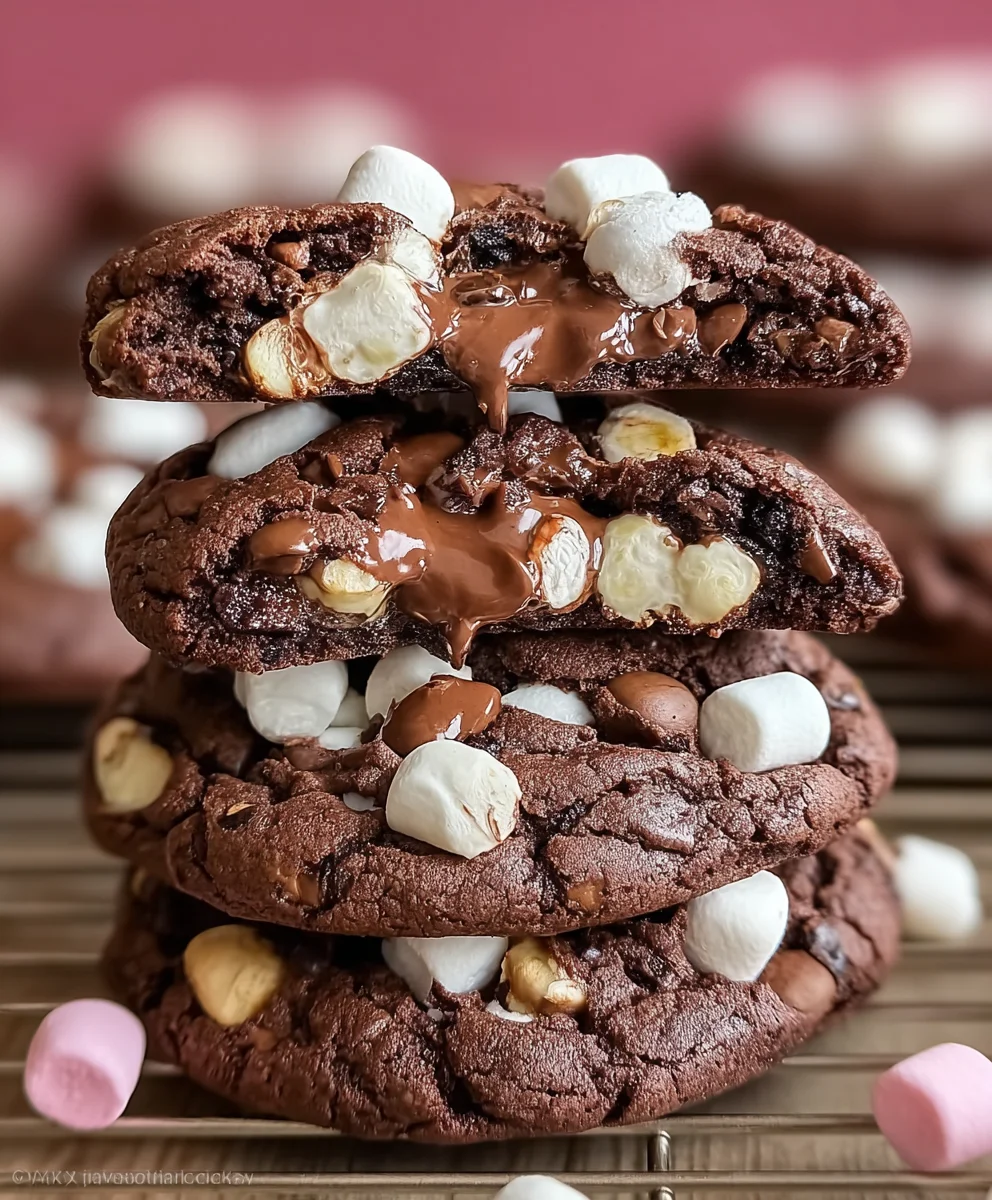
Rocky Road Cookies Stuffed With Marshmallow are not just a dessert; they are an invitation to a moment of pure, unadulterated bliss. Imagine sinking your teeth into a rich, fudgy chocolate cookie, only to discover a warm, gooey marshmallow core that stretches tantalizingly with every bite. This isn’t just any cookie; it’s a nostalgic journey wrapped in a delightful package, marrying the beloved elements of classic rocky road confectionery with the comforting embrace of a freshly baked cookie. Each bite offers a symphony of textures and flavors, from the deep cocoa base to the satisfying crunch of nuts and the ultimate sweet surprise within.
The concept of Rocky Road itself has a charming history, often credited to American ice cream makers in the early 20th century who sought inventive ways to incorporate miscellaneous sweets and nuts into their frozen treats. What began as a simple solution to utilize leftover candy evolved into an iconic flavor profile celebrated for its harmonious blend of textures and tastes. Our rendition takes that timeless appeal and elevates it, offering an incredible sensory experience where the slight crunch of walnuts meets decadent chocolate, all complemented by that irresistible, melt-in-your-mouth marshmallow surprise. It’s truly a celebration of comfort and indulgence, perfect for sharing with loved ones or savoring by yourself with a cup of coffee. I promise you, this recipe for Rocky Road Cookies Stuffed With Marshmallow will quickly become a cherished favorite in your baking repertoire.

Ingredients:
- For the Rocky Road Cookie Dough:
- 2 ½ cups (300g) all-purpose flour
- ¾ cup (75g) unsweetened cocoa powder, Dutch-processed is preferred for a darker, richer color
- 1 teaspoon baking soda
- ½ teaspoon salt
- 1 cup (226g) unsalted butter, softened to room temperature
- ¾ cup (150g) granulated sugar
- 1 cup (200g) packed light brown sugar
- 2 large eggs, room temperature
- 2 teaspoons pure vanilla extract
- 1 cup (170g) semi-sweet chocolate chips or chunks
- ½ cup (50g) mini marshmallows
- ½ cup (55g) chopped pecans or walnuts (optional, but highly recommended for that classic Rocky Road crunch)
- For the Marshmallow Stuffing:
- 18-24 large marshmallows (standard size, not jumbo or mini)
- For the Optional Chocolate Drizzle (highly recommended!):
- ½ cup (85g) semi-sweet chocolate chips or chopped chocolate
- 1-2 teaspoons coconut oil or unsalted butter (for a smoother drizzle)
Preparing the Rocky Road Cookie Dough
- Whisk Dry Ingredients: In a medium bowl, I always start by whisking together the flour, unsweetened cocoa powder, baking soda, and salt. This ensures all the leavening agents and flavorings are evenly distributed, which is super important for a consistent cookie texture. Set this bowl aside for a moment.
- Cream Butter and Sugars: Now, in the bowl of my stand mixer fitted with the paddle attachment (or a large bowl with a hand mixer), I combine the softened unsalted butter with both the granulated sugar and the packed light brown sugar. I beat these on medium speed for about 2-3 minutes, until the mixture is light, fluffy, and visibly pale. This creaming process is crucial as it incorporates air into the butter and sugar, which contributes to the cookies’ tender texture and helps them spread beautifully in the oven without being too flat. Don’t rush this step!
- Incorporate Eggs and Vanilla: One at a time, I add the large eggs to the butter and sugar mixture, beating well after each addition until fully incorporated. After the eggs, I stir in the pure vanilla extract. Scrape down the sides of the bowl with a spatula to make sure everything is thoroughly mixed. The mixture might look a little curdled after adding the first egg, but don’t worry, it will come together as you add the second and continue to beat.
- Combine Wet and Dry Ingredients: With the mixer on low speed, I gradually add the dry ingredient mixture to the wet ingredients, mixing just until almost combined. It’s absolutely vital not to overmix at this stage! Overmixing can develop too much gluten in the flour, leading to tough, chewy cookies instead of the soft, tender ones we’re aiming for. Stop mixing when there are still a few streaks of flour visible.
- Fold in Rocky Road Mix-Ins: This is where our Rocky Road Cookies Stuffed With Marshmallow truly begin to take shape. I remove the bowl from the mixer and, using a sturdy spatula, gently fold in the semi-sweet chocolate chips or chunks, the mini marshmallows, and the optional chopped pecans or walnuts. The mini marshmallows add an extra layer of texture and that signature Rocky Road chewiness throughout the cookie itself, not just as a stuffing. Be gentle to avoid deflating the dough or crushing the mini marshmallows. I ensure they are evenly distributed so every bite has a wonderful surprise!
Stuffing and Chilling the Cookies
- Prepare Your Workstation: Before I start stuffing, I like to have everything ready. Line a large baking sheet with parchment paper or a silicone baking mat. Have your large marshmallows ready to go.
- Scoop the Cookie Dough: Using a large cookie scoop (about 3 tablespoons in size, or a #20 scoop), I scoop out a generous portion of the Rocky Road cookie dough. I typically aim for about 2.5 to 3 ounces of dough per cookie to ensure there’s enough to fully encase the large marshmallow.
- Flatten and Stuff: I gently flatten the scooped dough into a disc in the palm of my hand. It doesn’t need to be perfectly round, but wide enough to comfortably hold a large marshmallow. Then, I place one large marshmallow directly in the center of the dough disc. This is the heart of our Rocky Road Cookies Stuffed With Marshmallow!
- Encase the Marshmallow: Carefully, I bring the edges of the cookie dough up and around the marshmallow, pinching and sealing them together at the top. It’s important to make sure the marshmallow is completely enclosed by the dough. Any exposed marshmallow will likely melt out and create a sticky mess on your baking sheet. I roll the dough gently between my palms to form a smooth, somewhat round ball. This step might require a little patience, especially as the dough becomes stickier, but it’s worth the effort for that perfect surprise inside.
- Chill the Stuffed Dough Balls: Place the formed cookie dough balls onto your prepared baking sheet, leaving a little space between each one. This chilling step is absolutely non-negotiable for these Rocky Road Cookies Stuffed With Marshmallow. I place the entire baking sheet into the refrigerator and chill the dough balls for at least 2 hours, but preferably 4 hours or even overnight. Chilling the dough helps the flavors meld, but more importantly, it prevents the cookies from spreading too much in the oven and helps the large marshmallow inside maintain its integrity and melt perfectly without completely oozing out. A well-chilled dough is the secret to a thick, chewy cookie with a gooey center. If I’m really planning ahead, I sometimes even freeze them for 30-60 minutes after chilling to ensure they hold their shape perfectly.
Baking Your Rocky Road Cookies Stuffed With Marshmallow
- Preheat Oven and Prepare Baking Sheets: About 20-30 minutes before I’m ready to bake, I preheat my oven to 375°F (190°C). While the oven preheats, I prepare fresh baking sheets with parchment paper or silicone baking mats. If you’re using the same sheet you used for chilling, just make sure it’s cooled down completely before putting more dough on it.
- Arrange Cookies on Baking Sheets: I place the thoroughly chilled cookie dough balls onto the prepared baking sheets, making sure to leave ample space (about 2-3 inches) between each one. These cookies are going to spread a bit and puff up, so giving them room is key to preventing them from merging into one giant cookie. I usually bake 6-8 cookies per standard baking sheet. Do not flatten the dough balls; let them be nice and round.
- Bake to Perfection: I bake the Rocky Road Cookies Stuffed With Marshmallow for about 12-15 minutes. The exact time can vary depending on your oven, so it’s good to keep an eye on them. I look for the edges to be set and lightly golden, while the centers still look slightly soft and puffy. When I gently touch the center, it should feel soft but not raw. A common issue with marshmallow-stuffed cookies is the marshmallow oozing out. If you notice some marshmallow starting to escape from the sides, don’t panic! You can gently push it back in with a spoon or spatula immediately after taking the cookies out of the oven, while they’re still hot and pliable. This little trick is a lifesaver for presentation!
- Cooling Process: Once baked, I carefully remove the baking sheets from the oven. It’s important to let the cookies cool on the baking sheet for at least 5-10 minutes. This crucial cooling time allows the cookies to continue to set up, firm up, and become easier to handle without breaking. The marshmallow inside will be incredibly hot and molten, so letting it cool slightly helps it to firm up into that irresistible gooey center we’re looking for. After this initial cooling, I transfer the cookies to a wire rack to cool completely. This ensures air circulation all around the cookie, preventing a soggy bottom and giving us a perfectly textured cookie.
Optional Glaze and Finishing Touches
While these Rocky Road Cookies Stuffed With Marshmallow are absolutely incredible on their own, a simple chocolate drizzle elevates them to bakery-level perfection and adds an extra touch of Rocky Road flair.
- Prepare the Chocolate Drizzle: If I decide to make the optional chocolate drizzle, which I highly recommend, I melt the semi-sweet chocolate chips (or chopped chocolate) with 1-2 teaspoons of coconut oil or unsalted butter in a microwave-safe bowl. I usually heat it in 30-second intervals, stirring well after each, until it’s smooth and glossy. The coconut oil or butter helps thin the chocolate slightly, making it perfect for drizzling and giving it a lovely sheen when it sets.
- Drizzle and Decorate: Once the cookies are completely cooled, I use a spoon or a whisk to drizzle the melted chocolate over the tops of the cookies in a decorative pattern. For an extra touch of visual appeal and flavor, while the chocolate drizzle is still wet, I sometimes sprinkle a few extra mini marshmallows or chopped nuts on top. This not only makes them look even more like a classic rocky road treat but also adds a lovely textural contrast.
- Allow Drizzle to Set: Let the chocolate drizzle set completely before stacking or storing the cookies. This can take about 15-30 minutes at room temperature, or you can pop them in the refrigerator for 5-10 minutes to speed up the process.
Storage Tips: These Rocky Road Cookies Stuffed With Marshmallow are best enjoyed fresh, when the marshmallow inside is at its peak gooeyness. However, they can be stored in an airtight container at room temperature for up to 3-4 days. If you want to experience that warm, gooey marshmallow center again, a quick 10-15 second zap in the microwave will bring them back to life. You’ll truly love biting into these decadent treats!
Enjoying Your Masterpiece:
Biting into one of these Rocky Road Cookies Stuffed With Marshmallow is an experience in itself. You first encounter the rich, fudgy chocolate cookie base, studded with crunchy nuts and soft mini marshmallows, then your teeth sink into that incredible pocket of warm, gooey, melted marshmallow. It’s a texture explosion and a flavor sensation that perfectly captures everything wonderful about rocky road in a soft, chewy cookie form. Trust me, these are going to be a huge hit!
Conclusion:
Well, my fellow dessert enthusiasts, we’ve journeyed through the delightful process of creating something truly extraordinary, and I sincerely hope you’re as excited about these treats as I am. This isn’t just another cookie recipe; it’s an invitation to experience pure, unadulterated bliss. The magic of these cookies lies in their ability to surprise and satisfy in equal measure. Imagine biting through a rich, chewy, chocolatey exterior, studded with crunchy nuts and more chocolate chips, only to discover a gooey, warm, marshmallowy heart. It’s a textural symphony and a flavor explosion that truly sets them apart from your everyday cookie jar staple. These are the cookies you bring to a potluck when you want to be the hero, the cookies you bake for a special occasion, or simply when you need a serious pick-me-up on a Tuesday afternoon. They are, without a doubt, a culinary masterpiece waiting to happen in your kitchen.
What makes these Rocky Road Cookies Stuffed With Marshmallow an absolute must-try? It’s the ingenious combination of classic rocky road elements – chocolate, nuts, and marshmallows – elevated to a whole new level by being encased in a perfectly baked cookie. The molten marshmallow core is the secret weapon, transforming an already delicious cookie into an unforgettable experience. It’s comforting, indulgent, and just plain fun. The aroma alone as they bake will fill your home with a warmth that promises pure joy. I’ve seen faces light up with the first bite, and I guarantee yours will too. This recipe is more than just ingredients; it’s a recipe for smiles, for sharing, and for creating cherished memories around the table.
Serving Suggestions & Creative Variations:
Now, let’s talk about making these beauties even more spectacular. While they are utterly divine straight from the oven, still warm and with the marshmallow oozing delightfully, there are a few ways to elevate your cookie experience. For the ultimate indulgence, serve them warm with a scoop of premium vanilla bean ice cream. The contrast between the warm, gooey cookie and the cold, creamy ice cream is simply heavenly. A drizzle of chocolate fudge sauce or a sprinkle of sea salt can also take this dessert to another dimension. If you prefer a drink pairing, a tall glass of cold milk is a classic for a reason, but I also love them with a steaming mug of hot cocoa on a chilly evening. Imagine curling up by the fire with one of these cookies and a comforting beverage – pure bliss!
But don’t stop there! This recipe is a fantastic canvas for your own culinary creativity. Feel free to experiment with different types of chocolate chips – milk, dark, white, or even a mix for varied sweetness. Love nuts? Try swapping out the pecans or walnuts for almonds, hazelnuts, or even peanuts for a different flavor profile. For an extra layer of decadence, consider adding a sprinkle of flaky sea salt on top of the cookies before baking; it beautifully cuts through the sweetness and enhances the chocolate flavor. You could even experiment with flavored marshmallows, like strawberry or chocolate marshmallows, for a unique twist. Miniature marshmallows work well if you want a more subtle melt, but I find the larger ones really deliver on that gooey, satisfying center. If you’re feeling adventurous, a tiny pinch of espresso powder in the dough can deepen the chocolate flavor without making it taste like coffee. The possibilities are truly endless, and I encourage you to make this recipe your own!
Your Turn: Bake, Share, and Inspire!
So, there you have it. My heartfelt plea for you to try these incredible Rocky Road Cookies Stuffed With Marshmallow. This isn’t just a recipe; it’s an experience waiting to unfold in your kitchen. I promise you, the joy of pulling these warm, gooey masterpieces from the oven, and the delighted expressions of those who get to taste them, will make every moment of preparation worthwhile. They are perfect for sharing with friends, surprising your family, or simply treating yourself to a moment of pure, unadulterated indulgence. Don’t hesitate – gather your ingredients and embark on this delicious adventure today! I would absolutely love to hear about your baking journey and see your magnificent creations. Please share your experiences, any variations you tried, and especially the reactions of your taste testers. Tag me, or simply let me know how it went in the comments. Happy baking, and get ready to fall in love with your new favorite cookie!
Rocky Road Cookies Stuffed With Marshmallow
Decadent Rocky Road Cookies, stuffed with a warm, gooey marshmallow core and studded with chocolate chips and nuts. These rich, fudgy chocolate cookies are perfect for sharing during parties or cozy nights in with a cup of hot chocolate.
Ingredients
-
2 ½ cups (300g) all-purpose flour
-
¾ cup (75g) unsweetened cocoa powder, Dutch-processed
-
1 teaspoon baking soda
-
½ teaspoon salt
-
1 cup (226g) unsalted butter, softened
-
¾ cup (150g) granulated sugar
-
1 cup (200g) packed light brown sugar
-
2 large eggs, room temperature
-
2 teaspoons pure vanilla extract
-
1 cup (170g) semi-sweet chocolate chips
-
½ cup (50g) mini marshmallows
-
½ cup (55g) chopped pecans or walnuts (optional)
-
18-24 large marshmallows
-
For Optional Chocolate Drizzle:
-
½ cup (85g) semi-sweet chocolate chips or chopped chocolate
-
1-2 teaspoons coconut oil or unsalted butter
Instructions
-
Step 1
In a medium bowl, whisk together the flour, cocoa powder, baking soda, and salt. Set aside. -
Step 2
In the bowl of a stand mixer, cream softened unsalted butter with granulated sugar and packed light brown sugar on medium speed for 2-3 minutes until light and fluffy. Beat in eggs one at a time until fully incorporated, then stir in vanilla extract. Scrape down the sides of the bowl. -
Step 3
With the mixer on low speed, gradually add the dry ingredient mixture to the wet, mixing just until almost combined. Do not overmix. Remove bowl from mixer and gently fold in the semi-sweet chocolate chips, mini marshmallows, and optional chopped nuts with a spatula until evenly distributed. -
Step 4
Line a large baking sheet with parchment paper. Scoop about 3 tablespoons (2.5-3 oz) of dough per cookie. Flatten each scoop into a disc in your palm. Place one large marshmallow in the center, then carefully bring the dough edges up and around the marshmallow, pinching to completely enclose it. Roll gently between palms to form a smooth ball. -
Step 5
Place the formed cookie dough balls onto the prepared baking sheet, leaving space between them. Chill in the refrigerator for at least 2 hours, but preferably 4 hours or even overnight. This chilling step is essential for cookie shape and marshmallow integrity. -
Step 6
Preheat oven to 375°F (190°C). Arrange thoroughly chilled cookie dough balls on new parchment-lined baking sheets, leaving 2-3 inches of space between each. Bake for about 12-15 minutes, until the edges are set and centers look slightly soft. If marshmallow oozes, gently push it back in with a spoon immediately after removing from oven. -
Step 7
Carefully remove baking sheets from the oven. Let cookies cool on the baking sheet for at least 5-10 minutes to allow them to set. Then, transfer to a wire rack to cool completely. -
Step 8
If desired, melt ½ cup (85g) semi-sweet chocolate chips (or chopped chocolate) with 1-2 teaspoons coconut oil or unsalted butter in a microwave-safe bowl in 30-second intervals, stirring until smooth and glossy. Drizzle over completely cooled cookies. For extra flair, sprinkle with a few extra mini marshmallows or chopped nuts while the chocolate is still wet. Allow drizzle to set completely before stacking or storing. -
Step 9
Store in an airtight container at room temperature for up to 3-4 days. For a warm, gooey marshmallow center, zap in the microwave for 10-15 seconds.
Important Information
Nutrition Facts (Per Serving)
It is important to consider this information as approximate and not to use it as definitive health advice.
Allergy Information
Please check ingredients for potential allergens and consult a health professional if in doubt.


Leave a Comment