

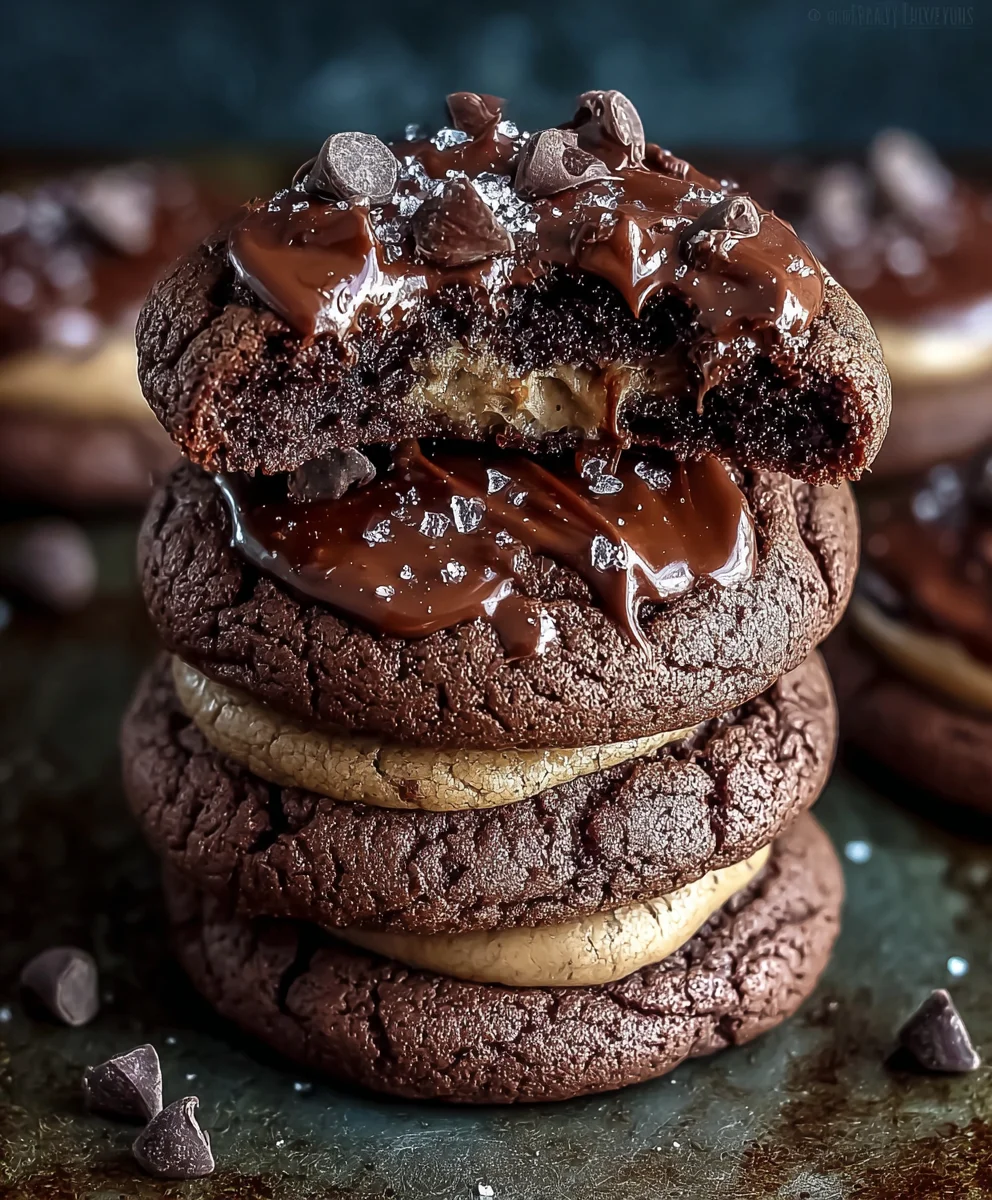
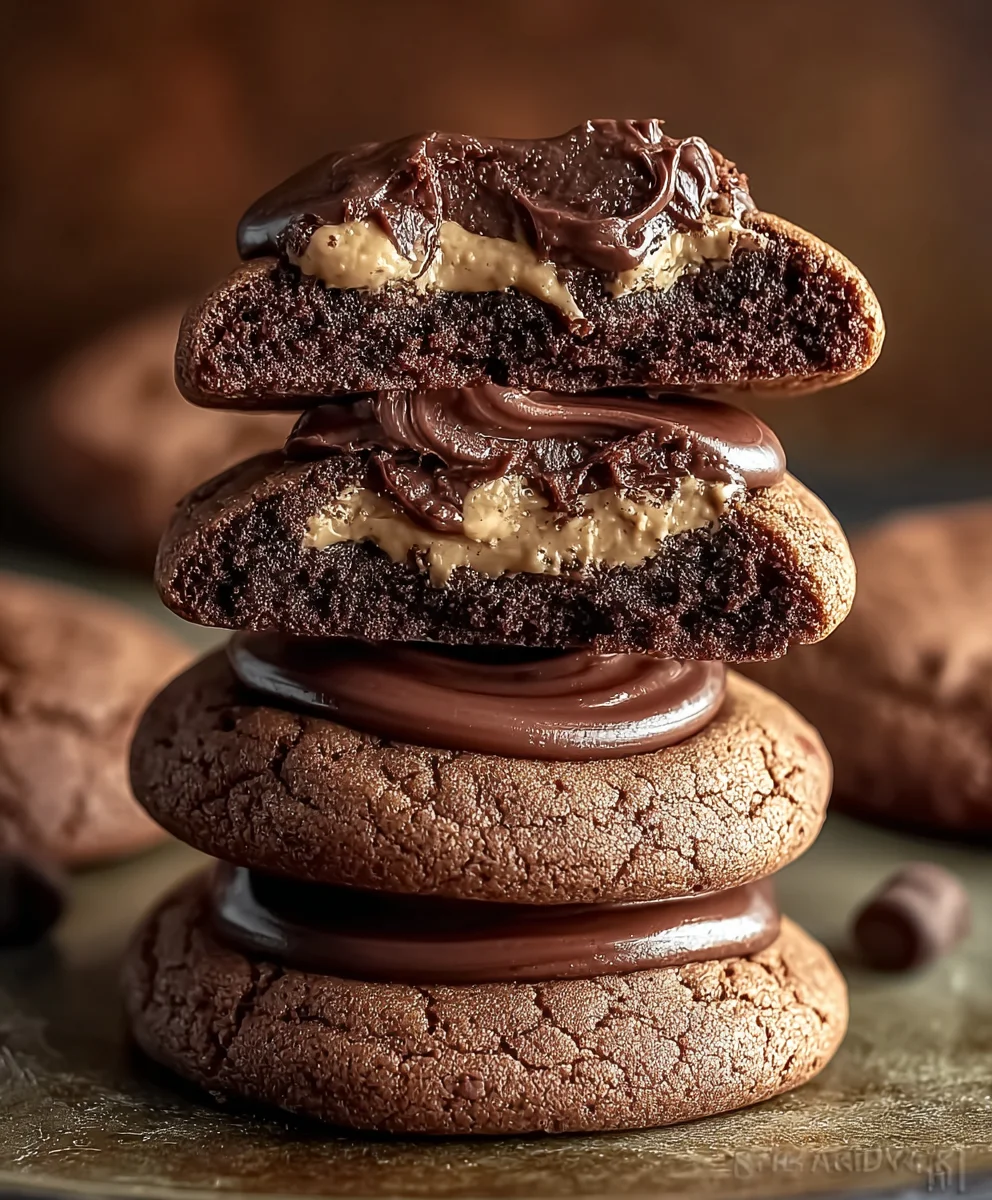
Choco Cream Dream Cookies. Just the name conjures images of pure confectionary bliss, doesn’t it? Prepare yourself for an extraordinary baking adventure that promises to delight your senses and capture your heart. Imagine sinking your teeth into a remarkably tender, rich chocolate cookie, only to discover it embraces a velvety, cloud-like cream filling that melts in your mouth. This isn’t merely a cookie; it’s a meticulously crafted experience, an elevated take on a universally beloved classic that brings back cherished memories of childhood treats while offering a sophisticated twist for the discerning palate.
I find that what truly makes these particular cookies so adored is their perfect harmony of textures and flavors. The deep, cocoa-rich cookie provides a satisfying chew, a perfect counterpoint to the smooth, vanilla-kissed cream that nestles within. It’s a symphony of sweet and decadent, a comforting embrace that makes every single bite feel like a special occasion. Whether you’re seeking to impress guests at your next gathering or simply craving a moment of luxurious self-indulgence, these Choco Cream Dream Cookies are guaranteed to become a cherished staple in your baking repertoire. They are more than just a recipe; they are an invitation to create joy, one delicious cookie at a time.

Ingredients:
-
For the Choco Cream Dream Cookies (Cookie Base):
- Unsalted Butter: 1 cup (226g), which is two sticks, softened to room temperature. This is crucial for a smooth dough.
- Granulated Sugar: 1 ½ cups (300g), for that essential sweetness and crisp edge.
- Light Brown Sugar: ½ cup (100g), packed. The molasses in brown sugar adds moisture, chewiness, and a lovely depth of flavor to our Choco Cream Dream Cookies.
- Large Eggs: 2, also at room temperature. Room temperature eggs emulsify better with the butter and sugar, leading to a more uniform dough.
- Vanilla Extract: 2 teaspoons. Don’t skimp on the vanilla; it truly enhances the chocolate flavor.
- All-Purpose Flour: 2 ½ cups (300g). Measure this precisely, ideally by weight for the best results.
- Unsweetened Cocoa Powder: ¾ cup (65g), natural or Dutch-processed. Either works beautifully; Dutch-processed will give a darker, less acidic chocolate flavor.
- Baking Soda: 1 teaspoon. This is our leavening agent, helping the cookies rise slightly and achieve a tender texture.
- Salt: ½ teaspoon. A little salt balances the sweetness and brings out the rich chocolate notes in these Choco Cream Dream Cookies.
- Chocolate Chips: 1 cup (170g), semi-sweet or dark. This is optional, but highly recommended! They add an extra layer of chocolatey delight within the cookies themselves.
-
For the Dreamy Cream Filling:
- Unsalted Butter: ½ cup (113g), which is one stick, softened. Again, room temperature is key for a smooth, lump-free frosting.
- Powdered Sugar (Confectioners’ Sugar): 3 cups (360g), sifted. Sifting is non-negotiable here to avoid lumps in your silky filling.
- Heavy Cream or Whole Milk: 2-3 tablespoons. Start with two and add more as needed to reach your desired consistency.
- Vanilla Extract: 1 teaspoon. Pure vanilla extract will give the best flavor to compliment our Choco Cream Dream Cookies.
- Pinch of Salt: Just a tiny bit, ¼ teaspoon at most, to balance the sweetness.
For the Choco Cream Dream Cookies: Preparing the Dough
- Prepare Your Workspace and Oven: Before you even think about mixing, let’s get organized! Preheat your oven to 350°F (175°C). Line two large baking sheets with parchment paper or silicone baking mats. This step ensures your Choco Cream Dream Cookies won’t stick and will bake evenly, plus it makes cleanup a breeze. I always tell myself, “a prepared baker is a happy baker!”
- Cream the Wet Ingredients (Part 1): In a large mixing bowl, using an electric mixer (either a stand mixer with the paddle attachment or a hand mixer), cream together the softened unsalted butter, granulated sugar, and packed light brown sugar. Beat on medium speed for about 2-3 minutes, or until the mixture is light in color and fluffy in texture. You’ll notice it becoming visibly lighter and airier as air is incorporated. This creaming process is vital for the texture of your Choco Cream Dream Cookies, as it creates tiny air pockets that will expand during baking, resulting in a tender cookie.
- Incorporate Eggs and Vanilla: Scrape down the sides of the bowl with a rubber spatula to ensure everything is well combined. Then, add the two large room temperature eggs, one at a time, beating well after each addition until fully incorporated. Follow this by adding the vanilla extract and beating for another 30 seconds. The mixture might look a little curdled after the first egg, but it will smooth out as you add the second and the vanilla. The goal here is a homogeneous, creamy mixture.
- Whisk the Dry Ingredients: In a separate medium bowl, whisk together the all-purpose flour, unsweetened cocoa powder, baking soda, and salt. Make sure to whisk thoroughly for at least 30 seconds to ensure the leavening agents and salt are evenly distributed throughout the flour. This prevents any pockets of unmixed ingredients, which could lead to inconsistent cookies. For truly exceptional Choco Cream Dream Cookies, every ingredient needs its place!
- Combine Wet and Dry Ingredients: Gradually add the dry ingredient mixture to the wet ingredient mixture. Do this in 2-3 additions, mixing on low speed until just combined after each addition. This is a critical step: do not overmix! Overmixing develops the gluten in the flour too much, which can lead to tough, dense cookies instead of the soft, chewy Choco Cream Dream Cookies we’re aiming for. Stop mixing as soon as you no longer see streaks of dry flour. A few small pockets of flour are okay, as they will disappear in the next step.
- Fold in Chocolate Chips (Optional but Recommended): If you’re using chocolate chips, now is the time to gently fold them into the dough using your rubber spatula. Distribute them evenly throughout the dough. The extra bursts of melty chocolate make these Choco Cream Dream Cookies even more irresistible!
- Chill the Dough: This step is often overlooked, but it’s incredibly important for our Choco Cream Dream Cookies. Cover the bowl with plastic wrap and refrigerate the dough for at least 1 hour, or up to 24 hours. Chilling the dough solidifies the butter, which prevents the cookies from spreading too much in the oven, resulting in a thicker, chewier cookie. It also allows the flavors to meld and deepen, giving you a more complex and satisfying cookie. Patience truly pays off here!
Baking the Choco Cream Dream Cookies
- Scoop and Space the Dough: Once your dough is nicely chilled, remove it from the refrigerator. Use a 1.5 to 2-tablespoon cookie scoop (or just roll by hand) to form uniform balls of dough. Place them about 2 inches apart on your prepared baking sheets. Remember, these Choco Cream Dream Cookies will spread a little, so give them room to breathe! Uniform size is important for even baking.
- Bake to Perfection: Bake one sheet at a time in the preheated oven for 10-12 minutes. The exact baking time can vary depending on your oven, so keep a close eye on them. The cookies are done when the edges are set and slightly firm, but the centers still look a little soft and slightly puffy. They might even look slightly underdone in the very middle, which is perfect! This ensures a wonderfully soft and chewy interior for your Choco Cream Dream Cookies.
- Cooling Process: As soon as you pull the baking sheet from the oven, let the cookies cool on the baking sheet for 5-7 minutes. They are quite delicate when hot, and this short cooling period allows them to set up without breaking. After this initial cooling, carefully transfer the Choco Cream Dream Cookies to a wire rack to cool completely. It is absolutely crucial that the cookies are completely cool before you even think about adding the filling. Warm cookies will melt your beautiful cream filling, leading to a messy disaster. Trust me on this one!
For the Dreamy Cream Filling: Crafting the Silky Center
- Cream the Butter: In a medium mixing bowl, using your electric mixer, beat the softened unsalted butter on medium speed for about 1-2 minutes until it’s very light, fluffy, and almost white in color. This aerates the butter, which is the secret to a truly light and airy filling for our Choco Cream Dream Cookies.
- Gradually Add Powdered Sugar: With the mixer on low speed, gradually add the sifted powdered sugar, about ½ cup at a time. Beat until each addition is fully incorporated before adding more. This slow addition prevents a cloud of sugar from engulfing your kitchen! Sifting the powdered sugar beforehand is essential to ensure a super smooth, lump-free filling. No one wants lumpy cream in their Choco Cream Dream Cookies!
- Incorporate Liquid and Flavor: Once all the powdered sugar is incorporated, the mixture will be quite thick and crumbly. Now, add 2 tablespoons of heavy cream (or whole milk), the vanilla extract, and the pinch of salt. Increase the mixer speed to medium-high and beat for another 2-3 minutes. This vigorous beating will transform the mixture into a wonderfully light, fluffy, and spreadable cream filling.
- Adjust Consistency: If your filling seems too thick, add the remaining tablespoon of heavy cream (or milk) slowly, ½ teaspoon at a time, beating after each addition until you reach your desired consistency. You want a filling that is soft and spreadable, but firm enough to hold its shape when sandwiched between your Choco Cream Dream Cookies. It should be dreamy, just like the name suggests!
Assembling Your Choco Cream Dream Cookies
- Match Your Cookies: Once your Choco Cream Dream Cookies are completely cool, gently sort through them and pair up cookies of similar size and shape. This will help them stack neatly and look professionally made. Think of them as perfect little partners, waiting for their sweet embrace!
-
Apply the Dreamy Cream Filling:
- Method 1 (Piping): For a neat and professional look, transfer the cream filling to a piping bag fitted with a round or star tip. Pipe a generous dollop of filling onto the flat side of one cookie. Start from the outer edge and spiral inwards, or simply pipe a good sized mound in the center.
- Method 2 (Spreading): If you don’t have a piping bag, no worries! Use a small offset spatula or a butter knife to spread a thick layer of the dreamy cream filling onto the flat side of one cookie. Ensure the filling goes almost to the edge, but leave a little room as it will spread when pressed.
Don’t be shy with the filling! The thick, creamy center is what makes these “Choco Cream Dream Cookies” truly live up to their name.
- Gently Sandwich the Cookies: Take a second, similarly sized cookie and gently place it on top of the filling, flat side down. Press down very lightly, just enough to spread the filling to the edges of the cookies. Be careful not to press too hard, or the filling will squish out excessively. The goal is a uniform, elegant sandwich. You’ve now officially created a “Choco Cream Dream Cookie”!
- Finishing Touches (Optional): For an extra touch of flair, you can roll the edges of your assembled Choco Cream Dream Cookies in sprinkles, mini chocolate chips, or even a little extra cocoa powder. This adds a nice visual appeal and a slight textural contrast.
- Storage and Enjoyment: Place your beautiful Choco Cream Dream Cookies on a plate or in an airtight container. While they are delightful immediately, I find they are even better after sitting for an hour or two at room temperature, allowing the flavors to fully meld. For longer storage, keep them in an airtight container at room temperature for up to 3-4 days. If your kitchen is very warm, or if you need to store them longer, you can refrigerate them for up to a week. Just make sure to bring them back to room temperature for about 15-20 minutes before serving for the best texture and flavor. These cookies are truly a dream come true! Enjoy every single bite of your homemade Choco Cream Dream Cookies.
Conclusion:
Well, my fellow dessert enthusiasts, we’ve reached the sweet finale of our journey, and I genuinely hope you’re feeling as inspired as I am to whip up a batch of these extraordinary treats. If there’s one recipe I could implore you to try, it would undoubtedly be this one. These aren’t just any cookies; they are an experience, a little slice of heaven that manages to be both profoundly comforting and utterly decadent. I’ve tried countless cookie recipes over the years, and none quite capture the perfect balance of rich chocolatey depth and a light, melt-in-your-mouth creaminess like these Choco Cream Dream Cookies do. From the moment the aroma fills your kitchen, you’ll understand why I’m so passionate about sharing this particular gem. The way the edges crisp ever so slightly while the centers remain wonderfully soft and chewy is pure magic, a textural symphony that will have everyone reaching for a second, and perhaps even a third. It’s a recipe that delivers on its promise of indulgence without being overly complicated, making it perfect for both seasoned bakers and those just starting their culinary adventures. Trust me when I say, once you taste these, they’re destined to become a staple in your baking repertoire, a go-to for any occasion that calls for something truly special.
And speaking of special, let’s talk about how to make these wonders even more your own. While fantastic straight out of the oven, perhaps slightly cooled with a glass of cold milk, their versatility is truly one of their strongest suits. Imagine them nestled alongside a scoop of vanilla bean ice cream, the warm cookie slightly melting the edges of the frosty dessert – absolute bliss! For a more grown-up treat, a warm cookie pairs exquisitely with a robust espresso or a creamy latte, turning an ordinary coffee break into a luxurious escape. Don’t be afraid to experiment with your serving. Try crumbling a few over a bowl of Greek yogurt for a decadent breakfast or dessert parfait, adding a delightful crunch and a burst of chocolate flavor to your morning. Or, for a truly impressive presentation, arrange them on a platter with fresh berries, perhaps a few raspberries or sliced strawberries, to add a pop of color and a touch of tartness that beautifully complements the chocolate. These are not merely cookies; they are a blank canvas for your dessert dreams, waiting for your personal touch.
Elevate Your Choco Cream Dream Cookies Experience
Now, let’s talk variations! The beauty of this recipe is its adaptability, allowing you to tailor it to your specific tastes or whatever ingredients you happen to have on hand. Feel free to swap out the type of chocolate chips – maybe a mix of dark and white chocolate for an extra layer of flavor complexity, creating a beautiful marbled effect, or even some butterscotch chips for a completely different, delightful twist that brings a touch of caramel notes. A sprinkle of flaky sea salt on top before baking can truly enhance the chocolate notes, bringing out a sophisticated counterpoint to the sweetness that elevates the entire experience. For those who love a bit of crunch, consider folding in a generous handful of chopped walnuts, pecans, or even roasted almonds during the mixing stage. If you’re feeling extra adventurous, a dash of peppermint extract or a teaspoon of fresh orange zest can transform these into a festive holiday treat, or a bright, citrusy delight perfect for a summer gathering. Want to make them even creamier? A thin layer of a simple cream cheese frosting, or even a dollop of whipped ganache between two cookies, can turn them into decadent sandwich cookies that are truly out of this world. The possibilities are endless, and I encourage you to unleash your inner baker and put your unique stamp on these delightful treats. The core recipe is so robust and forgiving, it can handle a little creative flair and still deliver an incredible result.
Your Turn to Bake and Share!
So, what are you waiting for? Clear some space in your kitchen, gather your ingredients, and prepare to embark on a delightful baking adventure. I promise you, the aroma alone that fills your home will be worth the effort. There’s something profoundly satisfying about creating something so delicious from scratch, and these Choco Cream Dream Cookies are exceptionally rewarding. I genuinely believe that sharing food is one of the purest forms of love, and I can’t wait for you to share these with your friends and family, watching their faces light up with every bite. Once you’ve baked your batch, I would absolutely love to hear about your experience! Did you stick to the original recipe, or did you venture into some exciting variations? What was your favorite serving suggestion? Please don’t hesitate to tell me how they turned out, what you loved most, and even share a picture of your gorgeous creations! Your feedback and photos mean the world to me and inspire me to keep sharing more deliciousness. Happy baking, and get ready to fall head over heels for your new favorite cookie!
Choco Cream Dream Cookies
Prepare yourself for an extraordinary baking adventure that promises to delight your senses. Imagine sinking your teeth into a remarkably tender, rich chocolate cookie, embracing a velvety, cloud-like cream filling that melts in your mouth. This elevated take on a universally beloved classic is a symphony of sweet and decadent textures and flavors, guaranteed to become a cherished staple.
Ingredients
-
1 cup (226g) unsalted butter, softened
-
1 ½ cups (300g) granulated sugar
-
½ cup (100g) light brown sugar, packed
-
2 large eggs, room temperature
-
2 teaspoons vanilla extract
-
2 ½ cups (300g) all-purpose flour
-
¾ cup (65g) unsweetened cocoa powder
-
1 teaspoon baking soda
-
½ teaspoon salt
-
1 cup (170g) semi-sweet or dark chocolate chips (optional)
-
½ cup (113g) unsalted butter, softened (for filling)
-
3 cups (360g) powdered sugar, sifted
-
2-3 tablespoons heavy cream or whole milk
-
1 teaspoon vanilla extract (for filling)
-
¼ teaspoon salt (for filling)
Instructions
-
Step 1
Preheat oven to 350°F (175°C) and line two baking sheets with parchment paper. In a large bowl, cream softened butter, granulated sugar, and light brown sugar for 2-3 minutes until light and fluffy. Beat in eggs one at a time, then add 2 teaspoons vanilla extract and beat for 30 seconds. -
Step 2
In a separate medium bowl, whisk together all-purpose flour, cocoa powder, baking soda, and ½ teaspoon salt. Gradually add the dry mixture to the wet mixture, mixing on low speed until just combined. Do not overmix. Gently fold in chocolate chips, if using. -
Step 3
Cover the bowl with plastic wrap and refrigerate the dough for at least 1 hour, or up to 24 hours. This helps prevent spreading during baking and deepens flavors. -
Step 4
Scoop 1.5 to 2-tablespoon balls of chilled dough onto prepared baking sheets, spacing them 2 inches apart. Bake one sheet at a time for 10-12 minutes, until edges are set but centers still look soft. Cool on the baking sheet for 5-7 minutes, then transfer to a wire rack to cool completely. -
Step 5
In a medium mixing bowl, beat ½ cup softened unsalted butter until light and fluffy (1-2 minutes). Gradually add 3 cups sifted powdered sugar, ½ cup at a time, on low speed. Once incorporated, add 2-3 tablespoons heavy cream (or milk), 1 teaspoon vanilla extract, and ¼ teaspoon salt. Beat on medium-high for 2-3 minutes until the filling is light, fluffy, and spreadable. Adjust consistency with more liquid if needed. -
Step 6
Once cookies are completely cool, pair them up by size. Spread or pipe a generous dollop of cream filling onto the flat side of one cookie. Gently place a second cookie on top, flat side down, and press lightly to spread the filling. Store assembled cookies in an airtight container at room temperature for 3-4 days, or refrigerate for longer storage. Bring to room temperature before serving for best texture and flavor.
Important Information
Nutrition Facts (Per Serving)
It is important to consider this information as approximate and not to use it as definitive health advice.
Allergy Information
Please check ingredients for potential allergens and consult a health professional if in doubt.


Leave a Comment