

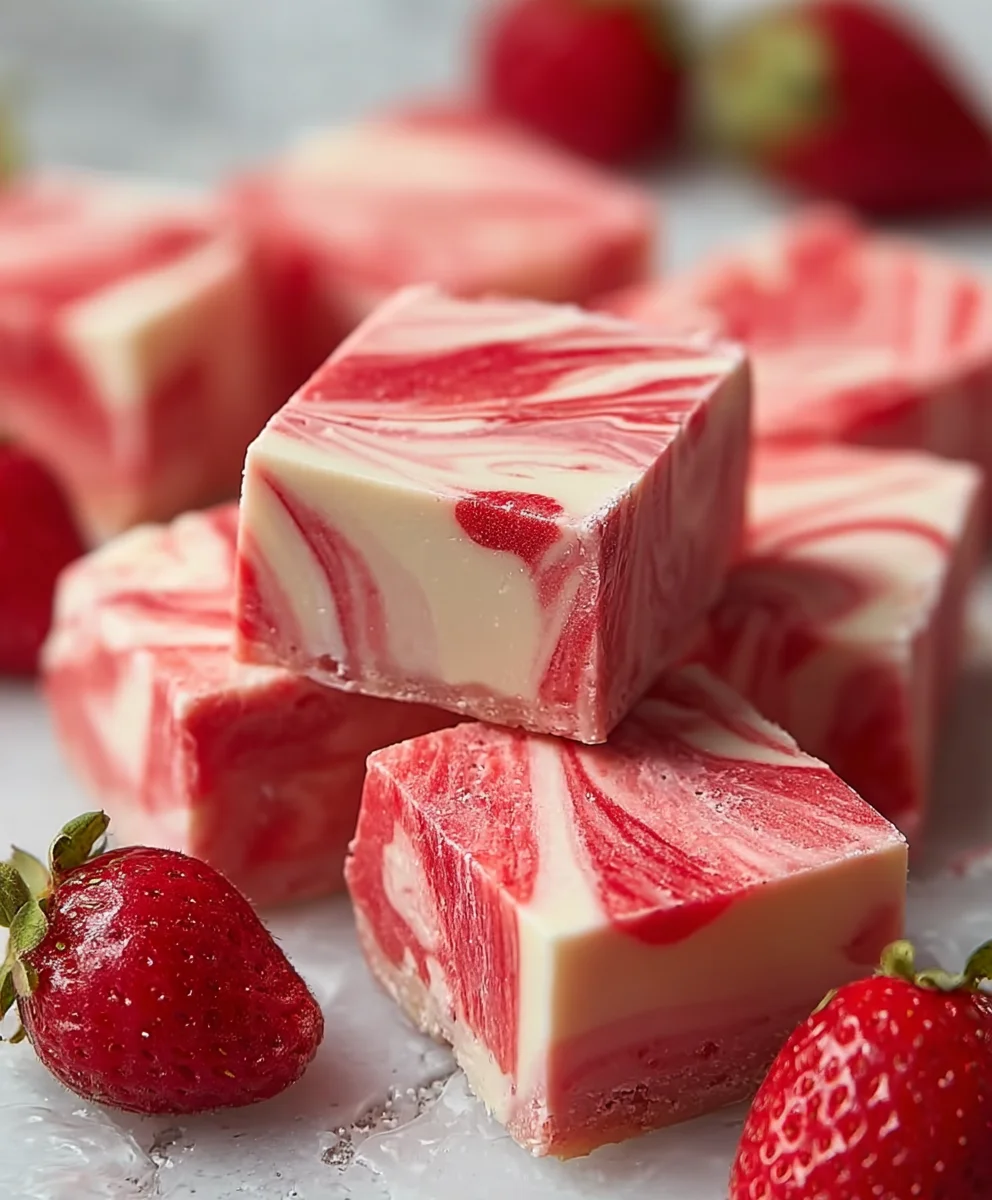
Strawberry Swirl Fudge. There’s something undeniably enchanting about a confection that marries the rich, creamy texture of traditional fudge with the bright, whimsical notes of summer strawberries. I remember the first time I attempted this delightful recipe, eager to create a treat that was as visually stunning as it was delicious. Fudge itself boasts a fascinating, somewhat accidental history, evolving from a botched batch of caramels in the late 19th century into a beloved American staple, gracing everything from artisanal shops to school bake sales. This particular iteration, Strawberry Swirl Fudge, elevates that classic comfort with a vibrant burst of fruitiness and a captivating marbled design, making it an absolute showstopper.
Why This Fudge is a Crowd-Pleaser
People adore this dish not just for its melt-in-your-mouth creaminess and the harmonious blend of sweet berry and rich sugar, but also for its sheer convenience – a no-bake wonder that promises impressive results with minimal fuss. It’s perfect for sharing at parties, gifting to loved ones, or simply indulging in a moment of pure, sweet bliss. Get ready to impress with this stunning yet surprisingly simple dessert!

Ingredients:
-
For the Rich Fudge Base:
- Granulated Sugar: 3 cups (approximately 600g)
- Unsalted Butter: 1 cup (2 sticks or 226g), cut into smaller pieces for easier melting
- Evaporated Milk: 5 oz can (approximately 2/3 cup or 147ml) – not sweetened condensed milk!
- Fine Sea Salt: 1/2 teaspoon, to balance the sweetness
- Mini Marshmallows: 10 oz bag (approximately 280g) – these provide that incredible smooth texture
- Good Quality White Chocolate Chips: 12 oz bag (approximately 340g) or a high-quality white chocolate bar, finely chopped
- Pure Vanilla Extract: 1 teaspoon, for that classic comforting aroma
-
For the Vibrant Strawberry Swirl:
- Fresh Ripe Strawberries: 1 lb (approximately 450g), hulled and quartered
- Granulated Sugar: 1/4 cup (approximately 50g), adjustable based on the sweetness of your strawberries
- Fresh Lemon Juice: 1 tablespoon, to brighten the strawberry flavor and prevent oxidation
- Red Food Coloring: Optional, a few drops, if you desire a more intensely vibrant pink swirl for your Strawberry Swirl Fudge.
-
Essential Equipment:
- 9×13 inch baking pan
- Parchment paper
- Heavy-bottomed saucepan (at least 4-quart capacity)
- Candy thermometer (highly recommended for accuracy)
- Rubber spatula or wooden spoon
- Hand immersion blender or standard blender
- Small saucepan for the strawberry puree
- Wire whisk
Preparing Your Workspace for the Perfect Strawberry Swirl Fudge
- Line Your Pan: Before you even begin to gather your ingredients, take a moment to prepare your 9×13 inch baking pan. Line it with parchment paper, allowing an overhang on the longer sides. This will create “handles” later, making it incredibly easy to lift your glorious Strawberry Swirl Fudge out of the pan once it’s set. A little non-stick cooking spray on the bottom of the pan before adding the parchment can help it stay put.
- Measure and Prep: Have all your ingredients measured and ready to go. This is called “mise en place” and it’s a game-changer, especially for recipes like fudge that require precise timing. Cut your butter, hull and quarter your strawberries, and have your marshmallows and white chocolate chips open and accessible.
Phase 1: Crafting the Delicious Strawberry Swirl Puree
- Combine for Flavor: In a small saucepan, combine your hulled and quartered fresh strawberries, 1/4 cup of granulated sugar, and the tablespoon of fresh lemon juice. Give it a gentle stir to mix everything together. The lemon juice is key here; it not only brightens the strawberry flavor but also helps prevent the berries from browning, keeping your swirl a lovely, natural pink.
- Simmer and Soften: Place the saucepan over medium-low heat. Bring the mixture to a gentle simmer, stirring occasionally. As the strawberries heat up, they will release their juices and soften beautifully. Continue to simmer for about 8-10 minutes, or until the strawberries are very soft and easily mashable with the back of a spoon. You want them to be thoroughly cooked down.
- Blend to Perfection: Remove the saucepan from the heat. Carefully transfer the hot strawberry mixture to a blender or use an immersion blender directly in the saucepan. Blend until the mixture is completely smooth and no large pieces of strawberry remain. Be cautious if using a standard blender, as hot liquids can create pressure; start on a low speed and gradually increase.
- Reduce for Intensity: Return the smooth strawberry puree to the small saucepan. Place it back over medium-low heat and bring it to a gentle simmer once more. We’re going to reduce this puree now to concentrate its flavor and thicken it slightly. Stir frequently to prevent scorching on the bottom of the pan. Continue simmering for another 10-15 minutes, or until the puree has thickened to a consistency similar to a thick jam or a fruit sauce that coats the back of a spoon. It should reduce by about one-third to one-half of its original volume. This reduction step is crucial for an intense strawberry flavor that won’t make your Strawberry Swirl Fudge watery.
- Cool and Color (Optional): Once thickened, remove the strawberry puree from the heat and let it cool completely. Transfer it to a small bowl. At this point, if you desire a more vibrant pink color for your swirl, you can add a few drops of red food coloring and stir it in. This is purely for aesthetics; the natural color is lovely on its own, but sometimes a little boost makes the “Strawberry Swirl Fudge” truly pop visually! Set this aside while you prepare the fudge base.
Phase 2: Crafting the Luxurious Fudge Base
- Initiate the Base: In your large, heavy-bottomed saucepan, combine the 3 cups of granulated sugar, the cut-up unsalted butter, the 5 oz can of evaporated milk, and the 1/2 teaspoon of fine sea salt. This combination forms the backbone of your incredible Strawberry Swirl Fudge.
- Heat and Stir: Place the saucepan over medium heat. Stir constantly with a rubber spatula or wooden spoon. It’s incredibly important to stir continuously to ensure all the sugar dissolves evenly and to prevent the mixture from scorching on the bottom. Keep stirring until the butter is completely melted and the sugar has fully dissolved. You should feel no grittiness when you rub a tiny amount between your fingers.
- Bring to a Rolling Boil: Increase the heat to medium-high and bring the mixture to a rolling boil. A “rolling boil” means it’s boiling so vigorously that stirring does not stop the bubbles. Once it reaches this stage, clip your candy thermometer to the side of the pan, making sure the tip of the thermometer is submerged in the mixture but not touching the bottom of the pan.
- Cook to Soft-Ball Stage: Continue to boil the fudge mixture, stirring occasionally (but not constantly at this stage, as it can cause sugar crystallization), until the thermometer registers 235-240°F (113-116°C). This is known as the “soft-ball stage.” This step is absolutely critical for the texture of your Strawberry Swirl Fudge. If you cook it too long, your fudge will be crumbly; not long enough, and it will be too soft and not set properly. If you don’t have a thermometer, you can test by dropping a small amount of the hot mixture into a cup of cold water; it should form a soft, pliable ball. This usually takes about 5-8 minutes once it reaches a rolling boil, but watch your thermometer!
- Remove from Heat and Add Remaining Ingredients: As soon as the mixture reaches the desired temperature, immediately remove the saucepan from the heat. This stops the cooking process right away. Now, swiftly add the entire bag of mini marshmallows, the 12 oz of white chocolate chips (or chopped white chocolate), and the 1 teaspoon of pure vanilla extract.
- Stir Until Silky Smooth: Without delay, begin to stir vigorously. The residual heat from the cooked sugar mixture will melt the marshmallows and white chocolate. Continue stirring until everything is completely melted and incorporated. You are looking for a perfectly smooth, glossy, and homogeneous fudge mixture. There should be no lumps of marshmallow or unmelted chocolate. This can take a few minutes of good, strong stirring, so put some elbow grease into it! The texture should be wonderfully creamy and inviting, ready to form the base of your Strawberry Swirl Fudge.
Phase 3: Assembling and Swirling Your Exquisite Strawberry Swirl Fudge
- Establish the Base Layer: Quickly, before the fudge sets too much, pour about two-thirds of the plain white fudge mixture into your prepared 9×13 inch pan. Use your rubber spatula to spread it evenly into a smooth layer across the bottom of the pan. Work with purpose, as fudge begins to set quite rapidly.
- Infuse the Remaining Fudge with Strawberry: To the remaining one-third of the white fudge mixture in your saucepan, add all of your cooled and reduced strawberry puree. Using your spatula, gently but thoroughly fold the strawberry puree into the fudge until it’s fully combined and forms a beautiful, light pink strawberry-flavored fudge. You’ll notice the delightful aroma of fresh strawberries instantly.
- Dollop and Distribute: Now, take spoonfuls of this strawberry-infused fudge and dollop them randomly over the plain white fudge layer in the pan. Don’t worry about perfection; randomness is key to a beautiful swirl! Spread these dollops out across the entire surface of the pan.
- Create the Iconic Swirl: Take a butter knife, a thin skewer, or even a toothpick. Insert it into the fudge and gently drag it through the two layers, creating swirling patterns. You can go back and forth, make figure-eights, or just gentle loops. Be careful not to over-swirl! If you swirl too much, the colors will blend entirely, and you’ll lose that beautiful, distinct “swirl” effect that makes this Strawberry Swirl Fudge so visually appealing. Aim for just a few passes to create an elegant marbling.
Phase 4: Cooling, Cutting, and Enjoying Your Magnificent Strawberry Swirl Fudge
- The Waiting Game – Cooling Period: Once your swirling masterpiece is complete, let the Strawberry Swirl Fudge cool at room temperature for about 30 minutes, uncovered. After that initial period, transfer the pan to the refrigerator. Allow it to chill and firm up completely for at least 3-4 hours, but ideally overnight. Patience is a virtue here; a fully set fudge is much easier to cut cleanly and results in the best texture.
- Lifting and Cutting: Once your Strawberry Swirl Fudge is thoroughly chilled and firm, use the parchment paper overhangs as handles to gently lift the entire block of fudge out of the pan and onto a clean cutting board.
- Precision Cuts: Now for the rewarding part! Using a large, sharp knife, cut the fudge into desired squares. For the cleanest cuts, wipe your knife with a damp, hot cloth between each slice, especially after the initial cuts. This will prevent the fudge from sticking and yield those perfectly defined squares that are so satisfying. I usually aim for 1-inch to 1.5-inch squares, as this fudge is quite rich, and smaller pieces are often perfect for satisfying a sweet craving.
- Storage for Lasting Enjoyment: Store your incredible Strawberry Swirl Fudge in an airtight container at room temperature for up to 1 week, or in the refrigerator for up to 2 weeks. If stacking pieces, place small sheets of parchment paper between layers to prevent them from sticking together. This fudge also freezes beautifully for up to 3 months; just thaw at room temperature before serving.
And there you have it! A truly delightful and visually stunning batch of homemade Strawberry Swirl Fudge. Each bite offers the creamy sweetness of white chocolate fudge perfectly complemented by the bright, tangy burst of strawberry. It’s a treat that’s sure to impress and satisfy anyone lucky enough to try it!
Conclusion:
After all the delightful steps we’ve taken together, I truly hope you’re feeling inspired to whip up a batch of this extraordinary dessert. What we’ve crafted here isn’t merely a confection; it’s an experience, a delightful journey for your taste buds, and a testament to how simple ingredients can come together to create something truly magical. I’ve found that many people are intimidated by making homemade fudge, but I promise you, this recipe demolishes those preconceived notions. It’s designed to be foolproof, fast, and fantastically flavorful, ensuring that even a novice in the kitchen can achieve gourmet results. This fudge is destined to become a staple in your recipe repertoire, not just for its ease but for its irresistible taste that will have everyone asking for more.
Why is this recipe a must-try? Well, for starters, its unparalleled creaminess is something to behold. Each bite melts in your mouth, leaving behind a lingering sweetness that is perfectly balanced by the bright, fruity tang of fresh strawberries. Then there’s the visual appeal – those mesmerizing swirls of pink and white are not just beautiful, they promise a burst of natural fruit flavor with every piece. It’s a treat that looks as good as it tastes, making it an ideal candidate for any special occasion or just a lovely everyday indulgence. Beyond the aesthetics, the genuine, wholesome taste of real strawberries shines through, distinguishing it from overly artificial alternatives. This isn’t just candy; it’s a little piece of edible art that brings joy and a sophisticated touch to your dessert table. Its vibrant color alone makes it a showstopper, drawing appreciative glances before anyone even takes a bite, truly making it a dessert that pleases all the senses.
One of the aspects I love most about this particular confection is its incredible versatility. While it’s absolutely divine on its own, imagine serving small, exquisite squares alongside a piping hot cup of Earl Grey tea or a robust dark roast coffee. The richness of the brew beautifully complements the sweetness of the fudge. For a more decadent dessert presentation, crumble a few pieces over a scoop of vanilla bean ice cream or a simple panna cotta – the textural contrast and flavor boost are simply divine. I’ve even been known to chop it into smaller bits and fold it into a homemade batch of no-churn ice cream, turning a delicious base into something truly extraordinary. If you’re hosting, arrange a colorful platter with various small treats, and watch as these vibrant squares disappear first. They also make magnificent, thoughtful gifts. Imagine boxing up a few pieces in a pretty tin or tied with a festive ribbon; it’s a personalized present that speaks volumes about your effort and affection, perfect for holidays, birthdays, or just a sweet ‘thinking of you’ gesture. It truly elevates any occasion, transforming a simple moment into a memorable one.
But let’s talk about taking this treat to the next level with some fun variations. While the classic iteration is a masterpiece, feel free to experiment with other fruit purees. Raspberry swirl fudge offers a similar tartness but with a slightly different berry profile, while a blueberry swirl could introduce a deeper, more earthy fruit note. For those who adore chocolate, consider swirling in a bit of melted dark chocolate or even a chocolate ganache instead of the strawberry puree for a rich, intense flavor bomb that will have chocoholics rejoicing. You could also experiment with extracts; a touch of almond extract in the white chocolate base can add a sophisticated nutty undertone, or a scraped vanilla bean could elevate the vanilla notes to new heights. For a textural twist, finely chop some pistachios, walnuts, or pecans and fold them into the base before setting, or sprinkle them on top for a delightful crunch and added visual interest. Another idea is to use a dark chocolate fudge base and swirl the strawberry, creating a beautiful contrast in both color and flavor, truly making the vibrant pink pop against the deep brown. Or perhaps, make mini fudge bites by pouring the mixture into a mini muffin tin lined with paper cases for adorable, bite-sized portions perfect for parties, allowing guests to sample without commitment. The possibilities are truly endless, limited only by your imagination!
Now, for the moment of truth: it’s your turn! I genuinely cannot wait for you to experience the sheer delight of making and tasting your very own batch of Strawberry Swirl Fudge. Don’t hesitate; gather your ingredients, follow the steps, and prepare to be amazed by how easily you can create something so incredibly delicious and visually stunning. Once you’ve made it, I would absolutely love to hear all about your experience. Did you stick to the original recipe, or did you venture into one of the variations I suggested? Perhaps you came up with a brilliant twist of your own that you’re eager to share! Please, take a photo of your beautiful creation and share it with me. Drop a comment below to let me know how it turned out, what you loved most, or if you have any tips for fellow fudge makers. Your feedback and creativity are what make our cooking community so vibrant and inspiring. I’m confident that this recipe will quickly become a cherished favorite in your household, bringing smiles and sweet moments to everyone who tries it. Happy fudge making, and I look forward to celebrating your culinary success!

Strawberry Swirl Fudge
This easy, no-bake Strawberry Swirl Fudge marries rich, creamy white chocolate fudge with bright, fruity strawberry puree, creating a visually stunning marbled treat perfect for any occasion.
Ingredients
-
3 cups (600g) Granulated Sugar
-
1 cup (226g) Unsalted Butter, cut
-
5 oz can (147ml) Evaporated Milk
-
1/2 tsp Fine Sea Salt
-
10 oz bag (280g) Mini Marshmallows
-
12 oz (340g) White Chocolate Chips
-
1 tsp Pure Vanilla Extract
-
1 lb (450g) Fresh Ripe Strawberries, hulled & quartered
-
1/4 cup (50g) Granulated Sugar (for swirl)
-
1 tbsp Fresh Lemon Juice
-
Few drops Red Food Coloring (optional)
Instructions
-
Step 1
Line a 9×13 inch baking pan with parchment paper, leaving an overhang on the longer sides. Measure and prepare all ingredients (mise en place). -
Step 2
In a small saucepan, combine hulled and quartered strawberries, 1/4 cup granulated sugar, and lemon juice. Simmer over medium-low heat for 8-10 minutes until soft. Remove from heat and blend until completely smooth using a blender or immersion blender. -
Step 3
Return the smooth strawberry puree to the saucepan. Simmer over medium-low heat for 10-15 minutes, stirring frequently, until it has thickened to a jam-like consistency (reduced by about one-third to one-half). Cool completely. Optionally, add a few drops of red food coloring for a more vibrant pink. Set aside. -
Step 4
In a large, heavy-bottomed saucepan, combine 3 cups granulated sugar, cut unsalted butter, evaporated milk, and sea salt. Cook over medium heat, stirring constantly, until butter melts and sugar dissolves. -
Step 5
Increase heat to medium-high and bring mixture to a rolling boil. Clip a candy thermometer to the side of the pan. Boil, stirring occasionally, until the thermometer registers 235-240°F (113-116°C) (soft-ball stage). This usually takes 5-8 minutes once boiling. -
Step 6
Immediately remove from heat. Add mini marshmallows, white chocolate chips, and vanilla extract. Stir vigorously until everything is completely melted and the mixture is smooth, glossy, and homogeneous. -
Step 7
Quickly pour about two-thirds of the plain white fudge into the prepared pan and spread evenly. To the remaining fudge in the saucepan, add all of the cooled strawberry puree. Fold gently until combined. Dollop spoonfuls of the strawberry-infused fudge randomly over the white layer. Use a butter knife or skewer to gently swirl the two layers together, being careful not to over-swirl. -
Step 8
Cool the fudge at room temperature for about 30 minutes, then transfer to the refrigerator and chill for at least 3-4 hours, or ideally overnight, until completely firm. Use the parchment overhangs to lift the fudge from the pan onto a cutting board. Cut into 1 to 1.5-inch squares using a sharp knife, wiping the blade between cuts for cleaner slices. -
Step 9
Store in an airtight container at room temperature for up to 1 week, or in the refrigerator for up to 2 weeks. For stacking, place parchment paper between layers. Fudge can be frozen for up to 3 months; thaw at room temperature before serving.
Important Information
Nutrition Facts (Per Serving)
It is important to consider this information as approximate and not to use it as definitive health advice.
Allergy Information
Please check ingredients for potential allergens and consult a health professional if in doubt.
Leave a Comment