

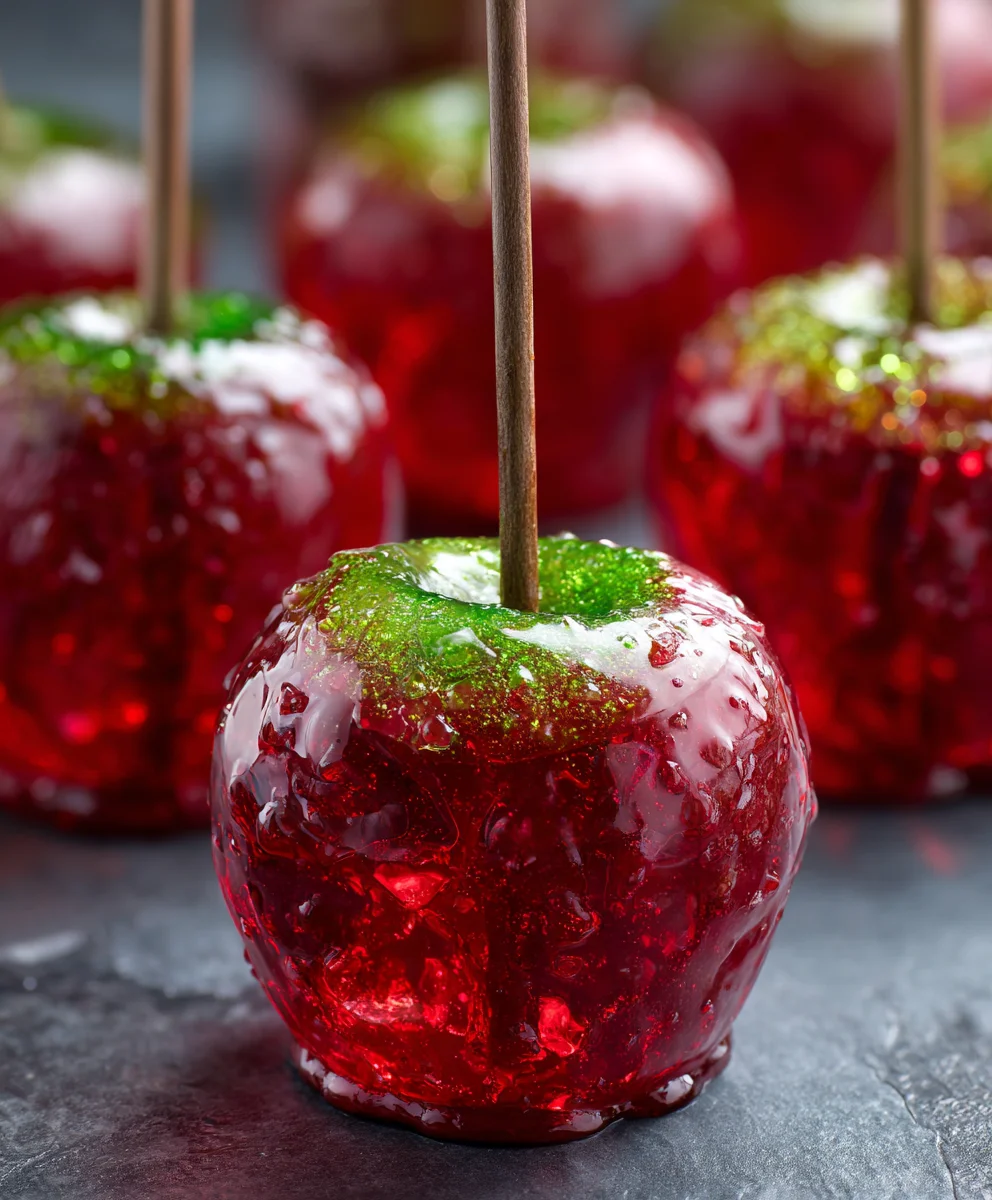
Jolly Rancher Candy Apples are not just a treat; they are a vibrant, nostalgic, and utterly delicious experience that promises to dazzle your taste buds and brighten any occasion. While traditional candy apples have graced fairs and festivals for generations, holding a special place in our hearts for their simple, sweet charm, this modern rendition elevates the classic with a spectacular burst of color and flavor. It’s a delightful reinterpretation that brings a contemporary twist to a beloved confectionery.
Imagine the crisp, juicy bite of a fresh apple, perfectly encased in a glossy, intensely flavored shell of your favorite Jolly Rancher hues. This delightful twist takes the familiar comfort of a classic fairground snack and infuses it with a playful, tangy sweetness that is simply irresistible, making it a showstopper at any event or a perfect homemade indulgence.
Why Everyone Adores Jolly Rancher Candy Apples
It’s this irresistible combination – the tartness of the apple contrasting beautifully with the powerful, fruity sweetness and slight tang of the candy – that makes Jolly Rancher Candy Apples an absolute sensation. They are visually stunning, incredibly fun to make, and offer a delightful textural journey from the initial satisfying crack of the candy coating to the soft, juicy core. Whether you’re planning a festive gathering, seeking a unique snack, or simply indulging your inner child, these vibrant treats consistently bring smiles and joy. I am thrilled to guide you through mastering this delightful creation.

Ingredients:
- 6-8 medium-sized apples (Granny Smith, Fuji, or Honeycrisp work wonderfully for their crisp texture and slight tartness, which balances the sweet candy coating)
- Approximately 3-4 bags (about 6.5 oz or 184g each) of assorted Jolly Rancher hard candies (This gives you plenty of candy to work with and a variety of vibrant colors. You’ll need about 10-15 individual candies per apple, so plan accordingly based on how many apples you’re making.)
- 1/4 cup light corn syrup (This helps prevent crystallization and gives the coating a lovely, glossy sheen)
- 1 cup granulated sugar
- 1/2 cup water
- 6-8 sturdy lollipop or popsicle sticks (ensure they are strong enough to hold the weight of a candy-coated apple)
- Optional: A few drops of gel food coloring (to intensify the color of your candy coating, especially if you’re aiming for a very specific hue)
Essential Equipment You’ll Need:
- Heavy-bottomed saucepan (preferably non-stick, to prevent sticking and burning)
- Candy thermometer (absolutely crucial for achieving the perfect hard-crack stage)
- Baking sheet or large platter
- Parchment paper or a silicone baking mat (essential for a non-stick surface to cool your apples)
- Small, microwave-safe bowls for melting candies (if you choose to melt by color)
- Vegetable brush (for thoroughly cleaning apples)
Preparation is Key!
My friends, before we even think about melting those vibrant Jolly Ranchers, a little meticulous preparation will go a very long way in ensuring your Jolly Rancher Candy Apples turn out absolutely spectacular. Trust me, skipping these initial steps is a recipe for frustration!
- Clean and Dry Your Apples: Begin by thoroughly washing your chosen apples. This step is far more crucial than you might initially imagine, especially if you’re using conventional apples which often have a protective wax coating. I recommend using very hot water and a firm vegetable brush to meticulously scrub each apple. The goal here is to remove every trace of wax or residue, as any remaining film will prevent your beautiful Jolly Rancher candy coating from adhering properly, leading to a frustratingly patchy finish. Once scrubbed, dry each apple completely with a clean cloth or paper towel. Any moisture left on the apple will cause your candy coating to seize or slide off, so a perfectly dry surface is non-negotiable.
- Insert the Sticks: Carefully remove any existing stems from your apples. Then, firmly insert a lollipop or popsicle stick into the stem end of each apple. Push the stick in about halfway or until it feels very secure. You want to ensure the stick can comfortably support the apple’s weight once it’s coated in candy. A wobbly stick is a recipe for a dropped, shattered candy apple, and nobody wants that!
- Prepare Your Workspace: Line your baking sheet or large platter with parchment paper or a silicone baking mat. This provides a non-stick surface for your candy apples to cool on, preventing them from sticking and making removal a breeze. Set this aside within easy reach, as you’ll need to move quickly once the candy coating is ready. You might also lightly spray the parchment or silicone with a tiny bit of cooking spray, just for extra insurance, though it’s often not strictly necessary with these materials.
- Unwrap and Sort Your Jolly Ranchers: This is perhaps the most time-consuming part of the preparation, so I highly recommend doing it in advance. Unwrap all of your Jolly Rancher hard candies. If you plan to make multi-colored apples or prefer specific color themes, now is the time to sort them into separate small, microwave-safe bowls. For a single-color batch, you can combine all your desired colors in one bowl. Having all your candies unwrapped and ready is essential, as the candy-making process moves quickly once it starts. Crushing the candies slightly can help them melt faster, but it’s not strictly necessary. If you do crush them, place them in a sturdy plastic bag and gently tap with a rolling pin or meat mallet.
Crafting the Jolly Rancher Candy Coating
Now for the fun part – transforming those colorful candies into a glorious, glassy coating! This stage requires your full attention and precision, especially with temperature. A candy thermometer is your best friend here.
- Combine Liquids and Sugar: In your heavy-bottomed saucepan, combine the granulated sugar, water, and light corn syrup. Give it a gentle stir to moisten the sugar. Place the saucepan over medium-high heat.
- Bring to a Boil: Let the mixture come to a rolling boil. Continue to cook without stirring initially. You want to ensure all the sugar dissolves completely. If any sugar crystals form on the sides of the pan, you can gently brush them down with a pastry brush dipped in a little water, or simply cover the pan with a lid for a minute or two; the steam will help dissolve them.
- Introduce the Jolly Ranchers: Once the sugar mixture is boiling vigorously and the sugar is fully dissolved, reduce the heat to medium. Carefully add your unwrapped Jolly Rancher candies to the saucepan. Stir gently and continuously with a heat-resistant spatula or spoon. The candies will begin to melt and incorporate into the sugar syrup. Maintain a steady, moderate heat; don’t rush this process by cranking up the heat too high, as it can cause the candy to burn and develop a bitter taste.
- Reach Hard-Crack Stage: Continue to cook and stir until all the Jolly Rancher candies have completely melted and the mixture is smooth and evenly colored. Insert your candy thermometer into the mixture, ensuring it doesn’t touch the bottom of the pan. Continue to cook, stirring occasionally to prevent scorching, until the thermometer registers between 300°F and 310°F (149°C – 154°C). This is known as the “hard-crack” stage, and it’s absolutely vital for your candy coating to set properly and have that delightful, shatteringly crisp texture. If you go below this temperature, your coating will be sticky; too high, and it might burn. Precision here is paramount for perfect Jolly Rancher Candy Apples.
- Add Optional Food Coloring: If you desire a more intense or custom color, carefully add a few drops of gel food coloring at this stage, once the hard-crack temperature is reached. Stir it in quickly and thoroughly until the color is evenly distributed. Gel food colorings are preferred over liquid ones as they won’t add excess moisture to your candy mixture.
The Dipping and Cooling Adventure
This is where your Jolly Rancher Candy Apples truly come to life! You need to work quickly and confidently while the candy mixture is still hot and fluid. Have your prepared apples and cooling surface ready.
- Get Ready to Dip: Carefully remove the saucepan from the heat. Be extremely cautious, as hot sugar syrup is incredibly hot and can cause severe burns. If you’re making multiple colors, you can gently pour the hot candy syrup into your individual microwave-safe bowls, being careful not to slosh. If the candy starts to thicken too much during dipping, you can return the saucepan (or microwave-safe bowl) to very low heat for a moment, or briefly microwave the bowl (30 seconds at a time) to bring it back to a dippable consistency.
- The Dipping Technique: Take one prepared apple by its stick. Tilt the saucepan or bowl of candy syrup slightly to create a deeper pool of candy. Carefully and swiftly dip the apple into the hot candy mixture. Rotate the apple to ensure it’s completely coated. You want a nice, even layer without too much excess.
- Drip Off Excess: Once coated, lift the apple and gently rotate it or lightly tap the stick against the edge of the saucepan. This allows any excess candy coating to drip back into the pot, preventing puddles at the bottom of your finished apple. Work efficiently, as the candy will begin to set quickly.
- Place to Cool: Immediately transfer the coated apple to your prepared baking sheet lined with parchment paper or a silicone mat. Place it stick-side up. Repeat the dipping process with the remaining apples, working as quickly as possible while the candy remains fluid.
- Patience for Perfection: Allow the Jolly Rancher Candy Apples to cool completely and harden at room temperature. This can take anywhere from 30 minutes to an hour, or even longer depending on the humidity in your kitchen. Resist the urge to touch them until they are completely firm and non-sticky to the touch. If it’s a particularly humid day, cooling in the refrigerator for about 15-20 minutes might help, but avoid prolonged refrigeration as it can sometimes lead to condensation on the candy, making it sticky.
Tips for Perfect Jolly Rancher Candy Apples and Troubleshooting
Making Jolly Rancher Candy Apples is an art and a science, and a few insider tips can make all the difference, especially if you encounter any bumps along the road.
- Humidity is Your Foe: Candy making is highly sensitive to humidity. If it’s a rainy or very humid day, your candy apples might struggle to harden completely and could remain sticky. If possible, choose a dry day for this culinary adventure.
- Sticky Coating? If your candy coating is sticky after cooling, it’s almost always due to one of two reasons: either the candy mixture didn’t reach the full hard-crack stage (300-310°F), or humidity is a factor. There’s no real fix once it’s cooled, so ensuring proper temperature during cooking is key for the next batch.
- Thin Coating vs. Thick Coating: If your coating seems too thin, you might have dipped too quickly or let too much drip off. For a thicker coating, a slightly slower dip or a second quick, shallow dip (after the first layer has barely set, but before it’s completely cold) can work, but be careful not to create too thick a layer which can be difficult to bite into.
- Safety First: Please remember, hot sugar syrup is incredibly dangerous. Wear oven mitts or heat-resistant gloves when handling the hot pot. Keep children and pets away from the stove during the cooking and dipping process. Have a bowl of ice water nearby, just in case of a small splash, but the best approach is prevention.
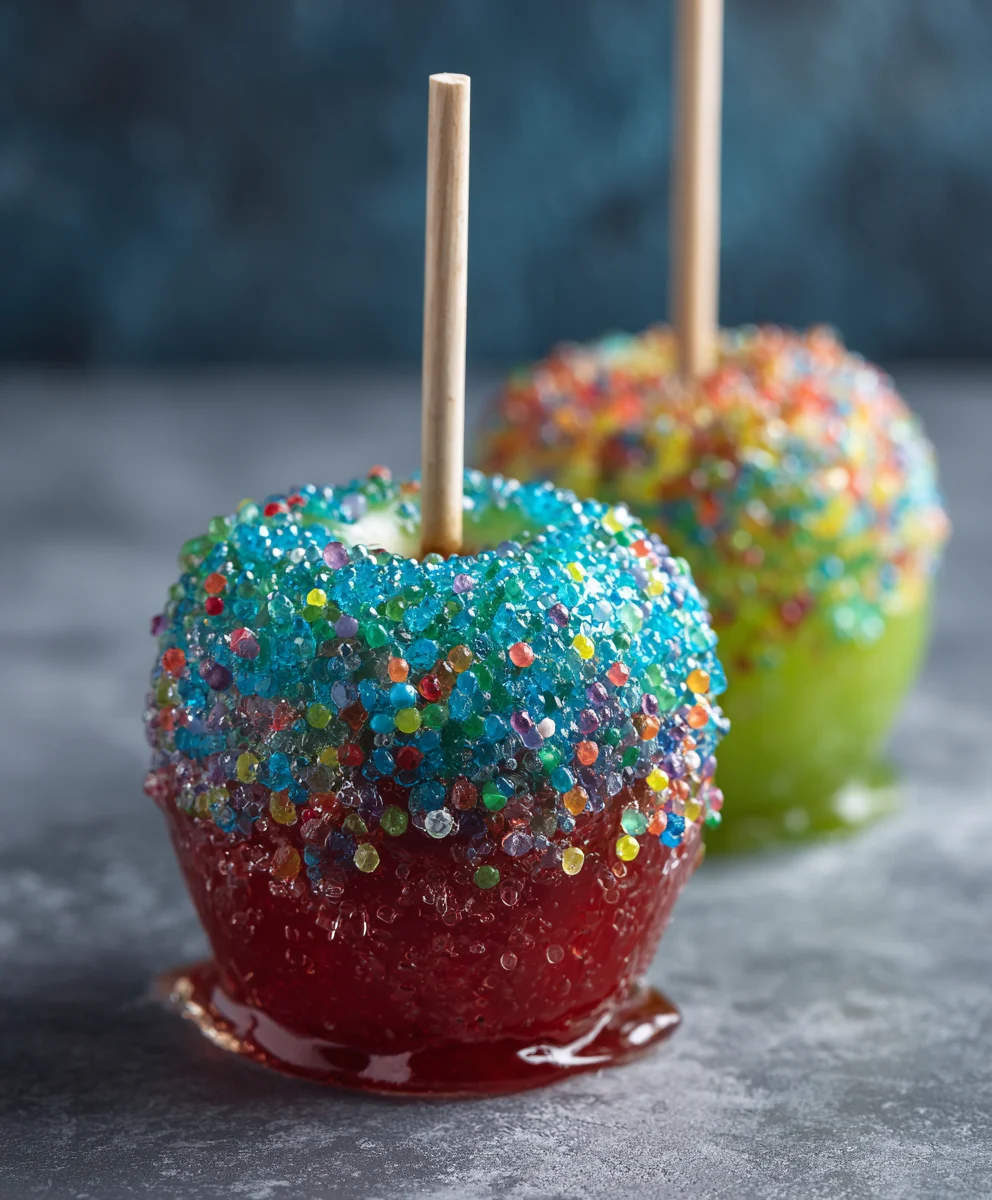
- Creative Variations: Don’t limit yourself to single colors! You can crush different colored Jolly Ranchers and sprinkle them onto the wet candy coating immediately after dipping for a fun, speckled effect. Alternatively, dip the bottom half in one color, let it set slightly, then dip the top half in another for a two-toned apple. The possibilities are as endless as the Jolly Rancher flavors themselves!
- Storage: Once your Jolly Rancher Candy Apples are completely firm and cool, they are best enjoyed fresh. However, if you need to store them, wrap each apple individually in cellophane or a small plastic bag to protect them from moisture and dust. Store them at cool room temperature for up to 2-3 days. Avoid refrigerating for extended periods, as the cold and moisture can make the candy coating soften and become sticky.
- Serving Suggestion: To make them easier to eat, you can use a sturdy chef’s knife to carefully cut the candy apples into wedges, avoiding the stick, before serving. This is especially helpful for younger children or those who prefer not to bite directly into the whole apple.
Enjoy Your Hard Work!
Now that your kitchen is filled with the sweet, fruity aroma of Jolly Rancher Candy Apples and your counter boasts a dazzling display of vibrant, glossy treats, it’s time to revel in your culinary creation! These are perfect for parties, holiday gifts, or simply as a fun, nostalgic snack that truly stands out. The satisfying crunch of the candy shell giving way to the crisp, juicy apple beneath is a sensation that is simply irresistible. Each bite is a burst of fruity flavor, reminiscent of your favorite Jolly Rancher, but with the added freshness of a whole apple. Share them with friends and family, or keep them all to yourself – I won’t tell! You’ve put in the effort, and now you deserve to enjoy the delicious rewards of your beautifully crafted Jolly Rancher Candy Apples.
I hope you found this detailed guide helpful and inspiring. Happy candy apple making!
<h2>Conclusion:</h2>
<p>So, as we wrap up our delightful journey through this recipe, I truly hope you’re as excited as I am about these incredible <strong>Jolly Rancher Candy Apples</strong>. This isn’t just another dessert recipe; it’s an invitation to unleash a vibrant burst of flavor and color into your kitchen, transforming simple apples into an extraordinary treat that will captivate everyone who lays eyes (and taste buds!) on them. Forget the mundane; these candy apples are a guaranteed showstopper.</p>
<h4>Why These Candy Apples Are an Absolute Must-Try!</h4>
<p>What makes them so special, you ask? Picture this: the satisfying, crisp "snap" of a fresh, juicy apple, perfectly encased in a shimmering, jewel-toned candy shell that literally explodes with the iconic fruity tang of Jolly Ranchers. This isn’t merely a sweet treat; it’s a sensory experience. From the moment you see their glossy, vibrant surface, to the delightful crack of the candy, and finally, the irresistible blend of sweet and tart flavors dancing on your tongue, these <strong>Jolly Rancher Candy Apples</strong> deliver on every front. They instantly elevate any occasion, turning a regular get-together into a festive carnival, a birthday party into an unforgettable celebration, or a quiet evening into a moment of pure, nostalgic bliss. I’ve witnessed firsthand the pure delight and surprise on people’s faces when they encounter these beauties – the wide eyes, the excited gasps, and the immediate request for “just one more.” That ‘wow’ factor, combined with the relative ease of creation, makes this recipe an absolute must-try for anyone looking to add a little extra magic, fun, and impressive flair to their culinary repertoire. They stand out in a crowd of desserts, promising a unique flavor profile that sets them apart from traditional candy apples, offering an intense fruitiness that is truly addictive.</p>
<h4>Unleash Your Creativity: Serving & Variation Ideas</h4>
<p>The versatility of these candy apples is another reason I adore them. While enjoying them straight off the stick is perfectly wonderful, they also offer a fantastic canvas for your creative serving and variation ideas. For a more elegant presentation, consider slicing the apples into wedges right before serving. Arrange these glossy, colorful wedges on a platter, perhaps alongside a scoop of creamy vanilla bean ice cream, a dollop of freshly whipped cream, or even a sprinkle of toasted coconut flakes for an added layer of flavor and texture. They make spectacular centerpieces for dessert tables, drawing all eyes with their vibrant hues. You could even create adorable mini versions using smaller apples, making them perfect bite-sized treats for children’s parties or for managing portions at a larger gathering.</p>
<p>But don’t stop there with the basic recipe! This is where the real fun begins. Experiment with different Jolly Rancher flavors – why limit yourself to just one? Imagine a mesmerizing swirl of blue raspberry and green apple, or a fiery fusion of cherry and watermelon. The possibilities for color and flavor combinations are endless! You can also play with different apple varieties; while Granny Smith provides that classic tart counterpoint, a sweeter apple like a Fuji or Honeycrisp can offer a distinctly different, equally delicious experience. For extra flair, before the candy shell fully hardens (work quickly!), you have a brief window to sprinkle on some exciting additions: think vibrant sprinkles, finely chopped nuts for an extra crunch, mini chocolate chips, or even a dusting of edible glitter for an undeniable sparkle. For a truly unique twist, you could even try a “deconstructed” approach: melt the Jolly Rancher candy, slice your apples, and drizzle the warm candy mixture over the slices in individual bowls, allowing it to cool and harden slightly. This creates a fork-and-knife candy apple experience that’s both fun and a little less messy. And, of course, tailor them to the season or occasion – festive red and green for Christmas, spooky orange and purple for Halloween, or a playful rainbow for a birthday bash. Each variation you try will add its own special charm to this already incredible treat, making every batch a unique creation.</p>
<h4>Your Turn! Try Them & Share Your Magic!</h4>
<p>I genuinely hope this recipe ignites your culinary curiosity and inspires you to step into your kitchen to create some magic. There’s an immense sense of satisfaction that comes from transforming simple ingredients into something so visually stunning and utterly delicious. <strong>Please, don’t hesitate – give these Jolly Rancher Candy Apples a try!</strong> I promise you, the gasps of delight and the genuine smiles from your friends, family, or anyone lucky enough to taste them will be more than worth the enjoyable effort. It’s more than just preparing a dessert; it’s about crafting an experience, fostering joy, creating lasting memories, and injecting a wonderful splash of vibrant fun into any gathering. I truly believe that food has a unique power to bring people together, and these candy apples are designed to do just that – spark conversations, elicit laughter, and create shared moments of deliciousness.</p>
<p>Once you’ve successfully whipped up your batch of these incredible apples, I would absolutely love to hear about your experience! What exciting flavors did you choose? Did you experiment with any fantastic variations or toppings? How did your family and friends react to these dazzling treats? <strong>Please, share your photos and your stories with me!</strong> Hearing about your successes (and even your adventurous learning moments!) is truly what makes this journey so rewarding for me. Let’s build a vibrant community of candy apple enthusiasts, sharing our tips, tricks, and all the incredible joy these treats bring. Happy cooking, and even happier eating!</p>
Jolly Rancher Candy Apples
A vibrant and delicious twist on traditional candy apples, featuring crisp apples coated in a glossy, intensely flavored Jolly Rancher shell. Perfect for parties, gifts, or a fun nostalgic treat.
Ingredients
-
6-8 medium apples (Granny Smith, Fuji, or Honeycrisp)
-
3-4 bags (6.5 oz/184g each) assorted Jolly Rancher hard candies
-
1/4 cup light corn syrup
-
1 cup granulated sugar
-
1/2 cup water
-
6-8 sturdy lollipop or popsicle sticks
-
Optional: Gel food coloring
Instructions
-
Step 1
Wash apples thoroughly with hot water and a brush to remove wax; dry completely. Remove stems and insert a lollipop stick firmly into the stem end of each apple. -
Step 2
Line a baking sheet with parchment paper or a silicone mat. Unwrap all Jolly Rancher candies and sort by color if making multi-colored apples. -
Step 3
In a heavy-bottomed saucepan, combine granulated sugar, water, and light corn syrup. Bring to a rolling boil over medium-high heat, stirring until sugar dissolves. -
Step 4
Reduce heat to medium. Add unwrapped Jolly Rancher candies. Stir gently and continuously until all candies are completely melted and the mixture is smooth. -
Step 5
Insert a candy thermometer. Continue to cook, stirring occasionally, until the temperature reaches 300°F – 310°F (149°C – 154°C). If desired, stir in a few drops of gel food coloring. -
Step 6
Carefully remove the saucepan from heat (or pour into smaller bowls for multiple colors). Quickly dip each prepared apple into the hot candy mixture, rotating to coat evenly. -
Step 7
Lift the apple, allowing excess candy to drip off. Place the coated apple stick-side up on the prepared baking sheet. Let cool completely at room temperature (30-60 minutes) until firm and non-sticky.
Important Information
Nutrition Facts (Per Serving)
It is important to consider this information as approximate and not to use it as definitive health advice.
Allergy Information
Please check ingredients for potential allergens and consult a health professional if in doubt.

Leave a Comment