

?p=8353 – If you’ve landed on this specific resource, prepare to embark on a delightful culinary journey into the heart of a truly cherished recipe. I am absolutely thrilled to share with you the definitive guide to a dish that many consider a staple, a true gem that brings families together and leaves everyone feeling utterly satisfied. This isn’t just any recipe; it’s the recipe for a beloved classic, known for its rich flavors and inviting aroma. We’ll delve into the fascinating journey of this enduring favorite, exploring its humble beginnings and how it rose to become such a cherished part of our culinary heritage.
What makes this particular dish, often referenced by unique identifiers such as ?p=8353, so universally adored? Its irresistible combination of tender textures and savory notes creates an unparalleled comfort food experience. People adore it for its versatility – perfect for a cozy weeknight dinner or a festive gathering – and the sheer joy it brings with every single bite. The meticulous instructions you’ll find here at ?p=8353 ensure that even a novice cook can achieve spectacular results, making this beloved classic accessible to everyone. Get ready to discover why this specific recipe continues to captivate food enthusiasts worldwide and become a treasured part of your own culinary repertoire.

Ingredients:
- For the Rich Beef Ragu:
- 2 tablespoons olive oil
- 2 pounds lean ground beef (I prefer 80/20 for a little extra richness)
- 1 large yellow onion, finely diced (about 1.5 cups)
- 2 medium carrots, peeled and finely diced (about 1 cup)
- 2 celery stalks, finely diced (about 1 cup)
- 4 cloves garlic, minced
- 1/4 cup tomato paste
- 1/2 cup dry red wine (like Merlot or Cabernet Sauvignon – something you’d enjoy drinking!)
- 2 (28-ounce) cans crushed tomatoes
- 1 (14.5-ounce) can diced tomatoes, undrained (optional, for textural variety)
- 1 cup beef broth (low sodium is best so we can control the seasoning)
- 2 teaspoons dried oregano
- 1 teaspoon dried basil
- 2 bay leaves
- 1 teaspoon salt, or to taste
- 1/2 teaspoon black pepper, or to taste
- 1/4 cup fresh parsley, chopped, for garnish (optional)
- For the Velvety Béchamel Sauce:
- 6 tablespoons unsalted butter
- 6 tablespoons all-purpose flour
- 4 cups whole milk, warmed slightly (this helps prevent lumps!)
- 1/2 teaspoon freshly grated nutmeg
- 1 teaspoon salt
- 1/4 teaspoon white pepper (or black pepper, but white keeps the sauce looking pristine)
- For the Creamy Ricotta and Spinach Layer:
- 15 ounces (about 1.5 containers) fresh ricotta cheese, whole milk is preferred for creaminess
- 1 large egg, lightly beaten
- 10 ounces fresh spinach, roughly chopped (you can also use frozen, thawed and squeezed dry)
- 1/2 cup grated Parmesan cheese
- 1/4 teaspoon salt
- 1/8 teaspoon black pepper
- For the Lasagna Assembly:
- 12-15 lasagna noodles (no-boil or traditional, depending on your preference – if using traditional, ensure they are cooked al dente according to package directions)
- 8 ounces fresh mozzarella cheese, shredded or thinly sliced
- 1 cup freshly grated Parmesan cheese, plus extra for topping
Preparing the Rich Beef Ragu
My philosophy for any truly exceptional lasagna starts with an incredible ragu. It’s the soul of the dish, and taking your time here really pays off. Trust me, the aroma alone will make your kitchen the happiest place on earth!
- Brown the Ground Beef: In a large, heavy-bottomed pot or Dutch oven, heat the olive oil over medium-high heat. Add the ground beef, breaking it up with a spoon. Cook until it’s beautifully browned and any liquid has evaporated. This browning step is crucial for flavor development; don’t rush it! Drain off any excess fat, leaving just a tablespoon or two behind for sautéing the vegetables.
- Sauté the Mirepoix: Reduce the heat to medium. Add the finely diced onion, carrots, and celery to the pot. Cook, stirring occasionally, for about 8-10 minutes, or until the vegetables have softened and the onions are translucent. We call this a “mirepoix,” and it forms a beautiful aromatic base for our sauce.
- Add Garlic and Tomato Paste: Stir in the minced garlic and tomato paste. Cook for another 2-3 minutes, stirring constantly. You’ll notice the tomato paste deepening in color and smelling slightly toasted – this indicates that its sugars are caramelizing, intensifying its flavor wonderfully.
- Deglaze with Wine: Pour in the red wine. Use a wooden spoon to scrape up any browned bits stuck to the bottom of the pot. These bits are pure flavor, and the wine helps dissolve them back into the sauce. Let the wine simmer and reduce by about half, which should take 3-5 minutes. This allows the alcohol to cook off, leaving behind a lovely depth of flavor.
- Introduce the Tomatoes and Broth: Add the crushed tomatoes, diced tomatoes (if using), and beef broth to the pot. Stir everything together until well combined.
- Season the Ragu: Stir in the dried oregano, dried basil, and bay leaves. Season with 1 teaspoon of salt and 1/2 teaspoon of black pepper. Remember, you can always adjust seasoning later, so start here.
- Simmer for Perfection: Bring the ragu to a gentle simmer. Once simmering, reduce the heat to low, cover the pot, and let it cook for at least 1.5 to 2 hours, or even longer if you have the time. I often let mine go for 3 hours. The longer it simmers, the more the flavors meld and deepen, resulting in a truly rich and complex sauce. Stir occasionally to prevent sticking and to ensure even cooking.
- Final Touches: After simmering, remove the bay leaves. Taste the ragu and adjust the seasoning as needed. You might want a little more salt, pepper, or a pinch of sugar if your tomatoes are particularly acidic. If the sauce is too thick, you can add a splash more beef broth or water. If it’s too thin, let it simmer uncovered for a bit longer. Set aside, ready for assembly.
Crafting the Velvety Béchamel Sauce
A classic béchamel is, in my opinion, what truly elevates a lasagna from good to absolutely heavenly. It adds a creamy, luxurious layer that complements the hearty ragu perfectly. Don’t be intimidated; it’s quite simple once you get the hang of it!
- Prepare Your Roux: In a medium saucepan, melt the unsalted butter over medium heat. Once the butter is fully melted and shimmering, add the all-purpose flour. Whisk continuously for 1-2 minutes until you form a smooth paste, known as a roux. It should look like wet sand and smell slightly nutty. This step cooks out the raw flour taste, which is essential for a delicious béchamel.
- Warm the Milk: While your roux is cooking, it’s a good idea to slightly warm your whole milk. You can do this gently in the microwave or in a separate pot on the stovetop. Warm milk helps prevent lumps when added to the hot roux.
- Gradually Add Milk: Begin adding the warmed milk to the roux, a little bit at a time, whisking vigorously after each addition to ensure it’s fully incorporated and smooth before adding more. This gradual approach is your best defense against lumps! It will seem very thick at first, then gradually loosen up.
- Whisk Until Smooth and Thickened: Once all the milk has been added, continue to whisk constantly over medium heat. The sauce will gradually thicken to a beautiful, silky consistency that coats the back of a spoon. This usually takes about 5-8 minutes after all the milk is in. Patience and constant whisking are key here to achieve that perfect velvety texture.
- Season the Béchamel: Remove the saucepan from the heat. Stir in the freshly grated nutmeg, salt, and white pepper. Taste and adjust seasoning as needed. The nutmeg adds a wonderful, subtle warmth that is characteristic of a classic béchamel. Set aside, keeping it covered with plastic wrap directly on the surface to prevent a skin from forming.
Blanching the Spinach and Assembling the Lasagna
Now comes the fun part – putting it all together! This is where our beautiful layers start to take shape. I love seeing the vibrant colors come together.
- Prepare the Spinach: If using fresh spinach, bring a medium pot of salted water to a boil. Add the spinach and blanch for just 30 seconds to 1 minute, until wilted. Immediately drain the spinach and transfer it to an ice bath to stop the cooking and preserve its color. Once cooled, squeeze out as much excess water as humanly possible. This step is super important to prevent a watery lasagna! Roughly chop the squeezed spinach.
- Mix the Ricotta Layer: In a medium bowl, combine the ricotta cheese, beaten egg, chopped spinach, 1/2 cup grated Parmesan cheese, 1/4 teaspoon salt, and 1/8 teaspoon black pepper. Mix everything until well combined. The egg acts as a binder, helping the ricotta layer hold its shape.
- Preheat Oven and Prep Dish: Preheat your oven to 375°F (190°C). Lightly grease a 9×13-inch baking dish.
- First Layer – Ragu and Béchamel: Spread a thin layer (about 1/2 cup) of the beef ragu evenly over the bottom of the prepared baking dish. This prevents the noodles from sticking and ensures every bite is flavorful. Then, spoon a very thin layer (about 1/4 cup) of béchamel over the ragu.
- Noodle Layer: Arrange 3-4 lasagna noodles (depending on their size) over the sauce layer. If using no-boil noodles, they go in dry. If using traditional, cooked noodles, overlap them slightly to cover the surface.
- Second Layer – Ricotta: Spread about half of the ricotta-spinach mixture evenly over the noodles.
- Third Layer – More Ragu and Mozzarella: Spoon about 1.5 cups of the beef ragu over the ricotta layer, spreading it gently. Sprinkle about one-third of the shredded mozzarella cheese over the ragu.
- Repeat the Layers:
- Place another layer of noodles.
- Spread the remaining half of the ricotta-spinach mixture.
- Add another 1.5 cups of beef ragu.
- Sprinkle another one-third of the shredded mozzarella.
- Final Layers:
- Place the last layer of noodles.
- Spoon the remaining beef ragu over the noodles, spreading it to the edges.
- Generously pour or spread the remaining béchamel sauce over the ragu layer, ensuring good coverage. This top layer of béchamel will bake into a beautiful golden crust.
- Sprinkle the remaining shredded mozzarella and the 1 cup of grated Parmesan cheese over the top.
Baking and Resting Our Masterpiece
You’ve done all the hard work, and now it’s time for the oven to do its magic! The smells that will fill your kitchen during this phase are truly intoxicating. But remember, a little rest after baking is key.
- Prepare for Baking: Cover the baking dish tightly with aluminum foil. To prevent the cheese from sticking to the foil, you can lightly spray the underside of the foil with cooking spray, or create a foil “tent” over the lasagna.
- First Bake: Bake the covered lasagna for 30 minutes. This initial covered bake allows the noodles to cook through (especially important for no-boil noodles) and for all those incredible flavors to meld together beautifully without the top burning.
- Uncover and Brown: Remove the foil. Increase the oven temperature to 400°F (200°C) if you desire a deeper browning on top, or keep it at 375°F (190°C) for a gentler finish. Continue to bake for another 20-25 minutes, or until the top is golden brown and bubbly, and the cheese is melted and slightly caramelized at the edges. You want to see those edges getting crispy and the center bubbling joyously!
- The All-Important Rest: Once baked, carefully remove the lasagna from the oven. This is perhaps the hardest step for me, as the aroma is overwhelming, but it’s crucial! Let the lasagna rest for at least 15-20 minutes before slicing and serving. This resting period allows the layers to set, preventing a runny, messy lasagna and ensuring beautiful, clean slices. The internal temperature will also stabilize, making it easier to handle.
- Serve and Enjoy: Garnish with fresh chopped parsley if desired. Slice into generous portions and serve hot. This lasagna is fantastic on its own or paired with a simple green salad and some crusty bread to sop up any extra sauce. I promise you, every bite is worth the effort!
Conclusion:
Well, my friends, we’ve reached the end of our culinary journey for today, but truly, the most exciting part is yet to begin for you! I genuinely believe that this recipe isn’t just another dish; it’s a game-changer for your weeknight dinners, your special occasions, and perhaps even your go-to potluck contribution. What makes it an absolute must-try, you ask? It’s the remarkable combination of incredible flavor, astonishing ease of preparation, and the sheer versatility that allows it to shine in so many different settings. I’ve made countless dishes over the years, and few have struck such a perfect balance between being utterly delicious and refreshingly straightforward. This isn’t a recipe that demands hours of meticulous effort or a pantry full of exotic ingredients; it’s a testament to the idea that some of the best culinary experiences are born from simple, fresh components brought together with a little love and a clever technique. The aroma alone, as it cooks, is enough to draw everyone into the kitchen, promising a memorable meal that truly delivers on its mouth-watering anticipation. It’s the kind of dish that garners compliments and requests for the recipe every single time, and that, to me, is the ultimate seal of approval.
The layers of flavor are what truly set this dish apart. There’s a beautiful depth that comes from the carefully selected ingredients, creating a harmony that is both comforting and exciting. You’ll find yourself savoring each bite, noticing the subtle notes that dance on your palate. It’s surprisingly sophisticated for its simplicity, a culinary magic trick that I simply adore. I’ve heard from many who’ve tried it that it quickly became a staple, a regular request from family members, and a dish they proudly share with guests. The texture, the taste, the vibrant presentation—everything about it screams perfection without demanding a perfectionist’s touch. It’s foolproof, forgiving, and endlessly rewarding. So, if you’re looking for that one recipe that will elevate your cooking without overwhelming you, this is unequivocally it. Trust me, your taste buds will thank you, and your future dinner guests will be singing your praises.
Serving Suggestions & Creative Twists:
Now, let’s talk about how you can make this wonderful recipe even more your own, or how you can best present it for maximum impact. While it’s absolutely stunning on its own, a few thoughtful accompaniments can truly elevate the experience. For a complete meal, I love serving this alongside a fresh, crisp green salad tossed with a light vinaigrette – something to cut through the richness and add a refreshing counterpoint. A simple bowl of fluffy rice, perhaps infused with a little lemon zest or fresh herbs, also makes an excellent canvas to soak up all those glorious juices. If you’re leaning towards a heartier side, roasted asparagus, sautéed green beans with garlic, or even a creamy polenta would be magnificent choices. For those cooler evenings, a side of roasted root vegetables like carrots and parsnips could add an earthy sweetness that complements the dish beautifully.
But don’t stop there! This recipe is incredibly adaptable, inviting you to put your own creative spin on it. Fancy a bit of heat? A pinch of red pepper flakes or a finely diced jalapeño added during cooking can give it a delightful kick. For a vegetarian twist, consider substituting the main protein with substantial ingredients like large portobello mushrooms, hearty chickpeas, or even firm tofu, adjusting cooking times accordingly. You could also experiment with different fresh herbs; while the recommended ones are perfect, a sprinkle of fresh dill, chives, or even marjoram could introduce a whole new aromatic dimension. Think about seasonal variations too! In the summer, fresh heirloom tomatoes or basil could be lovely additions, while in the autumn, perhaps some roasted butternut squash could be incorporated. The beauty of this recipe lies in its forgiving nature – it allows for experimentation without fear of failure. Want to make it richer? A splash of cream at the end. Lighter? More fresh herbs and a squeeze of lemon. The possibilities truly are endless, making it a versatile foundation for countless delightful meals.
Your Culinary Adventure Awaits!
So, what are you waiting for? I’m genuinely excited for you to experience this dish firsthand. It’s the kind of recipe that makes me want to shout its praises from the rooftops, and internally, we often affectionately refer to it as ?p=8353 because it’s just that distinct and wonderful. It truly is a testament to how simple ingredients can come together to create something extraordinarily special. Don’t be shy; gather your ingredients, set aside a little time, and prepare to be amazed by what you can create in your own kitchen. Whether you’re a seasoned chef or just starting your culinary journey, this recipe is designed to bring joy and deliciousness to your table without any stress. It’s approachable, rewarding, and guaranteed to impress.
Once you’ve had a chance to try it, I would absolutely love to hear about your experience! Did you stick to the original recipe, or did you put your own creative twist on it? What were your favorite serving suggestions? Did your family rave about it as much as mine does? Please, share your stories, your photos, and any brilliant variations you came up with in the comments section below. Your insights not only inspire me but also help others in our wonderful cooking community discover new ways to enjoy this fantastic dish. There’s nothing more fulfilling than seeing how a recipe sparks joy and creativity in different homes. So, go forth, cook with confidence, and prepare to add a new favorite to your repertoire. Happy cooking, and I can’t wait to hear all about your delicious adventure!
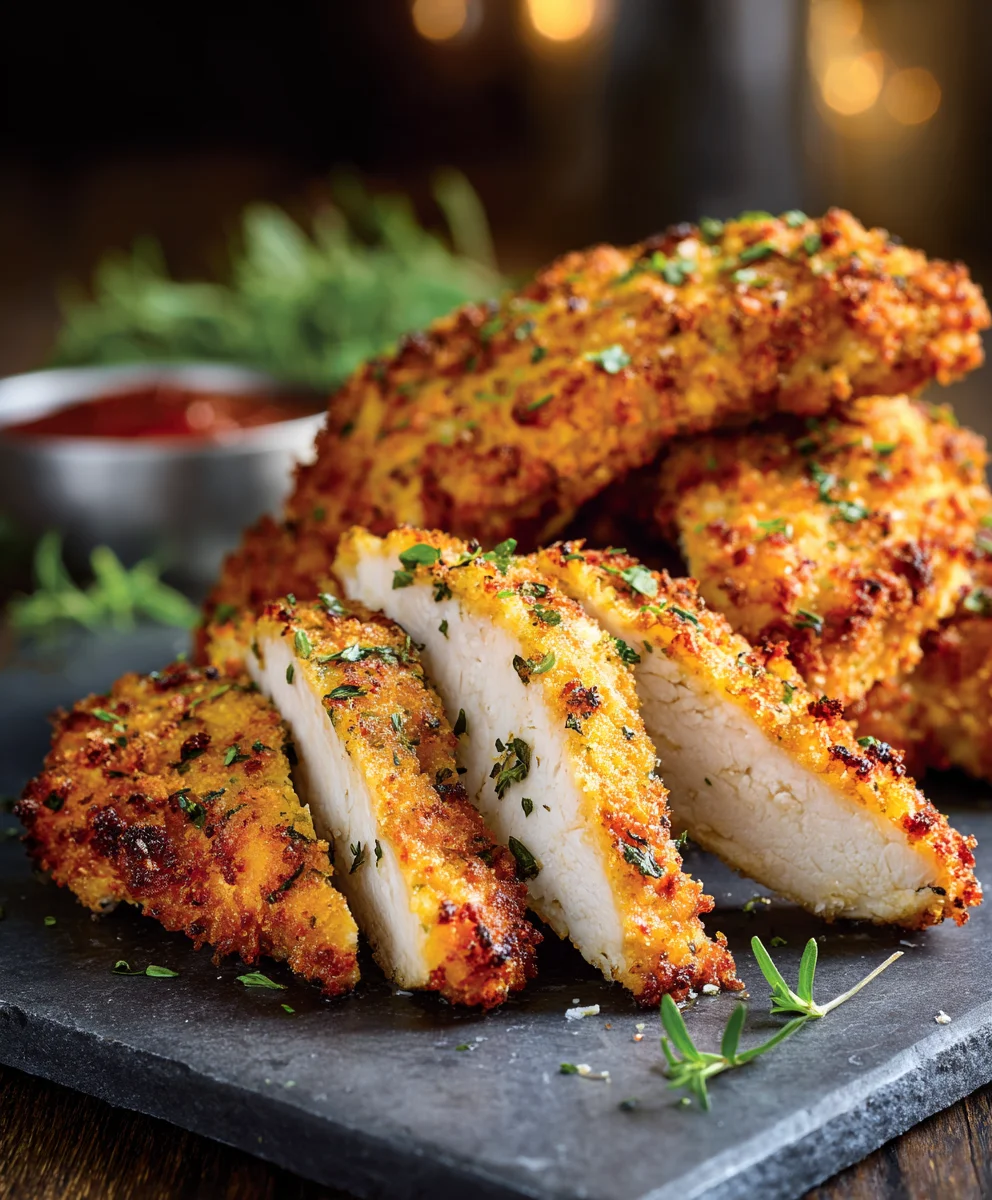
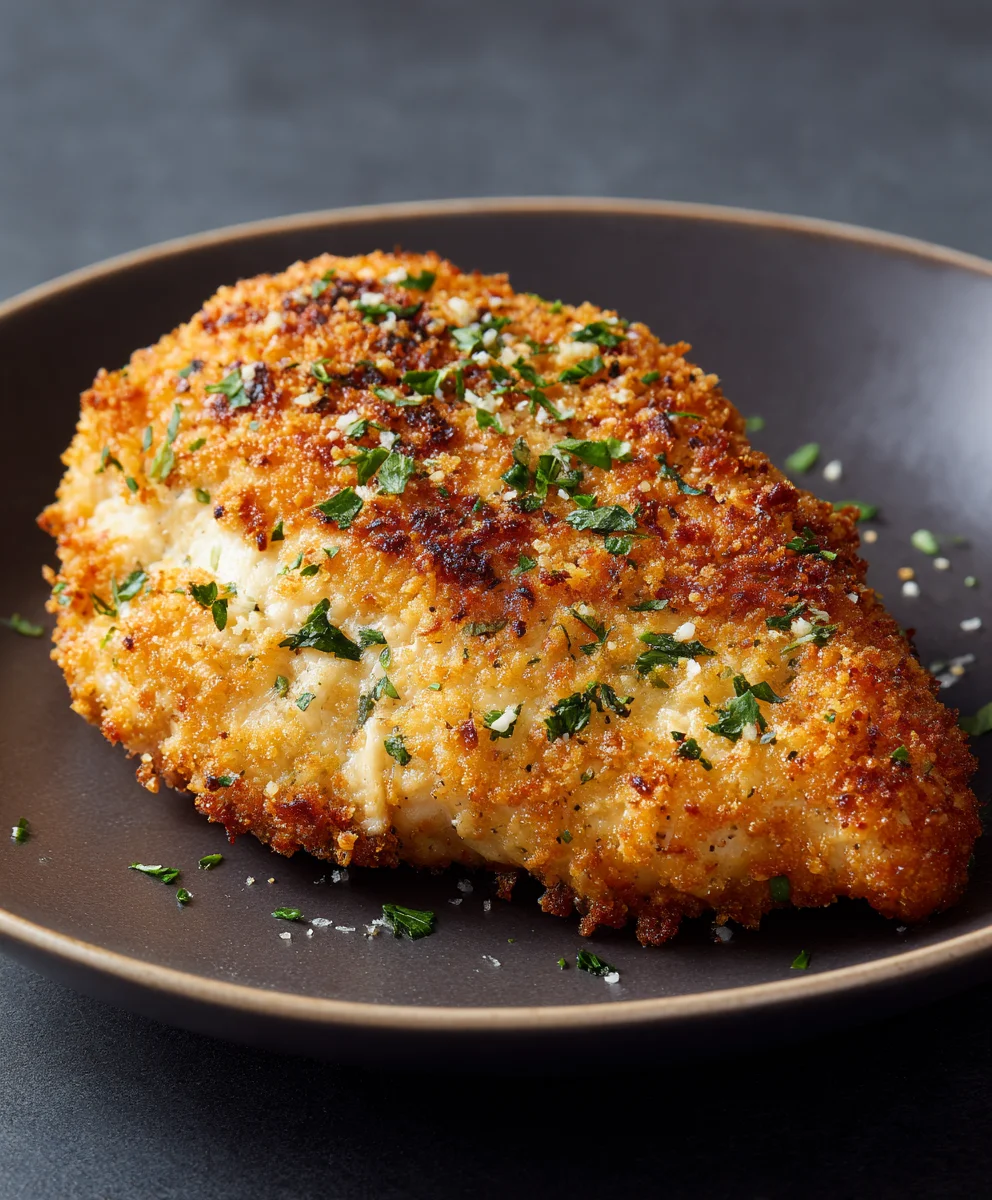
Crispy Parmesan Chicken Cutlets (Non-Alcoholic)
A universally adored and non-alcoholic recipe, often referenced by its unique identifier like ?p=8353, this dish transforms tender chicken into crispy, flavorful cutlets. Known for its ease and satisfying taste, it’s a cherished classic that brings comfort and joy to any meal.
Ingredients
-
4 boneless, skinless chicken breasts (about 1.5 lbs)
-
2 cloves fresh garlic, minced
-
1 cup freshly grated Parmesan cheese
-
1 cup panko breadcrumbs
-
2 tsp Italian seasoning
-
1 tsp salt
-
1/2 tsp pepper
-
Olive oil spray
Instructions
-
Step 1
Slice chicken breasts into 1/2-inch thick cutlets or pound to even thickness; pat dry thoroughly. -
Step 2
Combine panko, Parmesan, minced garlic, Italian seasoning, salt, and pepper in a shallow dish, mixing well. -
Step 3
Lightly spray chicken cutlets with olive oil, then dredge each cutlet in the breading mixture, pressing firmly to coat evenly. -
Step 4
To cook: For pan-frying, heat an oiled skillet over medium-high heat and cook chicken 3-5 minutes per side until golden brown and cooked through (internal temperature 165°F/74°C). For baking, place coated chicken on a baking sheet, spray tops lightly with olive oil, and bake at 400°F (200°C) for 15-20 minutes, flipping halfway, until golden and cooked through. -
Step 5
Let the cooked chicken rest for a few minutes before serving to retain juices.
Important Information
Nutrition Facts (Per Serving)
It is important to consider this information as approximate and not to use it as definitive health advice.
Allergy Information
Please check ingredients for potential allergens and consult a health professional if in doubt.

Leave a Comment