

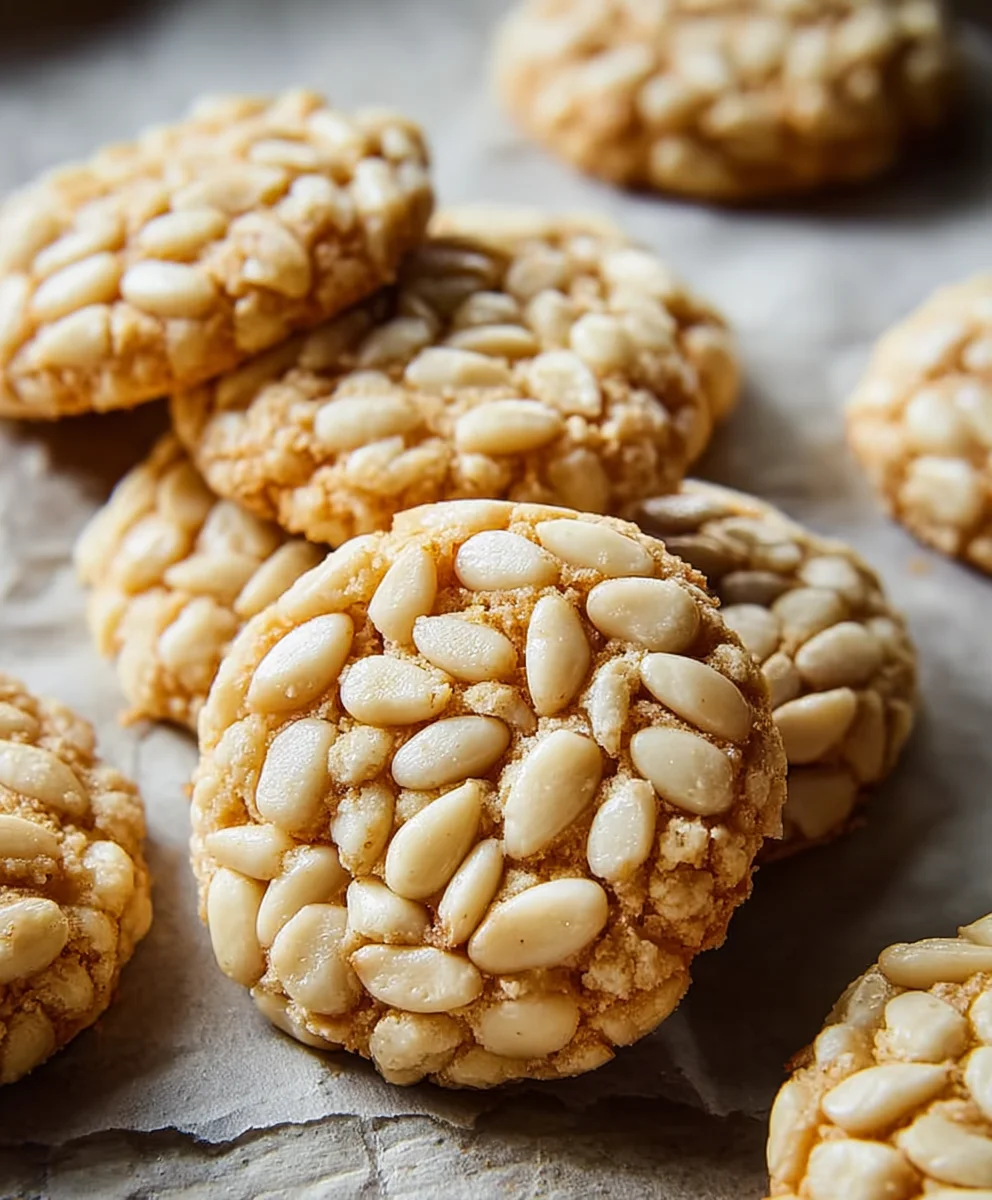
Pignoli Cookies are an absolute jewel in the crown of Italian baking, a true testament to simple ingredients yielding extraordinary results. From the moment you catch a glimpse of their golden-brown tops generously studded with fragrant pine nuts, you know you’re in for a treat. These delightful confections, deeply rooted in Italian culinary tradition, have graced countless holiday tables and celebrations for generations, bringing a touch of Mediterranean sunshine to every gathering. Their distinct appearance and exquisite flavor make them instantly recognizable and undeniably special.
Why Everyone Loves Pignoli Cookies
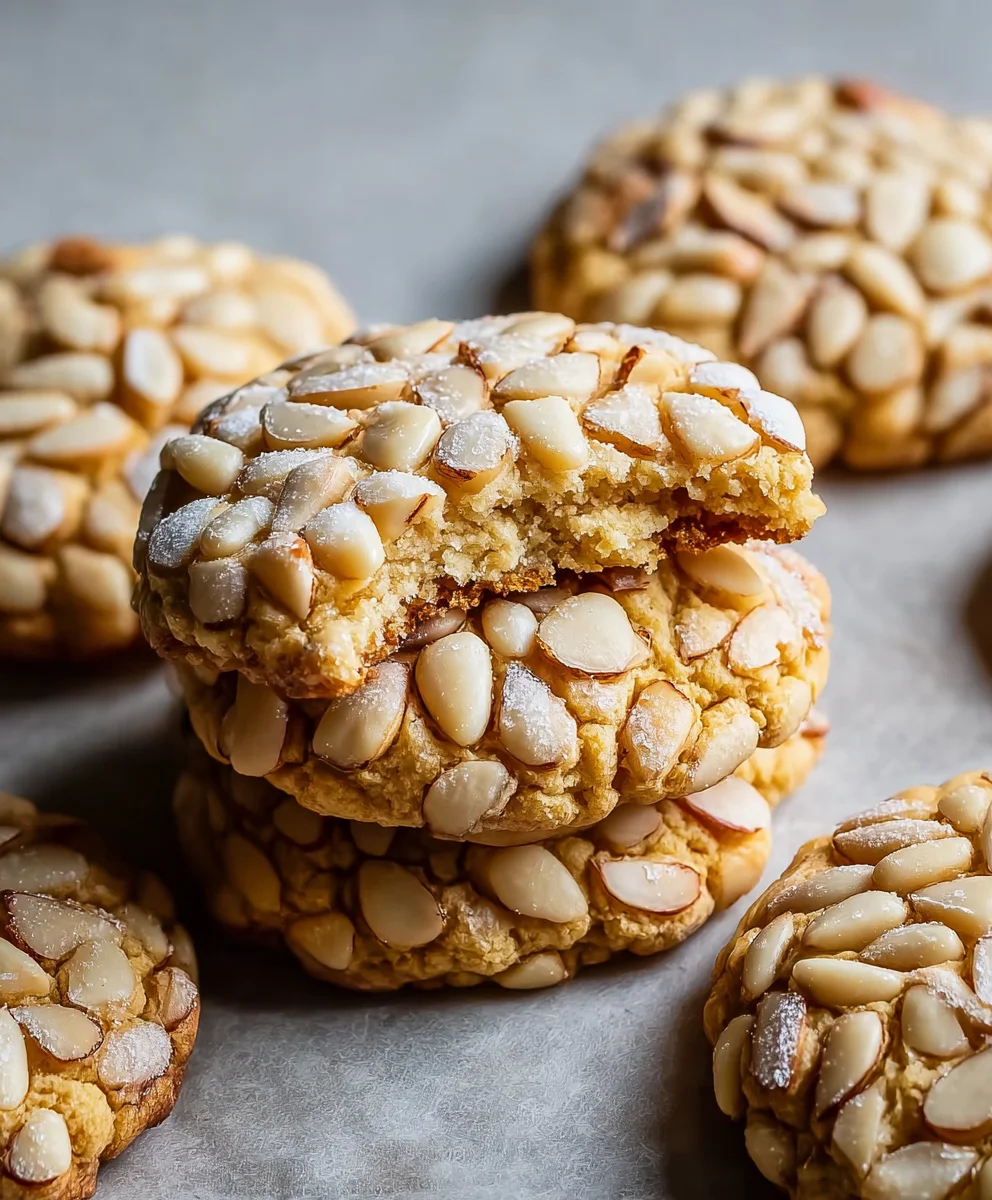
What makes these cookies so universally adored? It’s their irresistible combination of textures and flavors. Each bite delivers a tender, chewy interior, contrasting beautifully with a delicate, slightly crisp exterior, all enhanced by the buttery crunch of toasted pine nuts. The subtly sweet almond paste base provides a rich, marzipan-like essence that is simply divine. I find that mastering the art of baking Pignoli Cookies is not just about following a recipe; it’s about connecting with a heritage of deliciousness that transcends borders. Get ready to impress your friends and family with this timeless classic!

Ingredients:
- 8 ounces (227g) high-quality almond paste: I always recommend using a blanched almond paste for Pignoli Cookies, not marzipan or almond filling. Look for one with minimal ingredients – typically just almonds and sugar. This is the heart of your Pignoli Cookies, so quality truly makes a difference in flavor and texture. Ensure it’s at room temperature for easier mixing.
- 1 cup (200g) granulated sugar: This provides the perfect balance of sweetness and helps create that wonderfully chewy interior we all love in a classic Pignoli Cookie.
- 2 large egg whites: Separated from the yolks. These will be used for coating our beautiful cookies, helping the pine nuts adhere and creating a lovely sheen. Make sure they are at room temperature for best results.
- 1 large egg yolk: This will be incorporated into our almond paste dough, adding richness and helping bind everything together. Again, room temperature is ideal.
- 1 teaspoon pure vanilla extract: A touch of vanilla enhances the almond flavor beautifully, adding depth to your Pignoli Cookies. Feel free to use a good quality almond extract as well, or in addition to, if you want an even more pronounced almond essence.
- 1/4 teaspoon fine sea salt: A little salt balances the sweetness and brings out all the wonderful flavors in the dough.
- 6 ounces (about 1.5 cups) pignoli nuts (pine nuts): These are the star topping! Look for fresh, plump pine nuts. Their delicate, buttery flavor and slight crunch are absolutely essential for authentic Pignoli Cookies. I usually buy them from a reputable source that stores them well, as they can go rancid quickly.
- Confectioners’ sugar (for dusting, optional): A light dusting can add a beautiful finishing touch, though many prefer their Pignoli Cookies plain to showcase the pine nuts.
Equipment You’ll Need for Your Pignoli Cookies:
To ensure a smooth and enjoyable baking experience, I recommend having the following tools on hand:
- A stand mixer with a paddle attachment, or a good quality hand mixer and a large mixing bowl.
- Several medium-sized bowls for separating eggs, holding egg whites, and spreading out pine nuts.
- Measuring cups and spoons for precise ingredient amounts.
- Two large baking sheets, preferably light-colored, to prevent over-browning on the bottom.
- Parchment paper or silicone baking mats to line your baking sheets – this prevents sticking and ensures easy cleanup.
- A small cookie scoop (about 1 tablespoon capacity) or two small spoons for portioning the dough.
- A wire cooling rack for allowing your Pignoli Cookies to cool properly.
- A spatula or dough scraper for mixing and transferring dough.
Preparing the Almond Paste Base for Your Pignoli Cookies:
This is where the magic begins! The foundation of truly spectacular Pignoli Cookies lies in carefully preparing the almond paste dough. Achieving the right consistency here is absolutely key to their final texture – that coveted chewy center with a slightly crisp exterior.
-
Getting Your Almond Paste Ready for the Mix:
First things first, make sure your 8 ounces of high-quality almond paste is truly at room temperature. I often find it easiest to break it into smaller pieces before adding it to my mixing bowl. If it’s too cold and hard, it won’t blend smoothly, and you’ll end up with lumps, which we definitely want to avoid for the delicate Pignoli Cookies. Place these pieces into the bowl of your stand mixer fitted with the paddle attachment, or into a large mixing bowl if you’re using a hand mixer. This initial step ensures that the almond paste can fully integrate with the other ingredients, leading to a wonderfully uniform dough.
-
Creaming with Sugar for the Perfect Sweetness and Texture:
To the almond paste, add your 1 cup of granulated sugar. Begin mixing on low speed, gradually increasing to medium. You want to beat these two ingredients together until they are well combined and the mixture looks somewhat crumbly, but starting to come together. This creaming process not only distributes the sugar evenly but also starts to break down the almond paste into a finer, more workable texture. Keep mixing until the mixture is light in color and fluffy, usually about 3-5 minutes. Don’t rush this step! Proper creaming incorporates air, which contributes to the lightness of the finished Pignoli Cookies.
-
Incorporating the Egg Yolk for Richness and Binding:
Now, it’s time to add the 1 large egg yolk to your almond paste and sugar mixture. Continue mixing on medium speed. The yolk will help bind the dough, adding richness and moisture, which is crucial for that desirable chewy texture. Mix until the yolk is fully incorporated and the dough comes together into a cohesive, somewhat sticky mass. It’s important to scrape down the sides of the bowl frequently with a rubber spatula to ensure everything is evenly mixed. You want to see a smooth, almost paste-like consistency at this stage.
-
Adding Flavor with Vanilla and Salt:
Next, pour in your 1 teaspoon of pure vanilla extract and sprinkle in the 1/4 teaspoon of fine sea salt. Mix again on medium speed until these are completely blended into the dough, which usually takes about 30 seconds to a minute. The vanilla extract is non-negotiable for me, as it beautifully complements the almond flavor, elevating the overall taste profile of these classic Pignoli Cookies. The salt, though a small amount, is critical for balancing the sweetness and enhancing all the delicious nuances of the almond paste.
-
Checking for the Perfect Dough Consistency:
At this point, your almond paste dough should be soft, pliable, and slightly sticky, but firm enough to hold its shape when rolled. It shouldn’t be too wet or crumbly. If it feels too wet, you can try adding a tiny bit of almond flour (not wheat flour) to absorb excess moisture, though this is rarely necessary if measurements are accurate. Conversely, if it seems too dry, a tiny splash of additional egg white can help, but add it sparingly, drop by drop, as too much liquid will make the dough too soft and prone to spreading. This dough consistency is paramount for successfully shaping and baking your Pignoli Cookies.
Coating and Shaping Your Pignoli Cookies:
This phase is all about preparing our beautiful dough for its pine nut jacket! Precision and a gentle touch will ensure each Pignoli Cookie is perfectly coated and ready for the oven, displaying that iconic, rustic appearance.
-
Preparing Your Workstation and Ingredients:
Before you start shaping, get everything ready. Line your two baking sheets with parchment paper or silicone baking mats. This prevents sticking and makes cleanup a breeze. In one small, shallow bowl, lightly whisk your 2 room-temperature egg whites until they are slightly foamy. You don’t want stiff peaks, just enough to break them up and make them easier to work with. In another shallow dish or on a flat plate, spread out your 6 ounces of pignoli nuts (pine nuts) in a single, even layer. I always emphasize using fresh pine nuts for your Pignoli Cookies; stale ones can have a bitter taste that will compromise all your hard work. Having these ready makes the assembly line process incredibly efficient.
-
Portioning the Dough for Uniform Pignoli Cookies:
Using a small cookie scoop (about 1 tablespoon capacity) or two small spoons, portion out the almond paste dough. Aim for consistency in size, as this ensures all your Pignoli Cookies bake evenly. Each scoop should be roughly the size of a large gumball or a small walnut. If your dough is particularly sticky, you can lightly moisten your hands with water or confectioners’ sugar to prevent it from clinging too much. I find a scoop is the best method for achieving uniform cookies, which is important for both aesthetics and even baking.
-
Gently Rolling into Spheres:
Take each portion of dough and gently roll it between your palms to form a smooth, uniform ball. This doesn’t need to be perfectly round, as the pine nuts will add to their rustic charm, but aim for a relatively consistent shape. Be gentle; the dough is delicate but should hold its form nicely. This step is satisfying, as you begin to see your future Pignoli Cookies take shape. Place the rolled dough balls temporarily on a separate plate as you work through the batch, keeping them accessible for the next step.
-
The Egg White Dip: Adhesion and Shine:
Now, carefully pick up one dough ball and dip it into the lightly whisked egg whites. Roll it around gently, ensuring it’s completely coated on all sides. The egg white acts as the “glue” that will hold the delicate pignoli nuts in place, and also helps create a beautiful, slightly golden crust during baking. Allow any excess egg white to drip off for a moment; you want a good coating, but not so much that it’s pooling. This thin, even layer of egg white is crucial for the pine nuts to adhere properly to your Pignoli Cookies.
-
The Pine Nut Roll: Creating the Signature Look:
Immediately after dipping in egg white, transfer the dough ball to the dish with the spread-out pignoli nuts. Roll the ball around, pressing very gently, to completely coat it with pine nuts. I like to lightly press the nuts into the dough to ensure they really stick and don’t fall off during baking. You want a generous, almost shaggy coating of pine nuts on every surface. This step defines the Pignoli Cookie! The more pine nuts, the better, in my opinion, as they provide that signature texture and flavor.
-
Arranging Your Pignoli Cookies on the Baking Sheet:
Carefully place each pine nut-covered dough ball onto your prepared baking sheets. Make sure to leave about 1 to 1.5 inches of space between each cookie. While Pignoli Cookies don’t spread excessively, they do expand slightly, and adequate spacing ensures even air circulation, leading to beautifully baked cookies without them merging into each other. I usually fit about 12 Pignoli Cookies per standard baking sheet, depending on their size. Once all your dough is shaped and coated, your trays are ready for the oven!
Baking Your Perfect Pignoli Cookies:
The final phase! Baking Pignoli Cookies to perfection requires a careful watch, as they can go from perfectly golden to over-baked quickly. We’re aiming for a lovely golden hue and that distinct chewy texture.
-
Preheating Your Oven to the Optimal Temperature:
Before you even think about putting those beautiful Pignoli Cookies in, ensure your oven is thoroughly preheated. Set your oven to 350°F (175°C). I always recommend letting the oven preheat for at least 15-20 minutes, even after it indicates it’s reached the set temperature. A consistently heated oven is vital for even baking and prevents the cookies from spreading too much or baking unevenly. An oven thermometer can be a great tool to verify your oven’s true temperature, as many can run hot or cold.
-
Baking to Golden Perfection:
Carefully transfer your baking sheets into the preheated oven. If you’re baking two sheets at once, place one on the upper-middle rack and the other on the lower-middle rack. Bake for approximately 12-18 minutes. The baking time can vary depending on your oven and the exact size of your Pignoli Cookies. You’re looking for the edges to be lightly golden, and the pignoli nuts on top to be a beautiful golden brown. The centers might still look a little soft, but they will firm up as they cool. Keep a close eye on them, especially after 10 minutes, as pine nuts can burn quickly.
-
Rotating Baking Sheets for Even Baking:
If you’re baking two sheets of Pignoli Cookies simultaneously, after about 7-8 minutes, I highly recommend rotating the sheets – swapping their positions (top to bottom) and turning them 180 degrees. This helps ensure that all your cookies bake evenly, compensating for any hot spots in your oven. This step is crucial for achieving consistent results across your entire batch of these delicious Italian cookies.
-
Recognizing When Your Pignoli Cookies Are Done:
The perfect Pignoli Cookie will have a lightly crisp exterior from the toasted pine nuts, and a soft, chewy interior. When gently pressed, the center should feel slightly firm but still pliable. If they look too pale, they likely need another minute or two. If they are turning deep brown all over, they might be slightly over-baked, which could lead to a tougher texture. Trust your eyes and your nose! The aroma of toasted pine nuts and sweet almond will fill your kitchen.
-
Cooling Your Pignoli Cookies: The Patience Stage:
Once baked, remove the baking sheets from the oven. Allow the Pignoli Cookies to cool on the baking sheets for about 5-10 minutes. They are quite delicate when hot, and letting them cool on the sheet helps them set and firm up, preventing them from breaking when you transfer them. After this initial cooling period, carefully transfer the cookies to a wire cooling rack to cool completely. This allows air to circulate around them, preventing the bottoms from becoming soggy and ensuring they achieve that delightful, consistent chewiness. Resist the urge to eat them warm, though the temptation is strong! They truly develop their best texture once fully cooled.
Important Tips for Pignoli Cookie Perfection:
Achieving the best Pignoli Cookies consistently involves a few key insights and practices. Here are some of my top tips to elevate your baking experience and ensure truly outstanding results every time.
-
The Critical Role of Ingredient Quality:
I cannot stress this enough: for Pignoli Cookies, the quality of your main ingredients directly impacts the final flavor and texture. Invest in high-quality almond paste. Avoid brands that are mostly sugar or corn syrup; look for one where almonds are the first or second ingredient. Fresh, plump pignoli nuts are also paramount. Old or rancid pine nuts can ruin an entire batch with a bitter aftertaste. I often taste a few pine nuts before I start baking to ensure they are fresh and buttery. This attention to ingredient quality is perhaps the single most important factor in making truly exceptional Pignoli Cookies.
-
Ensuring Room Temperature Ingredients:
This is not just a suggestion; it’s a fundamental step for proper emulsion and texture. Room temperature almond paste blends smoothly with sugar and egg yolk, creating a cohesive, pliable dough. Cold ingredients can lead to a lumpy, stiff dough that’s harder to work with and might result in a less uniform texture in your baked Pignoli Cookies. Pull out your almond paste and egg at least an hour before you plan to bake.
-
Don’t Overmix the Dough:
Once the ingredients are just combined and smooth, stop mixing. Overmixing can develop the gluten (if any, though almond flour has minimal) or make the dough tough. For a tender, chewy Pignoli Cookie, a light touch after all ingredients are incorporated is best.
-
The Art of Shaping for Uniformity:
Using a small cookie scoop (1-tablespoon size is ideal) helps ensure your Pignoli Cookies are uniform in size. Uniformity is key for even baking; smaller cookies won’t burn while larger ones are still raw. If you don’t have a scoop, aim for consistency using two spoons, and practice rolling gentle balls. A consistent shape will lead to consistent baking results, giving you a tray of perfectly baked Pignoli Cookies.
-
Maximizing Pine Nut Adhesion:
To ensure maximum pine nut coverage and minimize loss during baking, lightly press the pine nuts into the dough ball after rolling in the egg white. The egg white provides the stickiness, but a gentle press ensures the pine nuts are firmly embedded. This also helps create that satisfying crunchy exterior that contrasts beautifully with the soft interior of the Pignoli Cookie.
-
Oven Temperature Accuracy is Crucial:
As mentioned earlier, an accurately preheated oven at 350°F (175°C) is essential. If your oven runs too hot, the Pignoli Cookies might brown too quickly on the outside before cooking through, or the pine nuts might burn. If it’s too cool, they might spread excessively and become flat. An oven thermometer is a small investment that pays off immensely in consistent baking results for all your delicate baked goods, including these Pignoli Cookies.
-
Knowing When They Are Done:
Pignoli Cookies are quite forgiving, but overbaking will make them dry and hard, losing their signature chewiness. Look for a light golden hue on the edges and toasted pine nuts. The center should still look soft when hot, but will firm up perfectly as they cool. When in doubt, it’s always better to underbake slightly and allow them to cool completely, as they continue to cook a little on the hot baking sheet.
-
Proper Cooling for Texture:
Allowing the Pignoli Cookies to cool completely on a wire rack is vital. This prevents condensation from forming on the bottom, which can make them soggy, and helps them achieve their final, stable, chewy texture. Resist the urge to stack them before they’re fully cool.
-
Storage for Longevity and Freshness:
Once completely cooled, store your Pignoli Cookies in an airtight container at room temperature for up to 5-7 days. They retain their delicious texture quite well. If you want to keep them longer, they freeze beautifully for up to 3 months. Just layer them in an airtight container with parchment paper between layers. Thaw them at room temperature for a few hours before serving. This ensures your Pignoli Cookies remain fresh and delicious.
-
Flavor Variations to Explore:
While classic Pignoli Cookies are perfect as they are, feel free to experiment! A hint of lemon zest or orange zest added to the dough can brighten the flavor wonderfully, complementing the almond without overpowering it. You could also try a touch of almond extract in addition to or in place of vanilla for an even more intense almond flavor. Small variations like these can make these already delightful Pignoli Cookies uniquely yours.
Conclusion:
And there you have it, my friends! We’ve reached the sweet finale of our journey, and I genuinely hope you’re feeling inspired, perhaps even a little giddy, to roll up your sleeves and bring these magnificent treats to life in your own kitchen. After all the measuring, mixing, and the magical transformation that happens in the oven, you’ll discover why this recipe isn’t just another cookie on the block; it’s an experience, a small taste of Italian culinary heritage that captivates every single time. My personal promise to you is that once you take that first bite, experiencing the delicate crunch of the golden pine nuts giving way to a wonderfully chewy, almond-scented interior, you’ll understand why these are truly a must-try. The subtle sweetness, the rich nuttiness of the almonds, perfectly complemented by the distinctive, almost buttery notes of the toasted pignoli, creates a symphony of flavors and textures that is simply unparalleled. It’s a sophisticated cookie that manages to be both utterly comforting and incredibly elegant, making it suitable for virtually any occasion, from a casual afternoon coffee break to the grandest of holiday dessert tables.
Why This Recipe Stands Above the Rest
What truly sets this particular recipe apart is the meticulous balance it strikes. We’ve focused on ensuring the almond paste yields that perfect, moist chewiness without being overly dense, and the pine nuts adhere beautifully, toasting to an exquisite golden hue. The aroma alone, as these bake, is enough to draw everyone in your household to the kitchen, creating an atmosphere of warmth and anticipation that is truly special. It’s a cookie that feels gourmet, yet with my step-by-step guidance, it’s entirely achievable for home bakers of all skill levels. I’ve put a lot of love into refining this method to guarantee success, so you can confidently create batches of these irresistible delights that will impress even the most discerning palates. Trust me, the sheer joy of pulling a tray of perfectly golden, fragrant Pignoli Cookies from your oven is an incredibly rewarding feeling, and the compliments you’ll receive will make every moment spent crafting them absolutely worthwhile.
Elevate Your Serving Game: Beyond the Cookie Plate
Now, let’s talk about how you can take your Pignoli experience to the next level. While they are undeniably perfect on their own, especially when paired with a strong espresso or a fragrant cup of Earl Grey tea, these versatile gems offer so many exciting serving possibilities. Imagine crumbling a few over a scoop of artisanal vanilla bean ice cream or a rich chocolate gelato for an added textural dimension and a burst of almond-pine nut flavor. They make an exquisite addition to any dessert platter, sitting proudly alongside biscotti, cannoli, or a delicate tiramisu, showcasing their unique character. For a truly elegant touch, consider drizzling them with a thin layer of melted dark chocolate or a delicate white chocolate ganache once they’ve cooled completely. A sprinkle of sea salt flakes before baking can also amplify their inherent flavors, creating an intriguing sweet-salty dynamic. During the holidays, these cookies, beautifully arranged in a decorative box or tin, transform into thoughtful, homemade gifts that speak volumes of your affection and culinary skill. You could even get creative and incorporate a hint of orange or lemon zest into the dough before baking, lending a bright, citrusy note that beautifully complements the nuttiness. And for those special celebratory evenings, serving them with a small glass of dessert wine, like Vin Santo or a rich Moscato, creates an unforgettable end to a meal.
Your Turn: Bake, Share, and Inspire!
So, now it’s your turn! I genuinely hope you feel inspired to dive into this recipe and discover the magic of making these exquisite treats for yourself. This isn’t just about following instructions; it’s about creating memories, filling your home with incredible aromas, and sharing something truly special with the people you love. I am so confident that you’re going to fall head over heels for these cookies, just as I have. Please, please, do me a huge favor and try this recipe out. And when you do, I would absolutely love to hear all about your experience! Did you love the aroma? How did your friends and family react? Did you try any of the serving suggestions or come up with your own brilliant variations? Don’t be shy! Share your stories, your triumphs, and even your questions in the comments below. Your feedback and experiences not only make my day but also help to inspire other bakers in our wonderful community. So go ahead, preheat that oven, gather your ingredients, and get ready to bake some unforgettable memories. Happy baking, everyone!
Classic Pignoli Cookies Recipe
Pignoli Cookies are a delightful Italian classic with a tender, chewy interior, crisp exterior, and generous coating of buttery pine nuts. An easy and delicious recipe perfect for any occasion.
Ingredients
-
8 oz (227g) almond paste, room temperature
-
1 cup (200g) granulated sugar
-
2 large egg whites, room temperature
-
1 large egg yolk, room temperature
-
1 tsp alcohol-free vanilla extract
-
1/4 tsp fine sea salt
-
6 oz (1.5 cups) pine nuts
-
Confectioners’ sugar (optional, for dusting)
Instructions
-
Step 1
Break room temperature almond paste into pieces. In a stand mixer, cream almond paste with 1 cup granulated sugar on low, gradually increasing to medium, until light and fluffy (3-5 minutes). Scrape bowl. Add 1 large egg yolk, mixing until fully incorporated into a cohesive, sticky mass. Mix in 1 tsp alcohol-free vanilla extract and 1/4 tsp fine sea salt until blended (30-60 seconds). Dough should be soft, pliable, and slightly sticky. -
Step 2
Line two baking sheets with parchment paper. In a shallow bowl, lightly whisk 2 room-temperature egg whites until slightly foamy. In another shallow dish, spread out 6 oz pine nuts in an even layer. Ensure pine nuts are fresh to avoid bitterness. -
Step 3
Using a 1-tablespoon cookie scoop, portion the dough. Gently roll each portion between palms to form a uniform ball. Dip each ball into the whisked egg whites, ensuring full coverage, and letting excess drip off. Immediately transfer to the pine nuts dish and roll, gently pressing, to coat completely with nuts. Place coated dough balls 1 to 1.5 inches apart on prepared baking sheets. -
Step 4
Preheat oven to 350°F (175°C) for at least 15-20 minutes. Bake cookies for approximately 12-18 minutes, or until edges are lightly golden and pine nuts are toasted. If baking two sheets, rotate their positions and turn them 180 degrees halfway through (around 7-8 minutes) for even baking. The centers will firm up as they cool. -
Step 5
Remove baking sheets from oven. Allow cookies to cool on the sheets for 5-10 minutes to set. Carefully transfer Pignoli Cookies to a wire cooling rack to cool completely. Once fully cooled, an optional dusting of confectioners’ sugar can be added. Store in an airtight container at room temperature for up to 5-7 days, or freeze for up to 3 months.
Important Information
Nutrition Facts (Per Serving)
It is important to consider this information as approximate and not to use it as definitive health advice.
Allergy Information
Please check ingredients for potential allergens and consult a health professional if in doubt.


Leave a Comment