

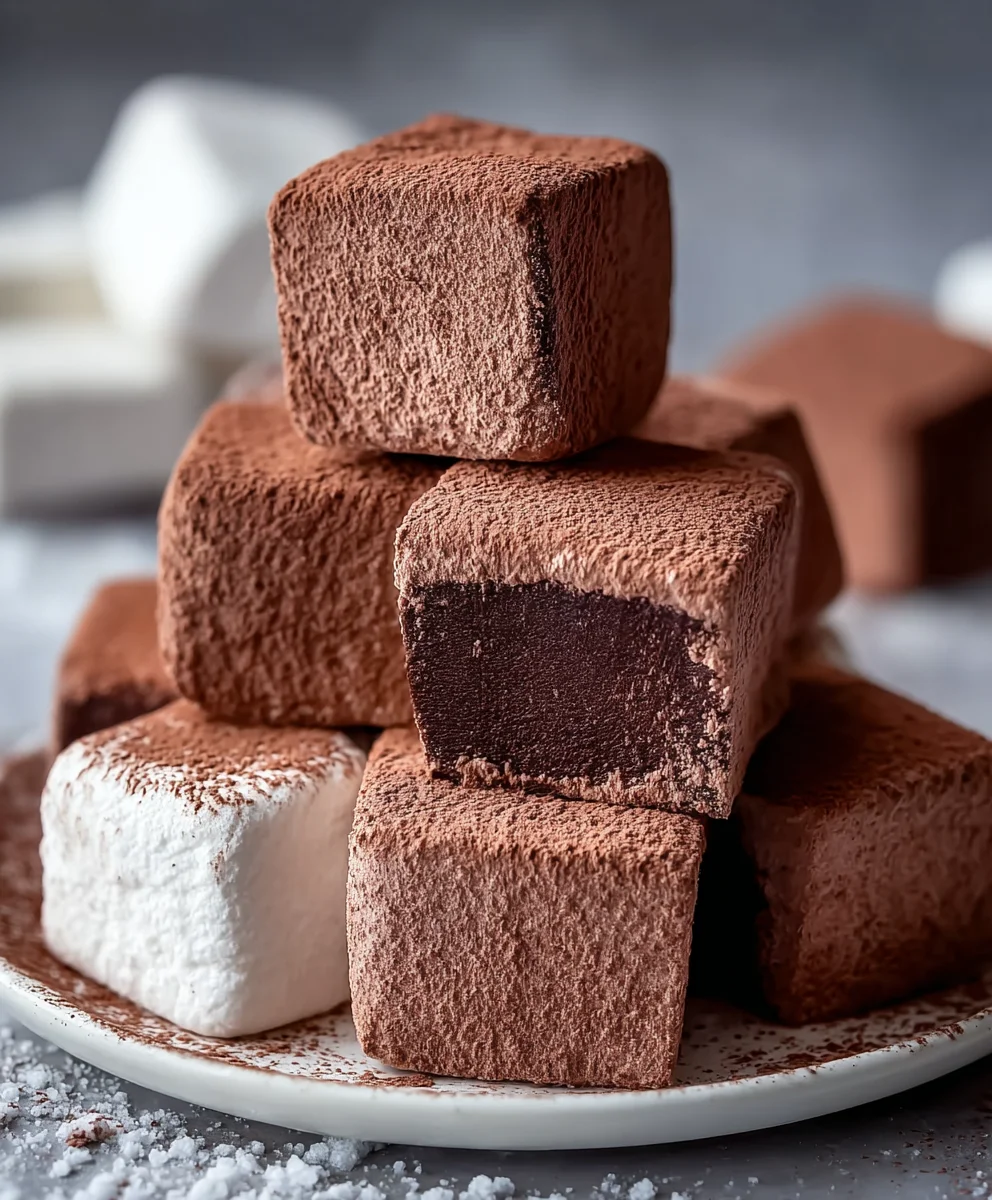
Chocolate Marshmallows are not merely a confection; they are an experience, a delightful fusion of two beloved sweet treats that promises to elevate your dessert repertoire.
Imagine biting into a cloud-like pillow, exquisitely soft and airy, yet possessing a subtle chew, all while being enveloped in the rich, comforting essence of premium chocolate. It’s a combination that truly transcends the ordinary, offering a moment of pure, unadulterated bliss with every bite.
While the marshmallow itself boasts a fascinating lineage, evolving from an ancient Egyptian delicacy made from the mallow plant into the beloved modern confection we recognize today, the integration of chocolate takes this classic to an entirely new level. This innovative pairing transforms a simple sweet into something truly gourmet, offering a sophisticated twist on a nostalgic favorite. People universally adore these homemade Chocolate Marshmallows for their unparalleled texture—that perfect balance of melt-in-your-mouth tenderness and satisfying resilience—coupled with the deep, complex notes of chocolate that sing on the palate. Whether you are seeking to enhance your hot cocoa, create a truly memorable s’more, or simply indulge in an extraordinary snack, crafting these from scratch offers a uniquely rewarding journey into the art of confectionery. I find immense satisfaction in creating these, knowing they will bring smiles and a touch of luxury to any occasion.

Ingredients:
- For the Marshmallows:
- 1 cup (240ml) cold water, divided (1/2 cup for gelatin, 1/2 cup for syrup)
- 3 tablespoons (24g) unflavored gelatin powder (about 3 packets)
- 2 cups (400g) granulated sugar
- 3/4 cup (180ml) light corn syrup (or glucose syrup), this really helps prevent crystallization and gives that classic marshmallow chew
- 1/4 teaspoon fine sea salt
- 1 tablespoon (15ml) pure vanilla extract, a good quality one makes all the difference for depth of flavor
- 4 large egg whites, at room temperature (optional, but highly recommended for a truly light and fluffy texture that elevates these Chocolate Marshmallows)
- 6 ounces (170g) good quality dark chocolate (at least 60% cacao), finely chopped or in disc form, for melting. I prefer a higher percentage for a deeper chocolate flavor, but use what you love!
- For Dusting:
- 1/2 cup (60g) powdered sugar (confectioners’ sugar)
- 1/2 cup (45g) unsweetened cocoa powder, preferably Dutch-processed for a darker color and milder flavor that complements the chocolate in the marshmallows themselves
Preparing Your Workspace and Pan
- Before you even think about starting, it’s crucial to prepare your pan. I’ve learned the hard way that a poorly prepped pan can lead to sticky situations and frustration! Choose a 9×13-inch baking pan for traditional-sized marshmallows. You can also use an 8×8-inch pan for thicker, more substantial cubes, but be aware that they will take a bit longer to set up.
- First, lightly grease the entire inside surface of your chosen pan with a neutral oil or cooking spray. Make sure to get into all the corners and up the sides.
- Next, line the greased pan with parchment paper, leaving an overhang on all sides. This “sling” will be your best friend later when it’s time to lift the set Chocolate Marshmallows out of the pan. The grease underneath helps the parchment stick, preventing it from sliding around while you pour.
- Now, it’s dusting time! In a small bowl, whisk together the powdered sugar and cocoa powder for your dusting mixture. Generously sift about half of this mixture all over the bottom and sides of your parchment-lined pan. Tap out any excess, making sure you have an even, thin layer. This step is vital because it creates a non-stick barrier that will allow you to easily remove and cut your beautiful Chocolate Marshmallows without them sticking to everything. Trust me, you do not want to skip this! Set aside the remaining dusting mixture for later.
- Finally, gather all your equipment. You’ll need a stand mixer with a whisk attachment (a hand mixer can work, but a stand mixer makes this process much easier and less tiring), a heavy-bottomed saucepan, a candy thermometer (absolutely essential for accuracy!), a heatproof spatula, and a small bowl for the gelatin. Having everything ready to go will make the subsequent steps flow much more smoothly, as things move quickly once the syrup is ready.
Blooming the Gelatin
- In the bowl of your stand mixer (or a separate large, heatproof bowl if you’re using a hand mixer), pour 1/2 cup of the cold water.
- Carefully sprinkle the unflavored gelatin powder evenly over the surface of the cold water. It’s important to sprinkle it rather than dumping it all at once to prevent clumps. If it clumps, it won’t hydrate properly, and you’ll end up with rubbery bits in your marshmallows.
- Let the gelatin “bloom” or soften for at least 5-10 minutes. During this time, the gelatin will absorb the water and swell, forming a thick, opaque paste. This process is crucial for ensuring the gelatin dissolves smoothly when heated and gives your Chocolate Marshmallows the correct texture. While it’s blooming, you can move on to preparing the sugar syrup.
Crafting the Silky Sugar Syrup
- In your heavy-bottomed saucepan, combine the granulated sugar, the remaining 1/2 cup of cold water, light corn syrup, and fine sea salt. Give it a gentle stir with your heatproof spatula just to combine the ingredients before heating.
- Place the saucepan over medium-high heat. Attach your candy thermometer to the side of the pan, making sure the tip doesn’t touch the bottom, but is submerged enough to accurately read the temperature of the syrup.
- Bring the mixture to a boil, stirring occasionally until the sugar has completely dissolved. Once it comes to a boil, stop stirring. Stirring at this point can encourage sugar crystals to form on the sides of the pan, which can then fall back into the syrup and cause the entire batch to crystallize, resulting in grainy marshmallows. We want smooth, silky Chocolate Marshmallows!
- If you see any sugar crystals forming on the sides of the pan, use a pastry brush dipped in a little cold water to gently wash them down into the syrup. This prevents crystallization.
- Continue to cook the syrup without stirring until it reaches 240°F (116°C), which is the “soft-ball” stage on a candy thermometer. This temperature is absolutely critical for the right marshmallow consistency. If it’s too low, your marshmallows will be too soft and won’t hold their shape; too high, and they’ll be too firm and potentially brittle. Be patient; it might take 10-15 minutes or even longer depending on your stovetop and pan.
- Once the syrup hits 240°F (116°C), immediately remove the saucepan from the heat. Do not let it go higher.
Melting the Chocolate
- While your sugar syrup is cooking, or immediately after you remove it from the heat, it’s time to melt your dark chocolate. You can do this using a double boiler or in the microwave.
- Microwave Method: Place the finely chopped chocolate in a microwave-safe bowl. Heat in 30-second intervals, stirring well after each interval, until the chocolate is mostly melted and smooth. Be careful not to overheat it, as chocolate can seize up and become grainy. The residual heat will melt the last few pieces as you stir.
- Double Boiler Method: Set a heatproof bowl over a saucepan of simmering water, ensuring the bottom of the bowl does not touch the water. Add the chopped chocolate to the bowl and stir gently until completely melted and smooth. Remove the bowl from the heat once melted.
- Set the melted chocolate aside for a moment, allowing it to cool slightly, but ensuring it remains liquid. We want to incorporate it when it’s warm, not scorching hot, to avoid deflating our marshmallow mixture later, but also not so cool that it starts to solidify.
Merging the Magic: Combining Syrup, Gelatin, and Meringue with Chocolate
- With the hot sugar syrup just off the heat, immediately pour it over the bloomed gelatin in your stand mixer bowl. The heat from the syrup will melt the gelatin. Turn the mixer on low speed with the whisk attachment for about 30 seconds, just until the gelatin is fully dissolved and the mixture is well combined.
- Increase the mixer speed to medium-high and begin whipping the mixture. You’ll notice it will start to lighten in color and increase in volume. Let it whip for about 5-7 minutes until it becomes thick, glossy, and lukewarm. It should resemble a very thick meringue at this stage, but without the egg whites.
- While that mixture is whipping, in a separate, absolutely clean and grease-free bowl (using your stand mixer bowl if you have a second one, or a very clean large bowl for a hand mixer), beat the 4 large egg whites at room temperature using clean whisk attachment. Start on medium speed until they become frothy, then gradually increase the speed to high.
- Continue beating the egg whites until they form stiff, glossy peaks. When you lift the whisk, the peak should hold its shape firmly. This meringue will add an incredible lightness and extra fluffiness to your Chocolate Marshmallows.
- Once your gelatin mixture has cooled slightly and is thick and glossy, and your egg whites are at stiff peaks, it’s time for the final combination.
- With your mixer running on medium-low speed for the gelatin mixture, very slowly and gradually pour the still-liquid melted chocolate into the whipping gelatin mixture. Do this in a thin, steady stream. Allowing the chocolate to incorporate slowly will ensure it emulsifies properly and doesn’t seize or clump.
- Once the chocolate is fully incorporated, turn off the mixer.
- Gently fold in the whipped egg whites into the chocolate-gelatin mixture in two additions using a large rubber spatula. Be careful not to deflate the mixture too much; the goal is to keep as much air in there as possible for truly fluffy Chocolate Marshmallows. This step requires a delicate touch. Fold until no streaks of white remain, and the mixture is uniformly chocolate-colored and airy.
- Finally, stir in the vanilla extract. The vanilla provides a wonderful aromatic counterpoint to the rich chocolate, enhancing the overall flavor profile of your homemade treats.
Pouring and Patience: Setting Your Chocolate Marshmallows
- Working quickly, immediately pour the fluffy Chocolate Marshmallow mixture into your prepared pan. It will be thick and sticky, so don’t be afraid to use a spatula to scrape every last bit out of the bowl.
- Using an offset spatula or the back of a spoon lightly oiled with neutral oil, spread the marshmallow mixture evenly into the pan. Try to get the top as smooth as possible, as this will be the top of your finished marshmallows.
- Let the pan of marshmallows sit undisturbed at room temperature for at least 4-6 hours, or preferably overnight. It’s really important not to put them in the refrigerator, as the cold can cause the marshmallows to “sweat” or release moisture, leading to a less desirable texture. Patience is a virtue here, as adequate setting time ensures your Chocolate Marshmallows will be easy to cut and handle. You’ll know they’re ready when the top is firm and springs back lightly when gently touched.
Cutting and Dusting: The Grand Finale
- Once the marshmallows are fully set, lightly dust your clean work surface (a large cutting board or countertop) with a portion of the reserved powdered sugar and cocoa powder dusting mixture.
- Using the parchment paper overhang as handles, carefully lift the entire slab of set Chocolate Marshmallows out of the pan and invert it onto your dusted work surface.
- Peel off the parchment paper from the top of the marshmallow slab. If it sticks a little, gently coax it off.
- Now, generously dust the top and sides of the marshmallow slab with more of the reserved dusting mixture. This outer coating is essential for preventing stickiness and making the marshmallows easy to handle and store.
- For cutting, I find a lightly oiled pizza cutter works wonders for clean, even cuts. Alternatively, you can use a large, sharp knife lightly coated with a neutral oil (like vegetable or grapeseed oil). If using a knife, wipe and re-oil it frequently to prevent sticking.
- Trim off the edges of the marshmallow slab to create neat, straight sides (these trimmings are a chef’s treat, of course!).
- Then, cut the slab into your desired size and shape. I usually go for 1×1-inch squares, but you can make them larger or smaller depending on your preference. For those who love a challenge, you can even use oiled cookie cutters to create fun shapes, but be prepared for a bit more stickiness.
- As you cut each marshmallow, immediately toss it gently in the remaining dusting mixture. Make sure each side is thoroughly coated. This final dusting step is incredibly important for maintaining their individual form and preventing them from fusing back together.
- Once fully coated, give each marshmallow a gentle pat to remove any excess dusting powder. You want a nice, even coating that signals these are indeed homemade Chocolate Marshmallows, ready for enjoyment.
Storing Your Homemade Chocolate Marshmallows
- Store your beautiful homemade Chocolate Marshmallows in an airtight container at room temperature.
- Properly stored, they will stay fresh, soft, and delicious for up to 1-2 weeks. Avoid storing them in the refrigerator, as the cold can make them firm and sometimes causes them to weep.
- These delightful Chocolate Marshmallows are perfect for snacking on their own, dropping into a mug of hot cocoa, or even toasting over a campfire for an elevated s’mores experience. Their rich chocolate flavor and incredibly tender texture make them a truly special treat!
Conclusion:
If you’ve followed along with me today, I sincerely hope you’re feeling as excited as I am about the incredible potential and sheer delight of making your own marshmallows from scratch. Forget everything you thought you knew about homemade confections; this recipe, specifically for our divine Chocolate Marshmallows, is an absolute game-changer. It’s not just about creating a sweet treat; it’s an experience, a journey into the heart of comforting, rich flavor and an unbelievably light, airy texture that simply cannot be replicated by anything you’d find in a store aisle. This is why I truly believe this recipe is a must-try for everyone, from novice bakers to seasoned dessert enthusiasts. The satisfaction of seeing these beautiful, pillowy squares come to life in your own kitchen is immense, and the taste? Pure, unadulterated bliss. The deep, cocoa-rich flavor harmoniously blended with that signature melt-in-your-mouth marshmallow softness creates something truly extraordinary. It’s a versatile delight that punches far above its weight, promising to elevate ordinary moments into something truly special. Once you try homemade, you’ll never go back!
Elevating Every Occasion with Your Homemade Delight
Now that you’ve mastered the art of creating these exquisite confections, let’s talk about the endless possibilities for enjoying them. While they are absolutely divine on their own, a simple, perfect square of pure joy, they truly shine when incorporated into other treats or served creatively. Imagine dropping a couple of these rich, fluffy morsels into a steaming mug of hot cocoa on a chilly evening. As they slowly melt, they release an additional layer of chocolatey goodness, transforming a simple beverage into a luxurious, decadent experience. This is not just any hot chocolate; it’s a gourmet drink, elevated by your homemade touch. They also make an unforgettable addition to your s’mores game. Forget the bland store-bought kind; picture a perfectly toasted, gooey Chocolate Marshmallow sandwiched between graham crackers with a piece of melting chocolate. It’s a s’more revolution, I tell you! For coffee lovers, a small piece alongside your morning brew or an afternoon pick-me-up can be a delightful surprise, adding a hint of sweetness and a touch of elegance. And for the ultimate dessert platter, arrange a selection of these beauties with fresh berries, a drizzle of caramel, or a scattering of toasted nuts. They bring sophistication and comfort in equal measure, making them perfect for parties, family gatherings, or simply a quiet moment of indulgence. Don’t underestimate their power to impress!
Unleash Your Creativity: Variations to Explore
But wait, the fun doesn’t stop there! One of the most exciting aspects of homemade confections is the freedom to experiment and customize. Your journey with these delightful creations is just beginning. Think about flavor infusions: imagine a hint of peppermint extract stirred into the marshmallow mixture for a festive, cooling twist, perfect for the holiday season. Or, for a more sophisticated palate, a touch of orange zest could brighten the deep chocolate notes beautifully. A pinch of espresso powder can intensify the cocoa flavor, adding a lovely depth, while a tiny dash of cayenne pepper could introduce an exciting, subtle warmth for those who enjoy a little kick. And when it comes to toppings, the sky’s the limit! Before the marshmallows fully set, you could sprinkle them with finely chopped toasted almonds, shredded coconut, vibrant rainbow sprinkles for a fun, playful look, or even a dusting of coarse sea salt to create a wonderful sweet and savory contrast. Drizzling them with melted white chocolate or a contrasting dark chocolate ganache after they’ve set adds an extra layer of visual appeal and flavor. You could even experiment with different shapes using cookie cutters – think hearts for Valentine’s Day or stars for a festive celebration. Every variation is an opportunity to make them uniquely yours, reflecting your taste and creativity. Let your imagination run wild!
Your Turn: Try, Share, and Inspire!
Now, it’s your moment to shine! I’ve walked you through every step, shared my tips, and painted a picture of the delicious possibilities. There’s truly no reason to hesitate. I wholeheartedly encourage you to roll up your sleeves, gather your ingredients, and embark on this incredibly rewarding culinary adventure. Trust me, the joy of tasting your very own, freshly made Chocolate Marshmallows will be a memory you’ll cherish, and an experience you’ll want to repeat again and again. Don’t be afraid to tweak, to innovate, to make this recipe your own personal masterpiece. Once you’ve successfully whipped up your batch, I would absolutely love to hear about your experience! Did you try a unique flavor variation? Did you serve them in an unexpected way? What was your family’s reaction? Please, share your stories, your triumphs, and even your learning moments in the comments below. Snap a picture of your beautiful creations and consider sharing it on social media, tagging me or simply inspiring others with your culinary prowess. Let’s build a community of marshmallow enthusiasts, sharing our passion and creativity. Your feedback and your shared experiences are what truly bring these recipes to life for me, and for everyone else who comes across this article. So, go forth, create, indulge, and most importantly, enjoy every single delicious bite of your homemade perfection!
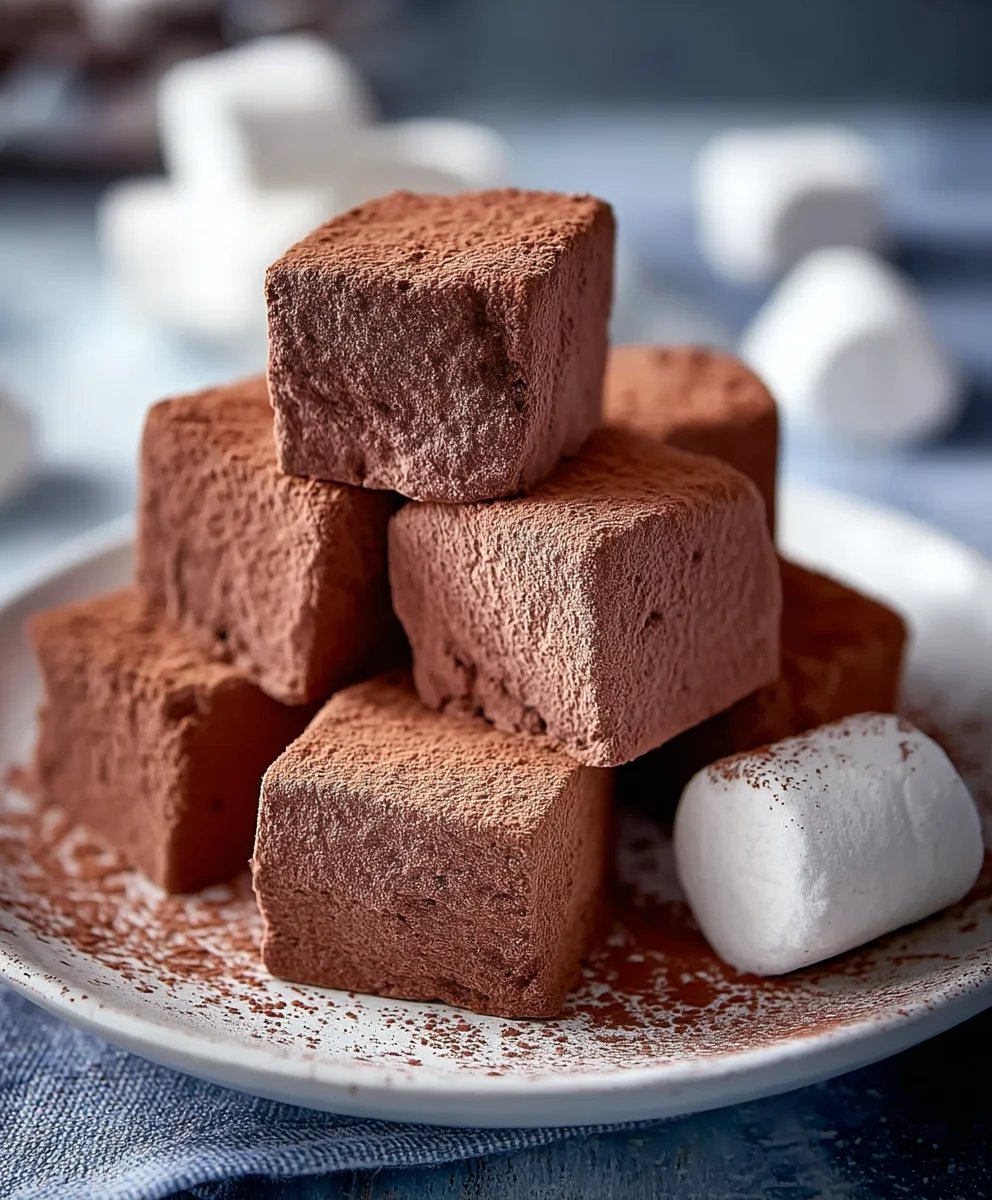
Decadent Chocolate Marshmallows
Exquisitely soft, airy, and rich with premium chocolate, these homemade Chocolate Marshmallows elevate any dessert. Enjoy their unparalleled texture and deep chocolate notes, perfect for hot cocoa, s’mores, or a decadent snack.
Ingredients
-
1 cup (240ml) cold water, divided
-
3 tablespoons (24g) unflavored gelatin powder
-
2 cups (400g) granulated sugar
-
3/4 cup (180ml) light corn syrup
-
1/4 teaspoon fine sea salt
-
1 tablespoon (15ml) pure vanilla extract
-
4 large egg whites, room temp (optional)
-
6 oz (170g) dark chocolate (60%+ cacao), chopped
-
1/2 cup (60g) powdered sugar
-
1/2 cup (45g) unsweetened cocoa powder (Dutch-processed recommended)
Instructions
-
Step 1
Grease a 9×13-inch baking pan, then line with parchment paper leaving an overhang. Whisk together 1/2 cup powdered sugar and 1/2 cup unsweetened cocoa powder. Sift half of this mixture evenly into the prepared pan. Set aside the remaining dusting mixture. -
Step 2
In the bowl of a stand mixer, pour 1/2 cup cold water and sprinkle the gelatin powder evenly over the surface. Let it bloom for 5-10 minutes until thick. -
Step 3
In a heavy-bottomed saucepan, combine granulated sugar, the remaining 1/2 cup cold water, light corn syrup, and fine sea salt. Attach a candy thermometer. Heat over medium-high, stirring until sugar dissolves. Stop stirring, and cook until the syrup reaches 240°F (116°C). Immediately remove from heat. -
Step 4
While the syrup cooks, melt the chopped dark chocolate using a microwave or double boiler method until smooth. Keep it warm and liquid. -
Step 5
Immediately pour the hot sugar syrup over the bloomed gelatin in the stand mixer bowl. Whisk on low speed for 30 seconds to dissolve the gelatin, then increase to medium-high. Whip for 5-7 minutes until the mixture is thick, glossy, and lukewarm (resembling a very thick meringue). -
Step 6
In a separate, clean bowl, beat the 4 large egg whites (if using) to stiff, glossy peaks. -
Step 7
With the mixer running on medium-low speed for the gelatin mixture, slowly stream in the melted chocolate until fully incorporated. Turn off the mixer. Gently fold in the whipped egg whites (if used) in two additions, then stir in the vanilla extract until the mixture is uniformly chocolate-colored and airy. -
Step 8
Working quickly, pour the marshmallow mixture into the prepared pan. Spread evenly with an offset spatula lightly oiled with neutral oil. Let the marshmallows set undisturbed at room temperature for at least 4-6 hours, or preferably overnight. Do not refrigerate. -
Step 9
Once set, lightly dust your work surface with reserved dusting mixture. Using the parchment overhang, lift the marshmallow slab from the pan and invert it onto the dusted surface; peel off the parchment. Generously dust the top and sides of the slab. Lightly oil a pizza cutter or sharp knife and cut the slab into desired shapes (e.g., 1×1-inch squares). Immediately toss each cut marshmallow in the remaining dusting mixture until thoroughly coated, then pat off any excess. -
Step 10
Store your homemade chocolate marshmallows in an airtight container at room temperature for up to 1-2 weeks. Avoid storing them in the refrigerator. Enjoy them as a snack, in hot cocoa, or for s’mores!
Important Information
Nutrition Facts (Per Serving)
It is important to consider this information as approximate and not to use it as definitive health advice.
Allergy Information
Please check ingredients for potential allergens and consult a health professional if in doubt.
Leave a Comment