

Cheesy Snack Pockets are an absolute game-changer for satisfying those sudden cravings and making meal prep a breeze. Whether you’re battling the afternoon slump, needing a delightful appetizer for unexpected guests, or simply yearning for something warm, savory, and utterly comforting, these delightful parcels are your ultimate culinary answer. While the specific term “Cheesy Snack Pockets” might be a modern invention, the concept of encasing delicious, molten fillings in a perfectly baked or fried dough traces back centuries across various cultures – think of the Italian calzone or the Indian samosa. Our recipe brings that timeless comfort right to your kitchen, beautifully modernized for today’s busy lifestyles.
What makes these Cheesy Snack Pockets so irresistibly popular? It’s the perfect harmony of a golden, often flaky or delightfully soft crust cradling a warm, gooey, and seasoned cheesy filling that bursts with flavor in every single bite. They offer unparalleled convenience, transforming simple ingredients into a gourmet-level snack or a light, satisfying meal with minimal fuss. Prepare to fall head over heels for their incredible versatility and undeniable deliciousness!

Ingredients:
- For the Dough:
- 1 cup (240ml) warm water (approximately 105-115°F or 40-46°C)
- 2 ¼ teaspoons (1 standard packet) active dry yeast
- 1 teaspoon granulated sugar
- 3 cups (360g) all-purpose flour, plus more for dusting
- 1 teaspoon salt
- 2 tablespoons olive oil, plus extra for greasing the bowl
- For the Cheesy Filling:
- 2 cups (226g) shredded sharp cheddar cheese
- 2 cups (226g) shredded low-moisture mozzarella cheese
- ½ cup (113g) cream cheese, softened
- 2 tablespoons fresh chives, finely chopped (optional, but highly recommended for a fresh bite!)
- 1 teaspoon garlic powder
- ½ teaspoon onion powder
- ¼ teaspoon black pepper
- For the Egg Wash and Topping:
- 1 large egg
- 1 tablespoon water or milk
- 1 tablespoon sesame seeds or everything bagel seasoning (optional, for that extra crunch and flavor)
Preparing the Dough
- Activate the Yeast: In a large mixing bowl or the bowl of a stand mixer, combine the warm water, granulated sugar, and active dry yeast. Give it a gentle stir and let it sit for about 5-10 minutes. You’ll know it’s ready when the mixture becomes foamy on top, indicating that the yeast is active and alive. This is a crucial step; if your yeast doesn’t foam, it might be old or the water temperature was off, and your dough won’t rise. In that case, I recommend starting over with fresh yeast.
- Combine Dry Ingredients: In a separate medium bowl, whisk together the all-purpose flour and salt. This ensures the salt is evenly distributed throughout the flour, which is important for flavor and yeast activity (too much direct contact with salt can inhibit yeast).
- Mix Wet and Dry: Once your yeast is foamy, add the 2 tablespoons of olive oil to the yeast mixture. Then, gradually add the dry flour mixture to the wet ingredients, mixing with a wooden spoon or a dough hook on low speed (if using a stand mixer) until a shaggy dough forms.
- Knead the Dough:
- By Hand: Turn the shaggy dough out onto a lightly floured surface. Begin to knead the dough. This involves pushing the dough away from you with the heels of your hands, folding it back over, rotating it a quarter turn, and repeating. Continue kneading for 8-10 minutes. Your goal is to develop the gluten, which will give your dough its elasticity and structure. The dough should become smooth, elastic, and no longer sticky. It should bounce back slowly when you gently poke it with your finger.
- With a Stand Mixer: Attach the dough hook and knead on medium-low speed for 6-8 minutes. Keep an eye on the dough; it should gather around the hook and pull away cleanly from the sides of the bowl. It will be smooth and elastic when properly kneaded.
- First Rise: Lightly grease a clean large bowl with olive oil. Place the kneaded dough into the bowl, turning it once to coat the entire surface with oil. Cover the bowl tightly with plastic wrap or a clean kitchen towel. Place the bowl in a warm, draft-free spot in your kitchen. I often use my oven (turned off, of course!) with the light on, which provides a gentle warmth. Let the dough rise for 1 to 1.5 hours, or until it has visibly doubled in size. Patience here is a virtue! A slow, steady rise yields the best flavor and texture in your Cheesy Snack Pockets.
- Punch Down and Rest: Once the dough has doubled, gently punch it down to release the air. Turn the dough out onto a lightly floured surface, give it a quick knead for about 30 seconds to deflate fully and reshape it into a smooth ball. Cover it lightly with a kitchen towel and let it rest for another 10-15 minutes. This resting period allows the gluten to relax, making the dough easier to roll out.
Creating the Cheesy Filling
- Prepare the Cheeses: In a medium-sized bowl, combine the shredded sharp cheddar cheese and shredded low-moisture mozzarella cheese. While pre-shredded cheese is convenient, I always recommend shredding your own from a block if you have the time. It melts much better and tastes fresher, as pre-shredded varieties often contain anti-caking agents.
- Add Cream Cheese and Seasonings: Add the softened cream cheese to the shredded cheeses. Ensure your cream cheese is at room temperature; this makes it much easier to incorporate smoothly without lumps. Sprinkle in the finely chopped fresh chives (if using), garlic powder, onion powder, and black pepper.
- Mix Thoroughly: Using a spoon, spatula, or even your clean hands, mix all the filling ingredients together until they are well combined. You want the cream cheese to be evenly distributed, coating the shredded cheeses and binding everything together. This creates a wonderfully creamy, flavorful filling that will burst with cheesy goodness inside your Cheesy Snack Pockets. Taste a small bit of the mixture (if you’re comfortable) to adjust seasonings if desired; you might want a pinch more garlic powder or pepper.
Assembling Your Cheesy Snack Pockets
- Prepare Your Workspace: Lightly flour your work surface and have a rolling pin ready. Line two large baking sheets with parchment paper; this prevents sticking and makes for easier cleanup. Preheat your oven to 400°F (200°C).
- Divide the Dough: Take your rested dough and divide it into two equal portions. Work with one portion at a time, keeping the other covered to prevent it from drying out.
- Roll Out the Dough: On your floured surface, roll out one portion of dough into a large rectangle, approximately 12×16 inches (30×40 cm) and about ⅛ inch (3-4 mm) thick. The key here is even thickness to ensure even baking. If the dough springs back too much, let it rest for a few minutes before continuing to roll.
- Cut the Dough: Using a sharp knife or a pizza cutter, trim the edges to make a neat rectangle. Then, cut the large rectangle into 12 smaller, roughly equal-sized squares or rectangles. My preference is usually around 4×4 inches or 3×5 inches, depending on how large I want my individual Cheesy Snack Pockets to be. For a visually appealing snack, try to keep them consistent in size.
- Fill the Pockets: Place about 1 to 1.5 tablespoons of the cheesy filling in the center of each dough square. Do not overfill, as this can make sealing difficult and lead to leaks during baking. Leave a border of about ½ to ¾ inch (1.5-2 cm) around the edges.
- Seal the Pockets:
- Lightly brush water or milk around the edges of each dough square. This acts as a “glue” to help seal the pockets.
- Carefully fold one corner of the dough over the filling to meet the opposite corner, forming a triangle. Alternatively, you can fold one side over to meet the other, creating a rectangle or half-moon shape, depending on your initial cut.
- Gently press down along the edges to seal the dough. To ensure a tight seal and add a decorative touch, use the tines of a fork to crimp all around the sealed edges. This step is important to prevent the delicious cheesy filling from oozing out while baking.
- Arrange on Baking Sheets: Carefully transfer the assembled Cheesy Snack Pockets to your prepared baking sheets, leaving about 1 inch (2.5 cm) of space between each one. Repeat the process with the remaining dough and filling. You should end up with approximately 24 Cheesy Snack Pockets.
Baking Your Golden Cheesy Snack Pockets
- Prepare the Egg Wash: In a small bowl, whisk together the large egg and 1 tablespoon of water or milk until well combined. This egg wash will give your Cheesy Snack Pockets a beautiful golden-brown color and a slightly shiny finish.
- Apply Egg Wash and Toppings: Brush the top of each assembled pocket evenly with the egg wash. Be careful not to let the wash pool around the base. If desired, sprinkle a pinch of sesame seeds or everything bagel seasoning over each pocket for an added layer of flavor and texture. This makes them look even more professional and appetizing!
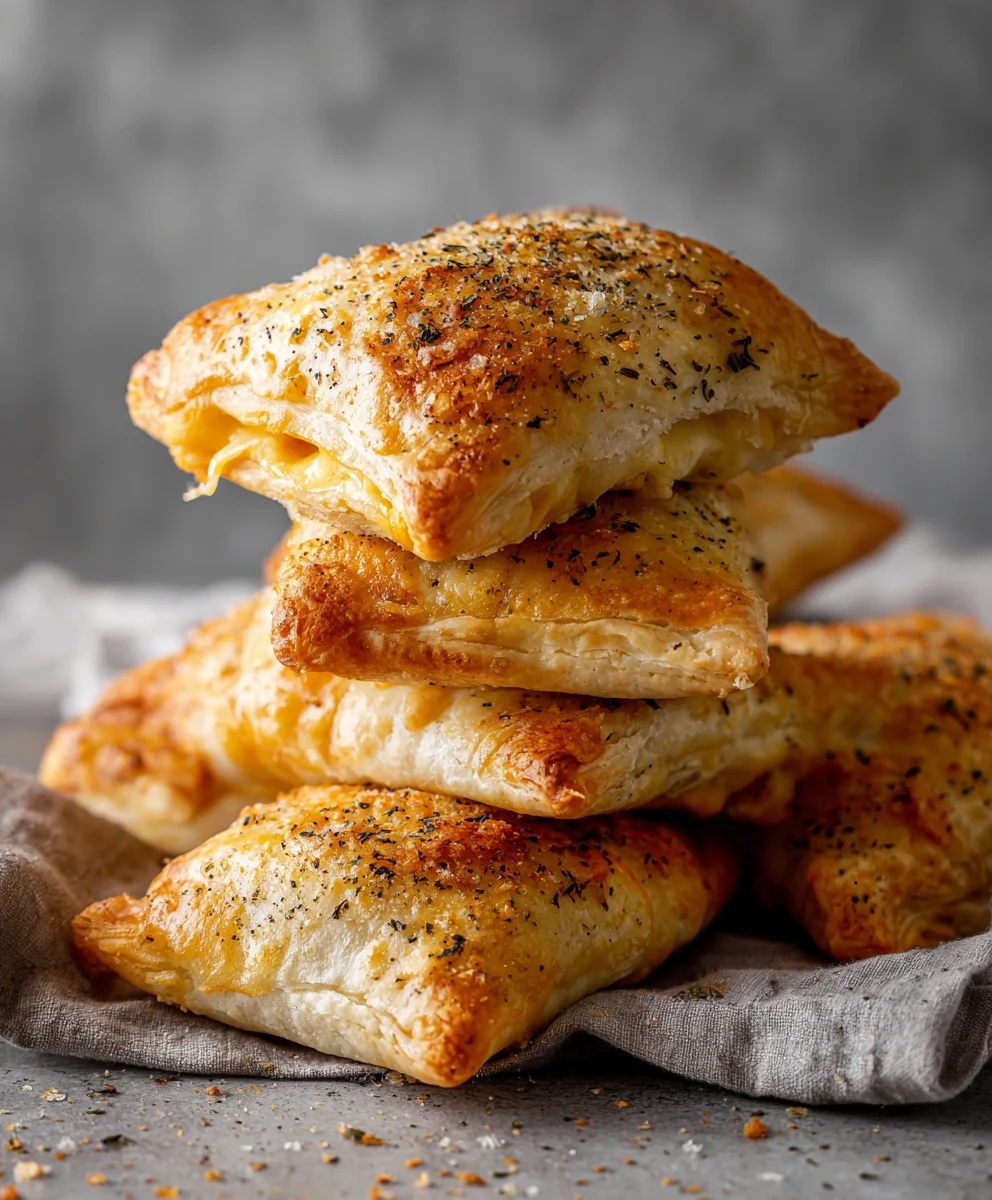
- Bake to Perfection: Place the baking sheets in your preheated 400°F (200°C) oven. Bake for 15-20 minutes, rotating the sheets halfway through baking to ensure even browning. The Cheesy Snack Pockets are ready when they are puffed up, golden brown, and the cheese filling is bubbling slightly. Keep a close eye on them in the last few minutes, as ovens can vary.
- Cool Slightly: Once baked, remove the Cheesy Snack Pockets from the oven. Let them cool on the baking sheets for 5-10 minutes before transferring them to a wire rack. They will be incredibly hot right out of the oven, and the filling needs a moment to set up.
Serving and Storage Tips
- Serve Warm: These Cheesy Snack Pockets are absolutely best served warm, ideally within minutes of coming out of the oven. The cheese will be perfectly molten and gooey, and the crust will be wonderfully crisp. They make an excellent appetizer, a delightful snack, or even a fun lunch alongside a fresh salad. I love dipping them in marinara sauce or a little ranch dressing for an extra kick!
- Storage: If you happen to have any leftovers (which is a rare occurrence in my house!), allow them to cool completely. Store them in an airtight container in the refrigerator for up to 3-4 days.
- Reheating: To reheat, place the Cheesy Snack Pockets on a baking sheet and warm them in a preheated oven at 350°F (175°C) for 8-10 minutes, or until heated through and the cheese is melted again. You can also microwave them, but the crust won’t be as crisp.
- Freezing for Later (Unbaked): If you want to get ahead, you can freeze the assembled but unbaked Cheesy Snack Pockets. After assembling and crimping, arrange them in a single layer on a parchment-lined baking sheet and freeze until solid (about 2-3 hours). Once solid, transfer them to a freezer-safe bag or container. They can be stored for up to 1 month. When ready to bake, place them on a parchment-lined baking sheet, brush with egg wash, and bake from frozen at 375°F (190°C) for 20-25 minutes, or until golden brown and cooked through. You might need an extra minute or two.
- Freezing for Later (Baked): Baked Cheesy Snack Pockets also freeze well. After cooling completely, freeze them in a single layer on a baking sheet, then transfer to a freezer-safe bag or container. Reheat in a 350°F (175°C) oven for about 15-20 minutes from frozen. This makes for a super quick and convenient snack any time!
- Customization Ideas: Feel free to get creative with your Cheesy Snack Pockets! You can add finely diced cooked ham, crumbled cooked bacon, a pinch of red pepper flakes for heat, or even some sautéed mushrooms to the cheese filling. The possibilities are endless, making these Cheesy Snack Pockets a versatile favorite for any occasion.
Conclusion:
Well, my friends, we’ve reached the exciting culmination of our culinary journey! I truly hope you’ve enjoyed exploring this recipe as much as I’ve loved sharing it with you. There’s something uniquely satisfying about creating a dish that brings smiles to faces, and I can confidently say that these Cheesy Snack Pockets are destined to be that very dish in your kitchen. They are, without a doubt, a fantastic addition to any home cook’s repertoire, offering a delightful blend of simplicity, versatility, and undeniable deliciousness that’s hard to beat.
Why these Cheesy Snack Pockets are an absolute must-try: First and foremost, imagine biting into a warm, golden crust, revealing a molten core of savory cheese, perfectly seasoned and utterly comforting. It’s a sensory experience that instantly transports you to a place of pure culinary joy. But beyond the incredible taste, the true beauty of this recipe lies in its sheer adaptability. Whether you’re looking for a quick and easy appetizer to impress unexpected guests, a fun and engaging project to do with the kids on a rainy afternoon, or a convenient grab-and-go lunchbox hero that will make your weekdays a breeze, these snack pockets fit the bill perfectly. They transform humble ingredients into something truly special, proving that you don’t need fancy techniques or exotic components to create memorable food. I’ve found them to be incredibly forgiving, making them ideal for both seasoned chefs and those just starting their cooking adventure. The satisfaction of pulling a batch of these glorious pockets from the oven, knowing you made them yourself, is truly unparalleled.
Now, let’s talk about making these pockets uniquely yours! While the classic cheesy filling is divine, the sky’s the limit when it comes to variations. For a fantastic Italian twist, try adding a tablespoon of mini pepperoni slices and a pinch of dried oregano to your cheese mix – it’s like a mini pizza pocket! If you’re craving something with a bit of a kick, a few finely diced jalapeños or a dash of red pepper flakes will definitely wake up your taste buds. Vegetarians will rejoice with fillings like sautéed spinach and crumbled feta, a mix of roasted bell peppers and onions, or even some finely chopped mushrooms for an earthy depth. For a heartier option, consider incorporating cooked, crumbled sausage, shredded cooked chicken, or even some leftover ham, diced small. Don’t be afraid to experiment with different cheeses either; a blend of sharp cheddar and Monterey Jack can offer a wonderfully rich and creamy texture, while provolone adds a lovely, mild counterpoint. Think about serving these warm with a side of your favorite dipping sauce – a classic marinara, creamy ranch, tangy BBQ sauce, or even a zesty sriracha mayo can elevate the experience. They also pair wonderfully with a simple green salad for a lighter meal, or a bowl of tomato soup on a chilly evening. Imagine them as the star of your next party platter, or packed into lunchboxes for a delightful surprise. The possibilities are truly endless, and that’s what makes this recipe so exciting!
So, what are you waiting for? I wholeheartedly encourage you to roll up your sleeves, gather your ingredients, and give these incredible Cheesy Snack Pockets a try this week. Experience the joy of baking something truly delicious from scratch, and revel in the compliments you’re sure to receive. And please, please, please – don’t keep your culinary triumphs a secret! I absolutely love seeing your creations and hearing about your experiences. Share your photos on social media, tag me, or drop a comment below. Tell me about your favorite filling variations, any clever serving suggestions you discovered, or just how much your family devoured them. Your feedback and creativity inspire me and our entire community of food lovers. Let’s make some delicious memories together!
People Also Ask:
Can I make Cheesy Snack Pockets ahead of time?
Absolutely! You can prepare the snack pockets (assemble them but don’t bake) and store them in the refrigerator for up to 24 hours. Just arrange them on a baking sheet, cover loosely with plastic wrap, and bake directly from the fridge, adding a few extra minutes to the baking time until golden brown and heated through. For longer storage, see the freezing question below!
How do I store leftover Cheesy Snack Pockets?
Once baked and cooled, leftover snack pockets can be stored in an airtight container in the refrigerator for 2-3 days. To reheat, you can pop them in the microwave for 30-60 seconds, or for best results (to maintain crispness), reheat them in a toaster oven or conventional oven at 350°F (175°C) for 5-10 minutes, until warmed through.
Can I freeze Cheesy Snack Pockets?
Yes, these are excellent for freezing! You have two options:
- Unbaked: Assemble the pockets, place them in a single layer on a baking sheet, and freeze until solid. Once frozen, transfer them to a freezer-safe bag or container. They can be stored for up to 2-3 months. When ready to bake, place them on a baking sheet (no need to thaw) and bake at 375°F (190°C) for 20-25 minutes, or until golden and bubbly.
- Baked: Bake the pockets completely, let them cool entirely, then freeze them in a single layer before transferring to a freezer-safe container. Reheat from frozen in an oven at 350°F (175°C) for 15-20 minutes, or until thoroughly heated.
What kind of dough can I use for snack pockets?
This recipe primarily uses store-bought crescent roll dough or puff pastry for convenience, which I highly recommend for ease and delicious results. However, you can also use homemade pie crust dough, biscuit dough, or even a simple pizza dough for a slightly chewier texture. Each type of dough will give a slightly different characteristic to your finished Cheesy Snack Pockets, so feel free to experiment!
How can I make these Cheesy Snack Pockets healthier?
To make them a bit healthier, you can opt for whole wheat crescent roll dough or a homemade whole wheat pizza dough. Reduce the amount of cheese slightly, or choose lower-fat cheese options. Incorporate plenty of finely chopped vegetables into your filling, such as spinach, bell peppers, onions, or zucchini, to boost nutrient content. Baking instead of frying (which we already do!) is also a healthier cooking method.
What if my snack pockets burst open while baking?
If your pockets burst, it’s usually due to overfilling or not sealing the edges tightly enough. Make sure not to overstuff them, leaving enough space for the dough to seal properly. Also, double-check that you’ve crimped the edges firmly with a fork, creating a good seal. Sometimes a tiny slit on top with a knife before baking can help release steam, preventing bursting, but ensure it’s a very small vent.

Easy Cheesy Snack Pockets: Gooey, Quick & Delicious Recipe
Throw together these cheesy pizza pockets for an easy snack or appetizer. Featuring convenient crescent or pizza dough, they’re loaded with savory pizza sauce, stretchy mozzarella, and beef pepperoni slices. A sprinkle of garlic powder, Italian seasoning, and Parmesan adds a flavor boost. These homemade pockets, with their crispy outside and gooey inside, beat frozen ones any day and are perfect when you’re short on time. Enjoy restaurant-quality taste with minimal effort and endless customization!
Ingredients
-
1 (8-ounce) can refrigerated crescent roll dough OR 1 (13.8-ounce) tube refrigerated pizza dough
-
½ cup pizza sauce, plus extra for dipping
-
1 cup shredded low-moisture mozzarella cheese
-
¼ cup sliced beef pepperoni
-
½ teaspoon garlic powder
-
½ teaspoon Italian seasoning
-
2 tablespoons grated Parmesan cheese
Instructions
-
Step 1
Preheat your oven to 375°F (190°C). Line a large baking sheet with parchment paper to prevent sticking. -
Step 2
Unroll the dough onto a lightly floured surface. If using crescent roll dough, pinch the seams together to form a solid rectangle. If using pizza dough, roll it out into approximately a 12×8 inch rectangle. Cut the dough into 8 to 12 equal-sized squares or rectangles (about 3-4 inches each). -
Step 3
On one half of each dough piece, spread about 1 tablespoon of pizza sauce, ensuring to leave a small border around the edges. Top the sauce with a portion of the shredded mozzarella cheese, beef pepperoni slices, garlic powder, Italian seasoning, and grated Parmesan cheese. -
Step 4
Carefully fold the other half of the dough over the filling to create a pocket. Gently press down along the edges to seal the dough, then use the tines of a fork to crimp all around the sealed edges, ensuring a tight seal. -
Step 5
Transfer the assembled pockets to the prepared baking sheet, leaving about 1 inch of space between each. Bake for 12-15 minutes, or until they are golden brown, puffed up, and the cheese filling is bubbling. -
Step 6
Remove the Cheesy Snack Pockets from the oven and let them cool slightly on the baking sheet for a few minutes before serving. They are best enjoyed warm, ideally with extra pizza sauce for dipping.
Important Information
Nutrition Facts (Per Serving)
It is important to consider this information as approximate and not to use it as definitive health advice.
Allergy Information
Please check ingredients for potential allergens and consult a health professional if in doubt.


Leave a Comment