

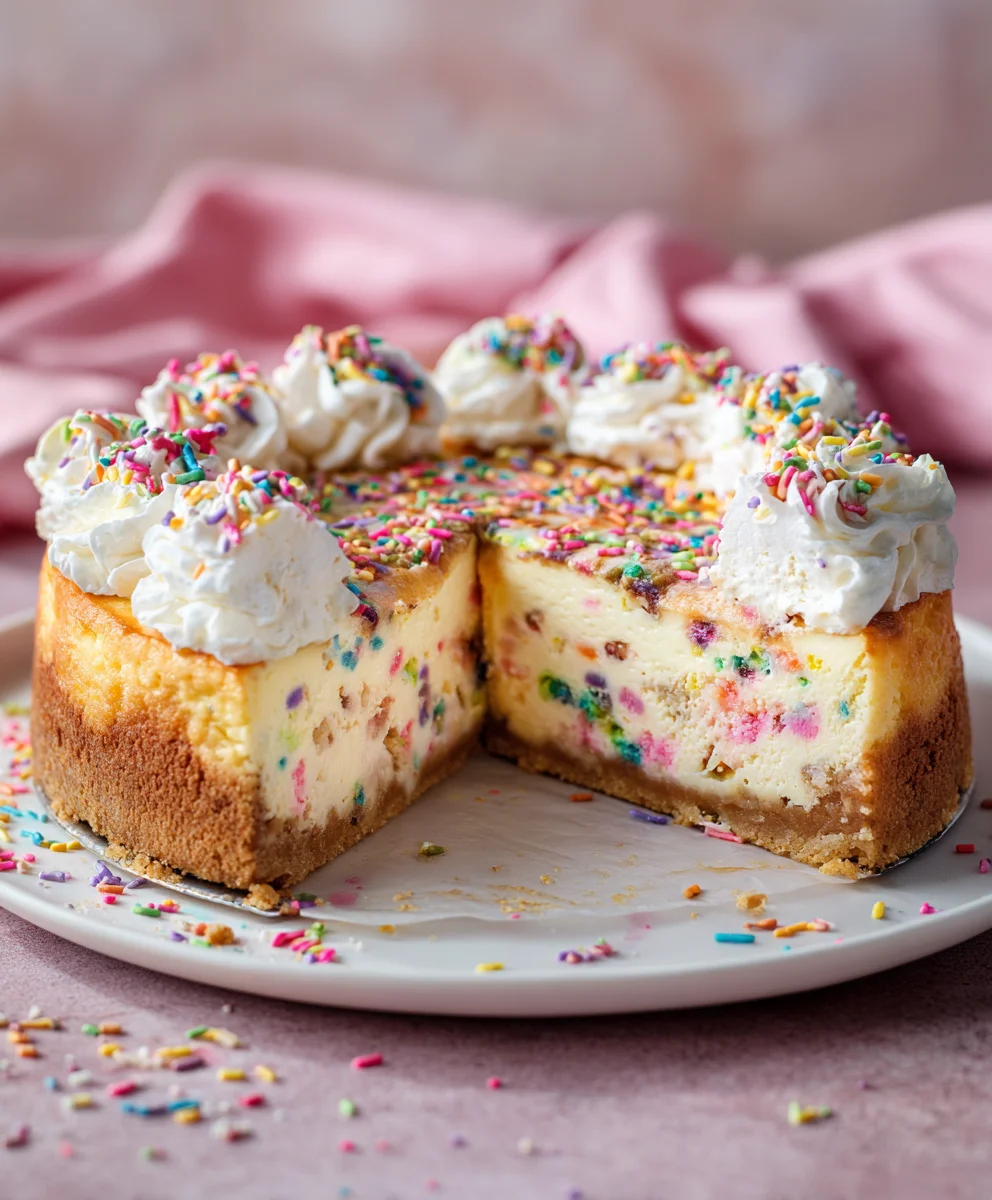
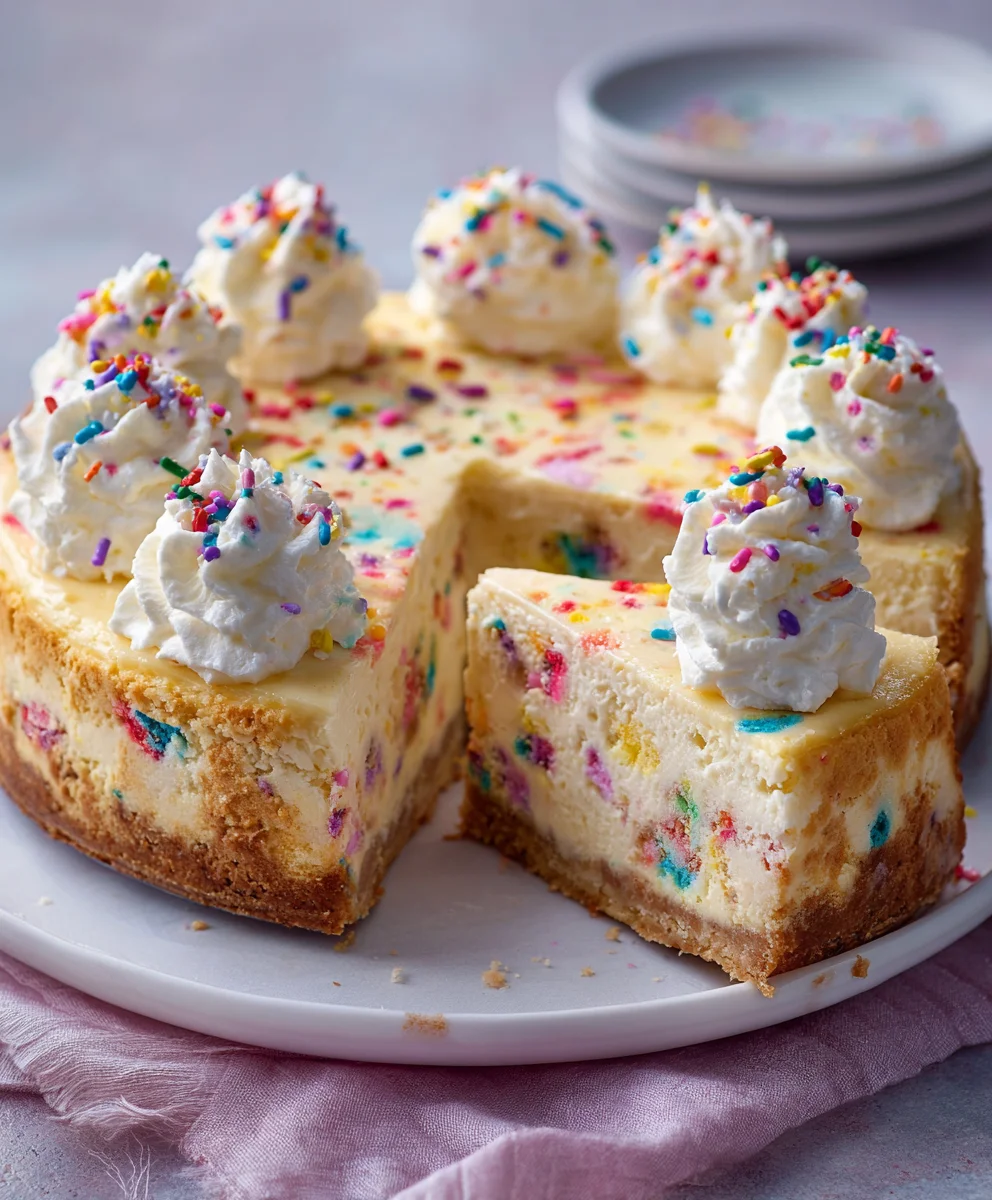
Funfetti Cookie Topped Cheesecake — just the name alone promises an unparalleled celebration for your taste buds, doesn’t it? Picture this: the velvety, rich creaminess of a classic cheesecake, perfectly balanced with the whimsical crunch and vibrant joy of a freshly baked Funfetti cookie. This isn’t merely a dessert; it’s a testament to the magic that happens when two beloved classics unite to form something truly extraordinary. While traditional cheesecake boasts a timeless elegance rooted in ancient Greek history, Funfetti captures the playful spirit of modern celebrations and childhood wonder. It’s this delightful juxtaposition of nostalgic comfort and vibrant fun that makes this creation so compelling.
People adore this particular fusion because it truly delivers on every front: a satisfyingly firm, yet yielding texture, an explosion of sweet, comforting flavors, and a visual spectacle that instantly brightens any occasion. The colorful sprinkles embedded in the cookie topping don’t just add aesthetic appeal; they introduce a subtle, delightful textural pop that elevates each bite. We understand the longing for a show-stopping dessert that requires minimal fuss but yields maximum impact, and this magnificent Funfetti Cookie Topped Cheesecake is precisely that. Get ready to embark on a delightful baking journey that promises to charm and impress everyone who takes a slice.

Ingredients:
-
For the Graham Cracker Crust:
- 1 ½ cups (about 10-12 full sheets) graham cracker crumbs
- 2 tablespoons granulated sugar
- 6 tablespoons (¾ stick) unsalted butter, melted
-
For the Silky Cheesecake Filling:
- 32 ounces (four 8-ounce blocks) full-fat cream cheese, softened to room temperature (this is critical!)
- 1 ½ cups granulated sugar
- ½ cup full-fat sour cream, at room temperature
- 1 ½ teaspoons pure vanilla extract (use good quality for the best flavor)
- 4 large eggs, at room temperature
- 2 tablespoons all-purpose flour (optional, but highly recommended for crack prevention)
-
For the Funfetti Cookie Topping:
- 1 ½ cups (180g) all-purpose flour
- ½ teaspoon baking soda
- ¼ teaspoon salt
- ½ cup (1 stick, 113g) unsalted butter, softened to room temperature
- ½ cup (100g) granulated sugar
- ¼ cup (50g) light brown sugar, packed
- 1 large egg, at room temperature
- 1 teaspoon pure vanilla extract
- ½ cup colorful sprinkles (jimmie sprinkles hold their color best)
-
For the Vanilla Glaze (Optional, but adds a lovely finish):
- 1 cup powdered sugar, sifted
- 2-3 tablespoons milk or heavy cream
- ¼ teaspoon pure vanilla extract
- Extra colorful sprinkles for garnish
Preparing the Irresistible Cookie Crust:
- Gather and Prep Your Pan: First things first, let’s get our oven ready. Preheat your oven to 350°F (175°C). Grab a 9-inch springform pan. I always start by spraying the bottom and sides with a non-stick cooking spray. For that extra peace of mind, especially since we’ll be using a water bath later, I like to wrap the outside bottom of the pan with a layer of heavy-duty aluminum foil. This isn’t strictly necessary for the pre-bake, but it saves a step later.
- Crush Those Graham Crackers: Now for the crust! In a food processor, pulse your graham cracker crumbs until they’re finely ground. We’re looking for about 1 ½ cups of crumbs, which typically comes from 10-12 full graham cracker sheets. If you don’t have a food processor, no worries! You can place the crackers in a large Ziploc bag and crush them with a rolling pin. It’s surprisingly therapeutic! The finer the crumbs, the more uniform your crust will be.
- Combine and Coat: Transfer your finely ground crumbs to a medium-sized mixing bowl. Sprinkle in 2 tablespoons of granulated sugar. Then, pour in your 6 tablespoons (¾ stick) of melted unsalted butter. Take a fork or a sturdy spoon and mix thoroughly. You want every single crumb to be moistened and coated in butter and sugar. The mixture should resemble wet sand – this is what will bind everything together beautifully.
- Press into Pan: Pour the crumb mixture into your prepared springform pan. Now for the satisfying part: pressing it down! Using the bottom of a flat-bottomed measuring cup, a clean glass, or even your fingers, press the mixture firmly and evenly across the bottom of the pan. I always make sure it’s really compact and forms a uniform layer. For a little extra structural integrity and a nice edge for our cheesecake, I also like to press the mixture slightly up the sides, about half an inch. This creates a neat little “lip.”
- Pre-bake for Perfection: Pop the pan into your preheated oven and bake for 10-12 minutes. You’ll know it’s ready when the edges are lightly golden and you can smell that delightful toasty graham cracker aroma. Pre-baking the crust gives it a wonderful crispness and prevents it from becoming soggy once the cheesecake filling is added. Once baked, remove it from the oven and set it aside to cool slightly while you prepare the filling. Don’t forget to reduce your oven temperature to 325°F (160°C) for the main cheesecake bake.
Crafting the Velvety Cheesecake Filling:
- The Golden Rule: Room Temperature Ingredients: Believe me when I say this is the absolute most important step for achieving a perfectly smooth, lump-free, and crack-free cheesecake. Your cream cheese, eggs, and sour cream absolutely must be at true room temperature. I usually take them out of the fridge at least 1-2 hours before I plan to start mixing. Cold ingredients are the enemy of a smooth cheesecake; they lead to lumps and force you to overmix, which can introduce too much air and cause cracks later.
- Cream the Cream Cheese: In the bowl of a stand mixer fitted with the paddle attachment (or a large bowl with a hand mixer), place your softened cream cheese. Beat it on medium-low speed until it’s incredibly smooth and completely creamy, usually about 3-5 minutes. Make sure to stop frequently and scrape down the sides of the bowl with a rubber spatula. We want absolutely no lumps here; a smooth foundation is key! Avoid beating on high speed at this stage; we’re just combining and smoothing, not incorporating excessive air.
- Sweeten It Up: Gradually add your 1 ½ cups of granulated sugar to the cream cheese, beating on low speed until it’s just combined and the mixture looks smooth. Continue to scrape down the sides of the bowl often. I like to beat it for another 2 minutes after the sugar is incorporated, ensuring the sugar is fully dissolved and the mixture looks light and fluffy.
- Introduce the Tang and Aroma: Now, add your ½ cup of full-fat sour cream and 1 ½ teaspoons of pure vanilla extract. Mix on low speed until they are just combined. The sour cream is a secret weapon; it adds a beautiful tangy depth and contributes significantly to that signature ultra-creamy, rich cheesecake texture we all love.
- Eggs – One at a Time, With Care: This step requires a gentle hand and plenty of patience. Add your 4 large eggs, one at a time, beating on the absolute lowest speed possible. Mix only until each egg is just incorporated into the mixture. The moment you see the yolk disappear and the mixture come back together, stop mixing and add the next egg. Do not overmix the eggs! Overmixing introduces too much air into the batter, which expands during baking and then dramatically collapses during cooling, leading to unsightly cracks on the surface of your beautiful cheesecake. After each egg, remember to gently scrape down the bowl to ensure everything is evenly combined.
- The Flour Stabilizer (Optional but Recommended): For an extra measure of crack prevention, lightly sprinkle 2 tablespoons of all-purpose flour over the mixture. Mix on the lowest speed for only about 10-15 seconds, just until you no longer see any dry streaks of flour. The flour acts as a mild stabilizer, helping to prevent cracks without affecting the luxurious texture of your cheesecake.
- Prepare for the Water Bath: Take your springform pan with the cooled crust. Remember how we wrapped it with foil earlier? If you didn’t, now’s the time. Wrap the outside of your springform pan securely with two or three layers of heavy-duty aluminum foil. This creates a waterproof barrier, preventing any water from seeping into the pan during the water bath. Make sure the foil goes all the way up the sides of the pan.
- Pour and Smooth: Carefully pour the silky-smooth cheesecake filling over the pre-baked graham cracker crust in the prepared, foil-wrapped springform pan. Gently tap the pan on the counter a few times. This helps to release any large air bubbles that might be lurking within the batter. Use an offset spatula or the back of a spoon to gently smooth the top surface of the filling, making it perfectly level.
The Art of Baking the Cheesecake:
- Setting Up the Water Bath (Bain-Marie): This technique is a cheesecake baker’s best friend. Place your foil-wrapped springform pan into a larger roasting pan. Now, carefully pour hot water (from a kettle or tap) into the roasting pan until it comes about halfway up the sides of the springform pan. The water bath provides a moist, gentle, and even heat environment for the cheesecake, which is crucial. It prevents the cheesecake from drying out, cracking, and over-browning, resulting in that perfectly creamy, uniform texture.
- Bake to Perfection: Very carefully, transfer the roasting pan (with the cheesecake nestled inside) to your preheated oven (325°F / 160°C). Bake for 60-75 minutes. How do you know when it’s done? The edges of the cheesecake should be set, but the very center (a circle about 2-3 inches in diameter) should still have a slight, delicate jiggle when you gently nudge the pan. Don’t worry if it looks a little underdone in the center; it will continue to cook and set as it cools. Overbaking is a common cause of cracks!
-
Cooling Gracefully (This is a Moment of Truth!): This is arguably the most critical step for preventing cracks and achieving that picture-perfect top. Patience truly pays off here.
- Step 1: Oven Cooling. Once your cheesecake is baked to perfection, turn off the oven. Crucially, leave the cheesecake inside the oven for another 1 hour with the oven door slightly ajar. You can easily prop it open with a wooden spoon. This gradual, slow cooling process prevents a sudden temperature shock, which is a major culprit for cheesecake cracks.
- Step 2: Counter Cooling. After that hour in the cooling oven, carefully remove the cheesecake from the water bath (lift the springform pan out of the roasting pan, then gently peel off the aluminum foil). Place the cheesecake on a wire rack to cool completely to room temperature. This step alone will take another 2-3 hours. Resist the urge to rush this process; it’s vital for the cheesecake to continue setting.
- Step 3: Refrigeration – The Final Set. Once your cheesecake is completely cool to the touch, cover it loosely with plastic wrap. Avoid pressing the plastic wrap directly onto the surface to prevent condensation. Transfer it to the refrigerator for at least 6-8 hours, or ideally, overnight. This extended chilling period is absolutely essential for the cheesecake to fully set, firm up, and for all those incredible flavors to meld and develop. Trust me, it’s truly not ready to be enjoyed until it’s had this dedicated chill time.
Crafting the Delightful Funfetti Cookie Topping:
- Prep the Dry Ingredients: In a medium bowl, whisk together your 1 ½ cups (180g) all-purpose flour, ½ teaspoon baking soda, and ¼ teaspoon salt until well combined. Set this bowl aside for a moment.
- Cream Butter and Sugars: In the bowl of your stand mixer fitted with the paddle attachment, or using a hand mixer, combine your ½ cup (1 stick, 113g) unsalted butter (which should be softened to room temperature), ½ cup (100g) granulated sugar, and ¼ cup (50g) packed light brown sugar. Beat these on medium speed until the mixture is wonderfully light and fluffy, usually about 2-3 minutes. Don’t forget to stop and scrape down the sides of the bowl frequently to ensure everything is evenly incorporated.
- Add Egg and Vanilla: Beat in your 1 large egg, making sure it’s also at room temperature. Mix just until it’s combined. Then, stir in 1 teaspoon of pure vanilla extract. These liquids help bring the dough together beautifully.
- Combine Wet and Dry: Now, gradually add your dry ingredient mixture to the wet ingredients. Mix on low speed, just until everything is combined. It’s really important not to overmix at this stage; as soon as no dry streaks of flour remain, stop mixing. Overmixing can develop the gluten in the flour, which can lead to tough cookies. We want tender, chewy cookies!
- Fold in the Sprinkles: Gently, with a rubber spatula, fold in your ½ cup of colorful sprinkles. For that authentic “Funfetti” look, I highly recommend using jimmie sprinkles (the rod-shaped ones). They tend to hold their color and shape much better during baking than nonpareils, which can sometimes bleed and create a muddy color.
- Chill and Prep for Baking: Cover the bowl with plastic wrap and refrigerate the cookie dough for at least 30 minutes. This chilling step helps the flavors meld together and makes the dough much easier to handle and shape. While the dough is chilling, preheat your oven to 350°F (175°C) and line a baking sheet with parchment paper.
- Bake the Cookies: Once the dough is chilled, remove it from the fridge. Take small portions of dough and roll them into roughly 1-inch balls. Place them about 2 inches apart on your prepared baking sheet. Bake for 8-10 minutes, or until the edges are lightly golden, but the centers still look slightly soft. They will continue to set as they cool. Remove from the oven and let them cool on the baking sheet for about 5 minutes before carefully transferring them to a wire rack to cool completely. You’ll need about 12-15 cookies for topping your cheesecake; any extras are a delightful chef’s treat!
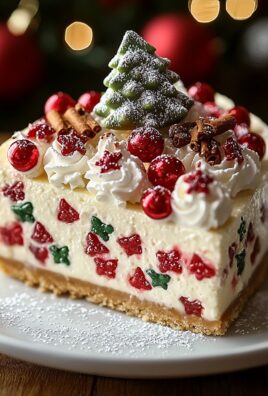
Assembling and Decorating the Ultimate “Funfetti Cookie Topped Cheesecake”:
- Release the Cheesecake Masterpiece: After your “Funfetti Cookie Topped Cheesecake” has had its long, well-deserved chill time (at least 6-8 hours, or preferably overnight), it’s time for the reveal! Carefully run a thin, sharp knife around the inner edge of the springform pan before releasing the springform collar. This prevents the cheesecake from sticking and tearing, ensuring a clean, perfect edge. Gently lift the collar off and carefully transfer your beautiful cheesecake to a serving plate or cake stand.
- Prepare Your Cookie Topping: Now, gather your cooled, vibrant Funfetti cookies. This is where your creativity comes in! You can choose to place them whole on top of the cheesecake for a classic look, or for a more dynamic and rustic texture, you can crumble some of them roughly. I personally love a mix – some whole, some halved, and some generously crumbled – to create visual interest and varied textures in every bite.
- Arrange with Flair: Gently arrange the baked Funfetti cookies (whether whole, halved, or crumbled pieces) over the top of the chilled cheesecake. You can decide to cover the entire surface, leaving no cheesecake peeking through, or leave a slight border of exposed cheesecake, depending on the aesthetic you’re going for. I always aim for an artful, slightly haphazard arrangement that truly showcases the colorful, cheerful nature of the Funfetti cookies.
- Whisk the Glaze (Optional, but a Brilliant Touch): If you want to take your “Funfetti Cookie Topped Cheesecake” to the next level of visual appeal and sweetness, let’s make a quick glaze. In a small bowl, whisk together your 1 cup of sifted powdered sugar, 2-3 tablespoons of milk (or heavy cream for an extra rich glaze), and ¼ teaspoon of pure vanilla extract until the mixture is wonderfully smooth and lump-free. The consistency should be pourable but not too thin; it should slowly drip off a spoon. If it’s too thick, add a tiny bit more milk; if too thin, whisk in a little more powdered sugar.
- Drizzle and Garnish with Joy: With a spoon or a whisk, artfully drizzle the prepared vanilla glaze over the Funfetti cookies and any exposed cheesecake surface. This glaze adds a beautiful sheen, an extra layer of sweetness, and helps to adhere the cookies slightly. For that final, irresistible burst of color that truly embodies the “Funfetti” spirit, immediately sprinkle a few extra colorful sprinkles over the glaze before it has a chance to set.
- Final Chill for Stability: To allow the glaze to set beautifully and to ensure everything is perfectly firm before slicing, return your fully decorated “Funfetti Cookie Topped Cheesecake” to the refrigerator for at least another 30 minutes. This quick chill will ensure you get those coveted clean, beautiful slices.
Chilling and Serving Your Masterpiece:
- Chilling for Ultimate Perfection: Always remember that a truly great “Funfetti Cookie Topped Cheesecake” is a cold cheesecake! Ensure your creation is thoroughly chilled before you even think about slicing into it. A cold cheesecake not only slices beautifully, giving you those clean, Instagram-worthy portions, but it also tastes its absolute best. The chilling time allows all the wonderful flavors to fully meld and harmonize, and the textures to become perfectly set, resulting in that iconic creamy, dense, yet melt-in-your-mouth experience.
- Mastering the Slicing Technique: For the cleanest, most professional-looking slices, here’s a little trick I swear by. Use a sharp, thin knife – a chef’s knife or a long slicing knife works wonderfully. For each slice, dip the knife in hot water (a tall glass of hot water works great) and then wipe it completely clean and dry with a paper towel before making your cut. This technique warms the blade, allowing it to glide through the dense cheesecake and the cookie topping without sticking or tearing, giving you perfectly smooth edges every single time. Repeat this hot water and wipe process between each and every slice.
- Storing Leftovers (If There Are Any!): If by some miracle you have any leftover “Funfetti Cookie Topped Cheesecake,” store it tightly covered with plastic wrap in the refrigerator. It will maintain its deliciousness for up to 4-5 days. While it’s always best enjoyed fresh, I’ve found that sometimes the flavors can even deepen overnight, making for an even more delightful treat the next day.
- Enjoy Every Magical Bite! Serve your “Funfetti Cookie Topped Cheesecake” cold and prepare for an explosion of delight! Relish the incredible combination of textures – the crisp graham cracker crust, the velvety smooth and tangy cheesecake filling, and the cheerful, chewy Funfetti cookie topping, all brought together with a hint of vanilla glaze. It’s a showstopper of a dessert that always brings smiles to faces and joy to any occasion!
Welcome to the grand finale of our culinary adventure! If you’ve followed along this far, you’re now perfectly poised to create a dessert that will truly become the talk of any gathering. This isn’t just another cheesecake; it’s a vibrant, joyous masterpiece, a delightful fusion of creamy indulgence and playful crunch. I truly believe that making this recipe will bring a huge smile to your face, not just because of the stunning result, but because the process itself is so rewarding and fun.
Why is this a must-try recipe, you ask? Simply put, it hits every single note you could possibly desire in a show-stopping dessert. The rich, velvety texture of the cheesecake base provides the ultimate canvas for the vibrant, slightly chewy, and utterly delicious Funfetti cookies on top. Each bite is a symphony of contrasting textures and complementary flavors – the tang of cream cheese, the sweet vanilla notes, and the unmistakable burst of sprinkles that just screams celebration. It’s elegant enough for a formal dinner party yet whimsical enough for a birthday bash or a simple family get-together. The visual appeal alone is enough to make jaws drop; who can resist a slice adorned with colorful cookies?
But the beauty of this dessert doesn’t stop at its core perfection. There are so many ways to make this recipe uniquely yours! For serving suggestions, I love to present slices of this magnificent creation with a dollop of freshly whipped cream, perhaps lightly sweetened with a touch of vanilla extract, or even a hint of almond for an extra layer of flavor. A drizzle of white chocolate ganache or a sprinkle of additional Funfetti sprinkles right before serving can elevate its appearance even further. Don’t shy away from adding some fresh berries on the side – the tartness of raspberries or strawberries provides a wonderful contrast to the sweet richness of the cheesecake, cleansing the palate and inviting another luxurious bite.
When it comes to variations, your imagination is the only limit. While the Funfetti cookie is iconic here, feel free to experiment with other cookie toppings. Imagine a decadent chocolate chip cookie-topped cheesecake, or perhaps crushed Oreos for an even more intense chocolate experience. For the crust, you could venture beyond the classic graham cracker and try a crushed shortbread cookie crust, or even a pre-made chocolate wafer crust for a different base flavor. If you want to play with the cheesecake itself, consider adding a zest of lemon or orange to the batter for a brighter, more citrusy profile, or perhaps a swirl of raspberry puree for a fruity twist. You could even make individual mini cheesecakes, topping each one with a smaller cookie or cookie crumbles, perfect for portion control and elegant presentation. The core technique remains the same, allowing you to innovate with confidence. This versatility is precisely what makes the Funfetti Cookie Topped Cheesecake such an incredible addition to your baking repertoire.
So now, it’s your turn! I genuinely encourage you to roll up your sleeves, gather your ingredients, and dive into the joyous process of creating this spectacular dessert. Don’t be intimidated; I promise you the effort is immensely rewarding. The aroma filling your kitchen as it bakes, the anticipation as it chills, and the sheer delight on the faces of those who taste it – these are the moments that make baking so special. Once you’ve created your masterpiece, please don’t keep it to yourself! I would absolutely love to hear about your experience. Did you try a fun variation? What was your favorite part of the process? Most importantly, share a photo of your beautiful creation! Tag me on social media or leave a comment below. Your culinary adventures inspire me and our entire community of fellow food enthusiasts. Happy baking, and get ready to impress!
People Also Ask:
-
How do you store Funfetti Cookie Topped Cheesecake?
-
After it has fully cooled, the best way to store your cheesecake is in an airtight container in the refrigerator. It will stay fresh and delicious for up to 3-4 days. For optimal texture and flavor, bring it to room temperature for about 15-20 minutes before serving.
-
Can I make this cheesecake ahead of time?
-
Absolutely! Cheesecake is a fantastic make-ahead dessert. In fact, it often tastes even better the next day after the flavors have had a chance to meld and deepen. You can bake it, cool it completely, and refrigerate it for up to 2-3 days before you plan to serve it. Add the fresh cookie topping closer to serving time for best texture.
-
Can I freeze Funfetti Cookie Topped Cheesecake?
-
Yes, cheesecake freezes beautifully! To freeze, ensure the cheesecake is completely cooled. You can freeze it whole or in individual slices. Wrap it tightly in several layers of plastic wrap, then an additional layer of aluminum foil. It can be frozen for up to 1-2 months. Thaw overnight in the refrigerator before serving.
-
What are some tips for preventing cracks in cheesecake?
-
There are a few key tricks! First, make sure all your ingredients, especially the cream cheese and eggs, are at room temperature. Don’t overmix the batter once the eggs are added; mix just until combined to avoid incorporating too much air. Using a water bath (baking the springform pan inside a larger pan filled with hot water) helps create a moist, even heat. Finally, allow the cheesecake to cool slowly in the oven with the door ajar after baking, and then completely at room temperature, before chilling.
-
Can I use store-bought Funfetti cookies for the topping?
-
You certainly can! While homemade cookies offer a superior texture and flavor, using good quality store-bought Funfetti cookies is a great time-saver and will still yield a delicious result. Just make sure they’re not too hard or brittle, as you want them to be soft enough to cut through easily with the cheesecake.
-
How do I get clean slices when cutting cheesecake?
-
For perfect, clean slices every time, use a sharp, thin-bladed knife. Dip the knife in hot water and wipe it clean between each cut. This prevents the cheesecake from sticking and dragging, ensuring a beautiful presentation for every piece.
Creamy Funfetti Cookie Topped Cheesecake Delight
Indulge in an unparalleled celebration for your taste buds with this Funfetti Cookie Topped Cheesecake. Experience the velvety richness of classic cheesecake beautifully contrasted with the whimsical crunch and vibrant joy of freshly baked Funfetti cookies. This dessert is a delightful fusion of nostalgic comfort and playful fun, offering satisfying textures, comforting flavors, and a visually stunning presentation perfect for any occasion.
Ingredients
-
2 cups graham cracker crumbs
-
½ cup unsalted butter, melted
-
2 tbsp granulated sugar
-
32 oz (4 x 8-oz blocks) full-fat cream cheese, softened
-
1 cup granulated sugar
-
¼ cup full-fat sour cream, at room temperature
-
1 tsp pure vanilla extract
-
4 large eggs, at room temperature
-
2 tbsp all-purpose flour (optional)
-
1 tbsp lemon juice (optional)
-
1 ½ cups all-purpose flour (for cookies)
-
½ tsp baking soda (for cookies)
-
¼ tsp salt (for cookies)
-
½ cup (1 stick) unsalted butter, softened (for cookies)
-
½ cup granulated sugar (for cookies)
-
¼ cup light brown sugar, packed (for cookies)
-
1 large egg, at room temperature (for cookies)
-
1 tsp pure vanilla extract (for cookies)
-
½ cup colorful sprinkles (jimmie sprinkles, for cookies)
-
1 cup powdered sugar, sifted (for glaze)
-
2-3 tbsp milk (for glaze)
-
¼ tsp pure vanilla extract (for glaze)
-
Extra colorful sprinkles (for garnish, optional)
-
1 cup whipped cream (for serving, optional)
Instructions
-
Step 1
Preheat oven to 350°F (175°C). Prepare a 9-inch springform pan by spraying with non-stick spray and wrapping the outside bottom with heavy-duty aluminum foil. Combine graham cracker crumbs, 2 tbsp sugar, and ½ cup melted butter. Press mixture firmly into the pan bottom and slightly up the sides. Bake for 10-12 minutes until lightly golden. Cool, then reduce oven temperature to 325°F (160°C). -
Step 2
Ensure cream cheese, eggs, and sour cream are at room temperature. In a stand mixer, beat softened cream cheese on medium-low until incredibly smooth (3-5 min), scraping bowl frequently. Gradually add 1 cup granulated sugar, beating on low for 2 minutes until smooth. Mix in ¼ cup sour cream, 1 tsp vanilla extract, and 1 tbsp lemon juice (optional) until just combined. Add 4 eggs, one at a time, beating on the lowest speed until just incorporated. Do not overmix. Optionally, sprinkle 2 tbsp flour over mixture and mix for 10-15 seconds until no dry streaks remain. Pour filling over the cooled crust and gently tap the pan to release air bubbles. Smooth the top. -
Step 3
Place the foil-wrapped springform pan into a larger roasting pan. Carefully pour hot water into the roasting pan until it comes halfway up the sides of the springform pan. Bake in the preheated 325°F (160°C) oven for 60-75 minutes. The edges should be set, but the center (2-3 inches) should still jiggle slightly. Do not overbake. -
Step 4
Turn off the oven and leave the cheesecake inside with the door slightly ajar for 1 hour. Remove from water bath, unwrap foil, and cool completely on a wire rack at room temperature for 2-3 hours. Cover loosely and refrigerate for at least 6-8 hours, or ideally overnight, for a full set. -
Step 5
In a medium bowl, whisk 1 ½ cups flour, ½ tsp baking soda, and ¼ tsp salt. In a stand mixer, cream ½ cup softened butter, ½ cup granulated sugar, and ¼ cup packed light brown sugar until light and fluffy (2-3 min). Beat in 1 large egg and 1 tsp vanilla extract. Gradually add dry ingredients, mixing on low until just combined; do not overmix. Gently fold in ½ cup colorful sprinkles. Cover dough and refrigerate for 30 minutes. Preheat oven to 350°F (175°C) and line a baking sheet with parchment paper. Roll dough into 1-inch balls, place 2 inches apart, and bake for 8-10 minutes until edges are lightly golden. Cool on the baking sheet for 5 minutes, then transfer to a wire rack to cool completely. -
Step 6
After the cheesecake has chilled, run a thin knife around the inner edge of the springform pan before releasing the collar. Transfer the cheesecake to a serving plate. Arrange cooled Funfetti cookies (whole, halved, or crumbled) artfully over the top. For the glaze, whisk 1 cup sifted powdered sugar, 2-3 tbsp milk, and ¼ tsp vanilla extract until smooth. Drizzle glaze over the cookies and cheesecake. Immediately sprinkle extra colorful sprinkles for garnish. Return the decorated cheesecake to the refrigerator for at least 30 minutes to allow the glaze to set. -
Step 7
Ensure your cheesecake is thoroughly chilled before slicing. For clean slices, dip a sharp knife in hot water and wipe it clean and dry between each cut. Store any leftovers tightly covered in the refrigerator for up to 4-5 days. Serve cold, optionally with a dollop of whipped cream, and enjoy every magical bite!
Important Information
Nutrition Facts (Per Serving)
It is important to consider this information as approximate and not to use it as definitive health advice.
Allergy Information
Please check ingredients for potential allergens and consult a health professional if in doubt.
Leave a Comment