

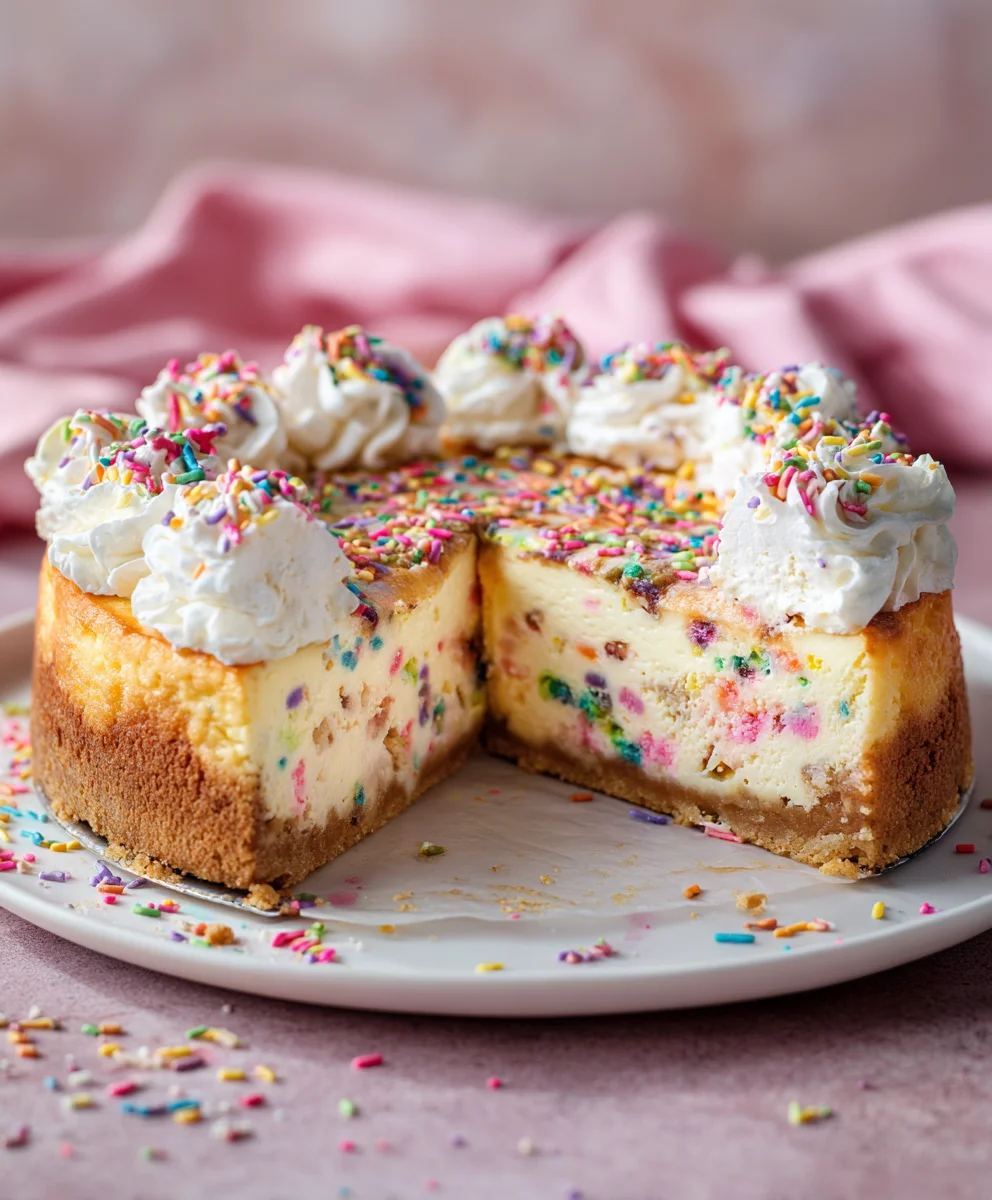
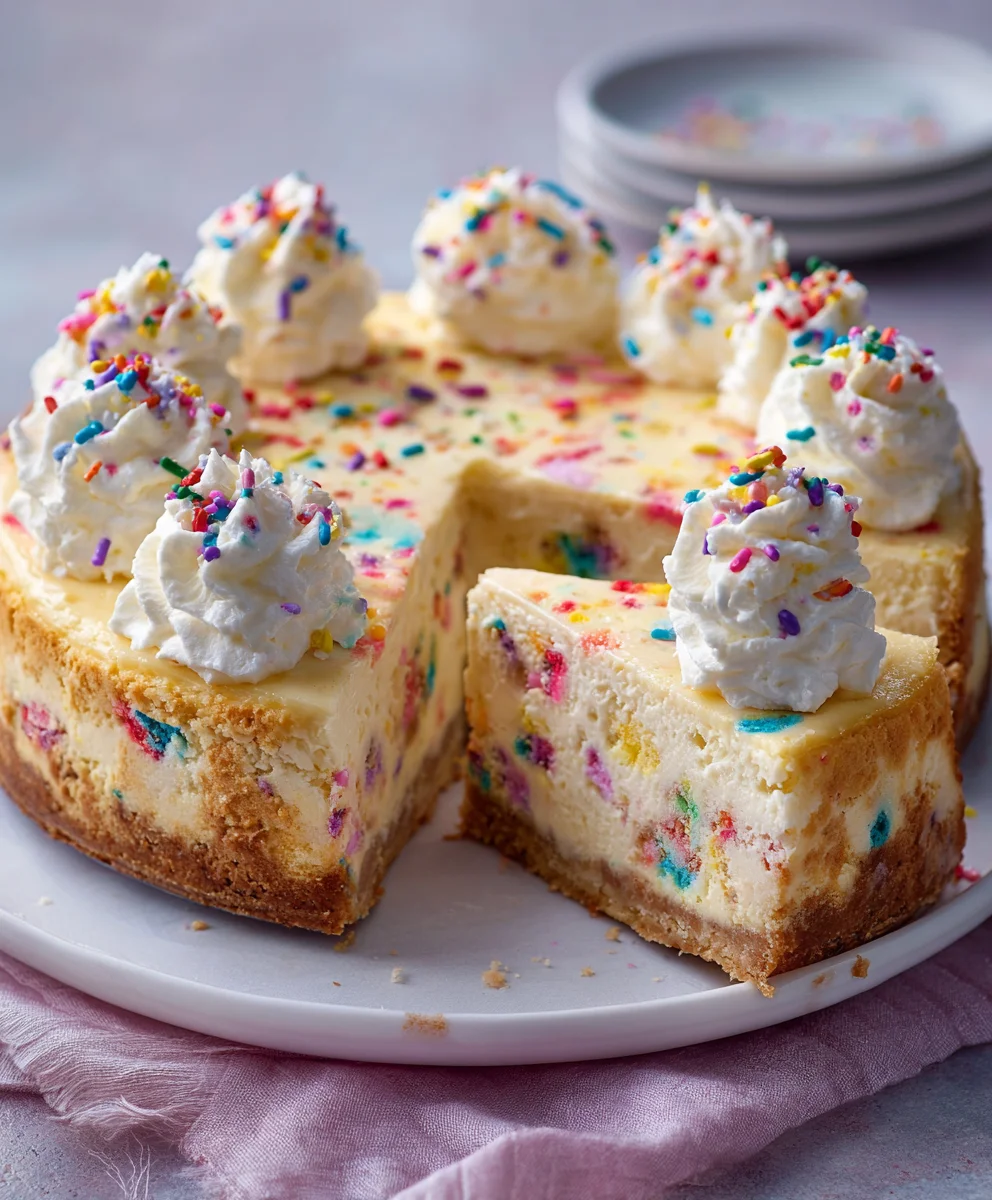
Funfetti Cookie Topped Cheesecake is not merely a dessert; it is an undeniable celebration of pure joy, vibrant nostalgia, and innovative decadence, all masterfully combined into one unforgettable treat. From the moment you lay eyes on its sprinkle-studded crown, you know you’re in for something truly special. This isn’t just about satisfying a sweet tooth; it’s about elevating the dessert experience to a whole new level, promising an indulgence that is as visually stunning as it is delicious.
The very essence of Funfetti, with its iconic burst of colorful sprinkles, has long been synonymous with happy occasions and childhood wonder, emerging as a beloved symbol of celebration in modern dessert culture. When this playful spirit meets the sophisticated, velvety richness of a classic cheesecake, it creates a modern culinary marvel. This ingenious mashup reflects a contemporary trend of blending beloved comfort foods to craft something entirely new and exciting, bridging the gap between whimsical fun and elegant indulgence in a way that truly delights.
What truly captivates enthusiasts about this remarkable creation is the exquisite interplay of textures and flavors that unfolds with every bite. Imagine: the smooth, creamy, and subtly tangy foundation of a perfectly baked cheesecake, providing a luxurious base that melts in your mouth. This is then crowned with a soft, chewy, and irresistibly sweet Funfetti cookie layer, bursting with those delightful, celebratory sprinkles. Every forkful offers a harmonious symphony – a rich, tangy creaminess giving way to a soft, sugary chewiness that evokes pure bliss. Whether you’re aiming to impress guests or simply indulge in a moment of delicious self-care, crafting your own Funfetti Cookie Topped Cheesecake guarantees a show-stopping result that tastes as magnificent as it looks.

Ingredients:
- For the Graham Cracker Crust:
- 1 ½ cups (approximately 10-12 full sheets) graham cracker crumbs (finely crushed)
- ¼ cup granulated sugar
- 6 tablespoons unsalted butter, melted
- For the Cheesecake Batter:
- 32 ounces (four 8-ounce blocks) full-fat cream cheese, softened to room temperature
- 1 ½ cups granulated sugar
- 4 large eggs, at room temperature
- 1 cup full-fat sour cream, at room temperature
- 2 teaspoons pure vanilla extract
- Pinch of salt
- For the Funfetti Cookie Topping:
- 1 cup (2 sticks) unsalted butter, softened to room temperature
- ¾ cup granulated sugar
- ½ cup packed light brown sugar
- 1 large egg, at room temperature
- 2 teaspoons pure vanilla extract
- 2 ¼ cups all-purpose flour
- 1 teaspoon baking soda
- ½ teaspoon salt
- ¾ cup festive rainbow sprinkles (the jimmie style work best for holding shape)
- ½ cup white chocolate chips or Funfetti baking chips (optional, but adds extra fun!)
- For Garnish (Optional):
- Extra rainbow sprinkles
- Whipped cream or cream cheese frosting
Preparing the Crust
- Preheat and Prepare: First things first, let’s get our oven ready. Preheat your oven to 350°F (175°C). Then, grab a 9-inch springform pan. I find it helpful to lightly grease the bottom and sides, just to ensure nothing sticks, although with a well-made crust, it usually comes out easily. This step ensures that our “Funfetti Cookie Topped Cheesecake” starts with a perfect foundation.
- Crush the Graham Crackers: In a medium bowl, combine the finely crushed graham cracker crumbs with the ¼ cup of granulated sugar. For super fine crumbs, which are essential for a firm crust, I always recommend pulsing the graham crackers in a food processor until they’re like fine sand. If you don’t have a food processor, a sturdy Ziploc bag and a rolling pin work wonderfully – just make sure they’re really fine to get a cohesive crust that won’t fall apart.
- Add Melted Butter: Pour the 6 tablespoons of melted unsalted butter into the graham cracker mixture. Stir it exceptionally well with a spoon or fork until all the crumbs are evenly moistened. The mixture should resemble wet sand and hold together when you press it between your fingers. This butter is absolutely crucial for binding the crust together and giving it that lovely golden crispness, which contrasts beautifully with the creamy cheesecake.
- Press into Pan: Transfer the buttered crumbs into the prepared springform pan. Using the bottom of a flat glass or a measuring cup, firmly press the mixture evenly over the bottom of the pan. It’s important to get it really compact and even so your crust doesn’t crumble when you cut into your delicious “Funfetti Cookie Topped Cheesecake”. You can also press a small amount up the sides if you prefer a side crust, but a bottom crust is perfectly fine and often preferred.
- Bake the Crust: Pop the pan into your preheated oven and bake for 8-10 minutes. You’re looking for a light golden brown color and a wonderfully fragrant aroma filling your kitchen. This short bake time helps to set the crust and prevents it from getting soggy once the creamy cheesecake batter is added. Once baked, remove it from the oven and set it aside to cool completely on a wire rack while you prepare the cheesecake batter. Keep the oven on, as we’ll need it again shortly for the main event!
Crafting the Velvety Cheesecake Batter
This is where the magic happens! Achieving a smooth, lump-free cheesecake batter is the secret to an exquisite “Funfetti Cookie Topped Cheesecake” that truly melts in your mouth. Attention to detail here pays off immensely.
- Prepare for Water Bath (Bain-Marie): While your crust is cooling, let’s get ready for the water bath – a professional baker’s secret weapon for preventing cracks in your cheesecake and ensuring an incredibly creamy texture. Wrap the bottom and sides of your springform pan tightly with several layers of heavy-duty aluminum foil. Make sure it goes all the way up the sides, creating a truly watertight seal. This will prevent any water from seeping into your precious crust during baking. Boil a kettle of water; you’ll need hot water later.
- Soften the Cream Cheese: In the bowl of a stand mixer fitted with the paddle attachment (or a large bowl with a handheld electric mixer), add the four 8-ounce blocks of full-fat cream cheese. It is absolutely critical that your cream cheese is at room temperature. Cold cream cheese will result in lumps, no matter how much you beat it, leading to a less-than-perfect texture. Beat the cream cheese on medium speed for about 2-3 minutes until it’s incredibly smooth and creamy, scraping down the sides of the bowl frequently. This initial aeration helps create a wonderfully light and airy texture.
- Add Sugar: Gradually add the 1 ½ cups of granulated sugar to the cream cheese, beating on medium-low speed only until just combined and smooth. Be careful not to overmix at this stage, as too much air can cause your cheesecake to puff up excessively in the oven and then crack dramatically when cooling. We’re aiming for a silky-smooth batter, not a fluffy one. Scrape the bowl again to ensure everything is perfectly incorporated.
- Incorporate Eggs: This is a delicate and crucial step. Add the 4 large eggs, one at a time, beating on low speed only until each egg is just incorporated before adding the next. Overmixing eggs can introduce too much air, which, as I mentioned, is a primary culprit for cheesecake cracks. Scrape down the sides of the bowl meticulously after each addition to ensure everything is evenly mixed into the batter.
- Fold in Wet Ingredients: Finally, add the 1 cup of full-fat sour cream, 2 teaspoons of pure vanilla extract, and the pinch of salt. Beat on very low speed, or even better, gently fold with a rubber spatula until just combined. The sour cream adds a beautiful tang and helps create that signature rich, creamy texture, while the pure vanilla extract deepens and rounds out the flavor profile. Stop mixing as soon as everything is uniform. A few tiny lumps from the sour cream are absolutely fine; don’t overmix trying to get rid of them, as you’ll only incorporate more air.
- Pour into Crust: Carefully pour the finished cheesecake batter over the cooled graham cracker crust in the prepared springform pan. Gently tap the pan on your counter a few times to release any large air bubbles that might be trapped within the batter. This helps ensure an even, dense crumb structure for your “Funfetti Cookie Topped Cheesecake.”
Baking the “Funfetti Cookie Topped Cheesecake” Base
The baking process is undeniably crucial for a perfectly set, smooth, and crack-free cheesecake. Patience and careful observation are your best friends here.
- Set Up Water Bath: Place the foil-wrapped springform pan, containing your beautiful cheesecake batter, into a larger roasting pan. Carefully pour the hot (but not boiling vigorously, as this can splash) water from your kettle into the roasting pan, ensuring the water comes about halfway up the sides of the springform pan. Be very careful not to get any water inside the cheesecake itself – that’s why we foil-wrapped so meticulously! The water bath provides a moist, even heat, preventing the edges from baking too quickly and cracking, and results in that incredibly tender and creamy texture we all love in a classic cheesecake.
- Bake the Cheesecake: Carefully transfer the roasting pan with the cheesecake to the preheated 350°F (175°C) oven. Bake for 60-75 minutes. The cheesecake is done when the edges are set but the center (about a 2-3 inch circle in the middle) still jiggles ever so slightly when you gently nudge the pan. It’s a delicate dance! Remember, it will continue to cook and firm up as it cools. Do not overbake, or it will be dry, dense, and potentially crack, losing that luxurious texture.
- Cooling Process (Crucial!): Once baked, turn off the oven, but leave the oven door ajar (you can prop it open with a wooden spoon) and let the cheesecake cool slowly in the water bath inside the oven for 1 hour. This extremely slow cooling process is a game-changer; it prevents drastic temperature changes that are notorious for causing cracks. After an hour, carefully remove the springform pan from the water bath (and remove the foil) and place it on a wire rack at room temperature to cool completely for another 2-3 hours.
- Chill Thoroughly: Once cooled to room temperature, cover the cheesecake loosely with plastic wrap and refrigerate for at least 6-8 hours, or preferably overnight. Chilling is absolutely essential for the cheesecake to firm up properly, develop its full, rich flavor, and allow for clean, beautiful slices. This waiting period is arguably the hardest part, I know, but it is non-negotiable for the best “Funfetti Cookie Topped Cheesecake” experience!
Preparing the Festive Funfetti Cookie Topping
While your cheesecake chills, let’s create the vibrant, chewy, and utterly delightful star of our “Funfetti Cookie Topped Cheesecake” – the Funfetti cookie!
- Cream Butter and Sugars: In the bowl of your stand mixer with the paddle attachment (or a large bowl with a reliable hand mixer), cream together the 1 cup (2 sticks) of softened unsalted butter, ¾ cup granulated sugar, and ½ cup packed light brown sugar. Beat on medium speed for 2-3 minutes until the mixture is beautifully light, fluffy, and pale in color. Scrape down the sides of the bowl as needed to ensure even creaming. This step incorporates air and helps create a wonderfully tender cookie.
- Add Egg and Vanilla: Beat in the 1 large egg until just combined, then add the 2 teaspoons of pure vanilla extract and beat for another minute until fully incorporated. Ensure the egg is at room temperature to prevent the mixture from seizing or curdling.
- Combine Dry Ingredients: In a separate medium bowl, whisk together the 2 ¼ cups all-purpose flour, 1 teaspoon baking soda, and ½ teaspoon salt. Make sure there are no lumps in your baking soda, as this ensures even leavening.
- Gradually Add Dry to Wet: With the mixer on low speed, gradually add the dry ingredient mixture to the wet ingredients, mixing only until just combined. Be careful not to overmix; overmixing develops gluten and can lead to tough, dense cookies, which is the opposite of what we want for our “Funfetti Cookie Topped Cheesecake”. As soon as you see no more streaks of flour, stop mixing.
- Fold in Sprinkles and Chips: Gently fold in the ¾ cup of festive rainbow sprinkles and ½ cup of white chocolate chips (if using) with a rubber spatula. Mix just enough to distribute them evenly throughout the dough. Overmixing here can cause the sprinkles to bleed their vibrant colors into the dough, which isn’t the end of the world, but can lessen their distinct, joyful pop.
- Chill the Cookie Dough: Cover the cookie dough bowl with plastic wrap and refrigerate for at least 30 minutes. This chilling time is beneficial as it helps the dough firm up, making it much easier to handle and shape, and more importantly, it prevents the cookies from spreading too much when baked. It also allows the flavors to meld beautifully, enhancing the taste of your Funfetti cookie.
Baking the Funfetti Cookie Topping and Assembling the “Funfetti Cookie Topped Cheesecake”
We’re in the home stretch! This is the exciting part where our two delicious components finally come together to form one show-stopping “Funfetti Cookie Topped Cheesecake.”
- Preheat Oven for Cookies: Preheat your oven to 375°F (190°C). Line a large baking sheet with parchment paper. This is absolutely essential for preventing sticking and for easy cleanup, especially with a cookie that’s meant to be transferred later.
-
Shape the Cookie Topping: Remove the chilled cookie dough from the refrigerator. You have a couple of fantastic options here for the topping of your “Funfetti Cookie Topped Cheesecake”:
- Option A (One Large Cookie): If you want one large, impressive cookie to sit majestically atop your cheesecake, gently press or roll the entire dough into a 9-inch circle (or slightly smaller, about 8.5 inches, to fit perfectly within the cheesecake’s edge). Place it directly on the parchment-lined baking sheet. Make sure it’s an even thickness for uniform baking and a consistent texture. This creates a truly integrated look.
- Option B (Individual Cookies): Alternatively, you can scoop portions of the dough (using a 2-tablespoon cookie scoop works well) and arrange them on the baking sheet, leaving about 2 inches between them. You’ll bake these as individual cookies, and once cooled, arrange them artfully on top of the cheesecake. This is a great choice if you want to offer varied textures or simply have some extra cookies for snacking while the cheesecake chills!
For a truly seamless and stunning “Funfetti Cookie Topped Cheesecake,” I personally recommend Option A.
- Bake the Cookie: Bake the cookie (or cookies) for 12-15 minutes for individual cookies, or 18-22 minutes for a large single cookie. The edges should be lightly golden, and the center should look set but still slightly soft and chewy. Do not overbake, as they will continue to set as they cool, and we want them to remain delightfully chewy, not hard or brittle.
- Cool the Cookie: Remove the baking sheet from the oven and let the cookie(s) cool on the baking sheet for about 5-10 minutes before carefully transferring them to a wire rack to cool completely. This step is critical: it’s crucial that the cookie is completely cool before placing it on the chilled cheesecake. Warm cookie + cold cheesecake = condensation, which can lead to a soggy cookie and a less appealing texture.
- Assemble the “Funfetti Cookie Topped Cheesecake”: Once your cheesecake has thoroughly chilled (at least 6-8 hours, remember!) and your Funfetti cookie topping is completely cool, it’s finally time to assemble! Carefully run a thin knife around the edge of the cheesecake to loosen it, then slowly unlatch and remove the sides of the springform pan. The cheesecake should release easily if chilled enough.
- Place the Cookie: Gently place your large, cooled Funfetti cookie on top of the chilled cheesecake. If you opted for individual cookies, arrange them aesthetically on the cheesecake, perhaps creating a colorful mosaic. This is the moment your “Funfetti Cookie Topped Cheesecake” truly comes to life, showcasing its festive glory!
- Garnish and Serve: If desired, sprinkle a few extra rainbow sprinkles over the top for an additional pop of color and festivity. You can also pipe some freshly made whipped cream or a simple cream cheese frosting around the edges or as dollops on top before serving for an extra layer of indulgence. Slice your magnificent “Funfetti Cookie Topped Cheesecake” with a sharp, warm knife (wipe the knife clean between each slice for the cleanest, most beautiful cuts) and serve! Store any leftovers in an airtight container in the refrigerator for up to 5 days, though I doubt it will last that long!
Enjoy your spectacular and utterly delightful “Funfetti Cookie Topped Cheesecake”! It’s truly a showstopper that combines two beloved desserts into one unforgettable, celebratory treat.
Conclusion:
And there you have it, my friends! We’ve reached the sweet culmination of our journey together, and I truly hope you’re as excited to bake and devour this magnificent dessert as I am. This isn’t just another cheesecake recipe; it’s an experience, a celebration, and a guaranteed showstopper that brings smiles to every face. The combination of a rich, velvety smooth cheesecake base with that delightfully chewy, sprinkle-studded funfetti cookie on top creates a symphony of textures and flavors that is nothing short of magical. It’s the kind of dessert that looks incredibly impressive but is surprisingly approachable, making it perfect for both seasoned bakers and those just starting their culinary adventures.
I genuinely believe the Funfetti Cookie Topped Cheesecake is a must-try for so many reasons. First, let’s talk about that flavor profile: the subtle tang of the cream cheese, perfectly balanced by the sweet, vanilla-laden cookie, all brought together with the playful pop of sprinkles. It’s a nostalgic trip back to childhood funfetti cakes but elevated to an elegant, sophisticated dessert. Then there’s the texture – oh, the glorious texture! You get that satisfying graham cracker crust, followed by the impossibly creamy cheesecake filling that melts in your mouth, and finally, the soft, slightly chewy funfetti cookie offering a delightful contrast. Visually, it’s an absolute feast for the eyes; the vibrant colors of the sprinkles peeking through the golden-brown cookie layer against the pristine white cheesecake are simply irresistible. It screams joy, celebration, and pure deliciousness. Whether you’re planning a birthday party, a holiday gathering, or just want to treat yourself to something extraordinary on a regular Tuesday, this cheesecake delivers on every front.
Now, let’s talk about making this masterpiece even more uniquely yours with some serving suggestions and delightful variations. While it’s utterly perfect on its own, a delicate dollop of freshly whipped cream can add another layer of luxuriousness. For the chocolate lovers, a light drizzle of warm ganache or a swirl of rich caramel sauce would be an exquisite addition, creating a sophisticated twist on an already amazing dessert. Don’t be afraid to play with extra sprinkles on top for even more festive flair, perhaps using seasonal colors for holidays like red and green for Christmas, or pastels for Easter. Beyond toppings, consider varying the cookie itself! While funfetti is truly special, imagine a chocolate chip cookie topped cheesecake for a classic twist, or a chewy oatmeal raisin cookie for a more comforting, spiced flavor profile. You could even experiment with different flavor extracts in your cheesecake – a hint of almond or a dash of lemon zest could beautifully complement the cookie topping. For individual servings, consider baking the cheesecake in smaller ramekins or even cupcake liners (adjusting baking time, of course), creating adorable mini Funfetti Cookie Topped Cheesecakes perfect for portion control or a charming dessert bar.
My biggest encouragement to you now is this: don’t just read about this incredible dessert; go ahead and make it! Clear your schedule, gather your ingredients, and immerse yourself in the joyful process of creating something truly spectacular. I promise you, the effort will be incredibly rewarding, and the rave reviews from your friends and family will make it all worthwhile. Once you’ve baked your very own Funfetti Cookie Topped Cheesecake, I would absolutely love to hear about your experience. Did you add any unique touches? What was your favorite part of making it? Most importantly, how did it taste? Please share your stories, your tips, and especially your photos! Tag me on social media or leave a comment below – your baking adventures inspire me and our entire community. So, preheat those ovens, grab your sprinkles, and get ready to bake a dessert that will undoubtedly become a new favorite in your repertoire. Happy baking!
People Also Ask:
Q: Can I make the Funfetti Cookie Topped Cheesecake ahead of time?
A: Absolutely! This cheesecake is actually one of those desserts that benefits from being made in advance. It needs ample time to chill and set properly, which also allows the flavors to meld beautifully. I recommend making it at least 12-24 hours before you plan to serve it. This makes it a fantastic option for parties or busy holidays, as you can tick one major item off your to-do list!
Q: How should I store the Funfetti Cookie Topped Cheesecake?
A: Once completely cooled and chilled, store your cheesecake tightly covered with plastic wrap or in an airtight container in the refrigerator. Proper storage is key to maintaining its freshness and preventing it from absorbing other odors from your fridge. It will stay wonderfully fresh for up to 5-7 days.
Q: Can I use store-bought cookie dough for the topping?
A: Yes, you absolutely can! While my recipe includes instructions for making delicious homemade funfetti cookie dough, using high-quality store-bought funfetti or sugar cookie dough is a fantastic time-saver. Just make sure to press it evenly over the cheesecake batter before baking as instructed. It’s a great shortcut that doesn’t compromise on flavor!
Q: What if I don’t have a springform pan?
A: A springform pan is ideal for cheesecakes because of its removable sides, which make for easy unmolding. However, if you don’t have one, you can use a regular 9-inch round cake pan. Line the bottom and sides with parchment paper, leaving an overhang on two opposite sides to create “slings” for lifting the cheesecake out after it’s cooled. It’s a bit trickier, but definitely doable!
Q: Can I freeze the Funfetti Cookie Topped Cheesecake?
A: Yes, this cheesecake freezes exceptionally well! For best results, allow the cheesecake to chill completely in the refrigerator first. Then, you can either freeze it whole or cut it into individual slices. Wrap it tightly in plastic wrap, then an additional layer of aluminum foil to prevent freezer burn. It will keep well in the freezer for up to 1-2 months. Thaw overnight in the refrigerator before serving for the best texture.
Q: Do I need to bake the cookie dough before putting it on the cheesecake?
A: No, you do not! The cookie dough is pressed raw onto the cheesecake batter and bakes along with the cheesecake. This allows the cookie to soften and meld beautifully with the creamy cheesecake below, creating that perfect, cohesive topping texture.
Q: What kind of sprinkles should I use?
A: For classic funfetti, I recommend using rainbow “jimmie” sprinkles (the long, thin ones) or confetti sprinkles (the flat, disc-shaped ones). These types of sprinkles hold their color well during baking and provide that quintessential festive look. Avoid nonpareils (the tiny, round, crunchy ones) as their color can sometimes bleed into the dough during baking.
Irresistible Funfetti Cookie Topped Cheesecake Creation
Funfetti Cookie Topped Cheesecake is not merely a dessert; it is an undeniable celebration of pure joy, vibrant nostalgia, and innovative decadence, all masterfully combined into one unforgettable treat.
Ingredients
-
2 cups graham cracker crumbs
-
½ cup unsalted butter, melted
-
2 tbsp granulated sugar
-
4 (8 oz) packages cream cheese, softened
-
1 cup granulated sugar
-
¼ cup sour cream
-
1 tsp vanilla extract
-
1 tbsp lemon juice (optional)
-
¼ cup funfetti or rainbow sprinkles
-
1 cup whipped cream
-
Icing drizzle (1 cup powdered sugar + 2 tbsp milk)
Instructions
-
Step 1
Preheat oven to 350°F (175°C). Lightly grease a 9-inch springform pan. In a bowl, combine 2 cups graham cracker crumbs, 2 tbsp granulated sugar, and ½ cup melted unsalted butter. Press mixture firmly into the bottom of the prepared pan. Bake for 8-10 minutes until lightly golden. Remove and cool completely on a wire rack. Keep oven on. -
Step 2
Tightly wrap the bottom and sides of the springform pan with several layers of heavy-duty aluminum foil to ensure a watertight seal for the water bath. Boil a kettle of water. -
Step 3
In a stand mixer, beat 4 (8 oz) packages of softened full-fat cream cheese on medium speed for 2-3 minutes until very smooth, scraping sides. Gradually add 1 cup granulated sugar, beating until just combined. Beat in ¼ cup sour cream, 1 tsp pure vanilla extract, and 1 tbsp lemon juice (if using) on low speed until just incorporated. Do not overmix. Pour batter over the cooled crust and gently tap the pan to release any large air bubbles. -
Step 4
Place the foil-wrapped springform pan into a larger roasting pan. Carefully pour hot water from the kettle into the roasting pan until it comes halfway up the sides of the springform pan. Transfer to the preheated 350°F (175°C) oven and bake for 60-75 minutes, or until edges are set and the center (about a 2-3 inch circle) still jiggles slightly. Do not overbake. -
Step 5
Once baked, turn off the oven, prop the door ajar, and let the cheesecake cool slowly in the water bath inside the oven for 1 hour. Remove the springform pan from the water bath (and remove the foil) and cool completely on a wire rack at room temperature for 2-3 hours. Cover loosely with plastic wrap and refrigerate for at least 6-8 hours, or preferably overnight, for proper firming and flavor development. -
Step 6
Once the cheesecake is thoroughly chilled, carefully run a thin knife around the edge to loosen it, then remove the sides of the springform pan. Prepare icing drizzle by whisking 1 cup powdered sugar with 2 tbsp milk until smooth. Decoratively spread or pipe 1 cup whipped cream over the top of the cheesecake. Drizzle with the prepared icing, then generously sprinkle with ¼ cup funfetti or rainbow sprinkles. Slice with a sharp, warm knife and serve. Store any leftovers in an airtight container in the refrigerator.
Important Information
Nutrition Facts (Per Serving)
It is important to consider this information as approximate and not to use it as definitive health advice.
Allergy Information
Please check ingredients for potential allergens and consult a health professional if in doubt.


Leave a Comment