

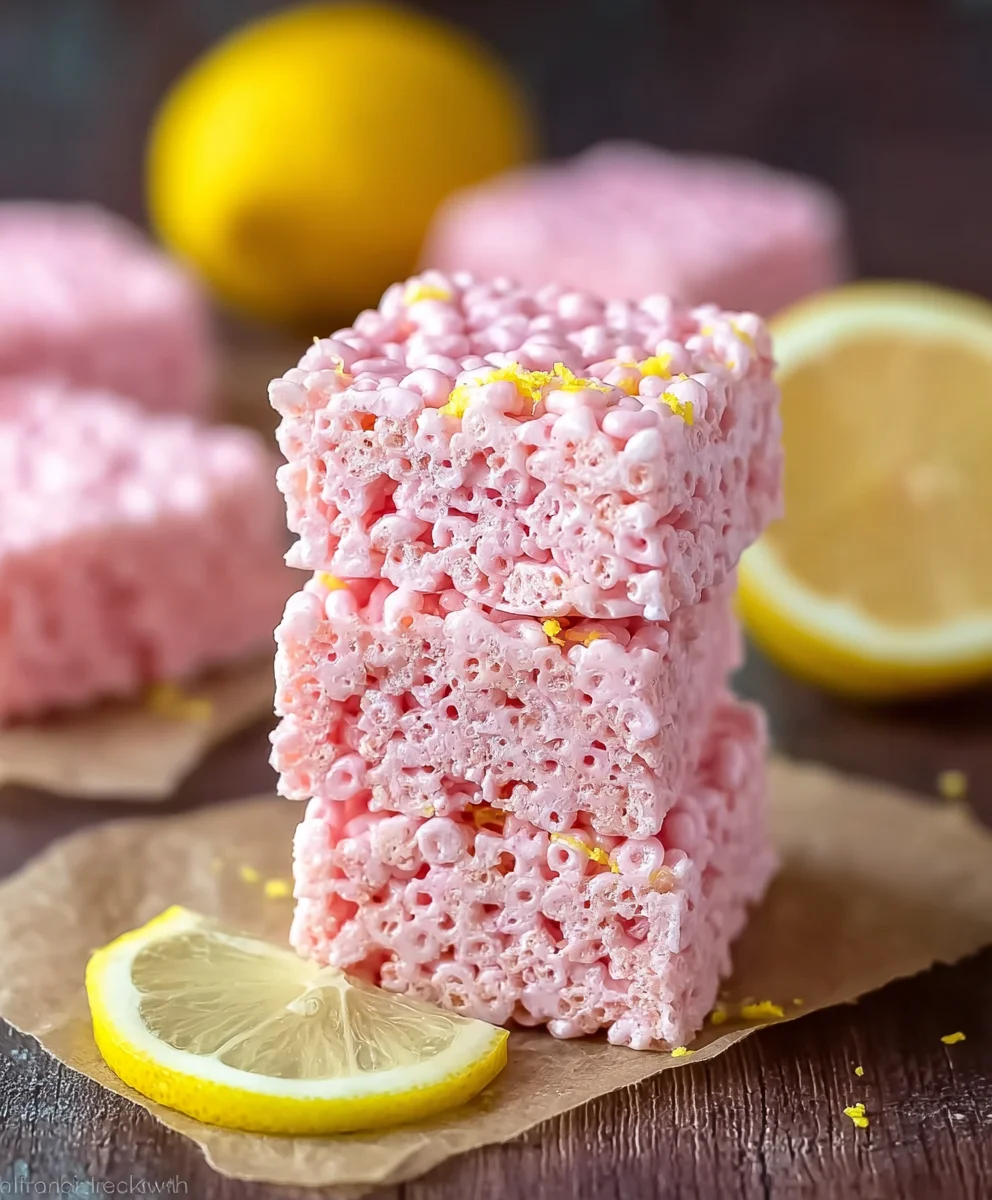
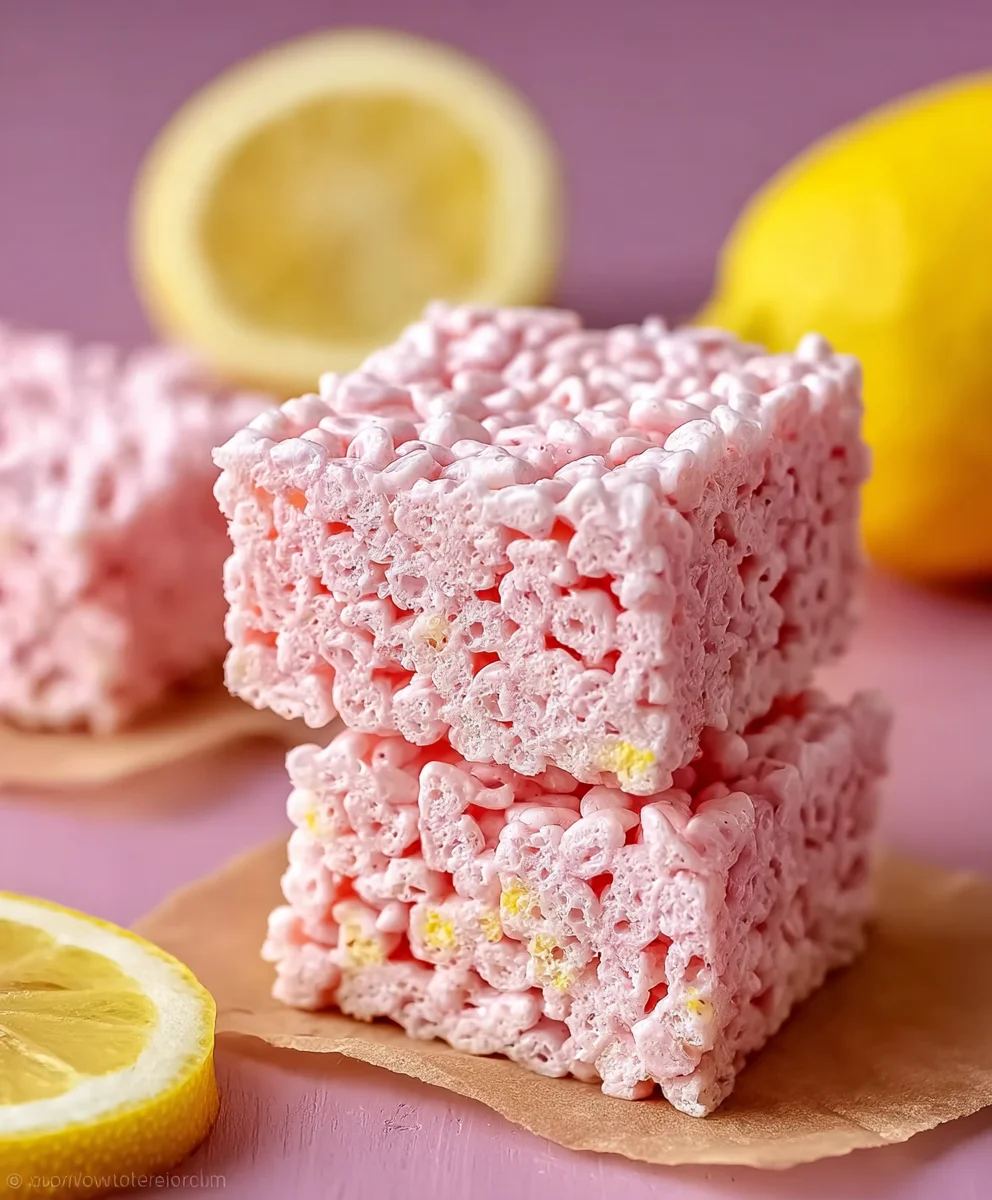
Pink Lemonade Rice Krispie Treats are an absolute game-changer when it comes to classic no-bake desserts. Imagine the beloved crispy, gooey texture you remember from childhood, but infused with the vibrant, zesty tang of a refreshing pink lemonade. It’s a nostalgic treat with a sophisticated twist that perfectly captures the essence of a sunny day.
The original Rice Krispie Treat, a simple yet ingenious creation, has graced countless potlucks and lunchboxes since its invention by Kellogg’s employees in 1939 for a Camp Fire Girls bake sale. It’s a testament to the power of simple ingredients creating pure joy and a dish deeply embedded in American culinary history. While the original holds a special place in our hearts, I believe there’s always room for a delightful new interpretation, especially one that evokes the bright, cheerful spirit of summer.
This recipe takes that timeless appeal and elevates it with a stunning color and an unexpected, incredibly delicious flavor profile. People adore this dish for its irresistible combination of crispiness and chewiness, the unexpected burst of sweet and tart, and its sheer convenience as a no-bake wonder. They are incredibly easy to make, require minimal effort, and deliver a truly unique burst of sunshine in every bite. Get ready to impress with these fun, vibrant, and utterly delicious Pink Lemonade Rice Krispie Treats.

Ingredients:
- 6 tablespoons (85g) Unsalted Butter: I always opt for unsalted butter when baking or creating sweet treats. This gives me complete control over the salt content in the final product. Using a good quality butter will truly make a difference in the richness and flavor of your Pink Lemonade Rice Krispie Treats.
- 16 ounces (approximately 10 cups) Mini Marshmallows: Freshness is absolutely paramount here! Stale marshmallows will melt poorly and result in a chewier, harder treat. Always check the expiration date and, if possible, use a freshly opened bag. Mini marshmallows melt more evenly and quickly than their larger counterparts, which is ideal for this recipe.
- 12 ounces (about 12 cups) Rice Krispies Cereal: Just like the marshmallows, fresh cereal is key to achieving that perfect crisp texture. A stale box will yield sad, chewy treats. Make sure your cereal is perfectly crisp and ready to absorb all that wonderful pink lemonade flavor.
- 1/4 cup Pink Lemonade Drink Mix Powder: This is the secret ingredient that gives our Pink Lemonade Rice Krispie Treats their signature flavor! I prefer using a powdered mix like Kool-Aid or Country Time lemonade powder. Adjust to your taste, but a quarter cup usually provides a lovely, tangy balance. Make sure it’s the sweetened kind, or you might need to adjust for tartness.
- 1/2 teaspoon Lemon Zest (from 1 medium lemon): Fresh lemon zest provides an incredible aromatic boost and brightens the overall flavor profile. It’s truly a game-changer for enhancing the “lemonade” aspect without adding excess liquid. Use a microplane to get the finest zest, avoiding the bitter white pith.
- 5-8 drops Pink Gel Food Coloring (optional, but highly recommended for vibrant color): While the pink lemonade mix offers some color, I find a few drops of gel food coloring truly elevates the visual appeal, making these treats pop with a lovely, vibrant pink. Gel coloring is concentrated, so start with a few drops and add more if needed to achieve your desired shade without thinning the mixture.
For the Optional Pink Lemonade Glaze:
- 1 cup Powdered Sugar (Confectioners’ Sugar): This forms the base of our sweet, smooth glaze. Sift it if you have lumps to ensure a silky texture.
- 2 tablespoons Fresh Lemon Juice: Freshly squeezed lemon juice is essential here for that bright, zesty counterpoint to the sweetness. Bottled lemon juice just doesn’t compare.
- 1-2 drops Pink Gel Food Coloring (optional): Just a touch to carry the pink theme through to the glaze.
Preparation Phase: Getting Ready for Pink Lemonade Perfection
- Prepare Your Baking Dish: First things first, we need to get our pan ready. I typically use a 9×13-inch baking dish for a standard batch of Pink Lemonade Rice Krispie Treats. The trick here is to ensure easy removal and clean cuts. I like to line the entire pan with parchment paper, leaving an overhang on two sides. This creates convenient “handles” that will allow you to lift the entire slab of treats out of the pan once they’ve cooled. If you don’t have parchment paper, a thorough greasing with butter or non-stick cooking spray will work, but parchment is truly superior for preventing sticking.
- Measure Your Ingredients Accurately: While Rice Krispie treats are generally forgiving, especially these delightful Pink Lemonade Rice Krispie Treats, accurate measuring ensures the best texture and flavor balance. Measure out your Rice Krispies cereal into a very large bowl – and I mean large! You’ll need ample space to fold in the marshmallow mixture later. Have your mini marshmallows ready to go in their bag, and ensure your butter is cubed for quicker melting. Measure your pink lemonade drink mix powder and have your lemon zested and ready. This mise en place (everything in its place) approach makes the cooking process smooth and stress-free.
Melting and Infusing: The Heart of Your Pink Lemonade Rice Krispie Treats
- Melt the Butter: In a large, heavy-bottomed pot or Dutch oven – the larger the better, as all the ingredients will eventually end up here – melt the 6 tablespoons of unsalted butter over low to medium-low heat. Patience is key at this stage. We don’t want to brown the butter, as that would impart a nutty flavor that might clash with our bright lemonade profile. We’re aiming for a gentle, even melt. Keep an eye on it and stir occasionally until it’s completely liquid.
- Add the Marshmallows: Once the butter is fully melted, immediately add all 16 ounces of mini marshmallows to the pot. Stir continuously with a sturdy rubber spatula or wooden spoon. The low heat is crucial here; high heat will cause the marshmallows to seize up or burn on the bottom, resulting in a gritty texture. We want a perfectly smooth, glossy, and fluid marshmallow base for our Pink Lemonade Rice Krispie Treats. Continue stirring until the marshmallows are completely melted and the mixture is smooth and cohesive. This usually takes about 5-7 minutes.
- Infuse with Pink Lemonade Flavor and Color: As soon as the marshmallows are completely melted and you have a smooth, gooey mixture, remove the pot from the heat. This is a critical step for preventing the pink lemonade powder from clumping.
- First, stir in the Pink Lemonade Drink Mix Powder: Add the 1/4 cup of pink lemonade drink mix powder directly into the hot marshmallow mixture. Stir vigorously until it’s fully incorporated and there are no dry pockets of powder. You’ll immediately notice the aroma of lemonade begin to permeate the kitchen. The mixture will take on a pale pink hue from the mix.
- Next, add the Lemon Zest: Sprinkle in the 1/2 teaspoon of fresh lemon zest. The heat from the marshmallow mixture will help to release the fragrant oils from the zest, intensifying the lemon flavor. Stir well to distribute evenly.
- Finally, add the Pink Gel Food Coloring (if using): Now, if you’re like me and love a vibrant color, add 5-8 drops of pink gel food coloring. Start with fewer drops, stir thoroughly, and observe the color. If you desire a deeper, more saturated pink for your Pink Lemonade Rice Krispie Treats, add one or two more drops at a time until you reach your preferred shade. Remember, a little gel coloring goes a long way, and it’s easier to add more than to correct too much! Stir until the color is uniform throughout the mixture. You should now have a beautifully scented, gloriously pink, sticky base ready for the cereal.
Combining and Cooling: Bringing Your Treats to Life
- Add the Rice Krispies Cereal: Immediately pour all 12 cups of Rice Krispies cereal into the large bowl you prepared earlier. Pour the hot, pink lemonade-infused marshmallow mixture over the cereal. This next part requires quick action and a gentle touch.
- Gently Fold and Coat: Using your large, sturdy spatula (I find a rubber spatula works best as it’s less prone to sticking), gently fold the cereal into the marshmallow mixture. The key word here is “gently.” You want to coat every single piece of cereal without crushing it. Crushed cereal leads to dense, hard treats, and we’re aiming for light, crisp, and chewy Pink Lemonade Rice Krispie Treats! Continue folding until all the cereal is evenly coated with the sticky, pink, lemonade-flavored marshmallow goodness. Work relatively quickly before the mixture cools too much and becomes difficult to manage.
- Transfer to the Prepared Pan: Once the cereal is fully coated, transfer the mixture into your parchment-lined 9×13-inch baking dish.
- Press Evenly (But Gently!): Now, for the pressing. Lightly spray your clean hands or another piece of parchment paper or waxed paper with non-stick cooking spray, or lightly butter them. Use this to gently press the mixture evenly into the pan. The golden rule here is to press gently, not pack! Over-compressing the treats will result in a hard, brick-like texture instead of the soft, chewy, and airy consistency we’re aiming for. Just enough pressure to ensure an even layer is perfect. Ensure the surface is relatively flat for uniform cutting later.
- Cool Completely: Allow your beautiful Pink Lemonade Rice Krispie Treats to cool completely at room temperature for at least 1-2 hours. If you’re in a hurry, you can pop them into the refrigerator for about 30-45 minutes to speed up the setting process. However, room temperature cooling often yields a slightly softer, chewier texture overall. Ensure they are fully set before proceeding to cutting or glazing.
Optional Pink Lemonade Glaze: An Extra Layer of Zesty Sweetness
- Prepare the Glaze: If you’re opting for the glaze (and I highly recommend it for an extra pop of flavor and visual appeal!), grab a medium bowl. Sift the 1 cup of powdered sugar into the bowl to remove any lumps, ensuring a super smooth glaze.
- Mix the Glaze Ingredients: Add the 2 tablespoons of fresh lemon juice to the powdered sugar. Stir well with a small whisk or spoon until a smooth, thick but pourable glaze forms. If it’s too thick, add lemon juice a tiny bit at a time (half a teaspoon at most) until you reach the desired consistency. If it’s too thin, add a little more sifted powdered sugar.
- Color the Glaze (Optional): For that extra visual flair, add 1-2 drops of pink gel food coloring to the glaze. Stir until the color is fully incorporated and uniform. You want a lovely, pale pink that complements the treats.
- Glaze the Treats: Once your Pink Lemonade Rice Krispie Treats have cooled and set completely, lift them out of the pan using the parchment paper overhangs. Place them on a cutting board. Drizzle or spread the pink lemonade glaze evenly over the top of the entire slab of treats. You can go for a full, even coat or a decorative drizzle, depending on your preference.
- Allow Glaze to Set: Let the glaze set for another 15-30 minutes at room temperature, or until it’s no longer tacky to the touch. This ensures a clean cut and prevents the glaze from smearing.
Cutting and Serving: Enjoying Your Creation
- Cut into Squares: Once the treats are fully set and, if glazed, the glaze is firm, it’s time to cut them. For clean cuts, I always recommend using a sharp, lightly greased knife. You can wipe the knife clean between cuts if it gets too sticky. Cut the large slab into your desired serving sizes – typically 2×2-inch squares, but feel free to make them larger or smaller. I find about 16-24 squares is a good yield from a 9×13-inch pan.
- Serve and Enjoy!: Arrange your beautiful Pink Lemonade Rice Krispie Treats on a platter and serve immediately. They are perfect for parties, picnics, or just a fun, tangy-sweet snack!
- Storage: For optimal freshness and that delightful chew, store any leftover Pink Lemonade Rice Krispie Treats in an airtight container at room temperature for up to 3 days. While they can be refrigerated, I find they tend to get a bit harder when chilled, so room temperature is my preference for maintaining their perfect texture. If you do refrigerate them, let them come to room temperature for about 15-20 minutes before serving for the best experience.
There you have it! A truly detailed and comprehensive guide to making the most vibrant, zesty, and utterly delicious Pink Lemonade Rice Krispie Treats. Every step has been carefully explained to ensure your success in creating this delightful and incredibly popular sweet snack. Happy treating!
Conclusion:
If there’s one recipe I genuinely hope you’ll add to your repertoire this season, it’s these incredible Pink Lemonade Rice Krispie Treats. I truly believe I’ve found a gem that perfectly encapsulates everything wonderful about a simple, joyful dessert. From the moment I first envisioned combining the classic comfort of a crispy, chewy square with the zesty, sweet, and undeniably cheerful notes of pink lemonade, I knew it was going to be something special. And let me tell you, they exceeded every expectation! This isn’t just another no-bake treat; it’s an experience, a little burst of sunshine and nostalgia wrapped up in a delightfully vibrant package.
Why are these treats an absolute must-try? For starters, their unique flavor profile is simply irresistible. You get that beloved buttery marshmallow goodness we all adore, but then comes the bright, tangy kick of lemon, beautifully balanced by just the right amount of sweetness, all culminating in that distinct, refreshing pink lemonade sensation. It’s a flavor journey that is both familiar and excitingly new. Plus, let’s not forget the aesthetics! The soft, inviting pink hue makes these treats an instant showstopper, perfect for brightening up any dessert table, whether it’s a casual get-together or a more festive celebration. They’re undeniably eye-catching and promise to elicit “oohs” and “aahs” from everyone who sees them.
Beyond their incredible taste and charming appearance, the sheer simplicity of this recipe is another major win. Requiring no oven, just a few common ingredients, and minimal effort, you can whip up a batch of these beauties in mere minutes. This makes them the ultimate stress-free dessert for busy weeknights, last-minute party contributions, or when you simply need a quick pick-me-up. Imagine the joy of having a homemade, impressive-looking treat ready in under an hour – it’s a culinary superpower! I’ve found myself turning to this recipe again and again because it delivers maximum impact with minimal fuss, which is exactly what I look for in a go-to dessert.
And let’s talk about versatility! These Pink Lemonade Rice Krispie Treats are incredibly adaptable. While they’re utterly delicious on their own, don’t hesitate to get creative. For serving suggestions, consider a light dusting of powdered sugar mixed with a tiny bit of lemon zest for an extra aromatic kick. A delicate drizzle of melted white chocolate across the top can add another layer of sweetness and texture, making them feel even more gourmet. You could even press some fresh raspberries or finely chopped candied lemon peel into the mixture before chilling for an added burst of color and flavor. For a truly elevated experience, serve them alongside a tall glass of sparkling water infused with lemon and mint, or even a chilled glass of actual pink lemonade for a themed dessert spread. They also make fantastic edible gifts, packaged prettily in cellophane bags with a ribbon.
Feeling adventurous with variations? Try swapping out some of the regular Rice Krispies for a fruity cereal like Fruity Pebbles for an even more vibrant, playful twist. Or, if you want to dial up the citrus, a tiny amount of concentrated lime juice could be an interesting experiment, though I personally adore the classic pink lemonade flavor as is. For those who love textures, adding a handful of mini marshmallows after melting the larger ones, just before mixing in the cereal, will give you pockets of soft, unmelted marshmallow throughout the treats. The possibilities are truly endless, and I encourage you to make these treats your own.
So, I wholeheartedly urge you to roll up your sleeves and give these Pink Lemonade Rice Krispie Treats a try. I promise you won’t be disappointed. They’re fun to make, a delight to look at, and an absolute joy to eat. Once you’ve experienced the magic, I would absolutely love to hear about it! Please don’t hesitate to share your experiences, your creative variations, and even photos of your beautiful creations in the comments below or on social media. Tag me if you do! Your feedback and ideas are what make this culinary community so wonderful. Happy making, and prepare to fall in love with your new favorite no-bake dessert!
Frequently Asked Questions (FAQs)
How long do Pink Lemonade Rice Krispie Treats last, and how should I store them?
When stored properly, your delightful Pink Lemonade Rice Krispie Treats will stay fresh and chewy for up to 3-4 days at room temperature. The key is to keep them in an airtight container. This prevents them from drying out and becoming too hard. I find a container with a tight-fitting lid works best, perhaps with a piece of parchment paper between layers if you stack them.
Can I make these treats ahead of time for a party?
Absolutely! These treats are fantastic for making ahead. Because they keep well for several days, you can easily prepare them a day or two before your event. Just make sure they are completely cooled before cutting and storing them in an airtight container. This convenience makes them a perfect stress-free dessert for any gathering!
What gives these treats their pink color and distinct flavor?
The lovely pink hue typically comes from a tiny amount of red food coloring, which is often used in traditional pink lemonade to achieve its signature shade. The vibrant, tangy-sweet flavor, however, is a wonderful combination of lemon extract or zest, and often a touch of berry or fruit flavoring (or simply more lemon if you prefer a less “pink lemonade” and more “lemonade” flavor with just the pink color). I love how the color hints at the delicious taste to come!
My Rice Krispie Treats sometimes turn out too hard or too sticky. How can I get the perfect texture?
Achieving that perfect balance of chewy and soft is an art! For treats that aren’t too hard, make sure you don’t overcook the marshmallows. Once they’re melted and smooth, take them off the heat immediately. Also, when pressing the mixture into the pan, be gentle – don’t pack them down too firmly, as this can make them dense and hard. If they’re too sticky, ensure your butter-to-marshmallow ratio is correct, and sometimes a tiny bit more cereal can help, though be careful not to add too much and make them crumbly. Lightly greasing your hands or spatula with butter or cooking spray before pressing can also help prevent stickiness.
Can I use fresh lemon juice instead of extract for the flavor?
While fresh lemon juice adds a wonderful natural tartness, it also introduces liquid, which can sometimes alter the texture of Rice Krispie Treats, potentially making them a bit softer or more prone to dissolving the crispy cereal over time. Lemon extract is concentrated flavor without the added liquid, making it ideal for maintaining that classic chewy texture. If you do wish to use fresh lemon juice, I recommend using a very small amount (perhaps 1-2 teaspoons) in addition to a little extract, and compensating by reducing other liquid elements slightly if applicable, or simply embracing a slightly softer treat. Lemon zest, however, is a fantastic addition for boosting fresh lemon flavor without changing the texture!
Are these Pink Lemonade Rice Krispie Treats suitable for those with gluten sensitivities?
The good news is that traditional Rice Krispies cereal in many regions is considered gluten-free, but it’s always essential to double-check the label as ingredients can vary by brand and region. Marshmallows are generally gluten-free, but again, always verify. Assuming you use certified gluten-free Rice Krispies and gluten-free marshmallows, then yes, these treats can absolutely be enjoyed by those with gluten sensitivities. Just be mindful of all your ingredient labels!
Delicious Pink Lemonade Rice Krispie Treats: Easy No-Bake
Pink Lemonade Rice Krispie Treats are an absolute game-changer when it comes to classic no-bake desserts. Imagine the beloved crispy, gooey texture you remember from childhood, but infused with the vibrant, zesty tang of a refreshing pink lemonade. It’s a nostalgic treat with a sophisticated twist that perfectly captures the essence of a sunny day.
Ingredients
-
6 tbsp (85g) Unsalted Butter
-
16 oz (10 cups) Mini Marshmallows
-
12 oz (12 cups) Rice Krispies Cereal
-
1/4 cup Pink Lemonade Drink Mix Powder
-
1/2 tsp Lemon Zest (from 1 medium lemon)
-
5-8 drops Pink Gel Food Coloring (optional)
-
For the Optional Pink Lemonade Glaze:
-
1 cup Powdered Sugar
-
2 tbsp Fresh Lemon Juice
-
1-2 drops Pink Gel Food Coloring (optional)
Instructions
-
Step 1
Prepare Pan: Line a 9×13-inch baking dish with parchment paper, leaving an overhang on two sides for easy lifting. -
Step 2
Measure Ingredients: Measure Rice Krispies cereal into a very large bowl. Have mini marshmallows, cubed butter, pink lemonade drink mix powder, and lemon zest ready. -
Step 3
Melt Butter: In a large, heavy-bottomed pot, melt 6 tbsp unsalted butter over low to medium-low heat until completely liquid. -
Step 4
Melt Marshmallows: Add 16 oz mini marshmallows to the pot. Stir continuously over low heat until completely melted, smooth, and cohesive (about 5-7 minutes). -
Step 5
Infuse Flavor & Color: Remove pot from heat. Stir in 1/4 cup pink lemonade drink mix powder, 1/2 tsp fresh lemon zest, and 5-8 drops pink gel food coloring (if using) until fully incorporated and uniformly pink. -
Step 6
Combine Cereal: Immediately pour the hot, pink lemonade-infused marshmallow mixture over the 12 cups of Rice Krispies cereal in the large bowl. Gently fold with a sturdy spatula until all cereal is evenly coated without crushing. -
Step 7
Press into Pan: Transfer the mixture to the prepared 9×13-inch baking dish. Using lightly greased hands or parchment paper, gently press the mixture evenly into the pan. Do not pack tightly. -
Step 8
Cool: Allow treats to cool completely at room temperature for at least 1-2 hours, or refrigerate for 30-45 minutes to speed up setting. -
Step 9
Prepare Glaze (Optional): If glazing, sift 1 cup powdered sugar into a medium bowl. Add 2 tbsp fresh lemon juice and stir until a smooth, thick but pourable glaze forms. Add 1-2 drops pink gel food coloring (if using) and stir until uniform. -
Step 10
Glaze Treats (Optional): Once treats are set, lift them from the pan. Drizzle or spread the pink lemonade glaze evenly over the top. Let glaze set for 15-30 minutes until no longer tacky. -
Step 11
Cut & Serve: Using a sharp, lightly greased knife, cut the slab into desired serving sizes, typically 2×2-inch squares (yielding 16-24 squares). Serve immediately. -
Step 12
Storage: Store any leftover treats in an airtight container at room temperature for up to 3 days.
Important Information
Nutrition Facts (Per Serving)
It is important to consider this information as approximate and not to use it as definitive health advice.
Allergy Information
Please check ingredients for potential allergens and consult a health professional if in doubt.


Leave a Comment