

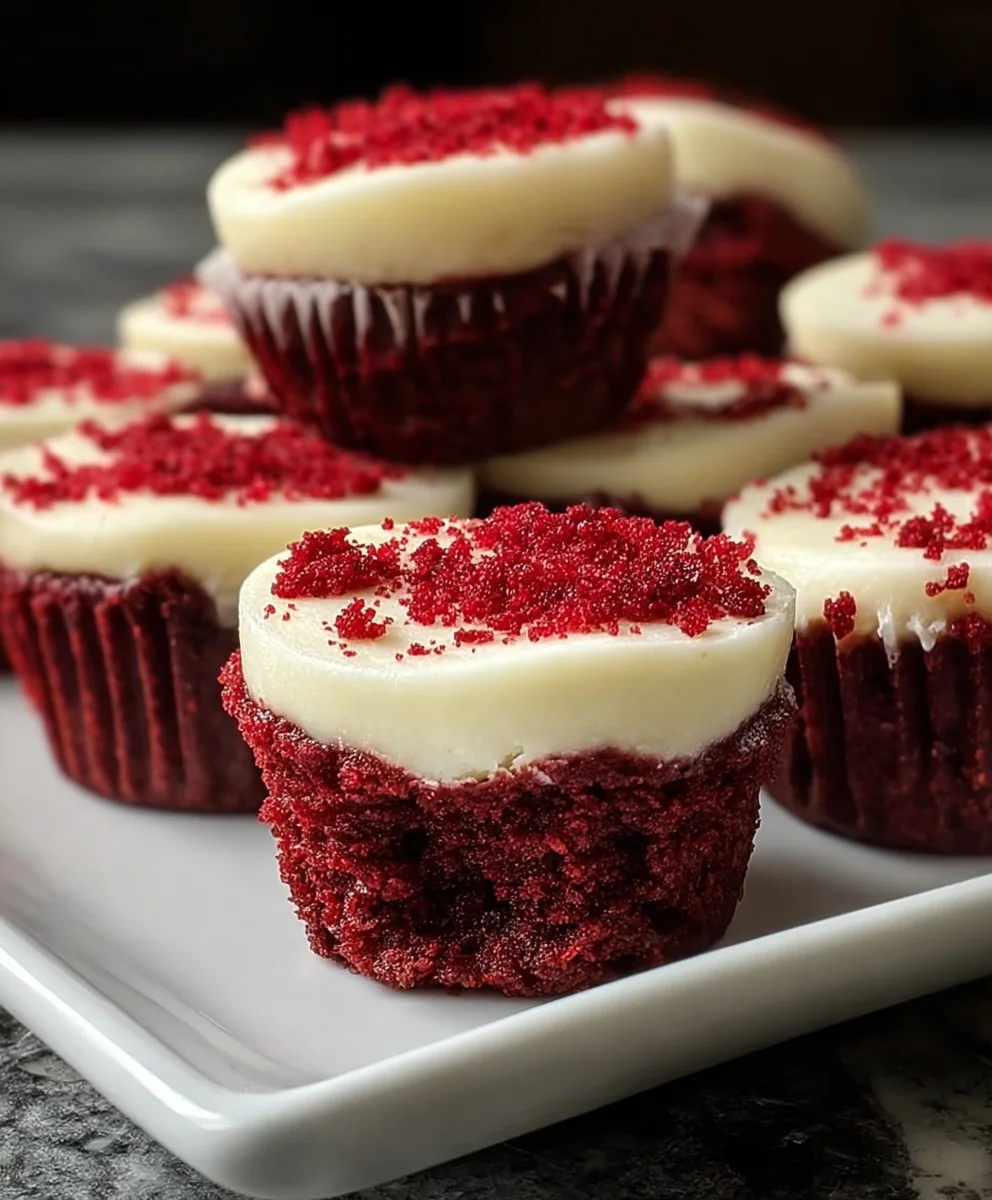
Red Velvet Cheesecake Bites are not merely a dessert; they are a celebration in miniature, a symphony of rich flavors and luxurious textures that captivate at first glance. Have you ever wondered what makes these ruby-hued treats so utterly irresistible? I find their charm lies in the perfect marriage of two beloved classics: the iconic, subtly cocoa-flavored red velvet cake and the creamy, tangy indulgence of classic cheesecake. This delightful combination results in a confection that is both familiar and excitingly new, perfect for any gathering or a personal moment of bliss.
The history of red velvet cake itself is quite intriguing, often tracing back to the Waldorf-Astoria Hotel in New York or even earlier periods where natural cocoa’s reaction with acidic ingredients gave cakes a reddish hue before food coloring became widespread. It’s a dessert steeped in a fascinating past, evolving from humble origins to become a true culinary legend. When that storied cake tradition meets the timeless elegance of cheesecake, something magical happens. I believe people adore these bites not only for their stunning visual appeal, a vibrant splash of color against a creamy white, but also for their incredibly balanced taste and satisfying texture – that tender cake base crowned with a smooth, rich cheesecake layer, all in a convenient, portion-controlled package. These Red Velvet Cheesecake Bites are genuinely a crowd-pleaser, delivering all the decadence without the overwhelming commitment of a full cake.

Ingredients:
-
For the Red Velvet Cake Base:
-
1 ½ cups (190g) All-Purpose Flour: Sifted for the lightest texture.
-
1 tablespoon (5g) Unsweetened Cocoa Powder: A good quality brand will make a noticeable difference in flavor.
-
½ teaspoon Baking Soda: Our leavening agent for that perfect rise.
-
¼ teaspoon Salt: Essential for balancing flavors.
-
½ cup (113g) Unsalted Butter: Softened to room temperature, which is crucial for creaming properly.
-
1 cup (200g) Granulated Sugar: To provide sweetness and moisture.
-
1 large Egg: At room temperature, helping everything emulsify beautifully.
-
1 teaspoon Vanilla Extract: Pure vanilla extract offers the best flavor.
-
1 tablespoon Red Food Coloring: Liquid or gel, for that iconic vibrant red hue. Gel works best for intense color without adding too much liquid.
-
½ cup (120ml) Buttermilk: At room temperature. If you don’t have buttermilk, you can make your own by adding ½ tablespoon of lemon juice or white vinegar to regular milk and letting it sit for 5-10 minutes.
-
½ tablespoon White Vinegar: To react with the baking soda and give the cake its classic tang and tender crumb.
-
-
For the Creamy Cheesecake Filling:
-
16 ounces (452g) Cream Cheese: Two standard blocks, full-fat, softened completely to room temperature. This is vital for a smooth, lump-free filling.
-
½ cup (100g) Granulated Sugar: Sweetness for our rich cheesecake.
-
1 large Egg: At room temperature, to bind and set the cheesecake.
-
1 teaspoon Vanilla Extract: Enhances the classic cheesecake flavor.
-
-
For the Tangy Cream Cheese Frosting:
-
8 ounces (226g) Cream Cheese: One block, full-fat, softened to room temperature. Again, room temperature is non-negotiable for a silky frosting.
-
¼ cup (56g) Unsalted Butter: Softened to room temperature, adding richness and stability.
-
2 cups (240g) Powdered Sugar (Confectioners’ Sugar): Sifted to prevent lumps in your frosting.
-
½ teaspoon Vanilla Extract: For that signature cream cheese frosting taste.
-
1-2 tablespoons Milk or Cream: As needed, to achieve your desired frosting consistency.
-
-
For Assembly and Decoration (Optional):
-
Extra red velvet cake crumbs: From the leftover cake, for garnish.
-
White chocolate shavings or sprinkles: For an extra festive touch.
-
Mini muffin liners or silicone mini muffin molds.
-
Preparing the Red Velvet Cake Base
First things first, we’re going to lay the foundation for our delectable Red Velvet Cheesecake Bites by baking a small, perfectly moist red velvet cake. Don’t worry, even if we’re only using parts of it, the process is straightforward and yields a fantastic cake that can be enjoyed on its own too!
-
Preheat Your Oven and Prep Your Pan: Begin by preheating your oven to 350°F (175°C). Lightly grease and flour a 9×13 inch baking pan or line a cupcake tin with paper liners. For these bites, a smaller square pan (like an 8×8 inch) or even a few standard cupcakes will provide more than enough cake. If using a smaller pan, adjust baking time accordingly. I usually go with an 8×8 inch pan because it gives me enough cake to crumble without too much leftover.
-
Combine Dry Ingredients: In a medium bowl, whisk together the 1 ½ cups all-purpose flour, 1 tablespoon unsweetened cocoa powder, ½ teaspoon baking soda, and ¼ teaspoon salt. Make sure to sift the flour and cocoa powder to prevent any lumps, which is a common culprit for unevenly textured cakes. Set this aside for a moment.
-
Cream Butter and Sugar: In a large mixing bowl, using an electric mixer (either stand or hand-held), beat the ½ cup softened unsalted butter and 1 cup granulated sugar together on medium speed until the mixture is light, fluffy, and pale in color. This process typically takes about 3-5 minutes. Don’t rush this step; properly creaming incorporates air, which contributes to the cake’s tender texture.
-
Add Egg and Vanilla: Scrape down the sides of the bowl with a rubber spatula. Add the 1 large room-temperature egg and beat for another minute until fully incorporated. Then, stir in the 1 teaspoon vanilla extract. Ensure the egg is well mixed in before moving on, as this helps prevent a curdled appearance in the batter.
-
Introduce the Color: Now for the star of the show! Add the 1 tablespoon red food coloring to your wet ingredients and mix until the color is evenly distributed and vibrant. If you’re using gel food coloring, you might need slightly less to achieve a deep red, so start with a little less and add more if necessary. I love how the red just pops at this stage!
-
Alternate Dry and Wet Ingredients: With the mixer on low speed, begin adding the dry ingredient mixture to the wet mixture, alternating with the ½ cup room-temperature buttermilk. Start and end with the dry ingredients. So, you’ll add about a third of the dry, mix until just combined, then half of the buttermilk, mix, another third of the dry, mix, the remaining buttermilk, mix, and finally the last of the dry ingredients. Be careful not to overmix here; overmixing can lead to a tough cake. Mix until just combined and no streaks of flour remain.
-
The Vinegar Activation: In a small separate bowl, combine the ½ tablespoon white vinegar with any tiny bit of leftover buttermilk if you have some (optional). Gently fold this into the cake batter. You might notice a slight fizzing, which is the vinegar reacting with the baking soda, creating that tender, open crumb and classic red velvet tang. This is the magic touch!
-
Bake the Cake: Pour the batter evenly into your prepared baking pan. Bake for 25-30 minutes for an 8×8 inch pan, or until a wooden skewer or toothpick inserted into the center comes out with moist crumbs, but not wet batter. If you’re baking cupcakes, it will be closer to 18-22 minutes. Let the cake cool in the pan on a wire rack for about 10-15 minutes, then invert it onto the rack to cool completely. Allowing the cake to cool completely is crucial before handling it for our bites.
-
Crumble the Cake Base: Once the cake is completely cooled, gently crumble it into fine, even pieces using your hands. We want a texture similar to coarse sand or fine breadcrumbs. You’ll need about 1 ½ to 2 cups of these delicious crumbs for your bites. Any extra crumbs can be saved for garnishing later!
Crafting the Creamy Cheesecake Filling
Now that our red velvet base is ready, it’s time to whip up the star of our “Red Velvet Cheesecake Bites” – the rich and creamy cheesecake filling. This step is all about achieving a perfectly smooth, velvety texture that will bake beautifully.
-
Prepare Your Molds: While we make the filling, you can go ahead and line your mini muffin tins with mini paper liners or lightly spray your silicone mini muffin molds with non-stick spray. This recipe yields about 24-36 mini bites, depending on how generous you are with your portions. It’s always good to have everything ready to go.
-
Soften Cream Cheese: In a large mixing bowl, place your 16 ounces of full-fat cream cheese. Make sure it’s at room temperature! Seriously, this cannot be stressed enough.
Cold cream cheese will result in lumpy cheesecake batter, no matter how long you beat it.
If you’re in a pinch, you can unwrap the cream cheese blocks and microwave them on low power for 10-15 seconds per block, checking constantly, until just softened.
-
Beat the Cream Cheese: Using an electric mixer on medium-low speed, beat the softened cream cheese until it is completely smooth and creamy, about 2-3 minutes. Scrape down the sides and bottom of the bowl frequently to ensure there are no unmixed chunks. We’re aiming for a cloud-like texture here.
-
Add Sugar: Gradually add the ½ cup granulated sugar to the cream cheese, beating on low speed until it’s just incorporated and the mixture is smooth. Continue to beat for another 1-2 minutes, increasing the speed slightly, until the sugar is fully dissolved and the mixture looks fluffy. Taste a tiny bit if you like – it should be perfectly sweet and tangy.
-
Incorporate the Egg: Add the 1 large room-temperature egg to the cream cheese mixture. Beat on low speed until just combined. Be careful not to overmix once the egg is added, as this can incorporate too much air, which can lead to cracks in your cheesecake during baking. We want just enough mixing to ensure the egg is fully integrated.
-
Stir in Vanilla: Finally, stir in the 1 teaspoon vanilla extract until evenly distributed. Give the bowl one last good scrape to make sure everything is perfectly blended. Your cheesecake filling should be luxuriously smooth and free of any lumps. It looks so tempting already!
Whipping Up the Tangy Cream Cheese Frosting
No Red Velvet Cheesecake Bite is complete without that iconic tangy cream cheese frosting! This frosting is light, fluffy, and perfectly complements both the red velvet and the cheesecake layers. It’s remarkably easy to make, and the key, once again, is room temperature ingredients.
-
Soften Cream Cheese and Butter: In a medium mixing bowl, combine the 8 ounces softened full-fat cream cheese and the ¼ cup softened unsalted butter. Just like with the cheesecake filling, ensuring these are at true room temperature will prevent any lumps and give you a super smooth frosting.
-
Cream Together: Using an electric mixer on medium speed, beat the cream cheese and butter together until the mixture is completely smooth, creamy, and free of any lumps. This will take about 2-3 minutes. Scrape down the sides of the bowl several times during this process to ensure everything is thoroughly combined. We want this base to be as uniform as possible before adding the sugar.
-
Gradually Add Powdered Sugar: With the mixer on low speed, gradually add the 2 cups sifted powdered sugar, about half a cup at a time. Mixing on low speed initially prevents a powdered sugar cloud from taking over your kitchen! Once all the sugar is added, increase the speed to medium-high and beat for another 2-3 minutes. This will make the frosting light and fluffy. If you notice any lumps, keep beating until it’s perfectly smooth.
-
Stir in Vanilla and Adjust Consistency: Add the ½ teaspoon vanilla extract and beat until just combined. If your frosting seems too thick, you can add 1-2 tablespoons of milk or cream, one tablespoon at a time, beating after each addition, until you reach your desired consistency. For piping, you want it firm enough to hold its shape, but soft enough to flow easily. For spreading, a slightly softer consistency is fine. Taste and adjust if needed – sometimes a tiny pinch of salt can really bring out the flavors!
-
Prepare for Piping: Transfer the cream cheese frosting to a piping bag fitted with your favorite decorative tip (a star tip or a round tip works wonderfully for these bites). If you don’t have a piping bag, a sturdy zip-top bag with a corner snipped off will work just as well, or you can simply spread it with a spoon or small offset spatula.
Assembling Your Red Velvet Cheesecake Bites
Now for the fun part – bringing all these delicious components together to create our delightful Red Velvet Cheesecake Bites! This is where your efforts truly come to fruition.
-
Base Layer of Red Velvet Crumbs: Take your prepared mini muffin liners or silicone molds. Spoon about 1-2 teaspoons (or a small tablespoon) of the crumbled red velvet cake into the bottom of each liner. Gently press the crumbs down firmly with your fingertips or the back of a small spoon. This forms a compact, delicious base for our cheesecake layer.
Make sure it’s truly compact, as this prevents the crumbs from floating up when you add the cheesecake batter.
-
Add Cheesecake Filling: Carefully spoon or pipe the creamy cheesecake filling over the red velvet crumb base in each liner. Fill each cup about two-thirds of the way full. Try to distribute the filling as evenly as possible among all the bites. You want enough filling to provide a substantial cheesecake experience without overflowing the mini cups. Gently tap the muffin tin or mold on your counter a few times to release any air bubbles and help the filling settle evenly.
-
Prepare for Baking: If you are using a standard metal mini muffin tin, I highly recommend placing the tin inside a larger baking pan. While not strictly a water bath, this can help regulate the temperature and prevent the edges from over-baking too quickly. If using silicone molds on a baking sheet, this isn’t as critical, but ensure they are on a stable surface for easy transfer to the oven.
-
Bake the Cheesecake Bites: Carefully transfer your muffin tin or baking sheet with the filled molds to the preheated 350°F (175°C) oven. Bake for approximately 15-20 minutes. The cheesecake bites are done when the edges are set and lightly golden, but the centers still have a slight jiggle. Don’t worry if they don’t look perfectly firm; they will set up completely as they cool. Overbaking can lead to cracks and a drier texture, so keep a close eye on them!
-
Cool Completely: Remove the muffin tin from the oven and let the cheesecake bites cool in the pan on a wire rack for at least 30 minutes. Once they’ve cooled a bit in the pan, carefully transfer them to the wire rack (still in their liners/molds) to cool completely to room temperature. This is another crucial step:
They absolutely must be completely cool before you even think about frosting them, or your beautiful frosting will melt and slide right off.
This can take 1-2 hours.
-
Chill for Setting: Once cooled to room temperature, transfer the bites to the refrigerator and chill for at least 2-3 hours, or even better, overnight. This chilling time allows the cheesecake to fully set and firm up, making them much easier to handle and ensuring that delightful dense, creamy texture we all love. Patience is a virtue here, I promise!
Finishing Touches and Serving
The hard work is done, and now it’s time to make these Red Velvet Cheesecake Bites shine with their beautiful frosting and optional decorations. This is where they truly become irresistible!
-
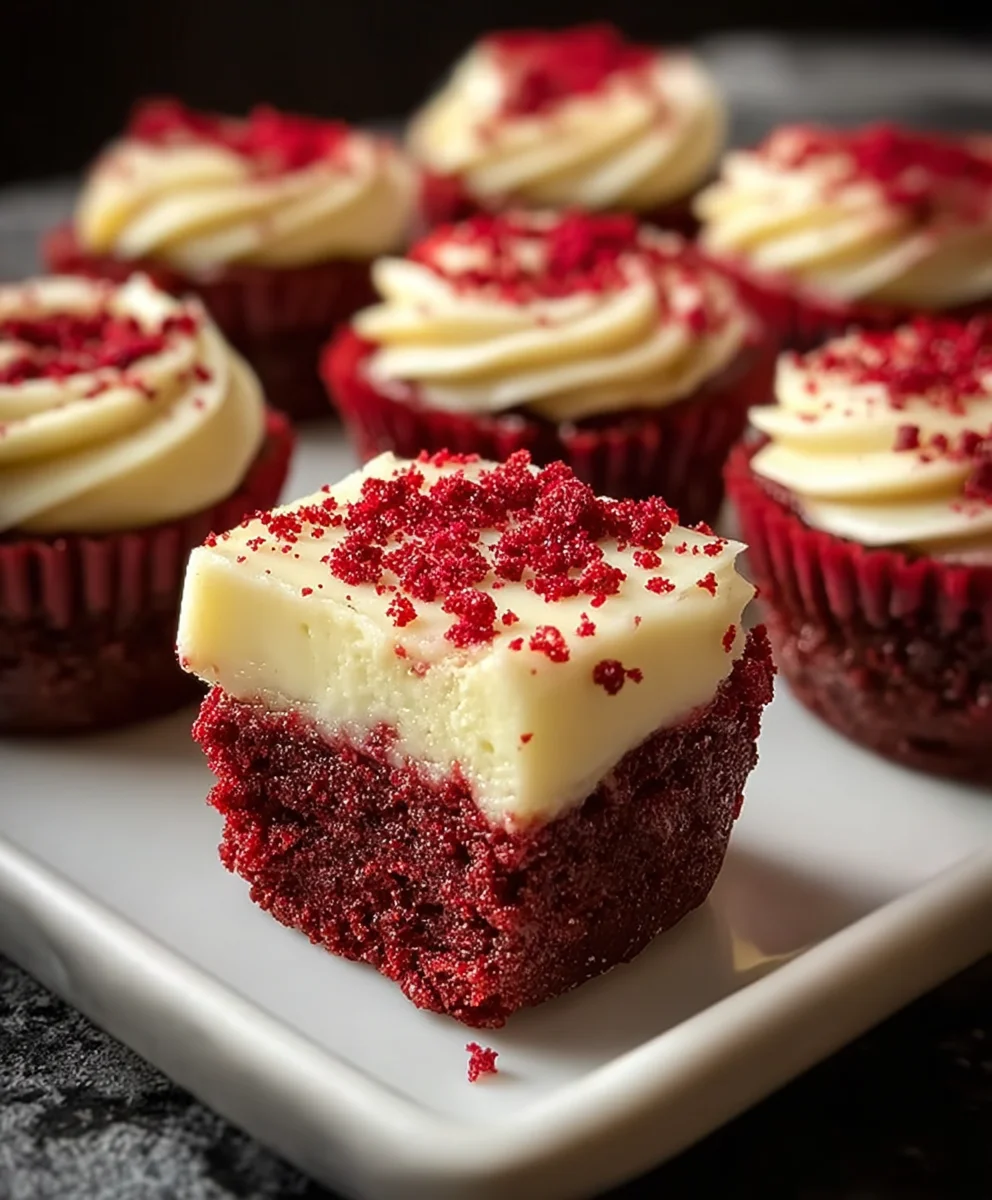
Frost the Chilled Bites: Once your cheesecake bites are thoroughly chilled and set, take them out of the refrigerator. Using your piping bag filled with the cream cheese frosting, pipe a generous swirl or dollop of frosting onto the top of each cheesecake bite. If you don’t have a piping bag, a small spoon or offset spatula works perfectly to spread the frosting in a charming rustic fashion. The contrast between the vibrant red and the creamy white is just gorgeous!
-
Decorate (Optional): Now for the creative part! If you have any extra red velvet cake crumbs, sprinkle a few over the top of each frosted bite for an extra pop of color and texture. Alternatively, a sprinkle of white chocolate shavings, some festive sprinkles, or even a tiny fresh raspberry can elevate the presentation even further. I love the simple elegance of just the crumbs, but feel free to let your imagination run wild!
-
Final Chill (Brief): After frosting and decorating, it’s a good idea to return the Red Velvet Cheesecake Bites to the refrigerator for another 15-30 minutes. This allows the frosting to firm up slightly, ensuring they are perfectly stable and easy to serve.
-
Serve and Enjoy: Arrange your beautiful Red Velvet Cheesecake Bites on a serving platter and present them to your eager guests (or keep them all for yourself – I won’t tell!). They are perfect for parties, holiday gatherings, or as a delightful individual treat. The combination of the moist red velvet cake, the tangy cheesecake, and the sweet cream cheese frosting is truly heavenly.
-
Storage: Any leftover Red Velvet Cheesecake Bites should be stored in an airtight container in the refrigerator for up to 3-4 days. They are best enjoyed chilled, but letting them sit at room temperature for 10-15 minutes before serving can slightly enhance the creamy texture of the cheesecake and the softness of the cake base. Just be careful not to leave them out for too long, especially if your kitchen is warm.
There you have it! A truly indulgent and show-stopping treat that perfectly combines the best of red velvet cake with the creamy luxury of cheesecake. Enjoy every bite!
Conclusion:
And there you have it, my friends! We’ve journeyed through the simple yet utterly delightful process of creating what I truly believe will become a staple in your dessert repertoire. If you’ve been on the fence about trying your hand at baking something impressive but not overly complicated, this recipe for Red Velvet Cheesecake Bites is absolutely where you should start. Trust me on this one; I’ve seen the smiles, heard the oohs and aahs, and personally savored every single bite of these little masterpieces, and I know you will too.
So, why exactly are these particular treats a non-negotiable must-try? Well, it’s not just about their striking good looks, though that vibrant red velvet peeking through a creamy, dreamy cheesecake layer is undeniably captivating. It’s the perfect marriage of two iconic desserts – the rich, subtle cocoa notes of red velvet cake blended seamlessly with the luxurious tang and silky texture of classic cheesecake. Each bite delivers an explosion of flavor and an exquisite mouthfeel that is simultaneously comforting and sophisticated. They offer that indulgent experience you crave, but in a perfectly portioned package, meaning you can enjoy one (or two, I won’t tell!) without feeling overwhelmed. They are the ideal dessert for when you want to impress without spending hours slaving away in the kitchen, giving you maximum impact for minimal effort. This recipe transforms simple ingredients into something truly extraordinary, proving that homemade doesn’t have to mean complicated. The aroma alone as they bake will fill your home with an irresistible warmth and promise of pure deliciousness, making the anticipation almost as good as the first taste.
Now, let’s talk about making these incredible morsels even more special for different occasions or tailoring them to your unique taste. The beauty of these Red Velvet Cheesecake Bites lies in their versatility. For serving suggestions, imagine them as the star of your next holiday gathering – their festive red hue makes them absolutely perfect for Valentine’s Day, Christmas, or even a Fourth of July spread. They’re fantastic for baby showers, bridal brunches, or simply as an elegant end to a dinner party. Arrange them artfully on a tiered platter, and watch them disappear! For a more casual affair, plate them alongside a bowl of fresh berries or a dollop of homemade whipped cream. They also make truly thoughtful homemade gifts; package a few in a cute box with a ribbon, and you’ve got a present that speaks volumes about your care and culinary prowess.
Looking for ways to switch things up? Here are a few variations I’ve experimented with and loved:
-
Crust Adventures:
While the classic Oreo crust is divine, consider using chocolate wafer cookies or even ginger snaps for a surprising twist. A crushed pretzel crust can offer a delightful sweet-and-salty contrast!
-
Topping Temptations:
A simple dusting of powdered sugar is elegant, but don’t shy away from a drizzle of melted white chocolate, a dollop of cream cheese frosting (thinned slightly for easy piping), or even a few fresh raspberries or blueberries for a burst of freshness and color. A tiny sprig of fresh mint can also add a touch of gourmet flair.
-
Flavor Infusions:
A drop of almond extract in the cheesecake batter can add a lovely depth, or a hint of orange zest could brighten the flavor profile beautifully. For a seasonal touch, a tiny pinch of pumpkin spice or a dash of peppermint extract could transform them into a holiday delight.
Ultimately, my biggest hope is that you’ll take this recipe, make it your own, and fall in love with these delightful Red Velvet Cheesecake Bites just as much as I have. Don’t be afraid to dive in, get a little messy, and enjoy the process. Baking should be a joyful experience, and I promise you, the reward for this one is truly extraordinary. Once you’ve whipped up your batch, I would absolutely love to hear about your experience! Did you try a fun variation? Were they a hit with your family and friends? Share your photos, your stories, and your feedback in the comments section below or tag me on social media. Your culinary adventures inspire me, and I can’t wait to see what delicious magic you create. Happy baking, everyone!
Frequently Asked Questions (FAQs):
What makes Red Velvet Cheesecake Bites “red velvet”?
The “red velvet” comes from the unique combination of cocoa powder, a touch of vinegar, and buttermilk, which traditionally reacts to create a reddish-brown hue. Modern recipes, including this one, often enhance this color with a bit of red food coloring to achieve that iconic vibrant crimson. The flavor is a subtle cocoa with a slight tang that perfectly complements the creamy cheesecake.
Can I make these Red Velvet Cheesecake Bites ahead of time?
Absolutely! These bites are fantastic for making ahead. In fact, chilling them overnight often enhances their flavor and firms up the texture beautifully. You can prepare them 1-2 days in advance, keep them covered in an airtight container in the refrigerator, and they’ll be ready to impress when you are.
How should I store leftover Red Velvet Cheesecake Bites?
Leftovers, if there are any, should be stored in an airtight container in the refrigerator. They will keep well for up to 3-4 days. For the best taste and texture, bring them to room temperature for about 15-20 minutes before serving.
Can Red Velvet Cheesecake Bites be frozen?
Yes, they can! To freeze, place the chilled bites on a baking sheet and freeze until solid (about 2-3 hours). Once frozen, transfer them to a freezer-safe airtight container or bag, separating layers with parchment paper. They can be frozen for up to 1 month. Thaw them overnight in the refrigerator before serving.
My cheesecake bites cracked on top. What went wrong?
Cracks can sometimes occur due to rapid temperature changes, overbaking, or excessive mixing of the batter. To minimize cracking, ensure you don’t overbake (they should still have a slight jiggle in the center when removed from the oven), and allow them to cool gradually, perhaps even in the oven with the door ajar after turning it off. Gentle mixing is also key to prevent too much air from incorporating into the batter.
Can I make these gluten-free?
Yes, you can! Simply substitute the Oreo cookies in the crust with a gluten-free chocolate cookie alternative. Most other ingredients in this recipe are naturally gluten-free, but always double-check labels to ensure all components meet your dietary needs.
Do I need a water bath for these mini cheesecakes?
One of the beauties of making mini cheesecakes, especially in a muffin tin, is that a water bath is typically not necessary! The smaller size and shorter baking time help prevent cracking and ensure even baking without the added fuss of a water bath. Just follow the recipe instructions, and you’ll be golden.
Red Velvet Cheesecake Bites
These delightful Red Velvet Cheesecake Bites combine the iconic, subtly cocoa-flavored red velvet cake with the creamy, tangy indulgence of classic cheesecake, creating a miniature celebration perfect for any occasion.
Ingredients
-
1 ½ cups (190g) All-Purpose Flour, sifted
-
1 tablespoon (5g) Unsweetened Cocoa Powder
-
½ teaspoon Baking Soda
-
¼ teaspoon Salt
-
½ cup (113g) Unsalted Butter, softened
-
1 cup (200g) Granulated Sugar
-
1 large Egg, room temperature
-
1 teaspoon Vanilla Extract
-
1 tablespoon Red Food Coloring (liquid or gel)
-
½ cup (120ml) Buttermilk, room temperature (or homemade: ½ tbsp lemon juice/vinegar + milk)
-
½ tablespoon White Vinegar
-
16 ounces (452g) Cream Cheese, full-fat, softened
-
½ cup (100g) Granulated Sugar
-
1 large Egg, room temperature
-
1 teaspoon Vanilla Extract
-
8 ounces (226g) Cream Cheese, full-fat, softened
-
¼ cup (56g) Unsalted Butter, softened
-
2 cups (240g) Powdered Sugar, sifted
-
½ teaspoon Vanilla Extract
-
1-2 tablespoons Milk or Cream, as needed
-
Extra red velvet cake crumbs (optional)
-
White chocolate shavings or sprinkles (optional)
-
Mini muffin liners or silicone mini muffin molds
Instructions
-
Step 1
Prepare Cake Base: Preheat oven to 350°F (175°C). Prep an 8×8 inch pan or cupcake tin. Whisk together flour, cocoa powder, baking soda, and salt. -
Step 2
Cream butter and 1 cup sugar until light and fluffy. Beat in 1 large egg and 1 teaspoon vanilla extract. Mix in 1 tablespoon red food coloring until vibrant. -
Step 3
Gradually add dry ingredients alternately with ½ cup buttermilk, mixing until just combined. Fold in ½ tablespoon white vinegar. -
Step 4
Pour batter into prepared pan and bake for 25-30 minutes, or until a toothpick comes out with moist crumbs. Cool completely. Crumble cooled cake into fine crumbs (about 1.5-2 cups). -
Step 5
Prepare Cheesecake Filling: Line mini muffin tins with liners or spray silicone molds. Beat 16 ounces softened cream cheese until smooth and creamy. -
Step 6
Gradually add ½ cup granulated sugar, beating until fully incorporated and smooth. Mix in 1 large room-temperature egg and 1 teaspoon vanilla extract until just combined; do not overmix. -
Step 7
Prepare Cream Cheese Frosting: Beat 8 ounces softened cream cheese and ¼ cup softened butter until smooth. -
Step 8
Gradually add 2 cups sifted powdered sugar on low speed, then beat until light and fluffy. Mix in ½ teaspoon vanilla extract. Add 1-2 tablespoons milk or cream as needed for desired consistency. Transfer to a piping bag. -
Step 9
Assemble & Bake: Press 1-2 teaspoons of red velvet cake crumbs firmly into the bottom of each mini muffin liner. -
Step 10
Spoon or pipe cheesecake filling over the cake base, filling each cup about two-thirds full. -
Step 11
Bake at 350°F (175°C) for 15-20 minutes, until edges are set and the center slightly jiggles. -
Step 12
Cool in the pan for 30 minutes, then transfer to a wire rack to cool completely (1-2 hours). Refrigerate for at least 2-3 hours, or overnight, until fully set. -
Step 13
Finish & Serve: Once chilled, pipe or spread cream cheese frosting onto each cheesecake bite. Garnish with extra red velvet cake crumbs, white chocolate shavings, or sprinkles, if desired. -
Step 14
Chill for another 15-30 minutes to set frosting. Serve cold. Store leftovers in an airtight container in the refrigerator for up to 3-4 days.
Important Information
Nutrition Facts (Per Serving)
It is important to consider this information as approximate and not to use it as definitive health advice.
Allergy Information
Please check ingredients for potential allergens and consult a health professional if in doubt.

Leave a Comment