

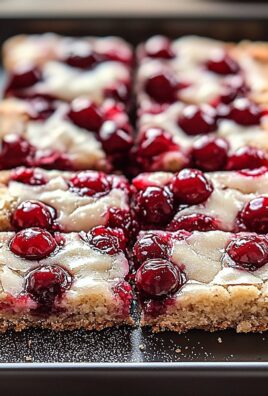
Strawberry Crunch Cheesecake: Prepare to be utterly captivated by this dessert sensation that’s taking the baking world by storm! Imagine the creamy, dreamy indulgence of a classic cheesecake, elevated to new heights with a burst of fresh strawberry flavor and an irresistible, crunchy topping. This isn’t just cheesecake; it’s an experience.
While the exact origins of the Strawberry Crunch Cheesecake are relatively modern, it draws inspiration from beloved childhood treats like strawberry shortcake ice cream bars. That nostalgic flavor profile, combined with the sophisticated elegance of cheesecake, creates a truly unique and unforgettable dessert. It’s a delightful fusion of comfort and refinement.
What makes this particular cheesecake so universally adored? It’s the perfect balance of textures and tastes. The smooth, velvety cheesecake filling melts in your mouth, while the vibrant strawberry swirl adds a touch of fruity sweetness. But the real magic lies in the crunchy topping a buttery, crumbly mixture that provides a satisfying contrast to the creamy base. It’s also surprisingly easy to make, making it a perfect choice for both experienced bakers and those just starting their culinary journey. Whether you’re looking to impress guests at a dinner party or simply treat yourself to something special, this Strawberry Crunch Cheesecake is guaranteed to be a crowd-pleaser.

Ingredients:
- For the Golden Oreo Crust:
- 36 Golden Oreo cookies, finely crushed (about 3 cups)
- 6 tablespoons (3 ounces) unsalted butter, melted
- 1/4 cup granulated sugar
- For the Cheesecake Filling:
- 32 ounces (4 packages) cream cheese, softened to room temperature
- 1 1/2 cups granulated sugar
- 1 teaspoon vanilla extract
- 1/2 teaspoon almond extract (optional, but highly recommended!)
- 4 large eggs, room temperature
- 1/2 cup sour cream, room temperature
- For the Strawberry Crunch Topping:
- 1 box (3.4 ounces) strawberry gelatin
- 1/2 cup boiling water
- 1/2 cup cold water
- 2 cups fresh strawberries, hulled and sliced
- 1 cup Golden Oreo crumbs (reserved from the 36 cookies)
- 1/4 cup freeze-dried strawberries, crushed
- 2 tablespoons unsalted butter, melted
- Optional Garnish:
- Fresh strawberries, for garnish
- Whipped cream, for garnish
Preparing the Golden Oreo Crust
- Crush the Golden Oreos: In a food processor, pulse the Golden Oreos until they are finely crushed. You should have about 3 cups of crumbs. If you don’t have a food processor, you can place the cookies in a large zip-top bag and crush them with a rolling pin. Reserve 1 cup of the crumbs for the strawberry crunch topping.
- Combine Crust Ingredients: In a medium bowl, combine the crushed Golden Oreo crumbs (2 cups), melted butter, and granulated sugar. Mix well until the crumbs are evenly moistened.
- Press into Springform Pan: Press the crumb mixture firmly into the bottom of a 9-inch springform pan. Use the bottom of a measuring cup or your fingers to create an even and compact crust.
- Pre-bake the Crust (Optional): For a sturdier crust, you can pre-bake it in a preheated oven at 350°F (175°C) for 8-10 minutes. This step is optional, but it helps prevent the crust from becoming soggy. Let the crust cool completely before adding the filling.
Making the Cheesecake Filling
- Beat the Cream Cheese: In a large bowl, using an electric mixer (stand mixer or hand mixer), beat the softened cream cheese on medium speed until smooth and creamy. This is a crucial step make sure there are no lumps!
- Add Sugar and Extracts: Gradually add the granulated sugar to the cream cheese, beating until well combined. Scrape down the sides of the bowl as needed to ensure everything is incorporated. Add the vanilla extract and almond extract (if using) and mix until combined. The almond extract really elevates the flavor, so I highly recommend it!
- Incorporate the Eggs: Add the eggs one at a time, beating well after each addition. Be careful not to overmix at this stage, as overmixing can incorporate too much air into the batter, which can cause the cheesecake to crack.
- Add Sour Cream: Stir in the sour cream until just combined. Again, avoid overmixing. The sour cream adds a lovely tang and helps to create a creamy texture.
Baking the Cheesecake
- Pour Filling into Crust: Pour the cheesecake filling over the prepared Golden Oreo crust in the springform pan. Smooth the top with a spatula.
- Water Bath (Recommended): To prevent cracking and ensure even baking, I highly recommend using a water bath. Wrap the bottom of the springform pan tightly with heavy-duty aluminum foil (use two layers to be safe). Place the wrapped pan in a larger roasting pan. Pour hot water into the roasting pan until it reaches about halfway up the sides of the springform pan.
- Bake the Cheesecake: Carefully transfer the roasting pan with the cheesecake to a preheated oven at 325°F (160°C). Bake for 70-80 minutes, or until the edges of the cheesecake are set but the center still has a slight jiggle.
- Cooling Process: Turn off the oven and crack the oven door slightly. Let the cheesecake cool in the oven for 1 hour. This gradual cooling helps prevent cracking. After 1 hour, remove the cheesecake from the water bath and let it cool completely on a wire rack.
- Chill the Cheesecake: Once the cheesecake is completely cooled, cover it with plastic wrap and refrigerate for at least 6 hours, or preferably overnight. This allows the cheesecake to set properly and develop its flavor.
Preparing the Strawberry Crunch Topping
- Make the Strawberry Gelatin: In a medium bowl, dissolve the strawberry gelatin in the boiling water. Stir until the gelatin is completely dissolved. Add the cold water and stir to combine.
- Add Strawberries: Gently fold in the sliced fresh strawberries into the gelatin mixture.
- Prepare the Crunch Mixture: In a separate bowl, combine the reserved Golden Oreo crumbs (1 cup), crushed freeze-dried strawberries, and melted butter. Mix well until the crumbs are evenly moistened.
Assembling the Strawberry Crunch Cheesecake
- Remove Cheesecake from Pan: Carefully remove the chilled cheesecake from the springform pan. Run a thin knife around the edge of the cheesecake to loosen it from the pan before releasing the sides.
- Pour Strawberry Gelatin Mixture: Pour the strawberry gelatin mixture with the sliced strawberries over the top of the cheesecake. Spread it evenly.
- Sprinkle with Crunch Topping: Sprinkle the Golden Oreo and freeze-dried strawberry crunch topping evenly over the strawberry gelatin layer.
- Chill Again (Optional): For best results, chill the assembled cheesecake for another 30 minutes to 1 hour to allow the gelatin to set slightly. This will help the topping adhere better.
- Garnish and Serve: Garnish with fresh strawberries and whipped cream, if desired. Slice and serve! Enjoy your delicious Strawberry Crunch Cheesecake!
Tips for Success:
- Room Temperature Ingredients: Using room temperature ingredients, especially the cream cheese and eggs, is crucial for a smooth and creamy cheesecake.
- Don’t Overmix: Overmixing the batter can incorporate too much air, leading to cracks. Mix until just combined.
- Water Bath: The water bath is highly recommended to prevent cracking and ensure even baking.
- Cooling Process: The gradual cooling process in the oven is also important for preventing cracks.
- Chill Time: Allow the cheesecake to chill for at least 6 hours, or preferably overnight, for the best flavor and texture.
- Strawberry Variation: You can adjust the amount of strawberries in the topping to your liking. You can also use other berries, such as raspberries or blueberries, for a different flavor.
- Freeze-Dried Strawberries: Freeze-dried strawberries add a concentrated strawberry flavor and a nice crunch to the topping. You can find them at most grocery stores or online.
Storage Instructions:
Store leftover Strawberry Crunch Cheesecake in the refrigerator for up to 3-4 days. Cover it tightly with plastic wrap or store it in an airtight container.
Freezing Instructions:
You can freeze the cheesecake (without the strawberry crunch topping) for up to 2-3 months. Wrap it tightly in plastic wrap and then in aluminum foil. Thaw it in the refrigerator overnight before adding the strawberry crunch topping.
Conclusion:
This isn’t just another seafood recipe; it’s an experience. The delicate dance of garlic, herbs, and white wine, culminating in perfectly steamed mussels, is a culinary journey you absolutely must embark on. The simplicity of the preparation belies the depth of flavor, making it an impressive dish that’s surprisingly easy to pull off, even on a busy weeknight. Trust me, once you taste these Mussels in White Wine Sauce, you’ll understand why I’m so enthusiastic!
But the best part? It’s incredibly versatile! While I adore serving these mussels with crusty bread for soaking up every last drop of that glorious sauce, the possibilities are truly endless. Imagine tossing them with linguine for a quick and elegant pasta dish. Or, for a heartier meal, serve them over a bed of creamy polenta. A side of roasted asparagus or a simple green salad provides a refreshing counterpoint to the richness of the mussels.
And don’t be afraid to experiment with variations! For a spicier kick, add a pinch of red pepper flakes to the sauce. If you’re feeling adventurous, try substituting the white wine with a dry cider for a slightly sweeter, more complex flavor profile. A splash of cream at the end adds an extra layer of richness and indulgence. You could even incorporate different herbs a sprig of thyme or a handful of chopped parsley would be wonderful additions. Think of this recipe as a foundation, a springboard for your own culinary creativity.
I truly believe that this recipe for Mussels in White Wine Sauce is a game-changer. It’s quick, it’s easy, it’s impressive, and most importantly, it’s absolutely delicious. It’s the kind of dish that will have your family and friends begging for more, and it’s guaranteed to become a staple in your own kitchen.
So, what are you waiting for? Gather your ingredients, put on some music, and get ready to create a truly memorable meal. I’m confident that you’ll be amazed by how simple and satisfying this recipe is.
And now, for the most important part: I want to hear about your experience! Did you try the recipe? Did you make any modifications? What did you serve it with? Share your photos, your stories, and your tips in the comments below. I’m always eager to learn from my readers and see how you’ve made this recipe your own. Let’s build a community of mussel-loving foodies! I can’t wait to hear from you and see your culinary creations. Happy cooking!
Mussels in White Wine Sauce: The Ultimate Guide to Cooking Delicious Mussels
Creamy cheesecake with a Golden Oreo crust, strawberry gelatin layer with fresh strawberries, and a Golden Oreo and freeze-dried strawberry topping.
Ingredients
- 1 tbsp olive oil
- 500g mixed mushrooms (chestnut, shiitake, oyster), finely chopped
- 2 shallots, finely chopped
- 2 cloves garlic, crushed
- 1 tbsp thyme leaves, chopped
- 50ml dry sherry or Madeira
- 50g butter
- Salt and freshly ground black pepper
- 1.5kg beef fillet, center cut, trimmed
- Olive oil, for searing
- Salt and freshly ground black pepper
- 2 tbsp Dijon mustard
- 100g plain flour
- 2 large eggs
- 300ml milk
- Pinch of salt
- Butter, for greasing
- 500g all-butter puff pastry, thawed
- 1 egg, beaten, for egg wash
- 200g smooth pâté (chicken liver or duck pâté)
Instructions
- Crush the Golden Oreos in a food processor or zip-top bag until finely crushed (about 3 cups). Reserve 1 cup for the topping.
- Combine 2 cups of crushed Oreos, melted butter, and sugar in a bowl. Mix well.
- Press the mixture firmly into the bottom of a 9-inch springform pan.
- (Optional) Pre-bake the crust at 350°F (175°C) for 8-10 minutes for a sturdier crust. Cool completely.
- Beat softened cream cheese until smooth and creamy.
- Gradually add sugar, beating until well combined. Scrape down the sides of the bowl.
- Add vanilla and almond extract (if using), and mix.
- Add eggs one at a time, beating well after each addition. Do not overmix.
- Stir in sour cream until just combined.
- Pour the filling over the crust in the springform pan. Smooth the top.
- Wrap the bottom of the springform pan tightly with heavy-duty aluminum foil. Place in a larger roasting pan.
- Pour hot water into the roasting pan until it reaches halfway up the sides of the springform pan (water bath).
- Bake at 325°F (160°C) for 70-80 minutes, or until the edges are set but the center still has a slight jiggle.
- Turn off the oven, crack the door slightly, and let the cheesecake cool in the oven for 1 hour.
- Remove from the water bath and cool completely on a wire rack.
- Cover with plastic wrap and refrigerate for at least 6 hours, or preferably overnight.
- Dissolve strawberry gelatin in boiling water. Stir until dissolved. Add cold water and stir.
- Gently fold in sliced fresh strawberries.
- Combine reserved Oreo crumbs (1 cup), crushed freeze-dried strawberries, and melted butter in a separate bowl. Mix well.
- Carefully remove the chilled cheesecake from the springform pan.
- Pour the strawberry gelatin mixture over the top of the cheesecake. Spread evenly.
- Sprinkle the Oreo and freeze-dried strawberry crunch topping evenly over the gelatin layer.
- (Optional) Chill for another 30 minutes to 1 hour to allow the gelatin to set slightly.
- Garnish with fresh strawberries and whipped cream, if desired. Slice and serve.
Notes
- The crêpes and pâté are optional but highly recommended for added flavor and to prevent a soggy pastry.
- Cooling the duxelles and beef completely is crucial to prevent the pastry from becoming soggy.
- Chilling the wrapped beef before wrapping in pastry helps it hold its shape.
- Use an all-butter puff pastry for the best flavor and flakiness.
- A meat thermometer is essential for ensuring the beef is cooked to your desired level of doneness.
- Letting the Wellington rest after baking allows the juices to redistribute, resulting in a more tender and flavorful dish.
Leave a Comment