

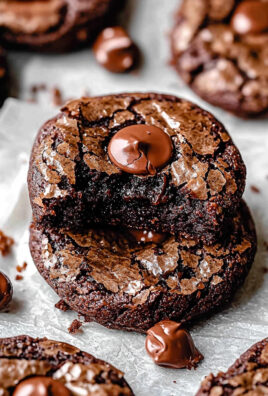
Chocolate Truffles: just the name conjures up images of decadent indulgence, doesn’t it? Imagine biting into a perfectly round sphere of rich, dark chocolate, its smooth surface giving way to an intensely flavored, melt-in-your-mouth center. It’s a sensory experience that’s hard to beat, and today, I’m going to share my foolproof recipe for creating these little bites of heaven right in your own kitchen.
The history of chocolate truffles is as intriguing as their taste. Legend has it that they were accidentally created in France in the 1890s when a pastry chef, while attempting to make another confection, mistakenly poured hot cream over chocolate. The resulting mixture, when cooled and shaped, resembled the prized truffle mushrooms found in the Périgord region of France, hence the name.
But why are these delightful treats so universally loved? Well, it’s a combination of factors. The intense chocolate flavor is, of course, a major draw. The smooth, creamy texture is incredibly satisfying. And let’s not forget the convenience! Truffles are relatively easy to make, require no baking, and are perfect for gifting or enjoying as a special treat any time of year. So, are you ready to embark on a chocolatey adventure? Let’s get started!

Ingredients:
- 1 pound (450g) high-quality dark chocolate, finely chopped (at least 70% cacao)
- 1 cup (240ml) heavy cream
- 4 tablespoons (57g) unsalted butter, softened
- 2 tablespoons (30ml) liqueur (such as Grand Marnier, Frangelico, or rum – optional)
- 1 teaspoon vanilla extract
- Pinch of sea salt
- For coating (choose one or a combination):
- Unsweetened cocoa powder
- Chopped nuts (almonds, pecans, hazelnuts)
- Powdered sugar
- Sprinkles
- Melted chocolate (milk, dark, or white)
Making the Ganache:
- Prepare the Chocolate: Place the finely chopped dark chocolate in a heatproof bowl. Make sure the bowl is large enough to hold all the chocolate and cream without overflowing. Using high-quality chocolate is crucial for the best flavor and texture. I always recommend using chocolate with at least 70% cacao for a rich, intense truffle.
- Heat the Cream: In a saucepan, heat the heavy cream over medium heat. Watch it carefully, as you don’t want it to boil. You’re looking for it to just begin to simmer around the edges. Overheating the cream can affect the final texture of the ganache.
- Pour over Chocolate: Once the cream is heated, immediately pour it over the chopped chocolate in the bowl. Make sure all the chocolate is submerged in the hot cream.
- Let it Sit: Allow the mixture to sit undisturbed for about 1 minute. This allows the heat from the cream to melt the chocolate evenly. Don’t be tempted to stir it right away!
- Whisk Until Smooth: After the minute is up, gently whisk the chocolate and cream together, starting from the center and working your way outwards. Continue whisking until the mixture is completely smooth and glossy. Be patient, as it may take a few minutes for all the chocolate to melt and incorporate fully. If you have any stubborn chocolate pieces, you can place the bowl over a double boiler (a saucepan with simmering water, making sure the bottom of the bowl doesn’t touch the water) and gently heat it until the chocolate melts.
- Add Butter, Liqueur, Vanilla, and Salt: Add the softened butter, liqueur (if using), vanilla extract, and a pinch of sea salt to the ganache. The butter adds richness and smoothness, the liqueur adds a complementary flavor, the vanilla enhances the chocolate, and the salt balances the sweetness.
- Incorporate Additions: Gently whisk everything together until the butter is fully melted and incorporated into the ganache. The ganache should be smooth, shiny, and emulsified.
Chilling and Shaping the Truffles:
- Cover and Chill: Cover the bowl of ganache tightly with plastic wrap, pressing the plastic wrap directly onto the surface of the ganache. This prevents a skin from forming on top. Refrigerate the ganache for at least 4 hours, or preferably overnight. This allows the ganache to firm up enough to be easily shaped. The longer it chills, the easier it will be to work with.
- Prepare Your Workstation: Once the ganache is firm, prepare your workstation. Line a baking sheet with parchment paper or a silicone mat. This will prevent the truffles from sticking. Also, prepare your chosen coatings (cocoa powder, chopped nuts, powdered sugar, sprinkles, etc.) in separate shallow bowls.
- Scoop the Ganache: Using a small spoon, melon baller, or truffle scoop, scoop out small portions of the chilled ganache. Aim for about 1 tablespoon per truffle. The size is up to you, but keep them relatively uniform for a professional look.
- Roll into Balls: Gently roll each portion of ganache between your palms to form a smooth ball. Don’t worry if they’re not perfectly round at this stage. The warmth of your hands will soften the ganache slightly, making it easier to shape. Work quickly to prevent the ganache from melting too much. If your hands get too warm, rinse them with cold water and dry them thoroughly.
- Place on Baking Sheet: Place the rolled truffle balls onto the prepared baking sheet.
- Chill Again (Optional): For easier coating, you can chill the truffle balls in the refrigerator for another 15-20 minutes. This will firm them up even more and make them less sticky.
Coating the Truffles:
- Roll in Coating: One at a time, roll each truffle ball in your chosen coating. For cocoa powder, powdered sugar, or sprinkles, simply drop the truffle into the bowl and gently roll it around until it’s completely coated. For chopped nuts, press the truffle into the nuts to ensure they adhere well.
- Remove Excess Coating: Gently tap off any excess coating. This will prevent the truffles from looking messy.
- Place Back on Baking Sheet: Place the coated truffles back onto the prepared baking sheet.
- If Using Melted Chocolate: If you’re using melted chocolate as a coating, melt your chosen chocolate (milk, dark, or white) in a double boiler or in the microwave in 30-second intervals, stirring in between, until smooth. Dip each truffle into the melted chocolate, using a fork or dipping tools to coat it completely. Lift the truffle out of the chocolate and gently tap off any excess. Place the dipped truffle back onto the baking sheet. You can sprinkle the dipped truffles with chopped nuts, sprinkles, or sea salt while the chocolate is still wet.
- Let Set: Allow the coated truffles to set completely. If you’ve used melted chocolate, you can place them in the refrigerator for a few minutes to speed up the setting process.
Storing and Serving:
- Store Properly: Store the finished truffles in an airtight container in the refrigerator for up to 2 weeks. They can also be frozen for up to 2 months. If freezing, thaw them in the refrigerator overnight before serving.
- Serving Suggestions: Serve the truffles chilled or at room temperature. They’re delicious on their own or as part of a dessert platter. You can also pair them with coffee, tea, or a glass of dessert wine.
Tips for Success:
- Use High-Quality Chocolate: The quality of the chocolate will directly impact the flavor of the truffles. Choose a high-quality dark chocolate with at least 70% cacao for the best results.
- Don’t Overheat the Cream: Overheating the cream can affect the texture of the ganache. Heat it just until it begins to simmer around the edges.
- Be Patient When Whisking: It may take a few minutes for all the chocolate to melt and incorporate fully into the cream. Be patient and continue whisking until the mixture is smooth and glossy.
- Chill the Ganache Thoroughly: Chilling the ganache for at least 4 hours, or preferably overnight, is crucial for it to firm up enough to be easily shaped.
- Work Quickly: The warmth of your hands will soften the ganache, so work quickly when shaping the truffles.
- Experiment with Flavors: Don’t be afraid to experiment with different liqueurs, extracts, and coatings to create your own unique truffle flavors.
Variations:
- Espresso Truffles: Add 1-2 teaspoons of instant espresso powder to the heavy cream while heating.
- Orange Truffles: Add 1 tablespoon of orange zest and 2 tablespoons of Grand Marnier to the ganache.
- Mint Truffles: Add 1/2 teaspoon of peppermint extract to the ganache.
- Spicy Truffles: Add a pinch of cayenne pepper to the ganache.
Conclusion:
And there you have it! These Chocolate Truffles are truly a must-try for any chocolate lover. From the rich, decadent ganache to the satisfying snap of the tempered chocolate shell (or the playful roll in cocoa powder!), every element combines to create an unforgettable experience. I know, I know, making truffles might seem a little intimidating at first, but trust me, the reward is well worth the effort. The sheer joy of biting into one of these homemade delights is something you just can’t replicate with store-bought versions.
But why are these truffles so special? It’s the quality of the ingredients, the careful attention to detail, and the love you pour into making them. Using high-quality chocolate makes a world of difference, and taking the time to properly temper the chocolate ensures a beautiful, glossy finish and that satisfying “snap” we all crave. Plus, you get to customize them to your liking!
Speaking of customization, let’s talk about serving suggestions and variations. While these truffles are divine on their own, they also make a stunning addition to a dessert platter. Imagine presenting a tray of these beauties alongside fresh berries, macarons, and other sweet treats. They’re perfect for parties, holidays, or simply a special occasion.
For variations, the possibilities are endless! You could infuse the ganache with different flavors, such as orange zest, peppermint extract, or even a hint of chili powder for a spicy kick. Consider adding a splash of your favorite liqueur, like Grand Marnier or Frangelico, for an extra layer of indulgence. And don’t forget about the coatings! Instead of cocoa powder, you could roll the truffles in chopped nuts, shredded coconut, or even colorful sprinkles. For a truly decadent experience, dip them in melted white chocolate or dark chocolate and drizzle with a contrasting color.
Another fun idea is to create a truffle bar! Set out bowls of different coatings and let your guests customize their own truffles. This is a great way to get everyone involved and create a memorable experience. You could even provide small bags or boxes so guests can take their creations home as party favors.
I truly believe that everyone should experience the joy of making and enjoying these Chocolate Truffles. They’re a labor of love, yes, but they’re also a testament to the power of simple ingredients transformed into something extraordinary. The process itself is therapeutic, and the end result is pure bliss.
So, what are you waiting for? Gather your ingredients, put on some music, and get ready to embark on a truffle-making adventure! I’m confident that you’ll be amazed at what you can create. And most importantly, don’t be afraid to experiment and have fun!
Once you’ve made your own batch of these delectable treats, I would absolutely love to hear about your experience. Did you try any of the variations I suggested? Did you encounter any challenges along the way? What was your favorite part of the process? Share your photos, tips, and stories in the comments below. I can’t wait to see what you create! Happy truffle-making! I hope you enjoy this Chocolate Truffles recipe as much as I do.
Chocolate Truffles: The Ultimate Guide to Making Perfect Truffles
Decadent homemade dark chocolate truffles! Rich, melt-in-your-mouth treats, surprisingly easy to make. Perfect for gifting or enjoying yourself. Customize with your favorite coatings and flavors.
Ingredients
- 1 pound (450g) high-quality dark chocolate, finely chopped (at least 70% cacao)
- 1 cup (240ml) heavy cream
- 4 tablespoons (57g) unsalted butter, softened
- 2 tablespoons (30ml) liqueur (such as Grand Marnier, Frangelico, or rum – optional)
- 1 teaspoon vanilla extract
- Pinch of sea salt
- Unsweetened cocoa powder
- Chopped nuts (almonds, pecans, hazelnuts)
- Powdered sugar
- Sprinkles
- Melted chocolate (milk, dark, or white)
Instructions
- Place the finely chopped dark chocolate in a heatproof bowl.
- In a saucepan, heat the heavy cream over medium heat until it just begins to simmer around the edges.
- Immediately pour the hot cream over the chopped chocolate.
- Allow the mixture to sit undisturbed for about 1 minute.
- Gently whisk the chocolate and cream together until the mixture is completely smooth and glossy.
- Add the softened butter, liqueur (if using), vanilla extract, and a pinch of sea salt to the ganache.
- Gently whisk everything together until the butter is fully melted and incorporated.
- Cover the bowl of ganache tightly with plastic wrap, pressing the plastic wrap directly onto the surface. Refrigerate for at least 4 hours, or preferably overnight.
- Line a baking sheet with parchment paper or a silicone mat. Prepare your chosen coatings in separate shallow bowls.
- Using a small spoon, melon baller, or truffle scoop, scoop out small portions of the chilled ganache (about 1 tablespoon per truffle).
- Gently roll each portion of ganache between your palms to form a smooth ball.
- Place the rolled truffle balls onto the prepared baking sheet.
- For easier coating, you can chill the truffle balls in the refrigerator for another 15-20 minutes.
- One at a time, roll each truffle ball in your chosen coating.
- Gently tap off any excess coating.
- Place the coated truffles back onto the prepared baking sheet.
- Dip each truffle into the melted chocolate, using a fork or dipping tools to coat it completely. Lift the truffle out of the chocolate and gently tap off any excess. Place the dipped truffle back onto the baking sheet. You can sprinkle the dipped truffles with chopped nuts, sprinkles, or sea salt while the chocolate is still wet.
- Allow the coated truffles to set completely. If you’ve used melted chocolate, you can place them in the refrigerator for a few minutes to speed up the setting process.
- Store the finished truffles in an airtight container in the refrigerator for up to 2 weeks. They can also be frozen for up to 2 months. If freezing, thaw them in the refrigerator overnight before serving.
- Serve the truffles chilled or at room temperature.
Notes
- Use high-quality chocolate (at least 70% cacao) for the best flavor.
- Don’t overheat the cream.
- Chill the ganache thoroughly for easy shaping.
- Work quickly when shaping the truffles to prevent them from melting.
- Experiment with different liqueurs, extracts, and coatings to create your own unique truffle flavors.
Leave a Comment