

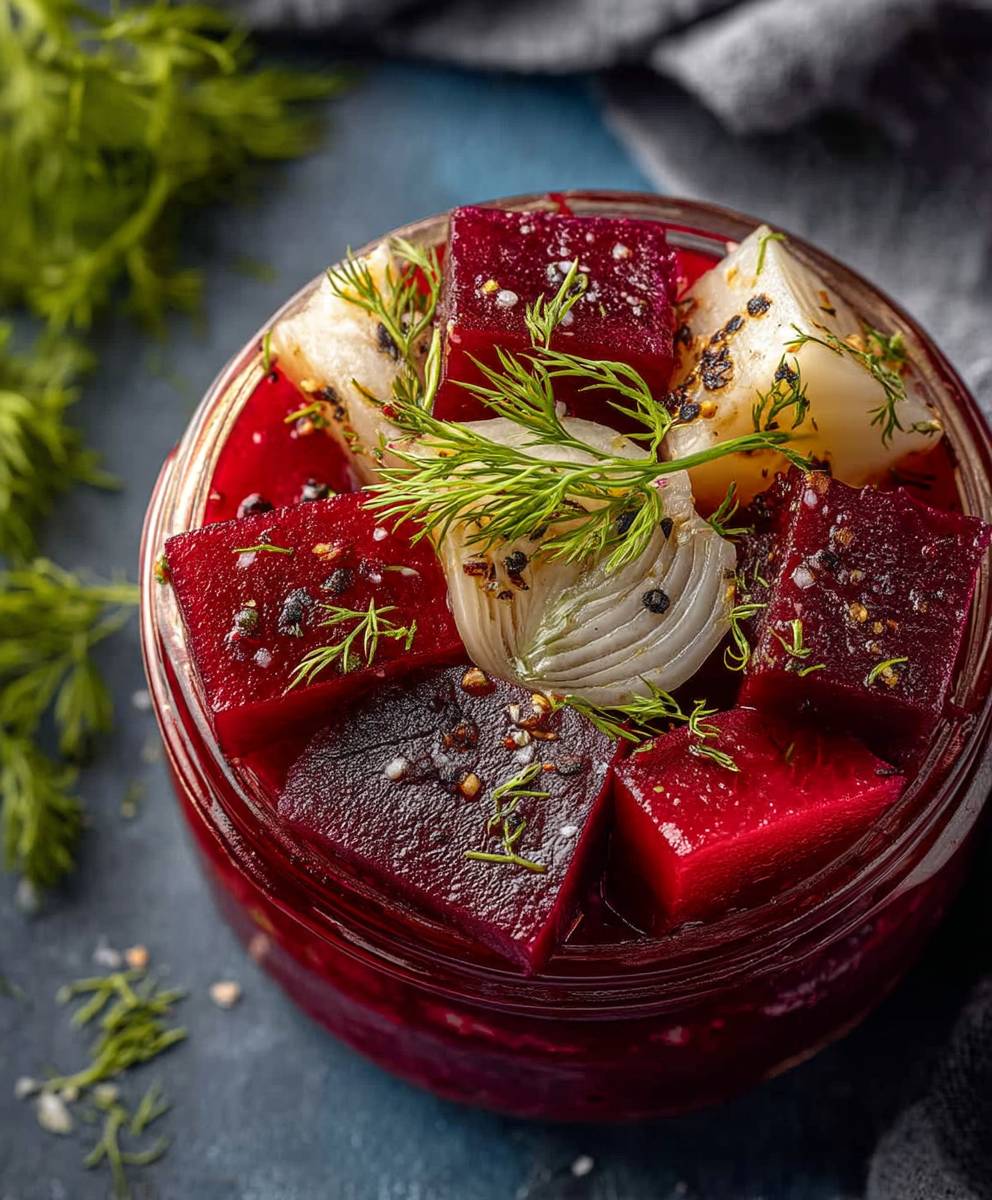
Quick Beet Pickles: Prepare to be amazed by this vibrant and tangy condiment that will elevate your meals to a whole new level! Imagine biting into a crisp, ruby-red pickle, bursting with a sweet and sour flavor that dances on your tongue. These aren’t your grandma’s dill pickles; these are a modern twist on a classic preservation method, offering a delightful combination of earthy beets and zesty pickling spices.
Pickling, a practice dating back to ancient Mesopotamia, has been used for centuries to preserve food and enhance its flavor. While various vegetables have been pickled throughout history, beets offer a unique sweetness that balances beautifully with the acidity of vinegar. In many cultures, pickled beets are a staple, often served as a side dish, a topping for salads, or even a vibrant addition to charcuterie boards.
What makes these quick beet pickles so irresistible? It’s the perfect marriage of convenience and flavor. Unlike traditional pickling methods that require weeks of fermentation, this recipe allows you to enjoy homemade pickled beets in just a few hours! People adore the bright, tangy flavor, the satisfying crunch, and the beautiful color that these pickles bring to any plate. Plus, they’re incredibly versatile, adding a pop of flavor to everything from sandwiches and burgers to salads and cheese boards. Get ready to experience the magic of homemade pickles the quick and easy way!

Ingredients:
- 1 pound small to medium beets, scrubbed
- 1 cup water
- 1 cup apple cider vinegar
- 1/2 cup granulated sugar
- 1 tablespoon kosher salt
- 1 teaspoon yellow mustard seeds
- 1/2 teaspoon black peppercorns
- 2 cloves garlic, smashed
- 1 bay leaf
- Optional: 1/4 teaspoon red pepper flakes (for a little heat)
Preparing the Beets:
- Get those beets ready! First, give your beets a good scrub under cold running water. You want to remove any dirt or debris clinging to them. Don’t peel them yet; we’ll do that after they’re cooked.
- Cooking the beets: There are a few ways to cook your beets. You can boil them, roast them, or even steam them. My preferred method is boiling because it’s quick and easy. Place the scrubbed beets in a large pot and cover them with cold water. Bring the water to a boil over high heat, then reduce the heat to medium and simmer for about 20-30 minutes, or until the beets are tender when pierced with a fork. The cooking time will depend on the size of your beets.
- Checking for doneness: To check if the beets are done, carefully insert a fork or knife into the center of one of the beets. If it goes in easily with little resistance, they’re ready. If not, continue to simmer for a few more minutes and check again.
- Cooling and peeling: Once the beets are cooked, drain them and immediately transfer them to a bowl of ice water. This will stop the cooking process and make them easier to handle. Let them cool in the ice water for about 5-10 minutes. Once they’re cool enough to handle, use your fingers or a paring knife to slip the skins off. The skins should come off easily at this point.
- Slicing the beets: Now that the beets are peeled, it’s time to slice them. You can slice them into rounds, wedges, or even dice them, depending on your preference. I like to slice them into rounds about 1/4 inch thick. Use a sharp knife to ensure clean, even slices.
Making the Pickling Brine:
- Combining the ingredients: In a medium saucepan, combine the water, apple cider vinegar, sugar, salt, mustard seeds, peppercorns, garlic cloves, bay leaf, and red pepper flakes (if using).
- Bringing to a boil: Place the saucepan over medium-high heat and bring the mixture to a boil, stirring occasionally to dissolve the sugar and salt.
- Simmering the brine: Once the mixture is boiling, reduce the heat to low and simmer for about 5 minutes, allowing the flavors to meld together. This step is crucial for developing a well-balanced and flavorful pickling brine.
- Removing from heat: After simmering, remove the saucepan from the heat and let the brine cool slightly for a few minutes before pouring it over the beets.
Pickling and Storing:
- Preparing the jars: While the brine is cooling slightly, prepare your jars. You can use sterilized canning jars for long-term storage, or clean glass jars with tight-fitting lids for refrigerator pickles. If you’re using canning jars, follow proper canning procedures to ensure a safe seal. For refrigerator pickles, simply wash the jars thoroughly with soap and hot water.
- Packing the beets: Pack the sliced beets into the prepared jars, leaving about 1/2 inch of headspace at the top. You want to pack them tightly, but not so tightly that they’re crushed.
- Pouring the brine: Carefully pour the warm pickling brine over the beets in the jars, making sure to cover them completely. Leave about 1/2 inch of headspace at the top of each jar. You may need to gently tap the jars on the counter to release any trapped air bubbles.
- Sealing the jars: If you’re using canning jars, wipe the rims of the jars with a clean, damp cloth and place the lids on top. Screw on the bands until they are fingertip tight. Process the jars in a boiling water bath for 10 minutes, following proper canning procedures. If you’re making refrigerator pickles, simply screw on the lids tightly.
- Cooling and storing: Let the jars cool completely at room temperature. If you’ve processed them in a boiling water bath, you should hear a “pop” as the lids seal. Once the jars are cool, check the seals by pressing down on the center of each lid. If the lid doesn’t flex, it’s properly sealed. Store the sealed jars in a cool, dark place for up to a year. Refrigerator pickles should be stored in the refrigerator and will last for about 2-3 weeks.
- Waiting for the flavors to develop: For the best flavor, let the pickled beets sit for at least 24 hours before eating them. This allows the flavors to fully develop and meld together. The longer they sit, the better they’ll taste!
Tips and Variations:
- Spice it up: For a spicier pickle, add more red pepper flakes or a pinch of cayenne pepper to the brine.
- Add other vegetables: You can also pickle other vegetables along with the beets, such as onions, carrots, or cucumbers.
- Use different vinegars: Experiment with different types of vinegar, such as white wine vinegar or rice vinegar, for a different flavor profile.
- Sweeten it up: If you prefer a sweeter pickle, add more sugar to the brine.
- Add herbs: Fresh herbs like dill or thyme can add a lovely aroma and flavor to the pickles.
- Make it a gift: Pickled beets make a wonderful homemade gift. Package them in pretty jars with a ribbon and a tag.
Serving Suggestions:
- Enjoy them straight from the jar as a snack.
- Add them to salads for a pop of color and flavor.
- Serve them as a side dish with grilled meats or fish.
- Use them as a topping for sandwiches or burgers.
- Chop them up and add them to dips or spreads.
Troubleshooting:
- Beets are too hard: If your beets are still hard after boiling, it could be due to a few factors. The beets might be old, or the water might not have been hot enough. Try simmering them for a longer period of time, checking for doneness every few minutes.
- Brine is too sour: If the brine is too sour for your taste, add a little more sugar to balance the acidity.
- Pickles are too soft: If your pickles are too soft, it could be because the beets were overcooked. Make sure to check for doneness frequently while boiling.
- Jars didn’t seal: If your canning jars didn’t seal properly, you can reprocess them or store them in the refrigerator.
Nutritional Information (approximate, per serving):
- Calories: 80
- Fat: 0g
- Saturated Fat: 0g
- Cholesterol: 0mg
- Sodium: 300mg
- Carbohydrates: 18g
- Fiber: 2g
- Sugar: 15g
- Protein: 1g
Conclusion:
And there you have it! These Quick Beet Pickles are truly a game-changer. I know, I know, you might be thinking, “Beets? Pickled?” But trust me on this one. The earthy sweetness of the beets, combined with the tangy vinegar and the subtle spice, creates a flavor explosion that will have you reaching for more. They’re not just delicious; they’re also incredibly versatile and ridiculously easy to make. What more could you ask for?
Seriously, this recipe is a must-try for so many reasons. First, the vibrant color alone makes them a showstopper. Imagine adding these gorgeous magenta slices to a cheese board instant elegance! Second, the flavor is complex and satisfying. They’re sweet, sour, and a little bit spicy, hitting all the right notes. And third, they’re ready in a fraction of the time compared to traditional pickling methods. No canning equipment needed, just a little patience while they chill in the fridge.
But the best part? The possibilities are endless! Serve these Quick Beet Pickles as a vibrant side dish with grilled meats or fish. They’re fantastic in salads, adding a burst of color and flavor. I especially love them with goat cheese and walnuts. Or, get creative and use them as a topping for burgers or sandwiches. They’re also a surprisingly delicious addition to tacos! For a fun variation, try adding a pinch of red pepper flakes for extra heat, or a sprig of fresh dill for a more herbaceous flavor. You could even experiment with different vinegars, like apple cider vinegar or balsamic vinegar, to create your own unique twist.
If you’re feeling adventurous, try roasting the beets before pickling them. This will intensify their sweetness and add a smoky depth to the flavor. Just remember to let them cool completely before slicing and adding them to the brine. Another fun idea is to add other vegetables to the mix, like thinly sliced onions or carrots. This will create a colorful and flavorful pickled medley.
I’m absolutely confident that you’ll love these Quick Beet Pickles as much as I do. They’re a simple, delicious, and versatile way to add a pop of flavor and color to any meal. So, what are you waiting for? Gather your ingredients, put on some music, and get pickling!
I’m so excited for you to try this recipe! Once you’ve made your own batch of these delightful Quick Beet Pickles, I would absolutely love to hear about your experience. Did you make any variations? What did you serve them with? What did your family and friends think? Share your photos and stories in the comments below! Your feedback is invaluable, and it helps me to create even better recipes for you in the future. Happy pickling! I can’t wait to see what you create! Don’t forget to rate the recipe too!
Quick Beet Pickles: The Easy Recipe You Need Now
Tangy and sweet pickled beets, perfect as a snack, salad addition, or side dish. Easy to make and store!
Ingredients
- 1 pound small to medium beets, scrubbed
- 1 cup water
- 1 cup apple cider vinegar
- 1/2 cup granulated sugar
- 1 tablespoon kosher salt
- 1 teaspoon yellow mustard seeds
- 1/2 teaspoon black peppercorns
- 2 cloves garlic, smashed
- 1 bay leaf
- Optional: 1/4 teaspoon red pepper flakes (for a little heat)
Instructions
- Prepare the Beets: Scrub beets under cold water. Do not peel.
- Cook the Beets: Boil, roast, or steam beets until tender. Boiling is quickest: Place beets in a pot, cover with water, bring to a boil, then simmer for 20-30 minutes until fork-tender.
- Check for Doneness: Insert a fork into the center of a beet. If it goes in easily, they’re ready.
- Cool and Peel: Drain beets and transfer to ice water for 5-10 minutes. Peel the skins off (they should slip off easily).
- Slice the Beets: Slice into rounds, wedges, or dice. About 1/4 inch thick is good for rounds.
- Make the Pickling Brine: Combine water, apple cider vinegar, sugar, salt, mustard seeds, peppercorns, garlic, bay leaf, and red pepper flakes (if using) in a saucepan.
- Bring to a Boil: Bring the brine to a boil over medium-high heat, stirring to dissolve sugar and salt.
- Simmer the Brine: Reduce heat to low and simmer for 5 minutes to meld flavors.
- Remove from Heat: Let the brine cool slightly.
- Prepare the Jars: Use sterilized canning jars (follow canning procedures) or clean glass jars with tight-fitting lids (for refrigerator pickles).
- Pack the Beets: Pack sliced beets into jars, leaving 1/2 inch headspace.
- Pour the Brine: Pour warm brine over beets, covering them completely. Leave 1/2 inch headspace. Tap jars gently to release air bubbles.
- Seal the Jars: For canning jars, wipe rims, place lids, and screw on bands fingertip-tight. Process in a boiling water bath for 10 minutes. For refrigerator pickles, simply screw on the lids tightly.
- Cool and Store: Cool jars completely at room temperature. Check seals (lids shouldn’t flex). Store sealed jars in a cool, dark place for up to a year. Refrigerator pickles last 2-3 weeks in the refrigerator.
- Wait for Flavors: Let pickled beets sit for at least 24 hours before eating for best flavor.
Notes
- Spice it up: Add more red pepper flakes or cayenne pepper.
- Add other vegetables: Pickle onions, carrots, or cucumbers with the beets.
- Use different vinegars: Try white wine vinegar or rice vinegar.
- Sweeten it up: Add more sugar to the brine.
- Add herbs: Dill or thyme can add flavor.
- Make it a gift: Package in pretty jars.
- Serving Suggestions: Snack, salad, side dish, sandwich/burger topping, dip ingredient.
- Troubleshooting:
- Beets too hard: Simmer longer.
- Brine too sour: Add more sugar.
- Pickles too soft: Don’t overcook beets.
- Jars didn’t seal: Reprocess or refrigerate.


Leave a Comment