

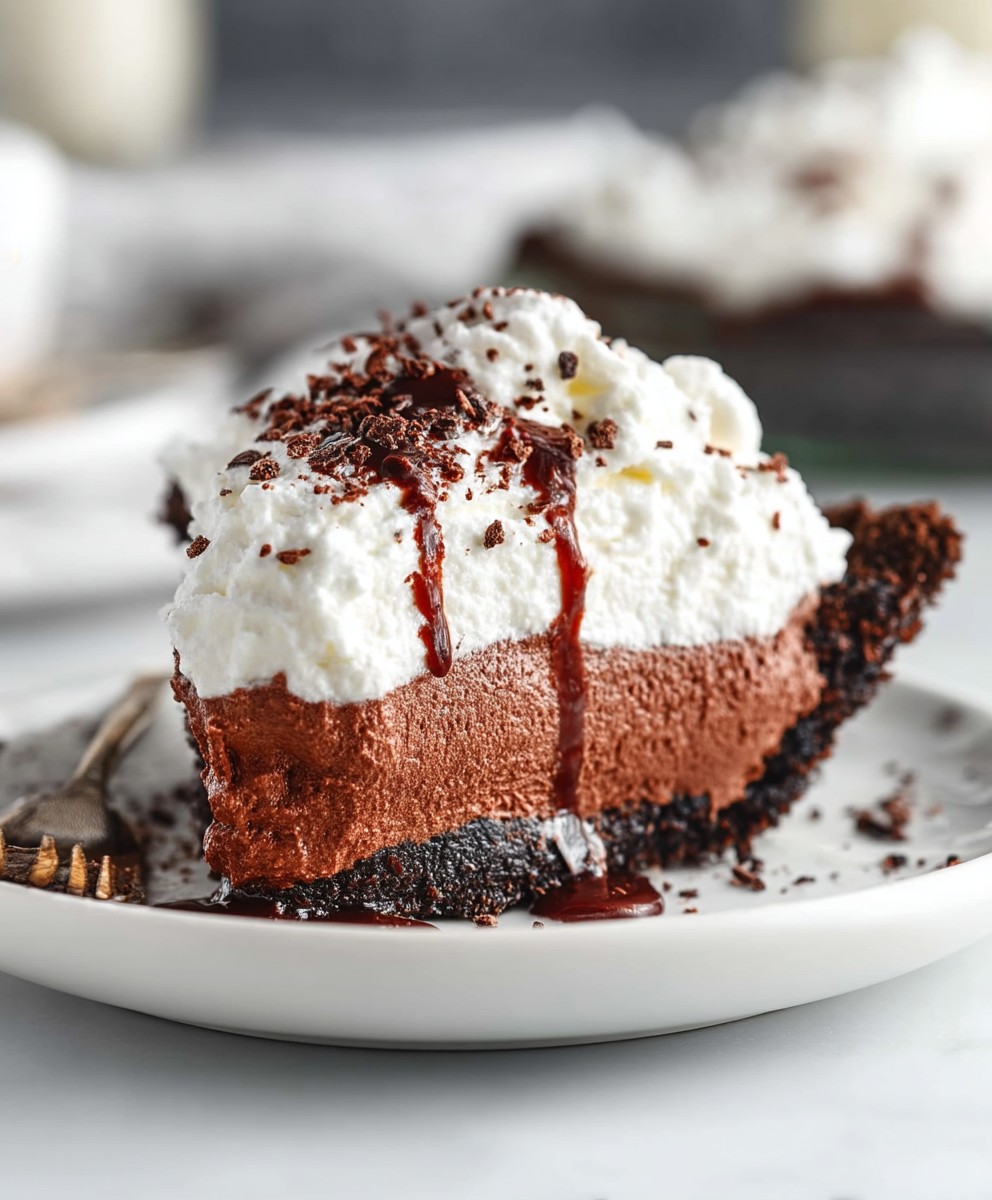
Chocolate Mousse Pie, a dessert so decadent, so intensely chocolatey, it’s practically a love letter written in cocoa. Imagine sinking your fork into a cloud of airy, rich chocolate mousse, nestled in a buttery, crumbly crust. It’s a symphony of textures and flavors that will leave you utterly speechless. Have I got your attention? Good, because this isn’t just any pie; it’s an experience.
While the exact origins of Chocolate Mousse Pie are debated, its roots lie in the classic French chocolate mousse, a dessert that gained popularity in the 18th century. The addition of a pie crust elevates this elegant dessert to a whole new level of indulgence, making it perfect for special occasions or simply a well-deserved treat after a long day.
But what is it about this pie that makes it so irresistible? For starters, the combination of the smooth, melt-in-your-mouth mousse and the satisfying crunch of the crust is simply divine. The intense chocolate flavor is balanced perfectly, never too sweet, never too bitter. Plus, while it looks impressive, this pie is surprisingly easy to make, making it a winner in my book. So, are you ready to create a dessert masterpiece? Let’s get baking!

Ingredients:
- For the Chocolate Cookie Crust:
- 1 ½ cups chocolate cookie crumbs (about 24 chocolate sandwich cookies, cream filling removed)
- 5 tablespoons unsalted butter, melted
- 2 tablespoons granulated sugar
- ¼ teaspoon salt
- For the Rich Chocolate Mousse Filling:
- 12 ounces bittersweet chocolate, finely chopped (60-70% cacao)
- 6 large eggs, separated
- ¼ cup granulated sugar
- 1 ½ cups heavy cream, divided
- 1 teaspoon vanilla extract
- Pinch of salt
- For the Whipped Cream Topping (Optional):
- 1 cup heavy cream
- 2 tablespoons powdered sugar
- ½ teaspoon vanilla extract
- For Garnish (Optional):
- Chocolate shavings
- Fresh raspberries
Preparing the Chocolate Cookie Crust:
- Preheat the Oven: Preheat your oven to 350°F (175°C). This step is crucial for setting the crust and preventing it from becoming soggy later on.
- Prepare the Cookie Crumbs: If you haven’t already, remove the cream filling from your chocolate sandwich cookies. You can use a food processor to finely grind the cookies into crumbs. Alternatively, you can place the cookies in a resealable plastic bag and crush them with a rolling pin. Just make sure the crumbs are fine and even.
- Combine Ingredients: In a medium bowl, combine the chocolate cookie crumbs, melted butter, granulated sugar, and salt. Mix well until all the ingredients are evenly distributed and the crumbs are moistened. The mixture should resemble wet sand.
- Press into Pie Plate: Press the crumb mixture firmly and evenly into the bottom and up the sides of a 9-inch pie plate. I like to use the bottom of a measuring cup to help press the crumbs firmly and create a smooth, even surface. Pay special attention to the edges to ensure they are well-compacted.
- Bake the Crust: Bake the crust in the preheated oven for 8-10 minutes. This will help set the crust and prevent it from becoming soggy when you add the mousse filling. Keep a close eye on it to prevent burning.
- Cool Completely: Remove the crust from the oven and let it cool completely on a wire rack before adding the mousse filling. This is important because adding the warm mousse to a warm crust can cause the crust to soften.
Making the Rich Chocolate Mousse Filling:
- Melt the Chocolate: Place the finely chopped bittersweet chocolate in a heatproof bowl set over a saucepan of simmering water (double boiler). Make sure the bottom of the bowl doesn’t touch the water. Stir occasionally until the chocolate is completely melted and smooth. Remove the bowl from the heat and let the chocolate cool slightly.
- Separate the Eggs: Carefully separate the eggs, placing the yolks in a large bowl and the whites in a clean, grease-free bowl. It’s crucial that no yolk gets into the whites, as this will prevent them from whipping properly.
- Whisk Egg Yolks and Sugar: In the bowl with the egg yolks, add the ¼ cup of granulated sugar. Whisk vigorously until the yolks become pale yellow and slightly thickened. This process incorporates air into the yolks, which will contribute to the light and airy texture of the mousse.
- Temper the Chocolate: Gradually whisk a small amount of the melted chocolate into the egg yolk mixture to temper it. This prevents the yolks from scrambling when you add them to the rest of the chocolate. Continue adding the chocolate in a slow, steady stream, whisking constantly until all the chocolate is incorporated and the mixture is smooth.
- Whip the Egg Whites: In the bowl with the egg whites, add a pinch of salt. Using an electric mixer, beat the egg whites until stiff peaks form. Be careful not to overbeat the egg whites, as this can make them dry and grainy. The peaks should be firm but still slightly glossy.
- Whip the Heavy Cream (Part 1): In a separate bowl, whip ½ cup of the heavy cream until soft peaks form. This whipped cream will add richness and lightness to the mousse.
- Fold in the Egg Whites: Gently fold one-third of the whipped egg whites into the chocolate mixture to lighten it. Then, gently fold in the remaining egg whites in two additions, being careful not to deflate the mixture. The goal is to incorporate the egg whites evenly while maintaining their volume.
- Fold in the Whipped Cream: Gently fold in the ½ cup of whipped cream into the chocolate mixture until just combined. Again, be careful not to overmix, as this can deflate the mousse.
- Whip the Remaining Heavy Cream (Part 2): In a clean bowl, whip the remaining 1 cup of heavy cream with the powdered sugar and vanilla extract until stiff peaks form. This will be used for the topping.
Assembling the Chocolate Mousse Pie:
- Pour in the Mousse Filling: Pour the chocolate mousse filling into the cooled chocolate cookie crust, spreading it evenly.
- Refrigerate: Cover the pie with plastic wrap, pressing it gently against the surface of the mousse to prevent a skin from forming. Refrigerate for at least 4 hours, or preferably overnight, to allow the mousse to set completely. This is a crucial step for achieving the perfect texture.
- Add Whipped Cream Topping: Once the mousse has set, remove the plastic wrap. Spread the whipped cream evenly over the top of the pie. You can also pipe the whipped cream using a piping bag and tip for a more decorative look.
- Garnish (Optional): Garnish the pie with chocolate shavings and fresh raspberries, if desired. These additions not only enhance the visual appeal of the pie but also add complementary flavors and textures.
- Serve and Enjoy: Slice the pie and serve chilled. This Chocolate Mousse Pie is best enjoyed within a few days of making it.
Conclusion:
This Chocolate Mousse Pie isn’t just dessert; it’s an experience. From the satisfying crunch of the crust to the airy, decadent mousse, every bite is a symphony of textures and flavors that will leave you wanting more. I truly believe this recipe is a must-try for anyone who loves chocolate, enjoys baking, or simply wants to impress their friends and family with a show-stopping dessert. It’s surprisingly easy to make, and the results are absolutely divine.
Think of it: a rich, dark chocolate flavor that melts in your mouth, perfectly balanced by the subtle sweetness of the mousse. It’s the kind of dessert that makes you close your eyes and savor every moment. And the best part? You made it yourself!
But the fun doesn’t stop there! This recipe is incredibly versatile. For a classic presentation, simply slice and serve with a dollop of whipped cream and a sprinkle of cocoa powder. However, if you’re feeling adventurous, there are endless possibilities for variations.
Consider adding a layer of salted caramel to the bottom of the crust before pouring in the mousse for a sweet and salty twist. Or, infuse the mousse with a hint of espresso for a mocha-flavored delight. For a truly decadent experience, top the pie with chocolate shavings, fresh berries, or even a drizzle of chocolate ganache.
If you’re looking for a lighter option, you can use a graham cracker crust instead of a chocolate cookie crust. You could also substitute some of the heavy cream with Greek yogurt for a tangier flavor and a slightly lower calorie count. Another fantastic variation is to add a layer of crushed Oreos between the crust and the mousse for an extra layer of chocolatey goodness.
Serving suggestions are just as flexible. This Chocolate Mousse Pie is perfect for any occasion, from a casual weeknight dessert to a fancy dinner party. It’s also a great option for potlucks and bake sales. For a truly elegant presentation, serve individual slices on dessert plates with a sprig of mint and a dusting of powdered sugar.
I’ve poured my heart and soul into perfecting this recipe, and I’m confident that you’ll love it as much as I do. It’s a guaranteed crowd-pleaser that will have everyone asking for seconds (and the recipe!).
So, what are you waiting for? Gather your ingredients, preheat your oven, and get ready to create a masterpiece. I promise you won’t regret it.
I’m so excited for you to try this recipe! Once you’ve made your own Chocolate Mousse Pie, please come back and share your experience in the comments below. I’d love to hear about your variations, serving suggestions, and any tips or tricks you discovered along the way. Don’t forget to rate the recipe and share it with your friends and family. Happy baking! I can’t wait to see your creations!
Chocolate Mousse Pie: A Decadent Dessert Recipe
Decadent chocolate mousse pie with a rich chocolate cookie crust and optional whipped cream topping. A perfect dessert for chocolate lovers!
Ingredients
- 1 ½ cups chocolate cookie crumbs (about 24 chocolate sandwich cookies, cream filling removed)
- 5 tablespoons unsalted butter, melted
- 2 tablespoons granulated sugar
- ¼ teaspoon salt
- 12 ounces bittersweet chocolate, finely chopped (60-70% cacao)
- 6 large eggs, separated
- ¼ cup granulated sugar
- 1 ½ cups heavy cream, divided
- 1 teaspoon vanilla extract
- Pinch of salt
- 1 cup heavy cream
- 2 tablespoons powdered sugar
- ½ teaspoon vanilla extract
- Chocolate shavings
- Fresh raspberries
Instructions
- Preheat your oven to 350°F (175°C).
- Remove the cream filling from your chocolate sandwich cookies. Grind the cookies into fine crumbs using a food processor or by crushing them in a resealable bag with a rolling pin.
- In a medium bowl, combine the chocolate cookie crumbs, melted butter, granulated sugar, and salt. Mix well until evenly distributed and moistened.
- Press the crumb mixture firmly and evenly into the bottom and up the sides of a 9-inch pie plate. Use the bottom of a measuring cup to help create a smooth, even surface.
- Bake the crust in the preheated oven for 8-10 minutes.
- Remove the crust from the oven and let it cool completely on a wire rack before adding the mousse filling.
- Place the finely chopped bittersweet chocolate in a heatproof bowl set over a saucepan of simmering water (double boiler). Stir occasionally until completely melted and smooth. Remove from heat and let cool slightly.
- Carefully separate the eggs, placing the yolks in a large bowl and the whites in a clean, grease-free bowl.
- In the bowl with the egg yolks, add the ¼ cup of granulated sugar. Whisk vigorously until the yolks become pale yellow and slightly thickened.
- Gradually whisk a small amount of the melted chocolate into the egg yolk mixture to temper it. Continue adding the chocolate in a slow, steady stream, whisking constantly until all the chocolate is incorporated and the mixture is smooth.
- In the bowl with the egg whites, add a pinch of salt. Using an electric mixer, beat the egg whites until stiff peaks form.
- In a separate bowl, whip ½ cup of the heavy cream until soft peaks form.
- Gently fold one-third of the whipped egg whites into the chocolate mixture to lighten it. Then, gently fold in the remaining egg whites in two additions, being careful not to deflate the mixture.
- Gently fold in the ½ cup of whipped cream into the chocolate mixture until just combined.
- In a clean bowl, whip the remaining 1 cup of heavy cream with the powdered sugar and vanilla extract until stiff peaks form. This will be used for the topping.
- Pour the chocolate mousse filling into the cooled chocolate cookie crust, spreading it evenly.
- Cover the pie with plastic wrap, pressing it gently against the surface of the mousse to prevent a skin from forming. Refrigerate for at least 4 hours, or preferably overnight, to allow the mousse to set completely.
- Once the mousse has set, remove the plastic wrap. Spread the whipped cream evenly over the top of the pie. You can also pipe the whipped cream using a piping bag and tip for a more decorative look.
- Garnish the pie with chocolate shavings and fresh raspberries, if desired.
- Slice the pie and serve chilled. This Chocolate Mousse Pie is best enjoyed within a few days of making it.
Notes
- Make sure no egg yolk gets into the egg whites, as this will prevent them from whipping properly.
- Be careful not to overbeat the egg whites, as this can make them dry and grainy.
- When folding in the egg whites and whipped cream, be gentle to avoid deflating the mousse.
- Refrigerating the pie for at least 4 hours is crucial for achieving the perfect texture.


Leave a Comment