

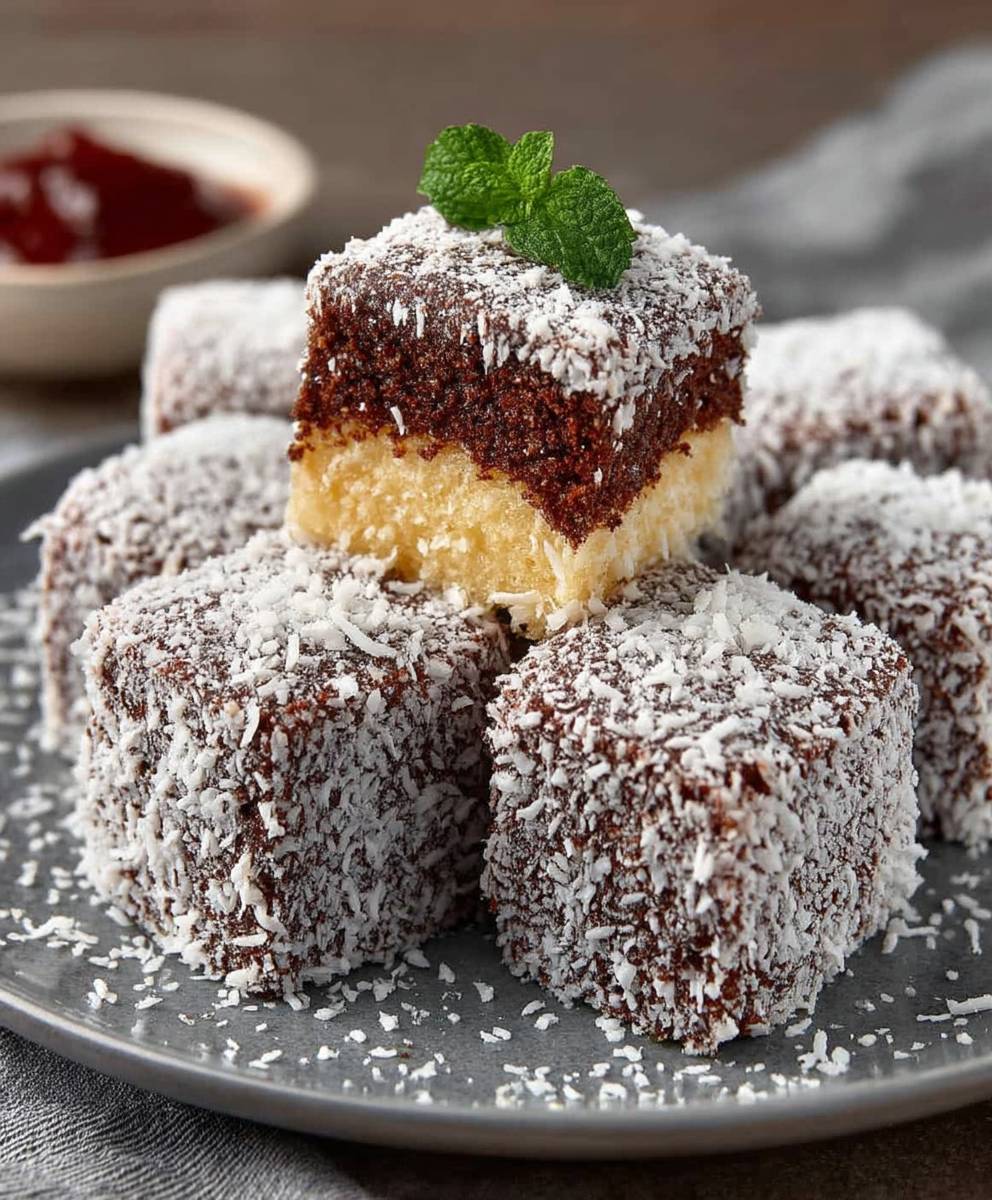
Australian Lamingtons: Prepare to embark on a delightful culinary journey to the land Down Under! Imagine biting into a cloud of sponge cake, generously coated in rich chocolate and then lovingly rolled in delicate, snowy coconut. That, my friends, is the magic of a Lamington, and I’m thrilled to share my foolproof recipe with you.
These iconic treats are more than just delicious; they’re a true symbol of Australian baking. While the exact origins are debated, the most popular story attributes their creation to a chef accidentally dropping sponge cake into chocolate. Necessity, as they say, is the mother of invention! The coconut coating was added to prevent the chocolate from sticking to fingers, a clever solution that resulted in a national treasure.
What makes Australian Lamingtons so irresistible? It’s the perfect combination of textures and flavors. The light and airy sponge provides a soft base, while the chocolate offers a decadent richness. And then there’s the coconut adding a subtle sweetness and a delightful chewiness that complements the other elements perfectly. They are also incredibly versatile, perfect for afternoon tea, a special occasion, or simply a sweet treat to brighten your day. So, let’s get baking and create these little squares of happiness together!

Ingredients:
- For the Sponge Cake:
- 225g (1 cup) unsalted butter, softened
- 225g (1 cup) caster sugar (superfine sugar)
- 4 large eggs
- 275g (2 cups) self-raising flour
- 60ml (1/4 cup) milk
- 1 teaspoon vanilla extract
- For the Chocolate Coating:
- 400g (14 oz) dark chocolate, finely chopped
- 60g (1/4 cup) unsalted butter
- 240ml (1 cup) milk
- 2 tablespoons cocoa powder
- 225g (1 cup) icing sugar (powdered sugar), sifted
- For the Coconut Coating:
- 250g (approximately 9 oz) desiccated coconut
Preparing the Sponge Cake:
- Cream the Butter and Sugar: Preheat your oven to 180°C (350°F). Grease and flour a 20cm (8 inch) square cake tin. In a large bowl, cream together the softened butter and caster sugar until light and fluffy. This is a crucial step for a light and airy sponge, so don’t rush it! I usually use an electric mixer for this, but you can definitely do it by hand if you’re feeling ambitious.
- Add the Eggs: Beat in the eggs one at a time, making sure each egg is fully incorporated before adding the next. If the mixture starts to curdle, add a tablespoon of flour from the measured amount. This will help bring it back together.
- Sift and Fold in the Flour: Sift the self-raising flour into the bowl. Gently fold the flour into the wet ingredients using a metal spoon or spatula. Be careful not to overmix, as this can develop the gluten in the flour and result in a tough cake. We want a tender crumb!
- Add Milk and Vanilla: In a separate small bowl, combine the milk and vanilla extract. Gradually add this mixture to the batter, folding gently until just combined. Again, avoid overmixing.
- Bake the Cake: Pour the batter into the prepared cake tin and spread it evenly. Bake for 25-30 minutes, or until a skewer inserted into the center comes out clean. The cake should be golden brown and spring back lightly when touched.
- Cool the Cake: Let the cake cool in the tin for 10 minutes before turning it out onto a wire rack to cool completely. It’s important that the cake is completely cool before you start dipping it in the chocolate, otherwise the chocolate will melt and make a mess.
Preparing the Chocolate Coating:
- Melt the Chocolate and Butter: In a heatproof bowl set over a saucepan of simmering water (make sure the bottom of the bowl doesn’t touch the water), melt the dark chocolate and butter together, stirring occasionally until smooth. Alternatively, you can melt them in the microwave in 30-second intervals, stirring in between, until smooth.
- Add the Milk and Cocoa: Remove the bowl from the heat and stir in the milk and cocoa powder until well combined. The cocoa powder adds a richer, deeper chocolate flavor.
- Add the Icing Sugar: Gradually add the sifted icing sugar to the chocolate mixture, whisking constantly until smooth and glossy. Sifting the icing sugar is important to prevent lumps in the coating. If the coating is too thick, add a little more milk, one tablespoon at a time, until you reach the desired consistency. The consistency should be thick enough to coat the cake but thin enough to drip off easily.
Assembling the Lamingtons:
- Cut the Cake into Squares: Once the cake is completely cool, use a serrated knife to trim the edges and cut it into even squares. I usually aim for squares that are about 4-5cm (1.5-2 inches) in size.
- Dip in Chocolate: Using a fork or two, carefully dip each cake square into the chocolate coating, making sure it’s completely covered. Let the excess chocolate drip off. This can be a bit messy, so work over a wire rack or a baking sheet lined with parchment paper.
- Coat in Coconut: Immediately after dipping in chocolate, roll each cake square in the desiccated coconut, ensuring it’s evenly coated on all sides. The coconut needs to stick to the wet chocolate, so don’t wait too long.
- Set the Lamingtons: Place the coated lamingtons on a wire rack to set. This will allow the chocolate to harden and the coconut to adhere properly. You can speed up the setting process by placing them in the refrigerator for about 30 minutes.
- Serve and Enjoy: Once the chocolate has set, your lamingtons are ready to serve! They are best enjoyed fresh, but they can be stored in an airtight container at room temperature for up to 3 days. They are also delicious served with a cup of tea or coffee.
Tips and Variations:
- For a lighter sponge: Separate the eggs and beat the egg whites until stiff peaks form. Gently fold the egg whites into the batter after adding the flour. This will create an even lighter and airier sponge cake.
- Add jam: For a classic twist, cut the lamingtons in half horizontally and spread a layer of raspberry or strawberry jam in the middle before dipping them in chocolate and coconut.
- Use different flavors: Experiment with different flavors in the chocolate coating. You can add a teaspoon of coffee extract for a mocha flavor, or a pinch of chili powder for a spicy kick.
- Coconut variations: Toast the desiccated coconut in a dry pan until golden brown for a nuttier flavor. You can also use shredded coconut instead of desiccated coconut for a coarser texture.
- Gluten-free option: Substitute the self-raising flour with a gluten-free self-raising flour blend. You may need to add a little xanthan gum to help bind the ingredients together.
- Storage: Lamingtons are best stored in an airtight container at room temperature. Avoid storing them in the refrigerator for extended periods, as this can dry out the sponge cake.
Troubleshooting:
- Cake is dry: Make sure you’re not overbaking the cake. Check it after 25 minutes and insert a skewer to test for doneness. If the cake is still dry, you can brush it with a simple syrup (equal parts sugar and water, heated until the sugar dissolves) after it cools.
- Chocolate coating is too thick: Add a little more milk, one tablespoon at a time, until you reach the desired consistency.
- Chocolate coating is too thin: Add a little more sifted icing sugar, one tablespoon at a time, until you reach the desired consistency.
- Coconut isn’t sticking: Make sure you’re coating the lamingtons in coconut immediately after dipping them in chocolate. The chocolate needs to be wet for the coconut to adhere properly.
- Lamingtons are too messy: Work over a wire rack or a baking sheet lined with parchment paper to catch any drips. You can also use a fork or two to carefully dip the cake squares in chocolate and let the excess drip off.
Conclusion:
So there you have it! This recipe for Australian Lamingtons isn’t just another cake recipe; it’s a passport to a delightful, coconut-covered experience. The light, airy sponge, the rich chocolate coating, and the generous dusting of coconut flakes combine to create a symphony of textures and flavors that’s simply irresistible. I truly believe this is a must-try for anyone who appreciates a classic treat with a unique twist.
Why is it a must-try, you ask? Well, beyond the sheer deliciousness, making these Lamingtons is a rewarding experience in itself. It’s a chance to connect with a piece of Australian culinary heritage and to create something truly special from scratch. Plus, the aroma that fills your kitchen as these bake is pure bliss! It’s a perfect project for a weekend baking session, a fun activity to do with kids, or simply a way to treat yourself to something extraordinary.
But the fun doesn’t stop there! While the classic recipe is divine, there’s plenty of room for experimentation. Feel free to get creative with your serving suggestions and variations. For a truly decadent experience, serve your Lamingtons with a scoop of vanilla ice cream or a dollop of whipped cream. A sprinkle of toasted almonds or a drizzle of melted white chocolate can also elevate the presentation and add an extra layer of flavor.
Looking for variations? Consider adding a layer of raspberry jam between the sponge layers before dipping them in chocolate. This adds a tangy sweetness that complements the richness of the chocolate and coconut beautifully. You could also experiment with different flavor extracts in the sponge, such as almond or vanilla bean paste, to create a more complex flavor profile. For a festive touch, try using colored coconut flakes for special occasions. Imagine pink and green coconut for Christmas or pastel shades for Easter!
And if you’re feeling adventurous, why not try making mini Lamingtons? These bite-sized treats are perfect for parties and gatherings. Simply cut the sponge into smaller squares before dipping and coating. They’re also a great way to control portion sizes (although, let’s be honest, you’ll probably still want to eat more than one!).
I’ve poured my heart into perfecting this recipe, and I’m confident that you’ll love it as much as I do. It’s a recipe that’s been passed down through generations, and I’m thrilled to be sharing it with you. But the best part about baking is sharing the joy with others. So, I wholeheartedly encourage you to give this recipe a try. Gather your ingredients, preheat your oven, and get ready to embark on a delicious adventure.
Once you’ve made your own batch of these delightful Australian Lamingtons, I’d absolutely love to hear about your experience. Did you stick to the classic recipe, or did you try any variations? What did your family and friends think? Share your photos and stories in the comments below! I’m always eager to see your creations and to learn from your experiences. Happy baking, and I hope you enjoy every bite! Don’t forget to tag me in your social media posts I can’t wait to see your Lamington masterpieces!
Australian Lamingtons: A Delicious Guide to This Classic Treat
Light sponge cake squares dipped in rich chocolate and coated in sweet desiccated coconut. A delightful Australian treat!
Ingredients
- 225g (1 cup) unsalted butter, softened
- 225g (1 cup) caster sugar (superfine sugar)
- 4 large eggs
- 275g (2 cups) self-raising flour
- 60ml (1/4 cup) milk
- 1 teaspoon vanilla extract
- 400g (14 oz) dark chocolate, finely chopped
- 60g (1/4 cup) unsalted butter
- 240ml (1 cup) milk
- 2 tablespoons cocoa powder
- 225g (1 cup) icing sugar (powdered sugar), sifted
- 250g (approximately 9 oz) desiccated coconut
Instructions
- Preheat your oven to 350°F (180°C). Grease and flour a 8-inch (20cm) square cake tin.
- In a large bowl, cream together the softened butter and caster sugar until light and fluffy.
- Beat in the eggs one at a time, making sure each egg is fully incorporated before adding the next. If the mixture starts to curdle, add a tablespoon of flour from the measured amount.
- Sift the self-raising flour into the bowl. Gently fold the flour into the wet ingredients using a metal spoon or spatula. Be careful not to overmix.
- In a separate small bowl, combine the milk and vanilla extract. Gradually add this mixture to the batter, folding gently until just combined.
- Pour the batter into the prepared cake tin and spread it evenly. Bake for 25-30 minutes, or until a skewer inserted into the center comes out clean.
- Let the cake cool in the tin for 10 minutes before turning it out onto a wire rack to cool completely.
- In a heatproof bowl set over a saucepan of simmering water (make sure the bottom of the bowl doesn’t touch the water), melt the dark chocolate and butter together, stirring occasionally until smooth. Alternatively, you can melt them in the microwave in 30-second intervals, stirring in between, until smooth.
- Remove the bowl from the heat and stir in the milk and cocoa powder until well combined.
- Gradually add the sifted icing sugar to the chocolate mixture, whisking constantly until smooth and glossy. If the coating is too thick, add a little more milk, one tablespoon at a time, until you reach the desired consistency.
- Once the cake is completely cool, use a serrated knife to trim the edges and cut it into even squares (about 1.5-2 inches/4-5cm).
- Using a fork or two, carefully dip each cake square into the chocolate coating, making sure it’s completely covered. Let the excess chocolate drip off.
- Immediately after dipping in chocolate, roll each cake square in the desiccated coconut, ensuring it’s evenly coated on all sides.
- Place the coated lamingtons on a wire rack to set. You can speed up the setting process by placing them in the refrigerator for about 30 minutes.
- Serve and enjoy!
Notes
- For a lighter sponge: Separate the eggs and beat the egg whites until stiff peaks form. Gently fold the egg whites into the batter after adding the flour.
- Add jam: Cut the lamingtons in half horizontally and spread a layer of raspberry or strawberry jam in the middle before dipping them in chocolate and coconut.
- Use different flavors: Add a teaspoon of coffee extract for a mocha flavor, or a pinch of chili powder for a spicy kick to the chocolate coating.
- Coconut variations: Toast the desiccated coconut in a dry pan until golden brown for a nuttier flavor. You can also use shredded coconut instead of desiccated coconut for a coarser texture.
- Gluten-free option: Substitute the self-raising flour with a gluten-free self-raising flour blend. You may need to add a little xanthan gum to help bind the ingredients together.
- Storage: Lamingtons are best stored in an airtight container at room temperature for up to 3 days. Avoid storing them in the refrigerator for extended periods, as this can dry out the sponge cake.
- Cake is dry: Make sure you’re not overbaking the cake. Check it after 25 minutes and insert a skewer to test for doneness. If the cake is still dry, you can brush it with a simple syrup (equal parts sugar and water, heated until the sugar dissolves) after it cools.
- Chocolate coating is too thick: Add a little more milk, one tablespoon at a time, until you reach the desired consistency.
- Chocolate coating is too thin: Add a little more sifted icing sugar, one tablespoon at a time, until you reach the desired consistency.
- Coconut isn’t sticking: Make sure you’re coating the lamingtons in coconut immediately after dipping them in chocolate. The chocolate needs to be wet for the coconut to adhere properly.
- Lamingtons are too messy: Work over a wire rack or a baking sheet lined with parchment paper to catch any drips. You can also use a fork or two to carefully dip the cake squares in chocolate and let the excess drip off.


Leave a Comment