

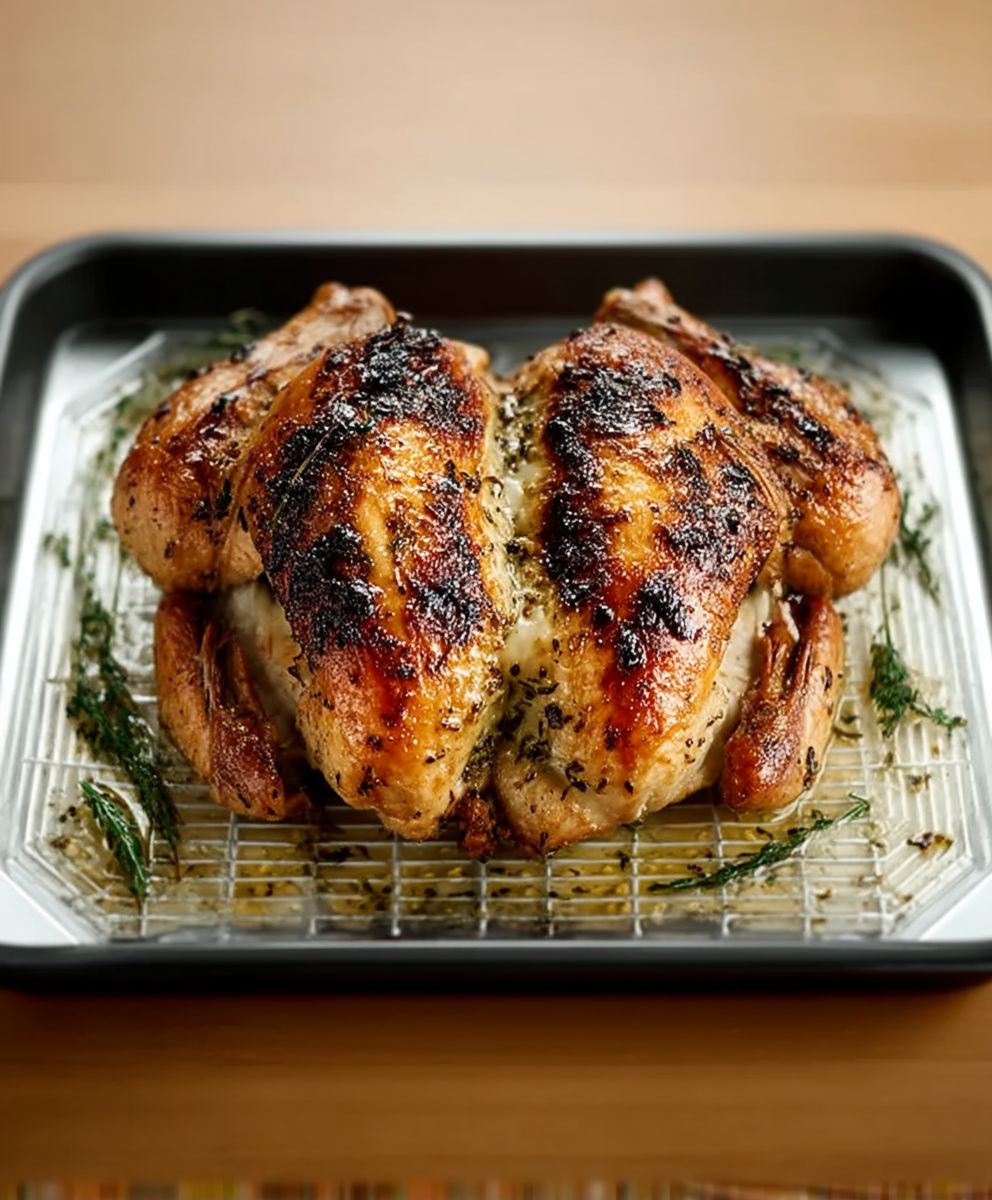
Spatchcock Turkey: Prepare to revolutionize your Thanksgiving (or any special occasion!) with this incredibly simple yet utterly impressive method for roasting a turkey. Forget dry, unevenly cooked birds spatchcocking, also known as butterflying, is the secret to a juicy, flavorful, and beautifully browned turkey every single time.
While the exact origins of spatchcocking are debated, the technique of removing the backbone and flattening poultry has been practiced in various cultures for centuries. Some culinary historians trace it back to Ireland, where “spatchcock” may have referred to quickly grilling a young chicken. Regardless of its precise beginnings, this method has gained immense popularity in recent years, and for good reason!
So, why is everyone raving about spatchcock turkey? The answer lies in its superior cooking performance. By removing the backbone, the turkey lays flat, allowing for even heat distribution. This results in faster cooking times often cutting the roasting time in half! and ensures that both the breast and thighs cook to perfection simultaneously. No more dry breast meat or undercooked legs! The flattened shape also maximizes skin exposure, leading to irresistibly crispy, golden-brown skin that everyone will fight over. Beyond the technical advantages, the taste is simply divine. The even cooking allows the natural juices to circulate, creating a moist and flavorful bird that will have your guests singing your praises. Get ready to experience turkey like never before!

Ingredients:
- 1 (12-14 pound) whole turkey, thawed
- 1/4 cup kosher salt
- 2 tablespoons freshly ground black pepper
- 2 tablespoons garlic powder
- 2 tablespoons onion powder
- 1 tablespoon dried thyme
- 1 tablespoon dried rosemary
- 1 tablespoon smoked paprika
- 1 teaspoon cayenne pepper (optional, for a little kick!)
- 1/2 cup olive oil
- 1 large onion, quartered
- 2 carrots, roughly chopped
- 2 celery stalks, roughly chopped
- 4 cloves garlic, smashed
- 2 cups chicken broth
- 1/2 cup dry white wine (optional, but adds great flavor)
- Fresh herbs (rosemary, thyme, sage) for garnish (optional)
Spatchcocking the Turkey:
Okay, let’s get started! Spatchcocking, or butterflying, a turkey might sound intimidating, but trust me, it’s easier than you think and it’s the key to a perfectly cooked, juicy bird. It allows the turkey to lay flat, ensuring even cooking and crispy skin all over. Here’s how we do it:
- Prepare Your Workspace: Make sure you have a clean, large cutting board. It’s also a good idea to have some paper towels handy for wiping down surfaces and your hands.
- Remove Giblets and Neck: Take the turkey out of its packaging and remove the giblets and neck from the cavity. These are usually in a small bag. You can save these for making gravy later! Rinse the turkey inside and out with cold water and pat it completely dry with paper towels. This is crucial for crispy skin!
- Locate the Backbone: Place the turkey breast-side down on the cutting board. You’ll see the backbone running down the center.
- Cut Out the Backbone: Using a pair of heavy-duty kitchen shears (poultry shears are ideal), cut along one side of the backbone, starting at the tail end. You’ll need to apply some pressure. Work your way up, cutting through the ribs.
- Repeat on the Other Side: Now, cut along the other side of the backbone, again starting at the tail end. You should now be able to remove the entire backbone. You can save this to add flavor to your gravy or stock.
- Flatten the Turkey: Flip the turkey over so it’s breast-side up. Press down firmly on the breastbone to flatten the turkey. You might hear a crack that’s normal! You want the turkey to lay as flat as possible.
Preparing the Turkey Rub:
Now for the flavor! This dry rub is packed with herbs and spices that will create a delicious, crispy skin and infuse the turkey with amazing flavor. Feel free to adjust the spices to your liking!
- Combine Dry Ingredients: In a small bowl, combine the kosher salt, black pepper, garlic powder, onion powder, dried thyme, dried rosemary, smoked paprika, and cayenne pepper (if using).
- Add Olive Oil: Pour the olive oil into the bowl with the dry ingredients.
- Mix Well: Mix everything together until it forms a paste. The olive oil helps the spices adhere to the turkey and also contributes to the crispy skin.
Rubbing and Preparing the Turkey for Roasting:
This is where the magic happens! We’re going to generously coat the turkey with our flavorful rub, ensuring every inch is covered. This will create a beautiful, crispy skin and infuse the meat with delicious flavor.
- Apply the Rub: Using your hands, generously rub the spice mixture all over the turkey, including under the skin of the breast and thighs. This is important for maximum flavor penetration. Don’t be shy use all of the rub!
- Massage the Rub In: Really massage the rub into the turkey, ensuring it’s evenly distributed.
- Rest the Turkey (Optional): For even better flavor, you can let the turkey rest in the refrigerator for at least 4 hours, or even overnight. This allows the flavors to meld and penetrate the meat even further. If you’re short on time, you can skip this step, but I highly recommend it if you have the time.
- Prepare the Roasting Pan: Preheat your oven to 425°F (220°C). Place the quartered onion, chopped carrots, chopped celery, and smashed garlic cloves in the bottom of a large roasting pan. These vegetables will add flavor to the drippings and help keep the turkey from sticking to the pan.
- Add Chicken Broth and Wine: Pour the chicken broth and white wine (if using) into the bottom of the roasting pan. This will create steam and help keep the turkey moist during cooking.
- Place Turkey in Roasting Pan: Place the turkey, breast-side up, on top of the vegetables in the roasting pan.
Roasting the Turkey:
Now for the main event! Roasting the turkey is all about maintaining the right temperature and ensuring it’s cooked through without drying out. The spatchcocking method helps with even cooking, but we’ll still need to monitor the internal temperature to ensure it’s perfect.
- Roast at High Heat: Roast the turkey at 425°F (220°C) for the first 30 minutes. This high heat helps to crisp up the skin.
- Reduce Heat: After 30 minutes, reduce the oven temperature to 325°F (160°C).
- Continue Roasting: Continue roasting the turkey for approximately 1 1/2 to 2 hours, or until a meat thermometer inserted into the thickest part of the thigh registers 165°F (74°C). The exact cooking time will depend on the size of your turkey and your oven.
- Basting (Optional): Basting the turkey with the pan juices every 30 minutes or so can help keep it moist and add flavor. However, be careful not to open the oven too frequently, as this can lower the temperature and increase the cooking time.
- Check for Doneness: Use a meat thermometer to check the internal temperature of the turkey. Insert the thermometer into the thickest part of the thigh, being careful not to touch the bone. The turkey is done when the thermometer registers 165°F (74°C). You can also check the temperature in the breast, which should be at least 160°F (71°C).
- If Skin is Browning Too Quickly: If the skin starts to brown too quickly, you can tent the turkey with aluminum foil. This will help prevent it from burning.
Resting and Carving the Turkey:
Resting the turkey is crucial! It allows the juices to redistribute throughout the meat, resulting in a more tender and flavorful bird. Carving it properly will also ensure you get the most out of your perfectly cooked turkey.
- Rest the Turkey: Once the turkey is cooked, remove it from the oven and let it rest for at least 20-30 minutes before carving. Tent it loosely with aluminum foil to keep it warm. This resting period is essential for juicy meat!
- Prepare to Carve: Transfer the turkey to a large cutting board.
- Remove the Legs: Using a sharp carving knife, cut through the skin and joint connecting the leg to the body. Pull the leg away from the body and cut through the remaining joint to detach it completely. Repeat on the other side.
- Separate the Thigh and Drumstick: Place each leg on the cutting board and locate the joint connecting the thigh and drumstick. Cut through the joint to separate them.
- Slice the Thigh Meat: Slice the thigh meat against the grain into thin, even slices.
- Slice the Drumstick Meat: Hold the drumstick upright and slice the meat down along the bone.
- Carve the Breast: Locate the breastbone and slice down along one side of the breastbone to remove the entire breast. Repeat on the other side.
- Slice the Breast Meat: Place each breast on the cutting board and slice it against the grain into thin, even slices.
- Arrange and Serve: Arrange the carved turkey on a platter and garnish with fresh herbs, if desired. Serve immediately and enjoy!
Making Gravy (Optional):
Don’t let those delicious pan drippings go to waste! They’re the perfect base for a flavorful gravy. Here’
Conclusion:
This Spatchcock Turkey recipe isn’t just another way to cook a turkey; it’s a game-changer. Trust me, once you experience the even cooking, the crispy skin, and the dramatically reduced cooking time, you’ll never go back to roasting a turkey the traditional way again. It’s a must-try for anyone looking to elevate their holiday feast or simply enjoy a delicious, juicy turkey any time of the year.
Think about it: no more dry breast meat! No more wrestling with a giant bird for hours! This method ensures that every part of the turkey cooks evenly, resulting in a succulent and flavorful centerpiece that will impress your family and friends. The flattened shape allows for maximum skin exposure, leading to that coveted golden-brown, crispy perfection we all crave.
But the best part? It’s surprisingly easy! Don’t let the term “spatchcock” intimidate you. With a good pair of kitchen shears and a little bit of confidence, you’ll be able to master this technique in no time. And the results are so worth the effort.
Now, let’s talk about serving suggestions and variations. While this recipe is fantastic as is, there’s always room for customization! For a classic Thanksgiving or Christmas dinner, serve your spatchcock turkey with all the traditional fixings: creamy mashed potatoes, savory stuffing, tangy cranberry sauce, and rich gravy. But don’t be afraid to get creative!
Consider basting the turkey with different flavor combinations. A honey-garlic glaze would add a touch of sweetness and depth, while a lemon-herb marinade would create a bright and zesty flavor profile. You could even experiment with different spice rubs, such as a smoky paprika blend or a spicy Cajun mix.
And the sides? The possibilities are endless! Roasted root vegetables, green bean casserole, sweet potato pie the choice is yours. I personally love pairing this spatchcock turkey with a wild rice pilaf and some roasted Brussels sprouts with bacon. The nutty flavors of the rice and the salty-sweetness of the Brussels sprouts complement the richness of the turkey perfectly.
Another great variation is to smoke your spatchcock turkey. The smoky flavor adds a whole new dimension to the dish and creates a truly unforgettable experience. Just be sure to adjust the cooking time accordingly and monitor the internal temperature closely.
Don’t forget about the leftovers! Spatchcock turkey is fantastic in sandwiches, salads, soups, and even tacos. Get creative and use up every last bit of that delicious bird. I love making turkey pot pie with the leftover meat and vegetables. It’s a comforting and satisfying meal that’s perfect for a chilly evening.
So, what are you waiting for? Grab your kitchen shears, gather your ingredients, and give this Spatchcock Turkey recipe a try. I promise you won’t be disappointed. It’s a simple yet impressive way to cook a turkey that will leave everyone wanting more.
I’m so excited for you to experience the joy of cooking a spatchcock turkey! Once you’ve tried it, I’d love to hear about your experience. Share your photos, your tips, and your variations in the comments below. Let’s create a community of spatchcock turkey enthusiasts! Happy cooking!
Spatchcock Turkey: The Ultimate Guide to a Juicy, Fast-Cooked Bird
Perfectly cooked, juicy spatchcock turkey with crispy skin, infused with flavorful herbs and spices.
Ingredients
- 1 (12-14 pound) whole turkey, thawed
- 1/4 cup kosher salt
- 2 tablespoons freshly ground black pepper
- 2 tablespoons garlic powder
- 2 tablespoons onion powder
- 1 tablespoon dried thyme
- 1 tablespoon dried rosemary
- 1 tablespoon smoked paprika
- 1 teaspoon cayenne pepper (optional)
- 1/2 cup olive oil
- 1 large onion, quartered
- 2 carrots, roughly chopped
- 2 celery stalks, roughly chopped
- 4 cloves garlic, smashed
- 2 cups chicken broth
- 1/2 cup dry white wine (optional)
- Fresh herbs (rosemary, thyme, sage) for garnish (optional)
Instructions
- Prepare Your Workspace: Make sure you have a clean, large cutting board. It’s also a good idea to have some paper towels handy for wiping down surfaces and your hands.
- Remove Giblets and Neck: Take the turkey out of its packaging and remove the giblets and neck from the cavity. These are usually in a small bag. You can save these for making gravy later! Rinse the turkey inside and out with cold water and pat it completely dry with paper towels. This is crucial for crispy skin!
- Locate the Backbone: Place the turkey breast-side down on the cutting board. You’ll see the backbone running down the center.
- Cut Out the Backbone: Using a pair of heavy-duty kitchen shears (poultry shears are ideal), cut along one side of the backbone, starting at the tail end. You’ll need to apply some pressure. Work your way up, cutting through the ribs.
- Repeat on the Other Side: Now, cut along the other side of the backbone, again starting at the tail end. You should now be able to remove the entire backbone. You can save this to add flavor to your gravy or stock.
- Flatten the Turkey: Flip the turkey over so it’s breast-side up. Press down firmly on the breastbone to flatten the turkey. You might hear a crack that’s normal! You want the turkey to lay as flat as possible.
- Combine Dry Ingredients: In a small bowl, combine the kosher salt, black pepper, garlic powder, onion powder, dried thyme, dried rosemary, smoked paprika, and cayenne pepper (if using).
- Add Olive Oil: Pour the olive oil into the bowl with the dry ingredients.
- Mix Well: Mix everything together until it forms a paste. The olive oil helps the spices adhere to the turkey and also contributes to the crispy skin.
- Apply the Rub: Using your hands, generously rub the spice mixture all over the turkey, including under the skin of the breast and thighs. This is important for maximum flavor penetration. Don’t be shy use all of the rub!
- Massage the Rub In: Really massage the rub into the turkey, ensuring it’s evenly distributed.
- Rest the Turkey (Optional): For even better flavor, you can let the turkey rest in the refrigerator for at least 4 hours, or even overnight. This allows the flavors to meld and penetrate the meat even further. If you’re short on time, you can skip this step, but I highly recommend it if you have the time.
- Prepare the Roasting Pan: Preheat your oven to 425°F (220°C). Place the quartered onion, chopped carrots, chopped celery, and smashed garlic cloves in the bottom of a large roasting pan. These vegetables will add flavor to the drippings and help keep the turkey from sticking to the pan.
- Add Chicken Broth and Wine: Pour the chicken broth and white wine (if using) into the bottom of the roasting pan. This will create steam and help keep the turkey moist during cooking.
- Place Turkey in Roasting Pan: Place the turkey, breast-side up, on top of the vegetables in the roasting pan.
- Roast at High Heat: Roast the turkey at 425°F (220°C) for the first 30 minutes. This high heat helps to crisp up the skin.
- Reduce Heat: After 30 minutes, reduce the oven temperature to 325°F (160°C).
- Continue Roasting: Continue roasting the turkey for approximately 1 1/2 to 2 hours, or until a meat thermometer inserted into the thickest part of the thigh registers 165°F (74°C). The exact cooking time will depend on the size of your turkey and your oven.
- Basting (Optional): Basting the turkey with the pan juices every 30 minutes or so can help keep it moist and add flavor. However, be careful not to open the oven too frequently, as this can lower the temperature and increase the cooking time.
- Check for Doneness: Use a meat thermometer to check the internal temperature of the turkey. Insert the thermometer into the thickest part of the thigh, being careful not to touch the bone. The turkey is done when the thermometer registers 165°F (74°C). You can also check the temperature in the breast, which should be at least 160°F (71°C).
- If Skin is Browning Too Quickly: If the skin starts to brown too quickly, you can tent the turkey with aluminum foil. This will help prevent it from burning.
- Rest the Turkey: Once the turkey is cooked, remove it from the oven and let it rest for at least 20-30 minutes before carving. Tent it loosely with aluminum foil to keep it warm. This resting period is essential for juicy meat!
- Prepare to Carve: Transfer the turkey to a large cutting board.
- Remove the Legs: Using a sharp carving knife, cut through the skin and joint connecting the leg to the body. Pull the leg away from the body and cut through the remaining joint to detach it completely. Repeat on the other side.
- Separate the Thigh and Drumstick: Place each leg on the cutting board and locate the joint connecting the thigh and drumstick. Cut through the joint to separate them.
- Slice the Thigh Meat: Slice the thigh meat against the grain into thin, even slices.
- Slice the Drumstick Meat: Hold the drumstick upright and slice the meat down along the bone.
- Carve the Breast: Locate the breastbone and slice down along one side of the breastbone to remove the entire breast. Repeat on the other side.
- Slice the Breast Meat: Place each breast on the cutting board and slice it against the grain into thin, even slices.
- Arrange and Serve: Arrange the carved turkey on a platter and garnish with fresh herbs, if desired. Serve immediately and enjoy!
Notes
- Spatchcocking the turkey ensures even cooking and crispy skin.
- Patting the turkey dry before applying the rub is crucial for crispy skin.
- Resting the turkey after cooking allows the juices to redistribute, resulting in a more tender and flavorful bird.
- The cayenne pepper is optional for a little kick.
- Resting the turkey with the rub on it in the refrigerator for at least 4 hours, or even overnight, allows the flavors to meld and penetrate the meat even further.

Leave a Comment