

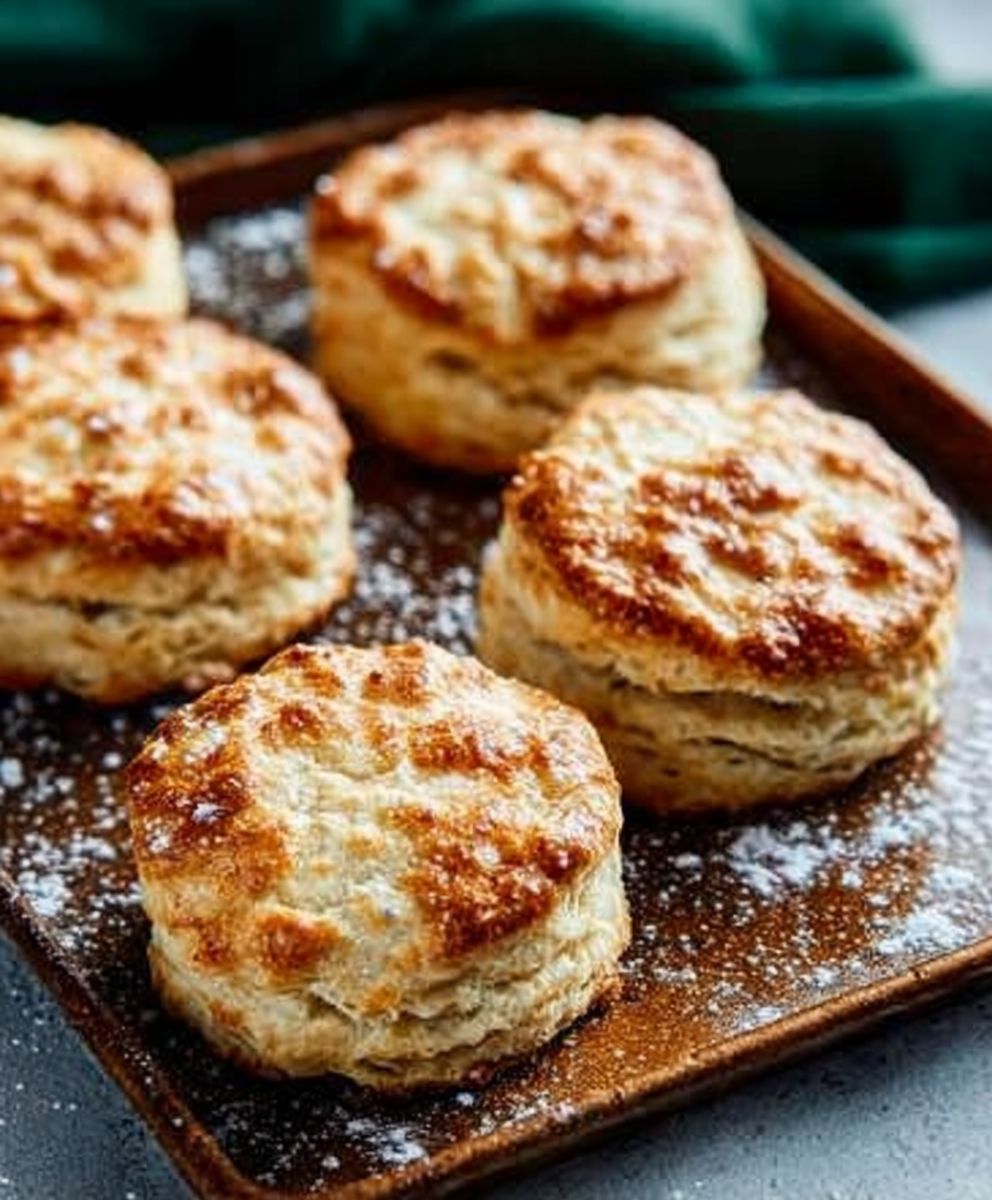
Buttermilk Biscuits: Is there anything that evokes feelings of warmth and comfort quite like a freshly baked biscuit, straight from the oven? I think not! These golden-brown beauties, with their flaky layers and slightly tangy flavor, are a true testament to the magic of simple ingredients.
The history of biscuits in America is a rich one, deeply intertwined with Southern culinary traditions. They evolved from hardtack, a staple food for sailors and pioneers, into the soft, fluffy delights we know and love today. Buttermilk, a byproduct of churning butter, became a key ingredient, adding a subtle tang and contributing to the biscuit’s tender crumb.
What is it about buttermilk biscuits that makes them so irresistible? Perhaps it’s the satisfying contrast between the crisp exterior and the soft, pillowy interior. Or maybe it’s the versatility they’re perfect slathered with butter and jam for breakfast, served alongside a hearty stew for dinner, or even transformed into a delicious sandwich. Whatever the reason, these biscuits are a guaranteed crowd-pleaser. I am excited to share my favorite recipe with you, so you can experience the joy of baking (and eating!) these classic treats yourself.

Ingredients:
- 2 cups all-purpose flour, plus more for dusting
- 1 tablespoon baking powder
- 1 teaspoon baking soda
- 1 teaspoon salt
- 1/2 cup (1 stick) cold unsalted butter, cut into small cubes
- 3/4 cup cold buttermilk, plus more for brushing
- 2 tablespoons honey (optional, for a touch of sweetness)
Preparing the Dough: The Key to Flaky Biscuits
Okay, let’s get started! The secret to amazing buttermilk biscuits is keeping everything cold. Seriously, cold, cold, cold. This prevents the butter from melting into the flour, which is what creates those beautiful, flaky layers we all crave.
- Combine the Dry Ingredients: In a large bowl, whisk together the 2 cups of all-purpose flour, 1 tablespoon of baking powder, 1 teaspoon of baking soda, and 1 teaspoon of salt. Make sure everything is well combined. This ensures even rising and flavor distribution.
- Cut in the Butter: This is where the magic happens. Add the 1/2 cup (1 stick) of cold, cubed butter to the flour mixture. Now, you have a few options here. You can use a pastry blender, which is specifically designed for this task. Or, you can use two forks. Or, if you’re careful and quick, you can even use your fingers. The goal is to cut the butter into the flour until the mixture resembles coarse crumbs. You should still see small pieces of butter, about the size of peas. Don’t overmix! Overmixing will develop the gluten in the flour, resulting in tough biscuits.
- Add the Buttermilk: Gradually add the 3/4 cup of cold buttermilk to the flour and butter mixture. Stir gently with a fork until just combined. The dough will be shaggy and a little sticky, and that’s perfectly fine. Don’t overmix! I can’t stress this enough. Overmixing is the enemy of flaky biscuits. If you’re using honey, add it along with the buttermilk.
- Turn Out the Dough: Lightly flour a clean work surface. Gently turn the dough out onto the floured surface.
Shaping and Cutting: Creating Those Perfect Rounds
Now that we have our dough, it’s time to shape it into those classic biscuit rounds. Again, be gentle! We want to preserve those precious layers of butter.
- Pat and Fold: Gently pat the dough into a rectangle about 3/4 inch to 1 inch thick. Don’t roll it! Rolling will compress the layers. Fold the dough in thirds, like you’re folding a letter. This creates even more layers.
- Repeat: Gently pat the dough into a rectangle again, and fold it in thirds again. Repeat this process one more time. This folding technique is what gives the biscuits their incredible height and flakiness.
- Final Pat: After the final fold, gently pat the dough into a rectangle about 3/4 inch to 1 inch thick.
- Cut Out the Biscuits: Use a 2-inch or 2.5-inch biscuit cutter to cut out the biscuits. Press straight down and lift straight up. Don’t twist the cutter! Twisting seals the edges and prevents the biscuits from rising properly. If you don’t have a biscuit cutter, you can use a sharp knife to cut the dough into squares or rectangles.
- Re-roll Scraps (Sparingly): Gently gather the scraps of dough and pat them into a rectangle. Cut out more biscuits. Be aware that these biscuits won’t be as tender or flaky as the first ones, as the gluten has been worked more. Try to minimize the amount of re-rolling you do.
Baking: Achieving Golden Perfection
Almost there! Now it’s time to bake these beauties to golden perfection. Proper oven temperature and placement are key.
- Preheat the Oven: Preheat your oven to 450°F (232°C). Make sure your oven is fully preheated before you put the biscuits in.
- Prepare the Baking Sheet: Line a baking sheet with parchment paper. This prevents the biscuits from sticking and makes cleanup a breeze.
- Arrange the Biscuits: Place the biscuits on the prepared baking sheet, leaving about 1 inch of space between each biscuit. This allows for even air circulation and browning.
- Brush with Buttermilk (Optional): For a beautiful golden-brown crust, brush the tops of the biscuits with a little buttermilk. You can also use melted butter or heavy cream.
- Bake: Bake for 12-15 minutes, or until the biscuits are golden brown and have risen nicely. Keep a close eye on them, as baking times can vary depending on your oven.
- Cool Slightly: Let the biscuits cool on the baking sheet for a few minutes before transferring them to a wire rack to cool completely.
Serving: Enjoying Your Homemade Biscuits
And there you have it! Freshly baked, homemade buttermilk biscuits. These are best enjoyed warm, straight from the oven. Here are a few serving suggestions:
- With Butter and Jam: A classic combination!
- With Honey: A simple and delicious treat.
- With Sausage Gravy: A Southern staple.
- As a Sandwich: Fill them with your favorite breakfast meats, eggs, and cheese.
- Alongside Soup or Chili: Perfect for dipping.
Tips for Success:
- Keep everything cold! This is the most important tip.
- Don’t overmix the dough! Overmixing develops the gluten and results in tough biscuits.
- Use high-quality ingredients! The better the ingredients, the better the biscuits.
- Don’t twist the biscuit cutter! This seals the edges and prevents the biscuits from rising properly.
- Bake in a hot oven! This helps the biscuits rise quickly and evenly.
Enjoy your delicious, homemade buttermilk biscuits! I hope you love them as much as I do.
Conclusion:
And there you have it! These aren’t just any biscuits; they’re Buttermilk Biscuits that will redefine your understanding of comfort food. From the satisfying crack of the golden crust to the soft, pillowy interior, every bite is a little piece of heaven. I truly believe this recipe is a must-try because it delivers that perfect balance of simplicity and incredible flavor. It’s the kind of recipe that becomes a family favorite, passed down through generations.
But why is it a must-try? Well, beyond the incredible taste, it’s surprisingly easy to make. Forget complicated techniques and long ingredient lists. This recipe uses simple ingredients you probably already have in your pantry, and the steps are straightforward and easy to follow, even for beginner bakers. Plus, the results are consistently amazing. You’ll be pulling warm, fragrant biscuits from the oven in no time, ready to impress your family and friends.
But the real magic lies in the buttermilk. It adds a subtle tang and richness that elevates these biscuits to a whole new level. It also helps to create that incredibly tender crumb that melts in your mouth. Trust me, once you’ve tasted a buttermilk biscuit made from scratch, you’ll never go back to the store-bought kind.
Now, let’s talk about serving suggestions and variations because the possibilities are endless! Of course, they’re fantastic served warm with a generous slather of butter and your favorite jam or honey. But don’t stop there! These biscuits are also incredible as part of a savory breakfast. Try topping them with scrambled eggs, crispy bacon, and a drizzle of maple syrup for a truly decadent treat.
For a heartier meal, use them to make mini breakfast sandwiches with sausage patties, cheese, and a fried egg. Or, split them open and use them as the base for biscuits and gravy a classic Southern comfort food that’s sure to warm you from the inside out.
If you’re feeling adventurous, you can also experiment with different flavor variations. Add a handful of shredded cheddar cheese and chopped chives to the dough for a savory twist. Or, stir in some blueberries or raspberries for a sweet and fruity treat. You could even add a pinch of cinnamon and nutmeg for a warm and spicy flavor.
Serving Suggestions:
- Warm with butter and jam
- Breakfast sandwiches with eggs, bacon, and cheese
- Biscuits and gravy
- Alongside fried chicken
- With soup or chili
Variations:
- Cheddar cheese and chives
- Blueberries or raspberries
- Cinnamon and nutmeg
- Jalapeño and cheddar
- Everything bagel seasoning
I’m so excited for you to try this recipe and experience the joy of baking your own homemade Buttermilk Biscuits. I know you’ll love them as much as I do. So, gather your ingredients, preheat your oven, and get ready to create some delicious memories.
And most importantly, don’t forget to share your experience! I’d love to hear how your biscuits turned out and what variations you tried. Leave a comment below and let me know what you think. Did you add any special ingredients? What did you serve them with? I’m always looking for new ideas and inspiration. Happy baking! I can’t wait to hear all about your biscuit-baking adventures!
Buttermilk Biscuits: The Ultimate Guide to Fluffy Perfection
Flaky, tender homemade buttermilk biscuits, perfect for breakfast, brunch, or as a side.
Ingredients
- 2 cups all-purpose flour, plus more for dusting
- 1 tablespoon baking powder
- 1 teaspoon baking soda
- 1 teaspoon salt
- 1/2 cup (1 stick) cold unsalted butter, cut into small cubes
- 3/4 cup cold buttermilk, plus more for brushing
- 2 tablespoons honey (optional, for a touch of sweetness)
Instructions
- Combine Dry Ingredients: In a large bowl, whisk together the flour, baking powder, baking soda, and salt.
- Cut in Butter: Add the cold, cubed butter to the flour mixture. Use a pastry blender, two forks, or your fingers to cut the butter into the flour until the mixture resembles coarse crumbs with pea-sized pieces of butter.
- Add Buttermilk: Gradually add the cold buttermilk (and honey, if using) to the flour and butter mixture. Stir gently with a fork until just combined. The dough will be shaggy and a little sticky.
- Turn Out Dough: Lightly flour a clean work surface. Gently turn the dough out onto the floured surface.
- Pat and Fold: Gently pat the dough into a rectangle about 3/4 inch to 1 inch thick. Fold the dough in thirds, like folding a letter.
- Repeat: Gently pat the dough into a rectangle again, and fold it in thirds again. Repeat this process one more time.
- Final Pat: After the final fold, gently pat the dough into a rectangle about 3/4 inch to 1 inch thick.
- Cut Out Biscuits: Use a 2-inch or 2.5-inch biscuit cutter to cut out the biscuits. Press straight down and lift straight up (don’t twist). If you don’t have a biscuit cutter, you can use a sharp knife to cut the dough into squares or rectangles.
- Re-roll Scraps (Sparingly): Gently gather the scraps of dough and pat them into a rectangle. Cut out more biscuits.
- Preheat Oven: Preheat your oven to 450°F (232°C).
- Prepare Baking Sheet: Line a baking sheet with parchment paper.
- Arrange Biscuits: Place the biscuits on the prepared baking sheet, leaving about 1 inch of space between each biscuit.
- Brush with Buttermilk (Optional): For a beautiful golden-brown crust, brush the tops of the biscuits with a little buttermilk.
- Bake: Bake for 12-15 minutes, or until the biscuits are golden brown and have risen nicely.
- Cool Slightly: Let the biscuits cool on the baking sheet for a few minutes before transferring them to a wire rack to cool completely.
Notes
- Keep everything cold! This is the most important tip for flaky biscuits.
- Don’t overmix the dough! Overmixing develops the gluten and results in tough biscuits.
- Use high-quality ingredients! The better the ingredients, the better the biscuits.
- Don’t twist the biscuit cutter! This seals the edges and prevents the biscuits from rising properly.
- Bake in a hot oven! This helps the biscuits rise quickly and evenly.

Leave a Comment