

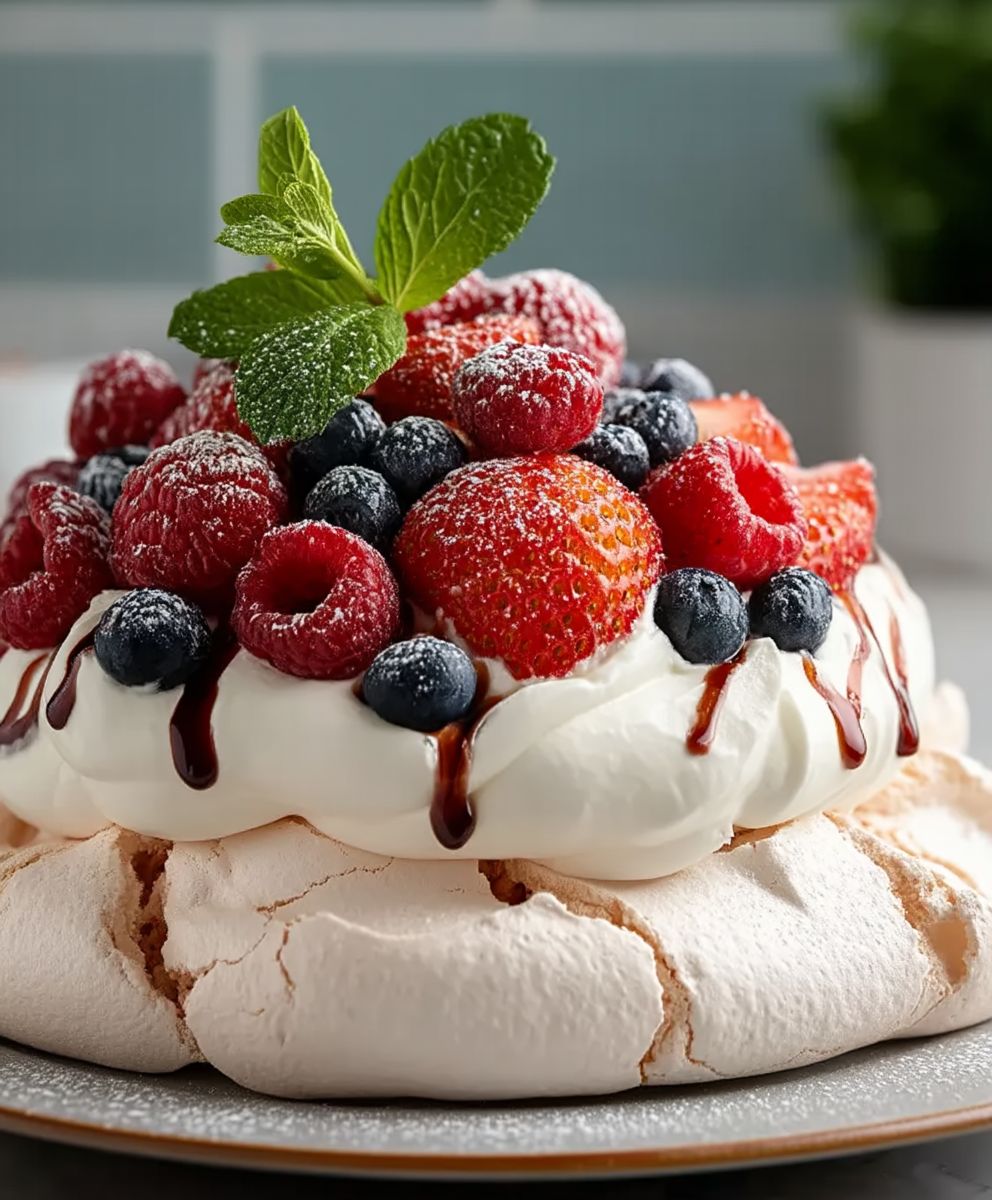
Berry Pavlova: a cloud of meringue, a swirl of whipped cream, and a crown of glistening berries. Is there a dessert more evocative of summer celebrations? I think not! This show-stopping dessert isn’t just beautiful; it’s a delightful dance of textures and flavors that will have your guests begging for more.
The Pavlova, named in honor of the Russian ballerina Anna Pavlova during her tours of Australia and New Zealand in the 1920s, has a contested origin, with both countries claiming its invention. Regardless of its true birthplace, the Pavlova has become a beloved dessert in both nations and beyond, symbolizing elegance and festivity. Its airy meringue base, crisp on the outside and marshmallowy within, provides the perfect canvas for the rich cream and the burst of fresh, juicy berries.
What makes the Berry Pavlova so irresistible? It’s the symphony of textures the delicate crunch of the meringue, the smooth coolness of the whipped cream, and the juicy pop of the berries. The sweetness is perfectly balanced by the tartness of the fruit, creating a dessert that is both decadent and refreshing. Plus, while it looks impressive, a Berry Pavlova is surprisingly simple to assemble, making it an ideal choice for both experienced bakers and those new to the world of meringue. So, let’s dive in and create this stunning dessert together!

Ingredients:
- For the Meringue:
- 6 large egg whites, at room temperature
- 1 ½ cups (300g) granulated sugar
- 1 teaspoon cornstarch
- 1 teaspoon white vinegar
- ½ teaspoon vanilla extract
- For the Whipped Cream:
- 2 cups (480ml) heavy cream, cold
- ¼ cup (30g) powdered sugar
- 1 teaspoon vanilla extract
- For the Berry Topping:
- 2 cups mixed berries (strawberries, raspberries, blueberries, blackberries), washed and dried
- 2 tablespoons powdered sugar (optional, for dusting berries)
- Fresh mint leaves, for garnish (optional)
Preparing the Meringue:
- Preheat and Prepare: First things first, preheat your oven to 250°F (120°C). This low temperature is key for drying out the meringue, not baking it. Line a large baking sheet with parchment paper. Trust me, parchment paper is your best friend here; it prevents sticking.
- Whip the Egg Whites: In a clean, grease-free bowl (stainless steel or glass works best), beat the egg whites with an electric mixer on medium speed until soft peaks form. Soft peaks mean the tips of the egg whites curl over when you lift the beaters. This is a crucial step, so take your time and make sure your bowl and beaters are spotless. Any trace of grease can prevent the egg whites from whipping properly.
- Gradually Add Sugar: Now, here’s the trick to a glossy, stable meringue: gradually add the granulated sugar, about a tablespoon at a time, while continuing to beat on medium speed. Make sure each addition of sugar is fully incorporated before adding the next. This process can take about 5-7 minutes, but it’s worth it. You’ll know it’s ready when the meringue is thick, glossy, and the sugar is completely dissolved. To test, rub a little of the meringue between your fingers; it should feel smooth, not gritty.
- Add Cornstarch, Vinegar, and Vanilla: Once the sugar is fully incorporated, reduce the mixer speed to low and add the cornstarch, white vinegar, and vanilla extract. Beat until just combined. The cornstarch helps stabilize the meringue, the vinegar adds a bit of tang and helps with the texture, and the vanilla extract adds a lovely flavor.
- Shape the Meringue: Now for the fun part! Spoon the meringue onto the prepared baking sheet, forming a circle about 8-9 inches in diameter. You can create a slight well in the center to hold the whipped cream and berries later. Alternatively, you can pipe the meringue using a piping bag fitted with a large round tip for a more decorative look. If you don’t have a piping bag, a large zip-top bag with a corner snipped off will work in a pinch. Don’t worry about making it perfect; the rustic look is part of the charm of a pavlova.
Baking the Meringue:
- Bake Low and Slow: Place the baking sheet in the preheated oven and immediately reduce the oven temperature to 200°F (95°C). This is important! We want to dry the meringue, not bake it. Bake for 60-75 minutes, or until the meringue is dry to the touch and sounds hollow when you gently tap it. The baking time can vary depending on your oven, so keep an eye on it.
- Cool Completely: Once the meringue is done, turn off the oven and crack the oven door slightly. Let the meringue cool completely in the oven for at least 2 hours, or even better, overnight. This slow cooling process prevents cracking. Resist the urge to open the oven door completely, as the sudden temperature change can cause the meringue to collapse.
- Handle with Care: Once the meringue is completely cool, carefully remove it from the baking sheet. It will be delicate, so handle it with care. Don’t worry if it cracks a little; that’s perfectly normal.
Preparing the Whipped Cream:
- Chill Everything: Make sure your heavy cream, bowl, and beaters are all well-chilled. This is essential for achieving a stable whipped cream. I like to put my bowl and beaters in the freezer for about 15 minutes before whipping.
- Whip the Cream: Pour the cold heavy cream into the chilled bowl and beat with an electric mixer on medium speed until soft peaks form.
- Add Sugar and Vanilla: Gradually add the powdered sugar and vanilla extract, and continue to beat until stiff peaks form. Stiff peaks mean the tips of the whipped cream stand straight up when you lift the beaters. Be careful not to overwhip, as this can turn the cream into butter.
- Keep it Cold: If you’re not using the whipped cream immediately, store it in the refrigerator until ready to assemble the pavlova.
Assembling the Berry Pavlova:
- Prepare the Berries: Gently wash and dry your mixed berries. If using large strawberries, you can slice them in half or quarters.
- Assemble Just Before Serving: This is important! Assemble the pavlova just before serving to prevent the meringue from becoming soggy.
- Spoon on the Whipped Cream: Carefully spoon the whipped cream into the center of the meringue, filling the well you created earlier.
- Arrange the Berries: Arrange the mixed berries on top of the whipped cream in a decorative pattern.
- Dust with Powdered Sugar (Optional): If desired, lightly dust the berries with powdered sugar for a touch of sweetness and visual appeal.
- Garnish (Optional): Garnish with fresh mint leaves for a pop of color and freshness.
- Serve Immediately: Serve the pavlova immediately and enjoy! The meringue will start to soften over time, so it’s best to eat it soon after assembling.
Conclusion:
This Berry Pavlova isn’t just a dessert; it’s an experience. The crisp meringue shell, the cloud-like whipped cream, and the burst of fresh, juicy berries create a symphony of textures and flavors that will leave you and your guests utterly delighted. It’s a showstopper that’s surprisingly simple to make, and the wow factor is off the charts. Trust me, once you’ve tasted this ethereal treat, you’ll understand why it’s a must-try for any special occasion, or even just a delightful weekend indulgence.
But the best part? This recipe is incredibly versatile. While I’ve highlighted a classic berry combination, feel free to get creative with your toppings! Imagine a tropical pavlova with mango, kiwi, and passionfruit, or a decadent chocolate version with shaved dark chocolate and a drizzle of chocolate sauce. For a more autumnal twist, try poached pears and a sprinkle of cinnamon. The possibilities are truly endless, so let your imagination run wild and create a pavlova that perfectly suits your taste and the season.
Beyond the toppings, you can also play around with the meringue itself. A touch of vanilla extract adds a warm, comforting note, while a pinch of almond extract can elevate the flavor profile to something truly special. You can even add a swirl of food coloring to the meringue before baking for a visually stunning effect.
When it comes to serving, this Berry Pavlova is best enjoyed soon after assembly to maintain the crispness of the meringue. However, you can prepare the meringue shell and whipped cream in advance and assemble everything just before serving. A light dusting of powdered sugar adds a touch of elegance, and a sprig of mint provides a refreshing contrast to the sweetness.
Consider serving individual pavlovas for a more elegant presentation. Simply pipe smaller meringue nests onto your baking sheet and top each one with whipped cream and berries. This is a great option for parties or gatherings where you want to impress your guests with a beautiful and delicious dessert.
Don’t be intimidated by the meringue! With a few simple tips and tricks, you’ll be whipping up perfect pavlovas in no time. Remember to use a clean, grease-free bowl and whisk, and be patient while the meringue bakes. The low and slow baking process is key to achieving that signature crisp exterior and marshmallowy interior.
I truly believe that everyone should experience the joy of making and eating a homemade pavlova. It’s a dessert that’s both impressive and approachable, and it’s guaranteed to bring a smile to your face. So, gather your ingredients, preheat your oven, and get ready to embark on a culinary adventure.
I’m so excited for you to try this recipe! And more importantly, I’m eager to hear about your experience. Did you stick to the classic berry combination, or did you create your own unique twist? What were your favorite toppings? What tips and tricks did you discover along the way? Please, share your photos and stories in the comments below. I can’t wait to see your beautiful creations and learn from your experiences. Happy baking! Let me know if you have any questions, I’m always happy to help.
Berry Pavlova: A Delicious & Easy Recipe
Light and airy pavlova topped with fresh whipped cream and vibrant mixed berries. A stunning and delicious dessert!
Ingredients
- 6 large egg whites, at room temperature
- 1 ½ cups (300g) granulated sugar
- 1 teaspoon cornstarch
- 1 teaspoon white vinegar
- ½ teaspoon vanilla extract
- 2 cups (480ml) heavy cream, cold
- ¼ cup (30g) powdered sugar
- 1 teaspoon vanilla extract
- 2 cups mixed berries (strawberries, raspberries, blueberries, blackberries), washed and dried
- 2 tablespoons powdered sugar (optional, for dusting berries)
- Fresh mint leaves, for garnish (optional)
Instructions
- Preheat your oven to 250°F (120°C). Line a large baking sheet with parchment paper.
- In a clean, grease-free bowl, beat the egg whites with an electric mixer on medium speed until soft peaks form.
- Gradually add the granulated sugar, about a tablespoon at a time, while continuing to beat on medium speed. Make sure each addition of sugar is fully incorporated before adding the next. Beat until the meringue is thick, glossy, and the sugar is completely dissolved (about 5-7 minutes).
- Reduce the mixer speed to low and add the cornstarch, white vinegar, and vanilla extract. Beat until just combined.
- Spoon the meringue onto the prepared baking sheet, forming a circle about 8-9 inches in diameter. Create a slight well in the center. Alternatively, pipe the meringue using a piping bag fitted with a large round tip.
- Place the baking sheet in the preheated oven and immediately reduce the oven temperature to 200°F (95°C). Bake for 60-75 minutes, or until the meringue is dry to the touch and sounds hollow when you gently tap it.
- Once the meringue is done, turn off the oven and crack the oven door slightly. Let the meringue cool completely in the oven for at least 2 hours, or even better, overnight.
- Once the meringue is completely cool, carefully remove it from the baking sheet.
- Make sure your heavy cream, bowl, and beaters are all well-chilled.
- Pour the cold heavy cream into the chilled bowl and beat with an electric mixer on medium speed until soft peaks form.
- Gradually add the powdered sugar and vanilla extract, and continue to beat until stiff peaks form. Be careful not to overwhip.
- If you’re not using the whipped cream immediately, store it in the refrigerator until ready to assemble the pavlova.
- Gently wash and dry your mixed berries. If using large strawberries, you can slice them in half or quarters.
- Assemble the pavlova just before serving to prevent the meringue from becoming soggy.
- Carefully spoon the whipped cream into the center of the meringue, filling the well you created earlier.
- Arrange the mixed berries on top of the whipped cream in a decorative pattern.
- If desired, lightly dust the berries with powdered sugar for a touch of sweetness and visual appeal.
- Garnish with fresh mint leaves for a pop of color and freshness.
- Serve the pavlova immediately and enjoy!
Notes
- Make sure your bowl and beaters are completely clean and grease-free when whipping the egg whites.
- Adding the sugar gradually is key to a stable and glossy meringue.
- Baking the meringue at a low temperature is essential for drying it out without browning.
- Cooling the meringue slowly in the oven prevents cracking.
- Assemble the pavlova just before serving to prevent the meringue from becoming soggy.
Leave a Comment