

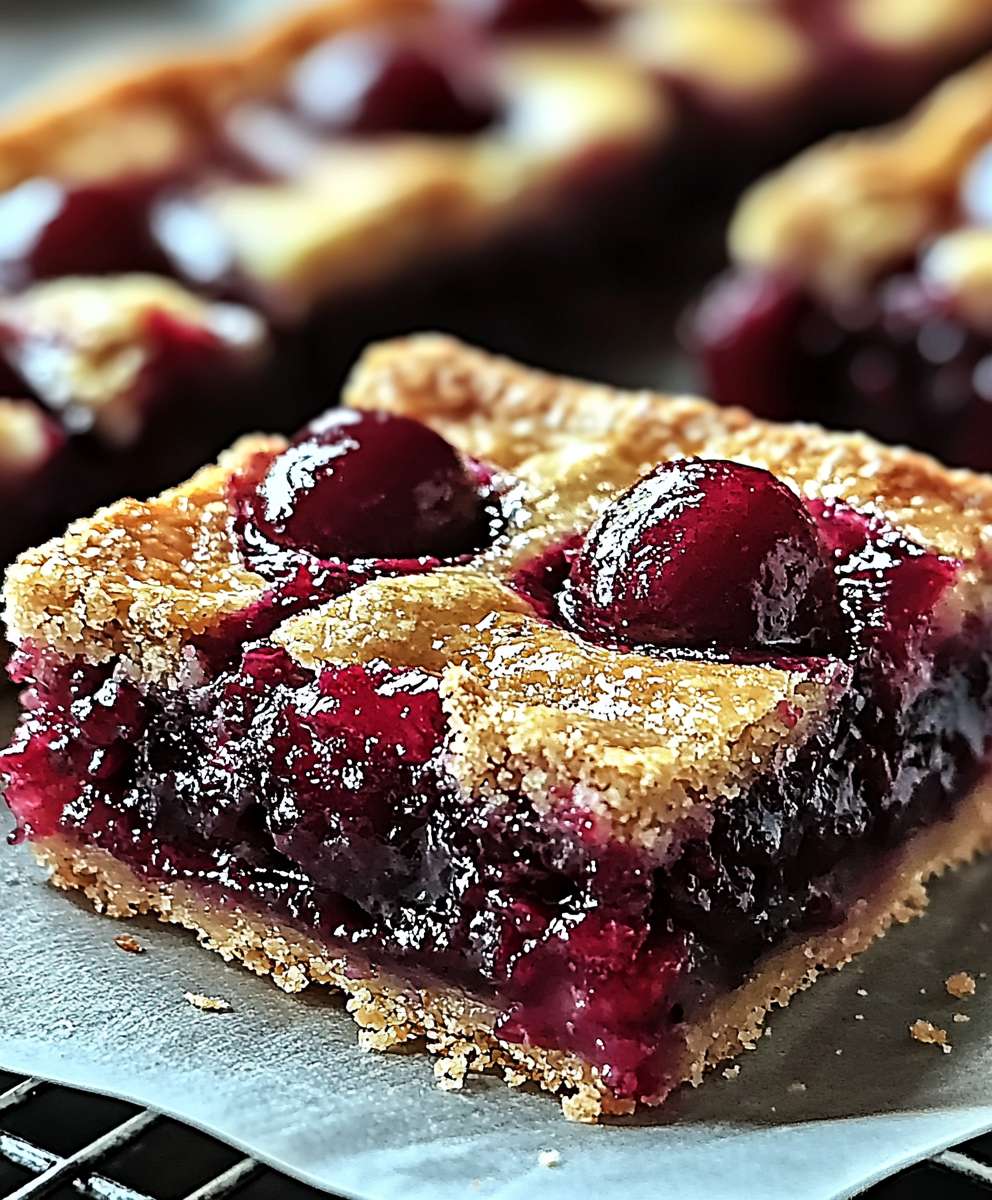
Cherry Pie Bars: Prepare to be captivated by a dessert that perfectly marries the comforting nostalgia of cherry pie with the effortless charm of a bar cookie! Imagine biting into a buttery, crumbly crust, giving way to a luscious, sweet-tart cherry filling that practically bursts with flavor. This isn’t just a recipe; it’s an invitation to experience a slice of Americana, reimagined for the modern baker.
Cherry pie, in its classic form, has deep roots in American culinary tradition, often associated with heartwarming family gatherings and celebratory occasions. While the exact origins are debated, cherry pies have been a beloved dessert in the United States since the 1800s, evolving from simple fruit tarts to the iconic, lattice-topped masterpieces we know and love. But let’s be honest, sometimes we crave that familiar flavor without the fuss of rolling out a perfect pie crust.
That’s where these delightful Cherry Pie Bars come in! People adore this version because it captures the essence of cherry pie that irresistible combination of sweet and tangy cherries nestled in a buttery embrace but in a fraction of the time and with minimal effort. The bars are incredibly convenient for potlucks, bake sales, or simply satisfying a sweet craving on a busy weeknight. Plus, the portable nature of these bars makes them a perfect treat for picnics and on-the-go snacking. The taste? Pure bliss. The texture? A delightful contrast of crumbly crust and juicy filling. What’s not to love?

Ingredients:
- For the Crust:
- 2 ½ cups all-purpose flour
- 1 teaspoon salt
- 1 cup (2 sticks) cold unsalted butter, cut into cubes
- ½ cup cold vegetable shortening, cut into cubes
- 6-8 tablespoons ice water
- For the Cherry Filling:
- 4 cups pitted fresh or frozen (thawed) sweet cherries
- ¾ cup granulated sugar
- ¼ cup cornstarch
- 2 tablespoons lemon juice
- 1 teaspoon almond extract
- Pinch of salt
- For the Crumble Topping:
- 1 cup all-purpose flour
- ½ cup packed light brown sugar
- ½ cup rolled oats
- ½ teaspoon ground cinnamon
- ½ cup (1 stick) cold unsalted butter, cut into cubes
- Optional:
- Turbinado sugar, for sprinkling
- Powdered sugar, for dusting
Preparing the Crust:
- In a large bowl, whisk together the flour and salt. This ensures the salt is evenly distributed throughout the crust, which is crucial for flavor.
- Add the cold butter and shortening to the flour mixture. Using a pastry blender or your fingertips, cut the butter and shortening into the flour until the mixture resembles coarse crumbs. The key here is to work quickly and keep the butter cold. If the butter melts, the crust will be tough. You should see small pea-sized pieces of butter remaining. These pockets of butter will create flaky layers in the crust as they melt during baking.
- Gradually add the ice water, one tablespoon at a time, mixing gently after each addition. Continue adding water until the dough just comes together. Be careful not to overmix, as this will develop the gluten in the flour and result in a tough crust. The dough should be slightly shaggy but hold together when pressed.
- Divide the dough in half. Flatten each half into a disc, wrap in plastic wrap, and refrigerate for at least 30 minutes. This chilling time is essential. It allows the gluten to relax, making the dough easier to roll out, and it also allows the butter to firm up, which will contribute to a flakier crust. You can chill the dough for up to 2 days.
Making the Cherry Filling:
- In a large saucepan, combine the cherries, granulated sugar, cornstarch, lemon juice, almond extract, and salt. The cornstarch acts as a thickener, preventing the filling from becoming too runny. The lemon juice brightens the flavor and balances the sweetness of the cherries. The almond extract complements the cherry flavor beautifully.
- Cook over medium heat, stirring constantly, until the mixture thickens and the cherries release their juices. This usually takes about 5-7 minutes. The filling should be glossy and slightly translucent. Make sure to stir constantly to prevent the cornstarch from clumping and burning on the bottom of the pan.
- Remove from heat and set aside to cool slightly while you prepare the crumble topping and assemble the bars. Letting the filling cool slightly will prevent it from making the crust soggy.
Preparing the Crumble Topping:
- In a medium bowl, combine the flour, brown sugar, rolled oats, and cinnamon. The brown sugar adds a caramel-like flavor to the topping, while the oats provide a nice texture. The cinnamon complements both the cherries and the brown sugar.
- Add the cold butter and cut it into the dry ingredients using a pastry blender or your fingertips until the mixture resembles coarse crumbs. Again, work quickly to keep the butter cold. The crumble topping should have a slightly clumpy texture.
Assembling and Baking the Cherry Pie Bars:
- Preheat your oven to 375°F (190°C). Line a 9×13 inch baking pan with parchment paper, leaving an overhang on the sides. This will make it easy to lift the bars out of the pan after baking.
- On a lightly floured surface, roll out one disc of dough to fit the bottom of the prepared baking pan. Transfer the dough to the pan and press it evenly into the bottom and slightly up the sides. If the dough tears, simply patch it together with your fingers.
- Dock the crust with a fork several times. This prevents the crust from puffing up during baking.
- Bake the crust for 12-15 minutes, or until lightly golden brown. This par-baking helps to ensure that the bottom crust is fully cooked and prevents it from becoming soggy.
- Remove the crust from the oven and let it cool slightly.
- Pour the cherry filling evenly over the par-baked crust.
- Sprinkle the crumble topping evenly over the cherry filling.
- Roll out the second disc of dough. You can either place it as a whole sheet on top of the crumble, or cut it into strips and arrange them in a lattice pattern. If you choose the lattice pattern, gently press the edges of the strips onto the bottom crust to seal.
- If desired, sprinkle the top with turbinado sugar for extra sparkle and crunch.
- Bake for 30-35 minutes, or until the topping is golden brown and the filling is bubbly. If the topping starts to brown too quickly, tent the pan with aluminum foil.
- Let the bars cool completely in the pan before lifting them out using the parchment paper overhang. Cooling completely is crucial for the filling to set properly.
- Cut into bars and dust with powdered sugar, if desired.
Tips for Success:
- Keep the ingredients cold: Cold butter and shortening are essential for a flaky crust and a crumbly topping.
- Don’t overmix the dough: Overmixing develops the gluten in the flour, resulting in a tough crust.
- Par-bake the crust: This helps to prevent a soggy bottom crust.
- Let the bars cool completely: This allows the filling to set properly.
- Use high-quality cherries: The flavor of the cherries will greatly impact the overall taste of the bars.
Variations:
- Add nuts: Add chopped pecans or walnuts to the crumble topping for extra flavor and texture.
- Use different fruit: Substitute other fruits, such as blueberries, raspberries, or peaches, for the cherries. Adjust the sugar and lemon juice accordingly.
- Add spices: Experiment with different spices, such as nutmeg, ginger, or cardamom, in the crumble topping or cherry filling.
- Make it gluten-free: Use a gluten-free flour blend in the crust and crumble topping.
Enjoy your delicious homemade Cherry Pie Bars!
Conclusion:
And there you have it! These Cherry Pie Bars are truly a must-try for anyone who loves the classic flavor of cherry pie but wants a quicker, easier, and more portable treat. Forget spending hours crimping crusts and worrying about soggy bottoms these bars deliver all the deliciousness with a fraction of the effort. The buttery, crumbly crust perfectly complements the sweet and tart cherry filling, creating a symphony of flavors and textures that will have you reaching for seconds (and maybe even thirds!).
But the best part? These bars are incredibly versatile! While they’re fantastic served warm with a scoop of vanilla ice cream or a dollop of whipped cream, they’re equally delightful at room temperature. Imagine packing them in a lunchbox for a sweet midday treat, bringing them to a potluck to impress your friends, or simply enjoying them with a cup of coffee on a lazy Sunday morning.
Looking for some variations? Get creative! Try adding a sprinkle of almond extract to the cherry filling for a richer, more complex flavor. Or, if you’re feeling adventurous, incorporate a layer of cream cheese filling between the crust and the cherries for an extra decadent twist. You could even top the bars with a streusel topping instead of the crumb crust for a different textural experience. Consider adding a hint of cinnamon or nutmeg to the crust for a warm, comforting spice. For a festive touch, drizzle melted white chocolate over the cooled bars and sprinkle with chopped pistachios. The possibilities are endless!
These Cherry Pie Bars are not just a recipe; they’re an invitation to create, experiment, and share joy. They’re perfect for beginner bakers and seasoned pros alike, and they’re guaranteed to be a crowd-pleaser no matter the occasion. I truly believe that once you try this recipe, it will become a staple in your baking repertoire. It’s the perfect balance of simplicity and deliciousness, and it’s sure to satisfy your sweet tooth every time.
So, what are you waiting for? Gather your ingredients, preheat your oven, and get ready to experience the magic of these incredible bars. I promise you won’t be disappointed. And more importantly, I want to hear about your experience! Did you try any of the variations I suggested? Did you add your own special touch? What did your friends and family think?
I encourage you to try this recipe and then come back and share your thoughts in the comments below. Let me know what you loved, what you changed, and any tips or tricks you discovered along the way. Baking is a journey, and I’m excited to share it with you. Let’s spread the love (and the deliciousness) of these amazing Cherry Pie Bars! Happy baking!
Cherry Pie Bars: The Ultimate Guide to Baking Delicious Treats
Flaky cherry pie bars with a sweet cherry filling and buttery crumble topping. Perfect for any occasion!
Ingredients
- 2 ½ cups all-purpose flour
- 1 teaspoon salt
- 1 cup (2 sticks) cold unsalted butter, cut into cubes
- ½ cup cold vegetable shortening, cut into cubes
- 6-8 tablespoons ice water
- 4 cups pitted fresh or frozen (thawed) sweet cherries
- ¾ cup granulated sugar
- ¼ cup cornstarch
- 2 tablespoons lemon juice
- 1 teaspoon almond extract
- Pinch of salt
- 1 cup all-purpose flour
- ½ cup packed light brown sugar
- ½ cup rolled oats
- ½ teaspoon ground cinnamon
- ½ cup (1 stick) cold unsalted butter, cut into cubes
- Turbinado sugar, for sprinkling
- Powdered sugar, for dusting
Instructions
- Prepare the Crust: In a large bowl, whisk together the flour and salt. Add the cold butter and shortening. Using a pastry blender or your fingertips, cut the butter and shortening into the flour until the mixture resembles coarse crumbs. Gradually add the ice water, one tablespoon at a time, mixing gently after each addition, until the dough just comes together. Divide the dough in half. Flatten each half into a disc, wrap in plastic wrap, and refrigerate for at least 30 minutes.
- Make the Cherry Filling: In a large saucepan, combine the cherries, granulated sugar, cornstarch, lemon juice, almond extract, and salt. Cook over medium heat, stirring constantly, until the mixture thickens and the cherries release their juices (about 5-7 minutes). Remove from heat and set aside to cool slightly.
- Prepare the Crumble Topping: In a medium bowl, combine the flour, brown sugar, rolled oats, and cinnamon. Add the cold butter and cut it into the dry ingredients using a pastry blender or your fingertips until the mixture resembles coarse crumbs.
- Assemble and Bake: Preheat oven to 375°F (190°C). Line a 9×13 inch baking pan with parchment paper, leaving an overhang. On a lightly floured surface, roll out one disc of dough to fit the bottom of the prepared baking pan. Transfer the dough to the pan and press it evenly into the bottom and slightly up the sides. Dock the crust with a fork several times. Bake the crust for 12-15 minutes, or until lightly golden brown. Remove the crust from the oven and let it cool slightly.
- Pour the cherry filling evenly over the par-baked crust. Sprinkle the crumble topping evenly over the cherry filling. Roll out the second disc of dough. You can either place it as a whole sheet on top of the crumble, or cut it into strips and arrange them in a lattice pattern. If you choose the lattice pattern, gently press the edges of the strips onto the bottom crust to seal. If desired, sprinkle the top with turbinado sugar for extra sparkle and crunch.
- Bake for 30-35 minutes, or until the topping is golden brown and the filling is bubbly. If the topping starts to brown too quickly, tent the pan with aluminum foil.
- Let the bars cool completely in the pan before lifting them out using the parchment paper overhang. Cut into bars and dust with powdered sugar, if desired.
Notes
- Keep the ingredients cold for a flaky crust and crumbly topping.
- Don’t overmix the dough to avoid a tough crust.
- Par-baking the crust prevents a soggy bottom.
- Let the bars cool completely for the filling to set properly.
- Use high-quality cherries for the best flavor.
Leave a Comment