

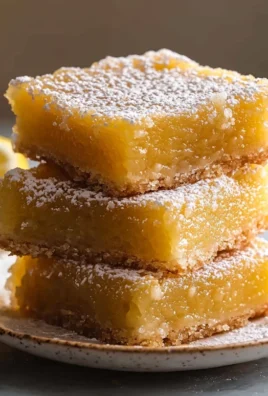
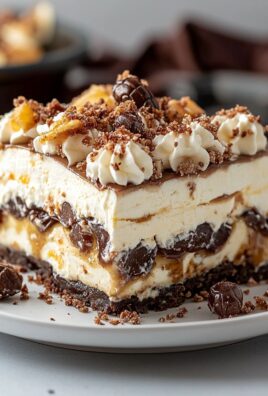
Hazelnut Chocolate Delice: Prepare to be transported to a realm of pure chocolate indulgence! This isn’t just a dessert; it’s an experience, a symphony of textures and flavors that will leave you craving more. Imagine a velvety smooth, intensely chocolatey base, infused with the rich, nutty aroma of toasted hazelnuts. Then, picture a delicate, melt-in-your-mouth ganache topping, adding another layer of decadent bliss.
While the exact origins of the delice are debated, its roots lie in the classic French pastry tradition, where meticulous attention to detail and the finest ingredients reign supreme. This particular variation, the hazelnut chocolate delice, elevates the experience by incorporating the beloved pairing of chocolate and hazelnuts, a combination that has captivated palates for centuries. Think of Nutella, but refined, sophisticated, and utterly irresistible.
People adore this dish for its luxurious taste and surprisingly simple preparation. It’s the perfect dessert to impress guests at a dinner party, yet it’s also approachable enough for a weekend baking project. The contrasting textures the dense, fudgy base and the silky smooth ganache create a delightful sensory experience. Plus, the combination of chocolate and hazelnut is a universally loved flavor profile, making this delice a guaranteed crowd-pleaser. So, are you ready to embark on a culinary adventure and create your own masterpiece? Let’s get started!

Ingredients:
- For the Hazelnut Praline Paste:
- 1 cup (150g) hazelnuts, skin on
- 1/2 cup (100g) granulated sugar
- 1 tablespoon neutral oil (like grapeseed or sunflower)
- 1/4 teaspoon sea salt
- For the Chocolate Biscuit Base:
- 1 cup (120g) all-purpose flour
- 1/4 cup (25g) unsweetened cocoa powder
- 1/2 teaspoon baking powder
- 1/4 teaspoon baking soda
- 1/4 teaspoon salt
- 1/2 cup (115g) unsalted butter, softened
- 1/2 cup (100g) granulated sugar
- 1 large egg
- 1/2 teaspoon vanilla extract
- 1/2 cup (120ml) buttermilk
- For the Dark Chocolate Mousse:
- 8 ounces (225g) dark chocolate (70% cacao), finely chopped
- 1/4 cup (60ml) heavy cream
- 3 large eggs, separated
- 1/4 cup (50g) granulated sugar
- 1 cup (240ml) heavy cream, cold
- For the Milk Chocolate Ganache:
- 6 ounces (170g) milk chocolate, finely chopped
- 1/2 cup (120ml) heavy cream
- 1 tablespoon unsalted butter
- For Decoration (Optional):
- Chopped hazelnuts
- Cocoa powder
- Chocolate shavings
Hazelnut Praline Paste Preparation:
- Toast the Hazelnuts: Preheat your oven to 350°F (175°C). Spread the hazelnuts in a single layer on a baking sheet. Toast for 12-15 minutes, or until the skins are cracked and the nuts are fragrant. Keep a close eye on them, as they can burn easily.
- Remove the Skins: Once the hazelnuts are cool enough to handle, place them in a clean kitchen towel and rub vigorously to remove as much of the skins as possible. Don’t worry if you can’t get all of them off.
- Caramelize the Sugar: In a heavy-bottomed saucepan, combine the sugar with 2 tablespoons of water. Cook over medium heat, without stirring, until the sugar melts and turns into a deep amber caramel. Be patient and watch it carefully to prevent burning.
- Combine and Process: Immediately add the toasted hazelnuts to the caramel and stir to coat them evenly. Pour the mixture onto a silicone baking mat or a lightly oiled baking sheet. Let it cool completely until hardened.
- Break and Blend: Once the caramel-hazelnut mixture is completely cool and brittle, break it into smaller pieces. Place the pieces in a food processor and process until a smooth paste forms. This may take several minutes, and you may need to scrape down the sides of the bowl occasionally.
- Add Oil and Salt: Add the neutral oil and sea salt to the food processor and continue to process until the praline paste is smooth and creamy. The oil helps to loosen the paste and create a better consistency.
- Store: Transfer the hazelnut praline paste to an airtight container and store at room temperature for up to 2 weeks.
Chocolate Biscuit Base Preparation:
- Preheat and Prepare: Preheat your oven to 350°F (175°C). Grease and flour an 8-inch square baking pan. You can also line the bottom with parchment paper for easy removal.
- Combine Dry Ingredients: In a medium bowl, whisk together the flour, cocoa powder, baking powder, baking soda, and salt. This ensures that the leavening agents are evenly distributed.
- Cream Butter and Sugar: In a separate large bowl, cream together the softened butter and granulated sugar until light and fluffy. This usually takes about 3-5 minutes with an electric mixer.
- Add Egg and Vanilla: Beat in the egg and vanilla extract until well combined. Make sure the egg is at room temperature for better emulsification.
- Alternate Wet and Dry Ingredients: Gradually add the dry ingredients to the wet ingredients, alternating with the buttermilk, beginning and ending with the dry ingredients. Mix until just combined. Be careful not to overmix, as this can result in a tough cake.
- Pour and Bake: Pour the batter into the prepared baking pan and spread evenly. Bake for 25-30 minutes, or until a toothpick inserted into the center comes out clean.
- Cool Completely: Let the biscuit base cool in the pan for 10 minutes before transferring it to a wire rack to cool completely.
Dark Chocolate Mousse Preparation:
- Melt the Chocolate: Place the finely chopped dark chocolate and 1/4 cup of heavy cream in a heatproof bowl set over a saucepan of simmering water (double boiler). Make sure the bottom of the bowl doesn’t touch the water. Stir occasionally until the chocolate is completely melted and smooth. Remove from heat and let cool slightly.
- Separate Eggs: Separate the eggs, placing the yolks in one bowl and the whites in another. Ensure that there is absolutely no yolk in the whites, as this will prevent them from whipping properly.
- Whisk Egg Yolks and Sugar: In a medium bowl, whisk together the egg yolks and sugar until pale and thick. This usually takes about 3-5 minutes with an electric mixer.
- Temper the Chocolate: Gradually whisk the melted chocolate into the egg yolk mixture until well combined. This step is important to temper the egg yolks and prevent them from scrambling.
- Whip Egg Whites: In a clean, grease-free bowl, beat the egg whites with an electric mixer until stiff peaks form. Be careful not to overwhip them.
- Whip Heavy Cream: In a separate bowl, whip the cold heavy cream until stiff peaks form.
- Fold in Egg Whites: Gently fold one-third of the whipped egg whites into the chocolate mixture to lighten it. Then, gently fold in the remaining egg whites until just combined. Be careful not to deflate the egg whites.
- Fold in Whipped Cream: Gently fold the whipped cream into the chocolate mixture until just combined. Again, be careful not to deflate the whipped cream.
Milk Chocolate Ganache Preparation:
- Heat the Cream: Place the heavy cream in a small saucepan and heat over medium heat until it just begins to simmer. Do not boil.
- Pour over Chocolate: Pour the hot cream over the finely chopped milk chocolate in a heatproof bowl. Let it sit for 1 minute to allow the chocolate to melt.
- Stir Until Smooth: Gently stir the mixture until the chocolate is completely melted and the ganache is smooth and glossy.
- Add Butter: Stir in the butter until it is melted and incorporated into the ganache. This will add richness and shine.
- Cool Slightly: Let the ganache cool slightly before using it. This will help it to thicken and spread more easily.
Assembling the Hazelnut Chocolate Delice:
- Prepare the Biscuit Base: If the chocolate biscuit base is uneven, trim the top to create a flat surface. You can also brush it with a simple syrup (equal parts sugar and water, heated until the sugar dissolves) for added moisture, if desired.
- Spread Praline Paste: Spread the hazelnut praline paste evenly over the cooled chocolate biscuit base. This layer adds a wonderful nutty flavor and texture.
- Pour Mousse: Pour the dark chocolate mousse over the praline paste layer and spread evenly.
- Chill: Cover the pan with plastic wrap and chill in the refrigerator for at least 4 hours, or preferably overnight, to allow the mousse to set completely.
- Pour Ganache: Once the mousse is set, pour the milk chocolate ganache over the top and spread evenly.
- Chill Again: Return the delice to the refrigerator and chill for another 30 minutes to allow the ganache to set slightly.
- Decorate (Optional): Before serving, decorate the delice with chopped hazelnuts, cocoa powder, or chocolate shavings, if desired.
- Cut and Serve: Cut the delice into squares or rectangles and serve chilled. Enjoy!
Conclusion:
And there you have it! This Hazelnut Chocolate Delice is more than just a dessert; it’s an experience. From the rich, intense chocolate flavor to the delightful crunch of the hazelnuts, every bite is a symphony of textures and tastes that will leave you wanting more. I truly believe this recipe is a must-try for any chocolate lover, whether you’re a seasoned baker or just starting out. The steps are straightforward, and the reward is absolutely worth the effort.
Why is this recipe a must-try? Because it’s decadent without being overly sweet, sophisticated without being complicated, and utterly unforgettable. It’s the kind of dessert that will impress your guests at a dinner party, comfort you on a rainy afternoon, or simply elevate your everyday into something special. It’s a showstopper that doesn’t require hours in the kitchen, and the flavor profile is universally appealing. Trust me, once you make this, it will become a staple in your dessert repertoire.
But the fun doesn’t stop there! Feel free to get creative with your serving suggestions and variations. For a truly elegant presentation, serve individual slices of the Hazelnut Chocolate Delice with a dollop of freshly whipped cream and a dusting of cocoa powder. A few fresh raspberries or strawberries on the side would also add a beautiful pop of color and a touch of tartness to balance the richness of the chocolate.
Looking for variations? You could try using different types of nuts, such as almonds or walnuts, for a slightly different flavor profile. Or, for an extra layer of indulgence, add a thin layer of salted caramel between the chocolate layers. If you’re feeling adventurous, you could even infuse the cream with a hint of coffee or orange zest for a unique twist. For a vegan version, substitute the butter and cream with plant-based alternatives; there are many excellent vegan butters and creams available that work beautifully in this recipe. Just be sure to choose high-quality ingredients for the best results.
Another fun variation is to make mini delice bites! Simply use small muffin tins or silicone molds to create individual portions that are perfect for parties or as a sweet treat to have on hand. You could even dip the mini delices in melted chocolate and sprinkle them with chopped nuts for an extra touch of elegance.
I’m so excited for you to try this recipe and experience the magic of the Hazelnut Chocolate Delice for yourself. I poured my heart into creating this recipe, and I truly believe it’s something special.
So, what are you waiting for? Gather your ingredients, preheat your oven, and get ready to embark on a delicious adventure. I promise you won’t be disappointed.
And most importantly, I’d love to hear about your experience! Once you’ve made this recipe, please share your photos and comments with me. Let me know what you thought of the flavor, the texture, and any variations you tried. Did you serve it at a special occasion? Did you make it for yourself as a little treat? I’m eager to hear all about it! You can find me on [Social Media Platform – e.g., Instagram] @[Your Handle] or leave a comment on my blog at [Your Blog Address]. Your feedback is invaluable, and it helps me to continue creating and sharing recipes that you’ll love. Happy baking!
Hazelnut Chocolate Delice: A Decadent Dessert Recipe
Decadent Hazelnut Chocolate Delice with layers of rich chocolate biscuit, creamy hazelnut praline, airy dark chocolate mousse, and smooth milk chocolate ganache. An unforgettable dessert!
Ingredients
- 1 cup (150g) hazelnuts, skin on
- 1/2 cup (100g) granulated sugar
- 1 tablespoon neutral oil (like grapeseed or sunflower)
- 1/4 teaspoon sea salt
- 1 cup (120g) all-purpose flour
- 1/4 cup (25g) unsweetened cocoa powder
- 1/2 teaspoon baking powder
- 1/4 teaspoon baking soda
- 1/4 teaspoon salt
- 1/2 cup (115g) unsalted butter, softened
- 1/2 cup (100g) granulated sugar
- 1 large egg
- 1/2 teaspoon vanilla extract
- 1/2 cup (120ml) buttermilk
- 8 ounces (225g) dark chocolate (70% cacao), finely chopped
- 1/4 cup (60ml) heavy cream
- 3 large eggs, separated
- 1/4 cup (50g) granulated sugar
- 1 cup (240ml) heavy cream, cold
- 6 ounces (170g) milk chocolate, finely chopped
- 1/2 cup (120ml) heavy cream
- 1 tablespoon unsalted butter
- Chopped hazelnuts
- Cocoa powder
- Chocolate shavings
Instructions
- Preheat your oven to 350°F (175°C). Spread the hazelnuts in a single layer on a baking sheet. Toast for 12-15 minutes, or until the skins are cracked and the nuts are fragrant. Keep a close eye on them, as they can burn easily.
- Once the hazelnuts are cool enough to handle, place them in a clean kitchen towel and rub vigorously to remove as much of the skins as possible. Don’t worry if you can’t get all of them off.
- In a heavy-bottomed saucepan, combine the sugar with 2 tablespoons of water. Cook over medium heat, without stirring, until the sugar melts and turns into a deep amber caramel. Be patient and watch it carefully to prevent burning.
- Immediately add the toasted hazelnuts to the caramel and stir to coat them evenly. Pour the mixture onto a silicone baking mat or a lightly oiled baking sheet. Let it cool completely until hardened.
- Once the caramel-hazelnut mixture is completely cool and brittle, break it into smaller pieces. Place the pieces in a food processor and process until a smooth paste forms. This may take several minutes, and you may need to scrape down the sides of the bowl occasionally.
- Add the neutral oil and sea salt to the food processor and continue to process until the praline paste is smooth and creamy. The oil helps to loosen the paste and create a better consistency.
- Transfer the hazelnut praline paste to an airtight container and store at room temperature for up to 2 weeks.
- Preheat your oven to 350°F (175°C). Grease and flour an 8-inch square baking pan. You can also line the bottom with parchment paper for easy removal.
- In a medium bowl, whisk together the flour, cocoa powder, baking powder, baking soda, and salt. This ensures that the leavening agents are evenly distributed.
- In a separate large bowl, cream together the softened butter and granulated sugar until light and fluffy. This usually takes about 3-5 minutes with an electric mixer.
- Beat in the egg and vanilla extract until well combined. Make sure the egg is at room temperature for better emulsification.
- Gradually add the dry ingredients to the wet ingredients, alternating with the buttermilk, beginning and ending with the dry ingredients. Mix until just combined. Be careful not to overmix, as this can result in a tough cake.
- Pour the batter into the prepared baking pan and spread evenly. Bake for 25-30 minutes, or until a toothpick inserted into the center comes out clean.
- Let the biscuit base cool in the pan for 10 minutes before transferring it to a wire rack to cool completely.
- Place the finely chopped dark chocolate and 1/4 cup of heavy cream in a heatproof bowl set over a saucepan of simmering water (double boiler). Make sure the bottom of the bowl doesn’t touch the water. Stir occasionally until the chocolate is completely melted and smooth. Remove from heat and let cool slightly.
- Separate the eggs, placing the yolks in one bowl and the whites in another. Ensure that there is absolutely no yolk in the whites, as this will prevent them from whipping properly.
- In a medium bowl, whisk together the egg yolks and sugar until pale and thick. This usually takes about 3-5 minutes with an electric mixer.
- Gradually whisk the melted chocolate into the egg yolk mixture until well combined. This step is important to temper the egg yolks and prevent them from scrambling.
- In a clean, grease-free bowl, beat the egg whites with an electric mixer until stiff peaks form. Be careful not to overwhip them.
- In a separate bowl, whip the cold heavy cream until stiff peaks form.
- Gently fold one-third of the whipped egg whites into the chocolate mixture to lighten it. Then, gently fold in the remaining egg whites until just combined. Be careful not to deflate the egg whites.
- Gently fold the whipped cream into the chocolate mixture until just combined. Again, be careful not to deflate the whipped cream.
- Place the heavy cream in a small saucepan and heat over medium heat until it just begins to simmer. Do not boil.
- Pour the hot cream over the finely chopped milk chocolate in a heatproof bowl. Let it sit for 1 minute to allow the chocolate to melt.
- Gently stir the mixture until the chocolate is completely melted and the ganache is smooth and glossy.
- Stir in the butter until it is melted and incorporated into the ganache. This will add richness and shine.
- Let the ganache cool slightly before using it. This will help it to thicken and spread more easily.
- If the chocolate biscuit base is uneven, trim the top to create a flat surface. You can also brush it with a simple syrup (equal parts sugar and water, heated until the sugar dissolves) for added moisture, if desired.
- Spread the hazelnut praline paste evenly over the cooled chocolate biscuit base. This layer adds a wonderful nutty flavor and texture.
- Pour the dark chocolate mousse over the praline paste layer and spread evenly.
- Cover the pan with plastic wrap and chill in the refrigerator for at least 4 hours, or preferably overnight, to allow the mousse to set completely.
- Once the mousse is set, pour the milk chocolate ganache over the top and spread evenly.
- Return the delice to the refrigerator and chill for another 30 minutes to allow the ganache to set slightly.
- Before serving, decorate the delice with chopped hazelnuts, cocoa powder, or chocolate shavings, if desired.
- Cut the delice into squares or rectangles and serve chilled. Enjoy!
Notes
- For best results, use high-quality chocolate.
- Make sure all ingredients are at the correct temperature as indicated in the instructions.
- Be patient when making

Leave a Comment