

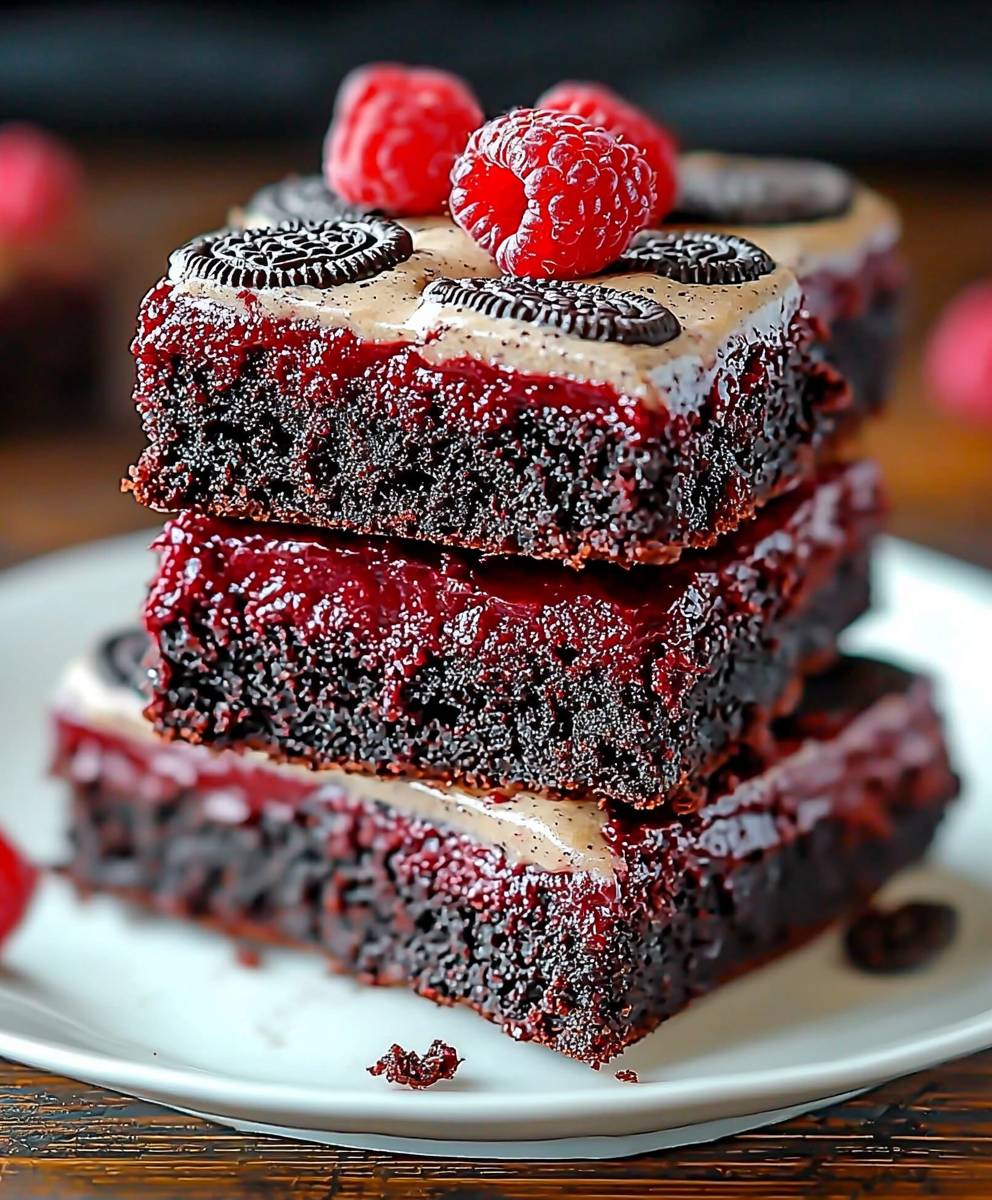
Red Velvet Oreo Brownies: Prepare to be utterly captivated! Imagine sinking your teeth into a fudgy, intensely chocolatey brownie, swirled with the unmistakable tang of red velvet, and punctuated by the delightful crunch of Oreo cookies. It’s a dessert symphony that will have everyone begging for more.
The allure of red velvet, with its intriguing history rooted in the use of non-alkalized cocoa powder that gave it a reddish hue, has captivated bakers and dessert enthusiasts for generations. While the exact origins are debated, its popularity soared in the mid-20th century, becoming a symbol of Southern charm and sophisticated indulgence. Now, we’re taking that classic flavor and giving it a modern, irresistible twist.
What makes these Red Velvet Oreo Brownies so irresistible? It’s the perfect marriage of textures and tastes. The fudgy brownie base provides a rich, chocolatey foundation, while the red velvet swirl adds a subtle tang and a beautiful visual appeal. And then, there are the Oreos! Those iconic cookies provide a satisfying crunch and a burst of creamy sweetness that perfectly complements the other flavors. Plus, these brownies are surprisingly easy to make, making them perfect for a weeknight treat or a show-stopping dessert for your next gathering. Get ready to experience brownie perfection!

Ingredients:
- For the Brownie Base:
- 1 cup (2 sticks) unsalted butter, melted
- 2 cups granulated sugar
- 4 large eggs
- 1 teaspoon vanilla extract
- ¾ cup all-purpose flour
- ¾ cup unsweetened cocoa powder
- ½ teaspoon baking powder
- ¼ teaspoon salt
- 1 tablespoon red food coloring
- For the Oreo Layer:
- 24 Oreo cookies (regular size), divided
- For the Cream Cheese Swirl:
- 8 ounces cream cheese, softened
- ? cup granulated sugar
- 1 large egg yolk
- 1 teaspoon vanilla extract
Preparing the Brownie Batter:
- Melt the Butter: First things first, let’s melt that butter! You can do this in a saucepan over low heat or in the microwave in 30-second intervals, stirring in between, until completely melted. Be careful not to burn it! Once melted, set it aside to cool slightly.
- Combine Butter and Sugar: In a large mixing bowl, pour in the melted butter and add the 2 cups of granulated sugar. Whisk them together really well until the mixture is smooth and well combined. This is the foundation of our fudgy brownies, so make sure it’s nicely mixed!
- Add Eggs and Vanilla: Now, crack in those 4 large eggs, one at a time, whisking well after each addition. This helps to incorporate air into the batter, which will give the brownies a slightly lighter texture. Then, stir in the vanilla extract.
- Dry Ingredients: In a separate bowl, whisk together the all-purpose flour, unsweetened cocoa powder, baking powder, and salt. This ensures that the baking powder and salt are evenly distributed throughout the batter.
- Combine Wet and Dry Ingredients: Gradually add the dry ingredients to the wet ingredients, mixing until just combined. Be careful not to overmix! Overmixing can lead to tough brownies. We want them fudgy and delicious, not chewy!
- Add Red Food Coloring: Stir in the red food coloring until the batter is evenly colored. The amount of food coloring might vary depending on the brand and intensity, so adjust to achieve your desired red velvet hue.
Assembling the Oreo Layer:
- Prepare the Pan: Preheat your oven to 350°F (175°C). Grease and flour a 9×13 inch baking pan. You can also line it with parchment paper, leaving an overhang on the sides, for easy removal of the brownies later.
- Pour Half the Batter: Pour half of the red velvet brownie batter into the prepared baking pan and spread it evenly.
- Arrange the Oreos: Arrange 18 of the Oreo cookies in a single layer over the brownie batter. You might need to break some of the Oreos to fit them snugly in the pan.
- Pour Remaining Batter: Carefully pour the remaining brownie batter over the Oreo layer, spreading it evenly to cover the Oreos completely.
Creating the Cream Cheese Swirl:
- Cream Cheese Mixture: In a medium mixing bowl, beat the softened cream cheese with the ? cup of granulated sugar until smooth and creamy. Make sure your cream cheese is properly softened, or you’ll end up with lumps in your swirl.
- Add Egg Yolk and Vanilla: Add the egg yolk and vanilla extract to the cream cheese mixture and beat until well combined.
- Swirl Time: Drop spoonfuls of the cream cheese mixture over the top of the brownie batter. Then, using a knife or a toothpick, gently swirl the cream cheese into the brownie batter, creating a marbled effect. Be careful not to over-swirl, or the cream cheese will completely blend into the brownie batter.
- Add Remaining Oreos: Roughly chop the remaining 6 Oreo cookies and sprinkle them over the top of the cream cheese swirl. This adds a nice textural element and a hint of Oreo flavor to the top of the brownies.
Baking and Cooling:
- Bake: Bake in the preheated oven for 30-35 minutes, or until a toothpick inserted into the center comes out with moist crumbs attached. The baking time may vary depending on your oven, so keep an eye on them.
- Cool Completely: Let the brownies cool completely in the pan before cutting into squares. This is crucial! If you try to cut them while they’re still warm, they’ll be too soft and messy. Cooling allows them to firm up and makes them easier to slice. I usually let them cool for at least 2 hours, or even overnight, for the best results.
- Cut and Serve: Once the brownies are completely cooled, cut them into squares and serve. These Red Velvet Oreo Brownies are best enjoyed at room temperature.
Tips and Variations:
- Use High-Quality Cocoa Powder: The quality of your cocoa powder will significantly impact the flavor of the brownies. Opt for a good-quality, unsweetened cocoa powder for the best results.
- Don’t Overbake: Overbaked brownies are dry and crumbly. To avoid this, check the brownies frequently during the last few minutes of baking. They’re done when a toothpick inserted into the center comes out with moist crumbs attached.
- Add Chocolate Chips: For an extra chocolatey treat, add ½ cup of chocolate chips to the brownie batter. Milk chocolate, semi-sweet chocolate, or even white chocolate chips would all be delicious.
- Experiment with Oreo Flavors: Feel free to experiment with different Oreo flavors! Golden Oreos, Mint Oreos, or even Birthday Cake Oreos would all be fun variations.
- Make it Gluten-Free: To make these brownies gluten-free, simply substitute the all-purpose flour with a gluten-free all-purpose flour blend. Make sure to choose a blend that contains xanthan gum for the best texture.
- Storage: Store the brownies in an airtight container at room temperature for up to 3 days, or in the refrigerator for up to a week. They can also be frozen for up to 2 months.
Troubleshooting:
- Brownies are too dry: This is usually caused by overbaking. Make sure to check the brownies frequently during the last few minutes of baking and remove them from the oven when a toothpick inserted into the center comes out with moist crumbs attached.
- Brownies are too gooey: This could be caused by underbaking or using too much butter. Make sure to bake the brownies for the recommended time and use the correct amount of butter.
- Cream cheese swirl is sinking: This can happen if the cream cheese mixture is too thin. Make sure to beat the cream cheese and sugar until smooth and creamy, but don’t overbeat it. Also, avoid over-swirling the cream cheese into the brownie batter.
- Oreos are soggy: To prevent the Oreos from becoming soggy, make sure to spread the brownie batter evenly over them and bake the brownies for the recommended time.
Nutritional Information (Approximate):
(Note: Nutritional information is an estimate and may vary based on specific ingredients and portion sizes.)
- Calories: 350-400 per brownie
- Fat: 20-25g
- Saturated Fat: 12-15g
- Cholesterol: 75-100mg
- Sodium: 150-200mg
- Carbohydrates: 40-45g
- Sugar: 30-35g
- Protein: 3-4g
Enjoy your delicious Red Velvet Oreo Brownies!
Conclusion:
And there you have it! These Red Velvet Oreo Brownies are truly something special, a decadent treat that’s guaranteed to impress. From the vibrant red hue and the subtle tang of the red velvet brownie base to the creamy, crunchy Oreo surprise nestled inside, every bite is an explosion of flavor and texture. I know, I know, I might be biased, but I genuinely believe this recipe is a must-try for any baking enthusiast or anyone simply looking to indulge in a truly unforgettable dessert.
Why is it a must-try, you ask? Well, beyond the sheer deliciousness, it’s surprisingly easy to make. The recipe is straightforward, using readily available ingredients, and doesn’t require any fancy techniques. Even if you’re a beginner baker, you can confidently whip up a batch of these beauties and wow your friends and family. Plus, the combination of red velvet and Oreos is just pure genius. It’s a match made in dessert heaven! The slight bitterness of the dark chocolate in the Oreos perfectly complements the sweet and tangy red velvet, creating a harmonious balance that will leave you wanting more.
But the best part? The versatility! While these brownies are amazing as is, there are so many ways to customize them to your liking. For a richer, more intense chocolate flavor, try using dark chocolate Oreos instead of the classic variety. Or, if you’re feeling adventurous, experiment with different Oreo flavors altogether! Birthday cake Oreos, peanut butter Oreos, even mint Oreos would all be fantastic additions.
Serving suggestions are endless too. These brownies are perfect on their own, warm from the oven with a scoop of vanilla ice cream. For a more elegant presentation, dust them with powdered sugar or drizzle them with melted white chocolate. You could even cut them into smaller squares and serve them as part of a dessert platter at your next party. They’re also incredibly portable, making them ideal for picnics, potlucks, or even just a sweet treat to pack in your lunchbox.
Serving Suggestions and Variations:
* Warm with Ice Cream: A classic pairing that never fails.
* Dusted with Powdered Sugar: Adds a touch of elegance.
* Drizzled with White Chocolate: Enhances the sweetness and visual appeal.
* Different Oreo Flavors: Experiment with birthday cake, peanut butter, or mint Oreos.
* Add Chocolate Chips: For an extra dose of chocolatey goodness.
* Top with Cream Cheese Frosting: Elevate the red velvet flavor.
I truly hope you’ll give this Red Velvet Oreo Brownies recipe a try. I’m confident that you’ll love them as much as I do. And when you do, please, please, please share your experience with me! I’d love to hear what you think, what variations you tried, and how much everyone enjoyed them. You can leave a comment below, tag me on social media, or even just send me a message. I’m always excited to see your creations and hear your feedback. Happy baking, and enjoy every delicious bite! Don’t forget to snap a picture and share your masterpiece! I can’t wait to see your version of these irresistible treats. Let me know if you have any questions, and happy baking!
Red Velvet Oreo Brownies: The Ultimate Dessert Recipe
Fudgy red velvet brownies layered with Oreo cookies and a creamy cream cheese swirl. A decadent and irresistible treat!
Ingredients
- 1 cup (2 sticks) unsalted butter, melted
- 2 cups granulated sugar
- 4 large eggs
- 1 teaspoon vanilla extract
- ¾ cup all-purpose flour
- ¾ cup unsweetened cocoa powder
- ½ teaspoon baking powder
- ¼ teaspoon salt
- 1 tablespoon red food coloring
- 24 Oreo cookies (regular size), divided
- 8 ounces cream cheese, softened
- ? cup granulated sugar
- 1 large egg yolk
- 1 teaspoon vanilla extract
Instructions
- Melt the butter in a saucepan over low heat or in the microwave in 30-second intervals, stirring in between, until completely melted. Let cool slightly.
- In a large mixing bowl, whisk together the melted butter and 2 cups of granulated sugar until smooth and well combined.
- Add the 4 large eggs, one at a time, whisking well after each addition. Stir in the vanilla extract.
- In a separate bowl, whisk together the all-purpose flour, unsweetened cocoa powder, baking powder, and salt.
- Gradually add the dry ingredients to the wet ingredients, mixing until just combined. Be careful not to overmix.
- Stir in the red food coloring until the batter is evenly colored. Adjust the amount to achieve your desired red velvet hue.
- Preheat your oven to 350°F (175°C). Grease and flour a 9×13 inch baking pan or line it with parchment paper.
- Pour half of the red velvet brownie batter into the prepared baking pan and spread it evenly.
- Arrange 18 of the Oreo cookies in a single layer over the brownie batter. Break some of the Oreos to fit them snugly in the pan if needed.
- Carefully pour the remaining brownie batter over the Oreo layer, spreading it evenly to cover the Oreos completely.
- In a medium mixing bowl, beat the softened cream cheese with the ? cup of granulated sugar until smooth and creamy.
- Add the egg yolk and vanilla extract to the cream cheese mixture and beat until well combined.
- Drop spoonfuls of the cream cheese mixture over the top of the brownie batter.
- Using a knife or a toothpick, gently swirl the cream cheese into the brownie batter, creating a marbled effect. Be careful not to over-swirl.
- Roughly chop the remaining 6 Oreo cookies and sprinkle them over the top of the cream cheese swirl.
- Bake in the preheated oven for 30-35 minutes, or until a toothpick inserted into the center comes out with moist crumbs attached.
- Let the brownies cool completely in the pan before cutting into squares. This may take at least 2 hours, or even overnight, for the best results.
- Once the brownies are completely cooled, cut them into squares and serve.
Notes
- Use high-quality cocoa powder for the best flavor.
- Don’t overbake the brownies. Check frequently during the last few minutes of baking.
- For an extra chocolatey treat, add ½ cup of chocolate chips to the brownie batter.
- Experiment with different Oreo flavors.
- To make these brownies gluten-free, substitute the all-purpose flour with a gluten-free all-purpose flour blend that contains xanthan gum.
- Store the brownies in an airtight container at room temperature for up to 3 days, or in the refrigerator for up to a week. They can also be frozen for up to 2 months.


Leave a Comment