

Crispy Slow Roasted Pork Belly: the very words conjure up images of crackling skin, meltingly tender meat, and an aroma that fills the entire house with pure, unadulterated deliciousness. Have you ever dreamt of achieving that perfect balance of textures in a single bite? Well, dream no more! This recipe is your passport to pork belly perfection.
Pork belly, a cut revered across cultures, has a rich history. From the siu yuk of Cantonese cuisine to the succulent porchetta of Italy, this cut of meat has been celebrated for centuries. Its versatility and inherent richness make it a culinary canvas for chefs and home cooks alike. But what truly elevates pork belly to legendary status is the transformative power of slow roasting.
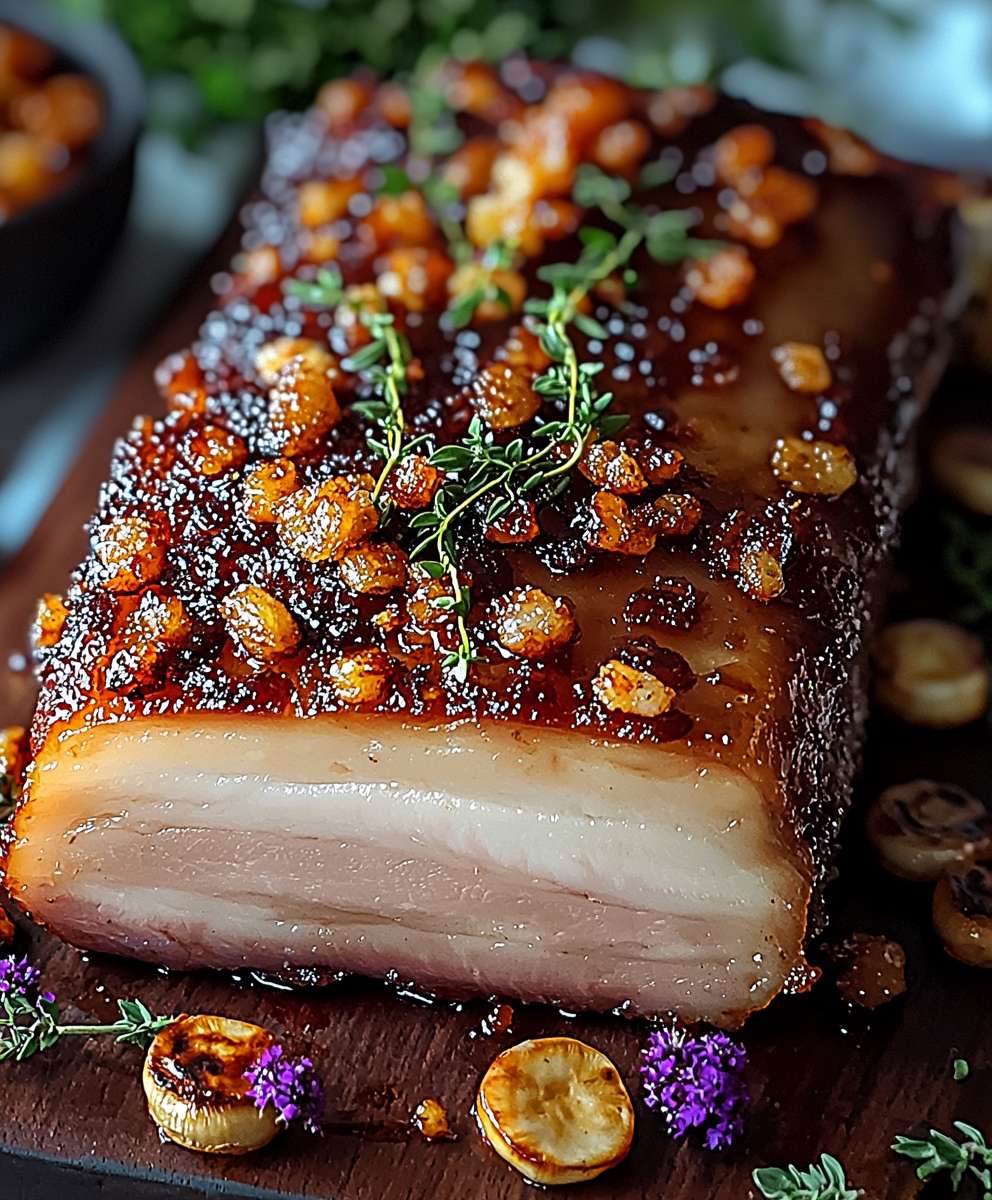
People adore crispy slow roasted pork belly for a multitude of reasons. The contrast between the shatteringly crisp skin and the incredibly moist, almost buttery meat is simply irresistible. The slow roasting process renders the fat, creating a depth of flavor that’s unparalleled. Plus, the hands-off nature of this recipe makes it surprisingly convenient for a weekend feast. Get ready to impress your friends and family with a dish that’s both elegant and comforting. Let’s embark on this culinary adventure together!

Ingredients:
- Pork Belly: 5 lbs, skin scored in a crosshatch pattern (about 1/2 inch apart)
- Kosher Salt: 2 tablespoons, plus more for seasoning
- Black Pepper: 1 tablespoon, freshly ground
- Garlic: 6 cloves, minced
- Ginger: 2 tablespoons, grated
- Five-Spice Powder: 1 tablespoon
- Shaoxing Wine (or Dry Sherry): 2 tablespoons
- Soy Sauce: 1 tablespoon
- Brown Sugar: 1 teaspoon
- White Vinegar: 1/4 cup
Preparing the Pork Belly:
- Score the Skin: This is crucial for achieving that irresistible crispy crackling. If your butcher hasn’t already done it, use a sharp knife or a box cutter to score the pork skin in a crosshatch pattern. Be careful not to cut into the meat layer you only want to score the skin and a little bit of the fat. The closer the scores, the crispier the skin will be.
- Dry Brine (Salt Application): Generously salt the skin of the pork belly with about 1 tablespoon of kosher salt. Really massage it into the scores. This will draw out moisture and help the skin dry out, which is essential for crisping. Don’t be shy with the salt!
- Season the Meat Side: In a small bowl, combine the remaining 1 tablespoon of kosher salt, black pepper, minced garlic, grated ginger, five-spice powder, Shaoxing wine (or dry sherry), soy sauce, and brown sugar. This is your flavor bomb!
- Marinate the Meat: Flip the pork belly over so the meat side is facing up. Rub the spice mixture all over the meat, making sure to get it into every nook and cranny.
- Refrigerate (Uncovered): Place the pork belly on a wire rack set over a baking sheet. This allows air to circulate around the pork, further drying out the skin. Refrigerate uncovered for at least 24 hours, and ideally up to 48 hours. The longer it sits, the better the skin will crisp. This is a key step, so don’t skip it!
The Slow Roasting Process:
- Preheat the Oven: Preheat your oven to 300°F (150°C). Low and slow is the name of the game here.
- Prepare the Vinegar Wash: In a small bowl, pour the white vinegar.
- Vinegar Application: Right before putting the pork belly in the oven, pat the skin dry with paper towels to remove any excess moisture. Then, brush the skin generously with the white vinegar. The vinegar helps to further dry out the skin and create a bubbly texture when it cooks.
- First Roast (Low Temperature): Place the pork belly on the wire rack (still on the baking sheet) in the preheated oven. Roast for 2 hours. This slow roasting renders the fat and tenderizes the meat.
- Increase the Temperature: After 2 hours, increase the oven temperature to 450°F (232°C).
- Second Roast (High Temperature): Continue roasting for another 30-45 minutes, or until the skin is puffed up and golden brown and incredibly crispy. Keep a close eye on it during this stage, as the skin can burn quickly. If it starts to get too dark, you can tent it loosely with foil.
- Resting Period: Once the skin is beautifully crispy, remove the pork belly from the oven and let it rest for at least 15 minutes before carving. This allows the juices to redistribute, resulting in a more tender and flavorful final product.
Achieving Maximum Crispiness (Optional):
Sometimes, even with all the right steps, the skin might not be as crispy as you’d like. Here are a few troubleshooting tips:
- Broiling (Watch Carefully!): If the skin is puffed up but not quite crispy enough, you can broil it for a minute or two at the very end. But be extremely careful, as it can burn in seconds! Keep a very close eye on it and remove it from the oven as soon as it reaches your desired level of crispiness.
- Crackling Boost: If some areas of the skin are crispier than others, you can use a kitchen torch to target those stubborn spots. Again, be careful not to burn the skin.
- Re-Crisping Leftovers: If you have leftover pork belly, you can re-crisp the skin by placing it under the broiler for a few minutes, or by pan-frying it skin-side down in a hot pan.
Carving and Serving:
- Carving: Use a sharp knife to carve the pork belly into slices. I like to cut it into roughly 1-inch thick slices, but you can adjust the thickness to your preference.
- Serving Suggestions: Crispy slow-roasted pork belly is incredibly versatile. Here are a few serving ideas:
- On its own: Simply serve it as a main course with a side of steamed rice and some stir-fried vegetables.
- In Banh Mi: Use it as the star ingredient in a delicious Vietnamese banh mi sandwich.
- With Noodles: Top a bowl of ramen or other noodle soup with slices of crispy pork belly.
- As an Appetizer: Cut it into smaller pieces and serve it as an appetizer with dipping sauces like hoisin sauce, sweet chili sauce, or a simple soy sauce and sesame oil mixture.
- In Tacos: Crispy pork belly tacos are always a crowd-pleaser!
- Dipping Sauces: Consider serving the pork belly with a variety of dipping sauces to complement its rich flavor. Some good options include:
- Hoisin Sauce: A classic pairing for pork.
- Sweet Chili Sauce: Adds a touch of sweetness and spice.
- Soy Sauce and Sesame Oil: A simple but flavorful combination.
- Plum Sauce: A sweet and tangy sauce that pairs well with fatty meats.
Tips and Tricks for Perfect Pork Belly:
- Quality of Pork: Start with the best quality pork belly you can find. Look for pork belly with a good amount of marbling (streaks of fat within the meat). This will result in a more tender and flavorful final product.
- Scoring is Key: Don’t underestimate the importance of scoring the skin properly. The closer the scores, the crispier the skin will be.
- Dry Brining is Essential: The dry brining process is crucial for drawing out moisture from the skin and creating that crispy crackling. Don’t skip this step!
- Patience is a Virtue: Slow roasting takes time, but it’s worth it. Don’t rush the process.
- Oven Temperature Variations: Ovens can vary in temperature, so keep a close eye on the pork belly, especially during the high-temperature roasting stage. Adjust the cooking time as needed.
- Don’t Overcrowd the Pan: Make sure the pork belly has enough space on the baking sheet so that the air can circulate properly. If you’re cooking a large piece of pork belly, you may need to use two baking sheets.
- Clean Up: Line your baking sheet with foil for easier cleanup. The rendered fat can be messy!
- Storage: Store leftover pork belly in an airtight container in the refrigerator for up to 3 days. Reheat it in the oven or under the broiler to re-crisp the skin.
Troubleshooting Common Issues:
- Skin Not Crispy Enough:
- Cause: Not enough moisture removed from the skin, oven temperature too low, not enough scoring.
- Solution: Ensure proper dry brining, increase oven temperature slightly (but watch carefully!), score the skin more closely. Broil for a short time at the end.
- Skin Burning:
- Cause: Oven temperature too high, skin too close to the heat source.
- Solution: Reduce oven temperature, move the baking sheet to a lower rack, tent the skin loosely with foil.
- Meat Too Dry:
- Cause: Overcooking, not enough fat in the pork belly.
Conclusion:
And there you have it! This Crispy Slow Roasted Pork Belly recipe isn’t just another dish; it’s an experience. From the tantalizing aroma that fills your kitchen to the satisfying crunch of the skin giving way to succulent, melt-in-your-mouth pork, every step of the process is a delight. I truly believe this is a must-try for anyone who appreciates deeply flavorful, expertly cooked food. The slow roasting method guarantees that the fat renders perfectly, leaving you with a texture that’s simply divine. Forget dry, tough pork belly this recipe delivers consistently juicy and tender results every single time.
But the best part? The versatility! While this Crispy Slow Roasted Pork Belly is incredible on its own, served with a simple side of roasted vegetables or a fresh green salad, the possibilities are truly endless. Imagine slicing it thinly and layering it into banh mi sandwiches for an explosion of flavor. Or, dice it up and toss it with noodles and a spicy peanut sauce for an Asian-inspired feast. You could even use it as a topping for ramen, adding a rich and savory element to your favorite noodle soup.
For serving suggestions, consider pairing it with creamy mashed potatoes and a tangy apple chutney to balance the richness of the pork. Alternatively, a vibrant slaw with a citrus vinaigrette will cut through the fat beautifully. If you’re feeling adventurous, try serving it with polenta and a mushroom ragu for a hearty and comforting meal.
And don’t be afraid to experiment with variations! Want to add a little heat? Incorporate some chili flakes into the spice rub. Prefer a sweeter flavor profile? Brush the pork belly with honey or maple syrup during the last hour of roasting. You can also play around with different herbs and spices to create your own signature flavor combination. Rosemary, thyme, garlic powder, onion powder, smoked paprika the possibilities are endless!
I’ve poured my heart and soul into perfecting this recipe, and I’m confident that you’ll love it as much as I do. It might seem a little intimidating at first, but trust me, the results are well worth the effort. The key is patience and low, slow cooking. Don’t rush the process, and you’ll be rewarded with the most incredible Crispy Slow Roasted Pork Belly you’ve ever tasted.
So, what are you waiting for? Gather your ingredients, preheat your oven, and get ready to embark on a culinary adventure. I’m so excited for you to try this recipe and experience the magic of perfectly cooked pork belly.
Once you’ve given it a go, I’d absolutely love to hear about your experience! Share your photos, tips, and variations in the comments below. Let me know what you thought of the recipe, what sides you paired it with, and any tweaks you made to make it your own. Your feedback is invaluable, and it helps me to continue creating delicious and inspiring recipes for you. Happy cooking! I can’t wait to see what you create!
Crispy Slow Roasted Pork Belly: The Ultimate Guide to Perfect Crackling
Crispy, slow-roasted pork belly with perfectly crackling skin. A flavorful and impressive dish that's surprisingly easy to make.
Ingredients
- 5 lbs Pork Belly, skin scored in a crosshatch pattern (about 1/2 inch apart)
- 2 tablespoons Kosher Salt, plus more for seasoning
- 1 tablespoon Black Pepper, freshly ground
- 6 cloves Garlic, minced
- 2 tablespoons Ginger, grated
- 1 tablespoon Five-Spice Powder
- 2 tablespoons Shaoxing Wine (or Dry Sherry)
- 1 tablespoon Soy Sauce
- 1 teaspoon Brown Sugar
- 1/4 cup White Vinegar
Instructions
- Use a sharp knife or box cutter to score the pork skin in a crosshatch pattern, about 1/2 inch apart. Be careful not to cut into the meat.
- Generously salt the skin with about 1 tablespoon of kosher salt, massaging it into the scores.
- In a small bowl, combine the remaining 1 tablespoon of kosher salt, black pepper, minced garlic, grated ginger, five-spice powder, Shaoxing wine (or dry sherry), soy sauce, and brown sugar.
- Flip the pork belly over and rub the spice mixture all over the meat side.
- Place the pork belly on a wire rack set over a baking sheet. Refrigerate uncovered for at least 24 hours, and ideally up to 48 hours.
- Preheat your oven to 300°F (150°C).
- Pour the white vinegar into a small bowl.
- Pat the skin dry with paper towels and brush generously with white vinegar.
- Place the pork belly on the wire rack (still on the baking sheet) in the preheated oven. Roast for 2 hours.
- After 2 hours, increase the oven temperature to 450°F (232°C).
- Continue roasting for another 30-45 minutes, or until the skin is puffed up and golden brown and incredibly crispy. Watch carefully to prevent burning. Tent with foil if needed.
- Remove the pork belly from the oven and let it rest for at least 15 minutes before carving.
- Use a sharp knife to carve the pork belly into slices. I like to cut it into roughly 1-inch thick slices, but you can adjust the thickness to your preference.
Notes
- The longer the pork belly dry brines in the refrigerator, the crispier the skin will be. Aim for at least 24 hours, but 48 hours is even better.
- Ovens can vary, so keep a close eye on the pork belly, especially during the high-temperature roasting stage. Adjust the cooking time as needed.
- Scoring the skin properly is crucial for achieving crispy crackling. The closer the scores, the better.
- Don’t skip the resting period! This allows the juices to redistribute, resulting in a more tender and flavorful final product.
- Store leftover pork belly in an airtight container in the refrigerator for up to 3 days. Reheat it in the oven or under the broiler to re-crisp the skin.
- Cause: Overcooking, not enough fat in the pork belly.


Leave a Comment