

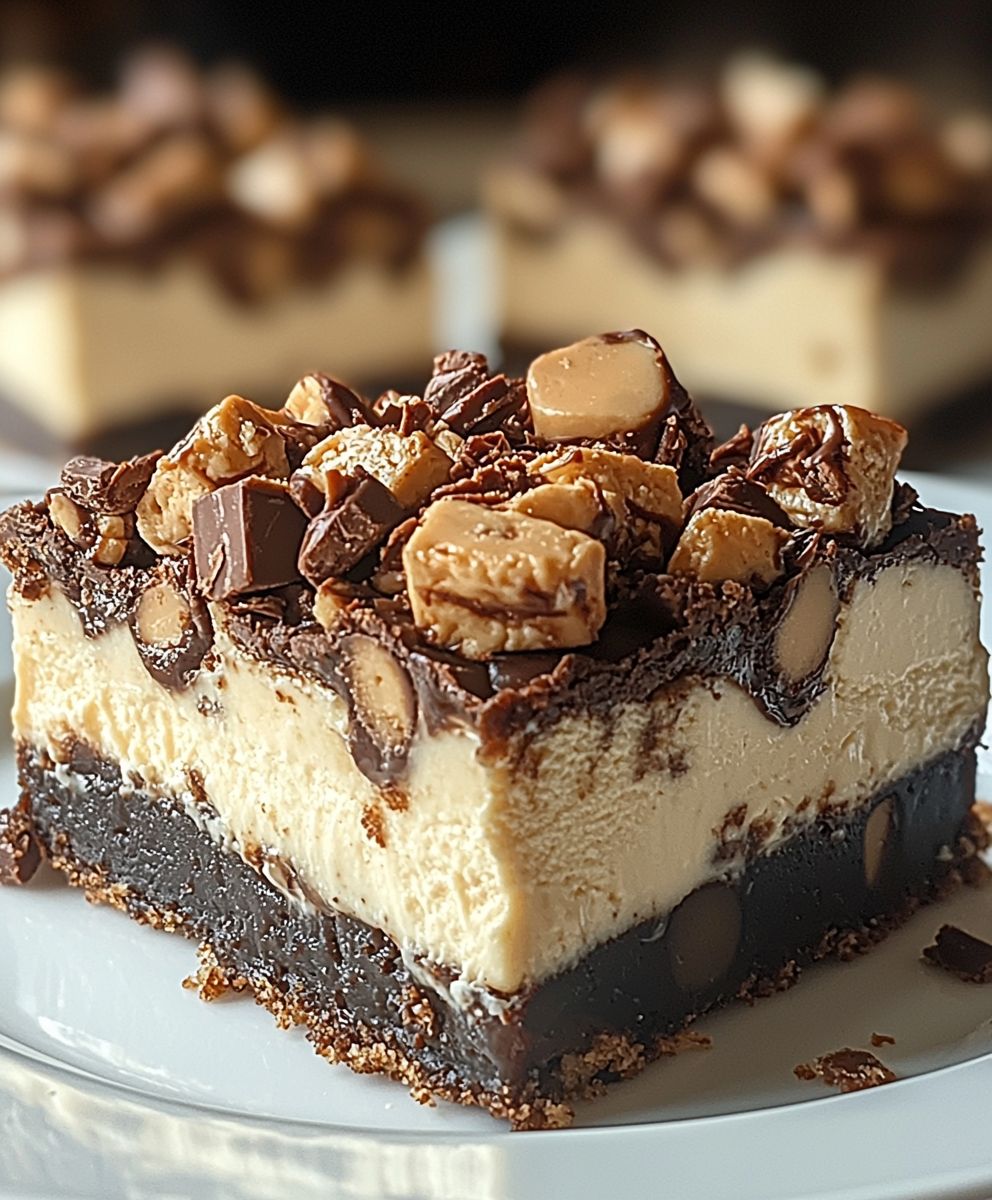
Reeses Butterfinger Cheesecake Bars: Prepare to have your dessert dreams redefined! Imagine the creamy, tangy perfection of cheesecake swirled together with the irresistible peanut butter and chocolate crunch of Reese’s and Butterfinger candies. It’s a flavor explosion that will have everyone begging for seconds.
While cheesecake itself boasts a rich history dating back to ancient Greece, the addition of these iconic American candies is a relatively modern, and utterly brilliant, innovation. It’s a playful fusion of classic elegance and pure, unadulterated fun. Think of it as a celebration of indulgence, a sweet symphony that hits all the right notes.
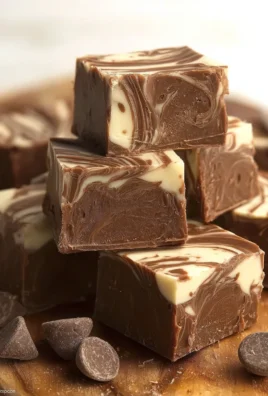
What makes these Reeses Butterfinger Cheesecake Bars so incredibly popular? It’s the perfect balance of textures and tastes. The smooth, velvety cheesecake provides a luxurious base, while the Reese’s Peanut Butter Cups and Butterfinger pieces offer a delightful contrast of creamy peanut butter, rich chocolate, and that signature crispy, flaky crunch. Plus, they are incredibly convenient! These bars are perfect for parties, potlucks, or simply satisfying your sweet tooth any time of day. Get ready to experience a dessert that’s as addictive as it is delicious!

Ingredients:
- For the Crust:
- 1 ½ cups graham cracker crumbs
- 5 tablespoons unsalted butter, melted
- ¼ cup granulated sugar
- Pinch of salt
- For the Cheesecake Filling:
- 24 ounces cream cheese, softened to room temperature
- 1 cup granulated sugar
- ½ cup sour cream
- 2 large eggs
- 1 teaspoon vanilla extract
- ½ cup peanut butter, creamy
- For the Butterfinger Layer:
- 6 fun-size Butterfinger bars, chopped
- For the Reese’s Peanut Butter Cup Topping:
- 1 cup semi-sweet chocolate chips
- 2 tablespoons unsalted butter
- 1 cup Reese’s Peanut Butter Cups, chopped
- Optional: Coarse sea salt, for sprinkling
Preparing the Graham Cracker Crust:
- Preheat your oven to 350°F (175°C). This is crucial for ensuring the crust bakes evenly.
- In a medium bowl, combine the graham cracker crumbs, melted butter, granulated sugar, and salt. Mix well until all the crumbs are moistened and the mixture resembles wet sand. I like to use a fork to really get everything incorporated.
- Press the mixture firmly into the bottom of a 9×13 inch baking pan. I find that using the bottom of a measuring cup helps to create an even and compact crust. Make sure to press it firmly so it doesn’t crumble later.
- Bake the crust for 8-10 minutes, or until lightly golden brown. Keep a close eye on it to prevent burning. Remove from the oven and let it cool completely before adding the cheesecake filling. This cooling period is important because it allows the crust to firm up and prevent the filling from seeping through.
Making the Cheesecake Filling:
- In a large bowl, beat the softened cream cheese with an electric mixer until smooth and creamy. This is where having softened cream cheese is key! It will prevent lumps in your filling. I usually let mine sit out for at least an hour, sometimes longer depending on the temperature of my kitchen.
- Gradually add the granulated sugar and continue to beat until well combined. Scrape down the sides of the bowl as needed to ensure everything is evenly mixed.
- Add the sour cream and vanilla extract and beat until just combined. Be careful not to overmix at this stage, as it can incorporate too much air into the batter.
- Add the peanut butter and beat until fully incorporated and the mixture is smooth. Make sure the peanut butter is well mixed in, otherwise you might get pockets of peanut butter in the cheesecake.
- Add the eggs one at a time, beating well after each addition. Again, be careful not to overmix. Overmixing can lead to cracks in the cheesecake during baking.
Assembling and Baking the Cheesecake Bars:
- Pour half of the cheesecake filling over the cooled graham cracker crust. Spread it evenly with a spatula.
- Sprinkle the chopped Butterfinger bars evenly over the cheesecake filling. This layer adds a fantastic crunch and that signature Butterfinger flavor.
- Pour the remaining cheesecake filling over the Butterfinger layer, spreading it evenly to cover the candy.
- Bake in the preheated oven for 30-35 minutes, or until the edges are set and the center is slightly jiggly. The cheesecake will continue to set as it cools.
- Turn off the oven and let the cheesecake bars cool in the oven with the door slightly ajar for about an hour. This helps to prevent cracking.
- Remove the cheesecake bars from the oven and let them cool completely at room temperature. Then, cover and refrigerate for at least 4 hours, or preferably overnight. This chilling time is essential for the cheesecake to fully set and develop its flavor.
Preparing the Reese’s Peanut Butter Cup Topping:
- Once the cheesecake bars are completely chilled, prepare the topping. In a microwave-safe bowl, combine the semi-sweet chocolate chips and butter.
- Microwave in 30-second intervals, stirring in between, until the chocolate is melted and smooth. Be careful not to overheat the chocolate, as it can burn easily.
- Pour the melted chocolate over the chilled cheesecake bars, spreading it evenly with a spatula.
- Immediately sprinkle the chopped Reese’s Peanut Butter Cups over the melted chocolate.
- If desired, sprinkle a little coarse sea salt over the top for a sweet and salty contrast. I personally love this addition!
- Return the cheesecake bars to the refrigerator for about 30 minutes to allow the chocolate topping to set. This will make them easier to cut and serve.
Cutting and Serving:
- Use a sharp knife to cut the cheesecake bars into squares. For clean cuts, I recommend running the knife under hot water and wiping it clean between each cut.
- Serve the Reese’s Butterfinger Cheesecake Bars chilled and enjoy! These bars are rich and decadent, so a small square is often enough.
- Store any leftover cheesecake bars in an airtight container in the refrigerator for up to 3-4 days. They are best enjoyed within the first few days while the crust is still crisp.
Tips and Variations:
- Crust Variations: You can substitute the graham cracker crumbs with Oreo crumbs for a chocolatey twist. Just remove the cream filling from the Oreos before crushing them.
- Peanut Butter Swirl: For an extra peanut butter kick, swirl some melted peanut butter into the cheesecake filling before baking.
- Candy Bar Swaps: Feel free to experiment with other candy bars in place of the Butterfingers and Reese’s Peanut Butter Cups. Snickers, Twix, or even Heath bars would be delicious!
- Chocolate Drizzle: Drizzle some melted white chocolate over the top of the bars for a beautiful and delicious garnish.
- Make Ahead: These cheesecake bars are perfect for making ahead of time. You can prepare them up to 2 days in advance and store them in the refrigerator until ready to serve.
- Freezing: You can freeze these cheesecake bars for longer storage. Wrap them tightly in plastic wrap and then in foil. They can be stored in the freezer for up to 2 months. Thaw them in the refrigerator overnight before serving.
Troubleshooting:
- Cracked Cheesecake: To prevent cracking, avoid overmixing the batter and cool the cheesecake slowly in the oven with the door ajar.
- Soggy Crust: Make sure to bake the crust until it is lightly golden brown and let it cool completely before adding the filling. This will help to prevent a soggy crust.
- Uneven Baking: Ensure your oven is properly calibrated and that you are using an oven thermometer to monitor the temperature.
Nutritional Information (Approximate):
Please note that the nutritional information is an estimate and may vary depending on the specific ingredients used.
- Calories: 450-550 per bar
- Fat: 30-40g
- Saturated Fat: 15-20g
- Cholesterol: 100-150mg
- Sodium: 200-300mg
- Carbohydrates: 40-50g
- Sugar: 30-40g
- Protein: 5-7g
Enjoy making and sharing these decadent Reese’s Butterfinger Cheesecake Bars! They are sure to be a hit with everyone who tries them.
Conclusion:
So, there you have it! These Reeses Butterfinger Cheesecake Bars are truly a decadent dream come true, and I genuinely believe you need to make them. They’re the perfect combination of creamy cheesecake, crunchy Butterfinger, and that classic peanut butter cup flavor we all adore. Seriously, what’s not to love? I know, I know, there are a million dessert recipes out there vying for your attention, but trust me on this one. These bars are surprisingly easy to make, even if you’re not a seasoned baker. The crust comes together in minutes, the cheesecake filling is wonderfully forgiving, and the Butterfinger topping? Well, that’s just pure magic. The contrasting textures and flavors create a symphony in your mouth that will leave you wanting more. Think about it: the smooth, tangy cheesecake, the satisfying crunch of the Butterfinger, and the rich, peanut buttery goodness of the Reese’s. It’s a party in every bite! And the best part? They’re perfect for any occasion. Bring them to a potluck, serve them at a birthday party, or simply enjoy them as a special treat on a cozy night in. But don’t just take my word for it. You absolutely have to experience the joy of these bars for yourself.Serving Suggestions and Variations:
* For a truly indulgent experience, serve these bars chilled with a dollop of whipped cream and a drizzle of chocolate sauce. * Feeling adventurous? Try adding a layer of hot fudge to the crust before adding the cheesecake filling. The warm fudge will create an even more decadent base. * Want to make them even more peanut buttery? Swirl some peanut butter into the cheesecake filling before baking. * For a festive twist, top the bars with crushed candy canes during the holidays. * If you’re a fan of dark chocolate, use dark chocolate Reese’s cups instead of the milk chocolate ones. * To make individual servings, bake the cheesecake in muffin tins lined with cupcake liners. Adjust the baking time accordingly. * Consider adding a thin layer of ganache on top of the baked and cooled cheesecake before adding the Butterfinger topping. This will add an extra layer of richness and shine. * For a lighter version, use reduced-fat cream cheese and sugar substitute. While it won’t be quite as decadent, it will still be delicious! I’m confident that once you try this recipe, it will become a staple in your dessert repertoire. It’s a crowd-pleaser, a guaranteed hit, and a surefire way to satisfy your sweet tooth. So, what are you waiting for? Gather your ingredients, preheat your oven, and get ready to bake up a batch of these incredible Reeses Butterfinger Cheesecake Bars. I promise you won’t regret it. And when you do, please, please, please share your experience! I’d love to hear what you think of the recipe, what variations you tried, and how much everyone loved them. Leave a comment below, tag me on social media, or send me an email. I can’t wait to see your creations! Happy baking! Print
Reeses Butterfinger Cheesecake Bars: The Ultimate Dessert Recipe
- Total Time: 300 minutes
- Yield: 12–16 bars 1x
Description
Decadent cheesecake bars featuring a graham cracker crust, creamy peanut butter cheesecake, a crunchy Butterfinger layer, and a Reese’s Peanut Butter Cup chocolate topping.
Ingredients
- 1 ½ cups graham cracker crumbs
- 5 tablespoons unsalted butter, melted
- ¼ cup granulated sugar
- Pinch of salt
- 24 ounces cream cheese, softened to room temperature
- 1 cup granulated sugar
- ½ cup sour cream
- 2 large eggs
- 1 teaspoon vanilla extract
- ½ cup peanut butter, creamy
- 6 fun-size Butterfinger bars, chopped
- 1 cup semi-sweet chocolate chips
- 2 tablespoons unsalted butter
- 1 cup Reese’s Peanut Butter Cups, chopped
- Optional: Coarse sea salt, for sprinkling
Instructions
- Prepare the Graham Cracker Crust: Preheat oven to 350°F (175°C). In a medium bowl, combine graham cracker crumbs, melted butter, granulated sugar, and salt. Mix well. Press the mixture firmly into the bottom of a 9×13 inch baking pan. Bake for 8-10 minutes, or until lightly golden brown. Remove from the oven and let it cool completely.
- Make the Cheesecake Filling: In a large bowl, beat the softened cream cheese with an electric mixer until smooth and creamy. Gradually add the granulated sugar and continue to beat until well combined. Add the sour cream and vanilla extract and beat until just combined. Add the peanut butter and beat until fully incorporated and the mixture is smooth. Add the eggs one at a time, beating well after each addition.
- Assemble and Bake the Cheesecake Bars: Pour half of the cheesecake filling over the cooled graham cracker crust. Spread it evenly. Sprinkle the chopped Butterfinger bars evenly over the cheesecake filling. Pour the remaining cheesecake filling over the Butterfinger layer, spreading it evenly to cover the candy. Bake in the preheated oven for 30-35 minutes, or until the edges are set and the center is slightly jiggly. Turn off the oven and let the cheesecake bars cool in the oven with the door slightly ajar for about an hour. Remove the cheesecake bars from the oven and let them cool completely at room temperature. Then, cover and refrigerate for at least 4 hours, or preferably overnight.
- Prepare the Reese’s Peanut Butter Cup Topping: Once the cheesecake bars are completely chilled, prepare the topping. In a microwave-safe bowl, combine the semi-sweet chocolate chips and butter. Microwave in 30-second intervals, stirring in between, until the chocolate is melted and smooth. Pour the melted chocolate over the chilled cheesecake bars, spreading it evenly with a spatula. Immediately sprinkle the chopped Reese’s Peanut Butter Cups over the melted chocolate. If desired, sprinkle a little coarse sea salt over the top. Return the cheesecake bars to the refrigerator for about 30 minutes to allow the chocolate topping to set.
- Cutting and Serving: Use a sharp knife to cut the cheesecake bars into squares. Serve the Reese’s Butterfinger Cheesecake Bars chilled and enjoy! Store any leftover cheesecake bars in an airtight container in the refrigerator for up to 3-4 days.
Notes
- Crust Variations: Substitute graham cracker crumbs with Oreo crumbs.
- Peanut Butter Swirl: Swirl some melted peanut butter into the cheesecake filling before baking.
- Candy Bar Swaps: Experiment with other candy bars.
- Chocolate Drizzle: Drizzle some melted white chocolate over the top.
- Make Ahead: Prepare up to 2 days in advance.
- Freezing: Freeze for up to 2 months. Thaw in the refrigerator overnight.
- Cracked Cheesecake: Avoid overmixing the batter and cool slowly in the oven with the door ajar.
- Soggy Crust: Bake the crust until lightly golden brown and let it cool completely.
- Uneven Baking: Ensure your oven is properly calibrated.
- Prep Time: 30 minutes
- Cook Time: 45 minutes
Leave a Comment