

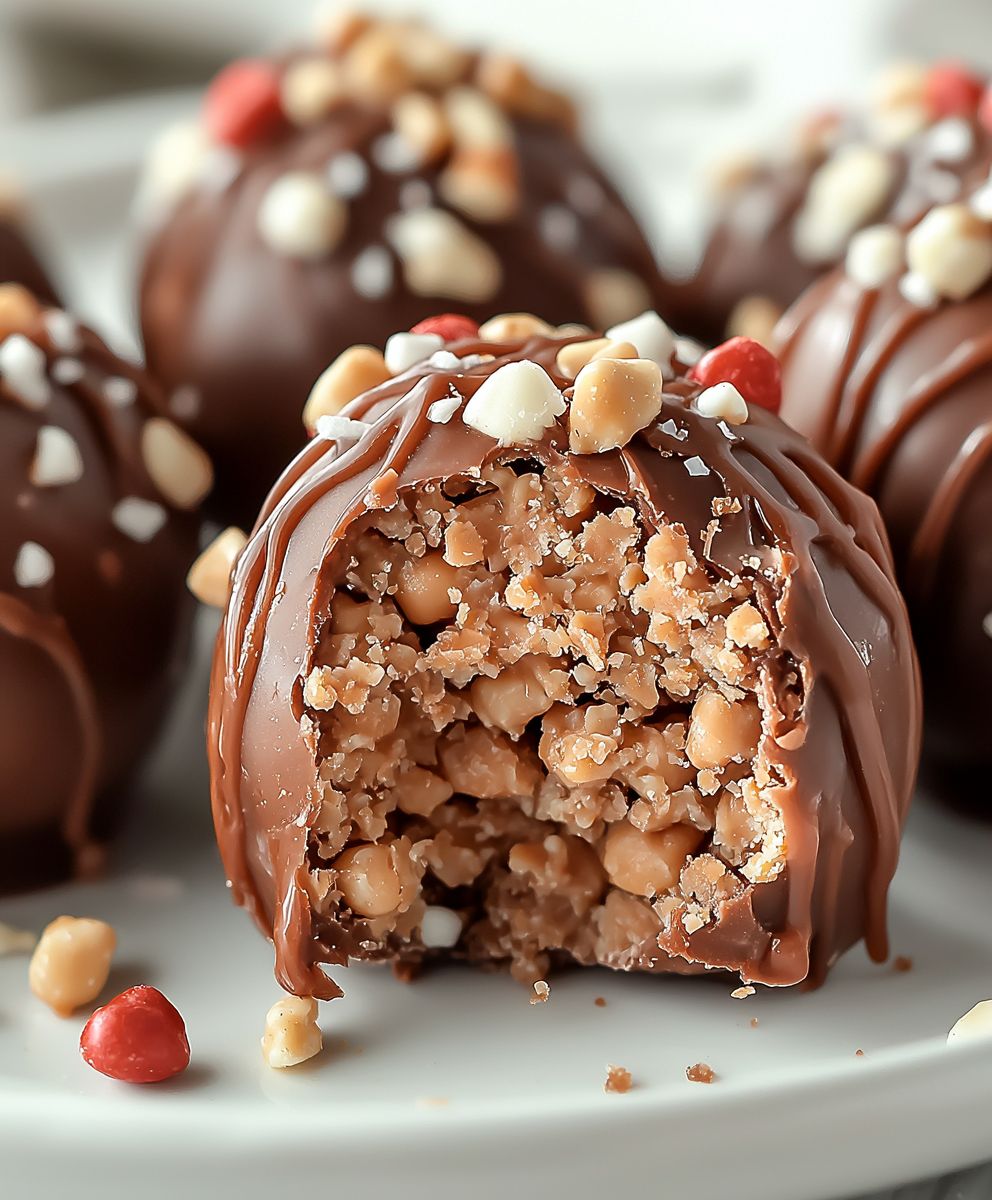
Peanut Butter Balls: Prepare to be amazed by these decadent, no-bake treats that are unbelievably easy to make and even easier to devour! Imagine biting into a creamy, melt-in-your-mouth center of peanut butter perfection, coated in a rich, chocolatey shell. These aren’t just any dessert; they’re a nostalgic trip back to childhood, a simple pleasure that brings joy with every single bite.
While the exact origins of Peanut Butter Balls are shrouded in a bit of mystery, their popularity exploded in the mid-20th century alongside the rise of convenience cooking. They represent a time when homemade treats didn’t require hours in the kitchen, a welcome concept that still resonates today. These little spheres of happiness quickly became a staple at holiday gatherings, bake sales, and family get-togethers.
What makes these so irresistible? It’s the perfect combination of textures and flavors. The smooth, slightly salty peanut butter filling contrasts beautifully with the crisp, sweet chocolate coating. Plus, they’re incredibly convenient! No oven required, minimal ingredients, and they can be made ahead of time. Whether you’re looking for a quick and easy dessert to satisfy a sweet craving or a crowd-pleasing treat for your next party, these are guaranteed to be a hit. So, let’s get started and create some peanut butter magic!

Ingredients:
- 1 cup (2 sticks) unsalted butter, softened
- 1 cup creamy peanut butter
- 3 cups powdered sugar, plus more for dusting
- 3 cups graham cracker crumbs (about 24 graham crackers, finely crushed)
- 1 teaspoon vanilla extract
- 1/2 teaspoon salt
- 12 ounces semi-sweet chocolate chips
- 1 tablespoon vegetable shortening (or coconut oil)
Preparing the Peanut Butter Mixture:
Okay, let’s get started! First, we’re going to make the delicious peanut butter base for our balls. This is where the magic happens, so pay close attention!
- Cream the Butter and Peanut Butter: In a large mixing bowl, cream together the softened butter and peanut butter using an electric mixer (stand mixer or hand mixer) until light and fluffy. This usually takes about 3-5 minutes. Make sure your butter is truly softened not melted! for the best texture. Scrape down the sides of the bowl occasionally to ensure everything is evenly mixed. We want a smooth, consistent base.
- Add the Powdered Sugar: Gradually add the powdered sugar, one cup at a time, to the butter and peanut butter mixture. Beat on low speed after each addition to prevent a powdered sugar cloud. Trust me, you don’t want that! Once all the powdered sugar is incorporated, increase the speed to medium and beat for another minute or two until the mixture is smooth and well combined. Again, scrape down the sides of the bowl as needed.
- Incorporate the Graham Cracker Crumbs: Now, it’s time to add the graham cracker crumbs. Add them gradually, about one cup at a time, mixing on low speed until just combined. Be careful not to overmix, as this can make the balls tough. We want them to be tender and melt-in-your-mouth good! The graham cracker crumbs add a lovely texture and subtle sweetness that complements the peanut butter perfectly.
- Add Vanilla and Salt: Stir in the vanilla extract and salt until evenly distributed. The vanilla enhances the flavor of the peanut butter, and the salt balances the sweetness. Don’t skip the salt it really makes a difference!
Forming the Peanut Butter Balls:
Now for the fun part rolling the mixture into balls! This can be a little messy, but it’s totally worth it.
- Chill the Dough: Cover the bowl with plastic wrap and refrigerate the peanut butter mixture for at least 30 minutes, or up to an hour. This will make it easier to handle and prevent the balls from being too sticky. Chilling is crucial!
- Shape the Balls: Once chilled, remove the mixture from the refrigerator. Using a small cookie scoop or a spoon, scoop out about 1 tablespoon of the mixture and roll it between your palms to form a ball. Aim for consistent sizes so they look uniform.
- Place on a Baking Sheet: Place the formed balls on a baking sheet lined with parchment paper or wax paper. This will prevent them from sticking.
- Chill Again (Optional but Recommended): For even firmer balls, you can chill them again for another 15-20 minutes before dipping them in chocolate. This will help the chocolate adhere better and prevent the balls from softening too quickly.
Melting the Chocolate:
Time to get that chocolate nice and melty! We want a smooth, glossy coating for our peanut butter balls.
- Combine Chocolate and Shortening: In a heat-safe bowl, combine the semi-sweet chocolate chips and vegetable shortening (or coconut oil). The shortening helps to thin the chocolate and gives it a smoother, shinier finish.
- Melt the Chocolate: There are two ways to melt the chocolate:
- Microwave Method: Microwave in 30-second intervals, stirring well after each interval, until the chocolate is completely melted and smooth. Be careful not to overheat the chocolate, as it can burn.
- Double Boiler Method: Place the bowl over a saucepan of simmering water, making sure the bottom of the bowl doesn’t touch the water. Stir constantly until the chocolate is completely melted and smooth. This method is more gentle and helps prevent the chocolate from burning.
- Stir Until Smooth: Once the chocolate is melted, stir until it is completely smooth and glossy. If the chocolate seems too thick, you can add a tiny bit more shortening, a teaspoon at a time, until you reach the desired consistency.
Dipping and Decorating:
The final step dipping the peanut butter balls in chocolate and adding any desired decorations! This is where you can get creative.
- Dip the Balls: Using a fork or dipping tools, carefully dip each peanut butter ball into the melted chocolate, ensuring it is completely coated.
- Remove Excess Chocolate: Gently tap the fork against the side of the bowl to remove any excess chocolate.
- Place on Baking Sheet: Place the chocolate-covered balls back on the prepared baking sheet.
- Decorate (Optional): While the chocolate is still wet, you can sprinkle the balls with your favorite toppings, such as:
- Sprinkles
- Chopped nuts (peanuts, pecans, walnuts)
- Sea salt
- Mini chocolate chips
- Crushed graham crackers
- Let the Chocolate Set: Refrigerate the chocolate-covered peanut butter balls for at least 30 minutes, or until the chocolate is completely set. This will help them hold their shape and prevent the chocolate from melting.
- Dust with Powdered Sugar (Optional): Once the chocolate is set, you can lightly dust the balls with powdered sugar for an extra touch of sweetness and visual appeal.
Storage:
Store the peanut butter balls in an airtight container in the refrigerator for up to a week. They can also be frozen for longer storage (up to 2-3 months). Just thaw them in the refrigerator before serving.
Tips for Success:
- Use softened butter: This is crucial for a smooth and creamy peanut butter mixture.
- Don’t overmix: Overmixing can make the balls tough.
- Chill the dough: Chilling makes the dough easier to handle.
- Use good quality chocolate: This will make a big difference in the flavor of the finished product.
- Melt the chocolate carefully: Avoid overheating the chocolate, as it can burn.
- Get creative with decorations: Have fun and personalize your peanut butter balls with your favorite toppings.
Variations:
- Dark Chocolate: Use dark chocolate chips instead of semi-sweet for a richer, more intense flavor.
- White Chocolate: Use white chocolate chips for a sweeter, more decadent treat.
- Peanut Butter Chips: Add peanut butter chips to the melted chocolate for an extra peanut butter boost.
- Different Extracts: Experiment with different extracts, such as almond extract or peppermint extract, to add a unique flavor.
- Add a Crunch: Mix in chopped peanuts or other nuts to the peanut butter mixture for added crunch.
Conclusion:
And there you have it! These Peanut Butter Balls are truly a must-try recipe for anyone who loves a quick, easy, and utterly satisfying treat. From the creamy, melt-in-your-mouth peanut butter center to the delightful chocolate coating, every bite is an explosion of flavor and texture. I know I’m biased, but I genuinely believe this is one of those recipes that will become a staple in your household, perfect for satisfying those sweet cravings or impressing guests with minimal effort. What makes these Peanut Butter Balls so special? It’s the simplicity, really. You don’t need any fancy equipment or hard-to-find ingredients. Just a few pantry staples and a little bit of time, and you’ll have a batch of these delectable treats ready to enjoy. Plus, they’re incredibly versatile! Looking for serving suggestions? These Peanut Butter Balls are fantastic on their own, of course, but they also make a wonderful addition to dessert platters. Imagine serving them alongside cookies, brownies, and other sweet treats a guaranteed crowd-pleaser! You could also crumble them over ice cream for an extra layer of peanut butter goodness. Or, for a truly decadent experience, try pairing them with a glass of cold milk or a warm cup of coffee. But the fun doesn’t stop there! Feel free to experiment with variations to make these Peanut Butter Balls your own. For a richer flavor, use dark chocolate instead of milk chocolate. If you’re feeling adventurous, add a pinch of sea salt to the peanut butter mixture for a sweet and salty twist. You could also roll the balls in chopped nuts, sprinkles, or even shredded coconut for added texture and visual appeal. For a festive touch, use colored sprinkles for holidays or special occasions. Another variation I love is adding a touch of honey or maple syrup to the peanut butter mixture for a slightly sweeter and more complex flavor. You could also incorporate some chopped pretzels for a salty crunch that complements the sweetness perfectly. And if you’re a fan of peanut butter and banana, try adding a mashed banana to the peanut butter mixture for a truly unique and delicious treat. These Peanut Butter Balls are also incredibly easy to customize for dietary restrictions. To make them gluten-free, simply ensure that your graham crackers are gluten-free. For a vegan version, use vegan chocolate and a plant-based butter substitute. The possibilities are endless! I truly hope you’ll give this recipe a try. I’m confident that you’ll love it as much as I do. It’s a simple, satisfying, and endlessly customizable treat that’s perfect for any occasion. So, what are you waiting for? Gather your ingredients, put on your apron, and get ready to whip up a batch of these irresistible Peanut Butter Balls. And don’t forget to share your creations with me! I’d love to see your photos and hear about your variations. Tag me on social media or leave a comment below to let me know how they turned out. Happy baking! I can’t wait to hear about your peanut butter adventures. Let me know what you think of this Peanut Butter Balls recipe! Print
Peanut Butter Balls: The Ultimate No-Bake Recipe
- Total Time: 60 minutes
- Yield: 36 peanut butter balls 1x
Description
Easy no-bake peanut butter balls dipped in rich chocolate. A perfect sweet treat for any occasion!
Ingredients
- 1 cup (2 sticks) unsalted butter, softened
- 1 cup creamy peanut butter
- 3 cups powdered sugar, plus more for dusting
- 1 teaspoon vanilla extract
- 1/2 teaspoon salt
- 12 ounces semi-sweet chocolate chips
- 1 tablespoon vegetable shortening (or coconut oil)
- Optional: Sprinkles, chopped nuts, or sea salt for topping
Instructions
- Cream the Butter and Peanut Butter: In a large bowl, using an electric mixer, cream together the softened butter and peanut butter until light and fluffy (2-3 minutes). Scrape down the sides of the bowl.
- Add Powdered Sugar: Gradually add the powdered sugar, one cup at a time, to the butter and peanut butter mixture. Mix on low speed after each addition until fully incorporated.
- Incorporate Vanilla and Salt: Add the vanilla extract and salt to the mixture. Mix until well combined.
- Check Consistency: The mixture should be firm enough to hold its shape. If too soft, add more powdered sugar (1 tbsp at a time). If too dry, add a tiny bit of softened butter or peanut butter.
- Prepare Workspace: Line a baking sheet with parchment paper or wax paper.
- Roll the Balls: Using a small cookie scoop or spoon, scoop out about 1 tablespoon of the peanut butter mixture. Roll between your palms to form a smooth ball.
- Place on Baking Sheet: Place the rolled peanut butter ball onto the prepared baking sheet, spacing evenly apart.
- Chill the Balls: Place the baking sheet in the refrigerator for at least 30 minutes (or up to an hour) to firm up.
- Choose Melting Method: Melt the chocolate using either a double boiler or the microwave.
- Double Boiler Method: Fill a saucepan with about an inch or two of water. Bring the water to a simmer over medium heat. Place a heatproof bowl (glass or stainless steel) on top of the saucepan, making sure the bottom of the bowl doesn’t touch the water. Add the chocolate chips and vegetable shortening (or coconut oil) to the bowl. Stir occasionally until the chocolate is completely melted and smooth. The shortening helps to thin the chocolate and gives it a nice shine.
- Microwave Method: Place the chocolate chips and vegetable shortening (or coconut oil) in a microwave-safe bowl. Microwave in 30-second intervals, stirring after each interval, until the chocolate is melted and smooth. Be very careful not to overheat the chocolate, as it can burn easily. If you see any signs of burning, stop immediately and stir vigorously.
- Maintain Chocolate Temperature: Keep the melted chocolate warm over the double boiler or in the microwave (on a very low power setting).
- Prepare Dipping Station: Have melted chocolate, chilled peanut butter balls, a clean baking sheet lined with parchment paper, and toppings ready.
- Dip the Peanut Butter Balls: Using a fork or dipping tools, carefully dip each chilled peanut butter ball into the melted chocolate, ensuring it’s completely coated. Gently tap off excess chocolate.
- Place on Baking Sheet: Place the chocolate-covered peanut butter ball onto the prepared baking sheet.
- Decorate (Optional): While the chocolate is still wet, sprinkle with desired toppings.
- Repeat: Repeat the dipping and decorating process with the remaining peanut butter balls.
- Chill Again: Place the baking sheet back in the refrigerator for at least 30 minutes, or until the chocolate is set.
- Serving: Serve chilled or at room temperature.
- Storing: Store in an airtight container in the refrigerator for up to a week. For longer storage, freeze in a single layer on a baking sheet until solid, then transfer to a freezer-safe bag for up to 2-3 months. Thaw in the refrigerator before serving.
- Dusting (Optional): If the peanut butter balls become sticky after storing, dust with powdered sugar before serving.
Notes
- Make sure the butter is properly softened for a smooth peanut butter mixture.
- Add powdered sugar gradually to prevent a “sugar explosion.”
- Chilling the peanut butter balls before dipping is crucial to prevent melting.
- Be careful not to overheat the chocolate when melting.
- Get creative with your toppings!
- If you don’t have shortening, coconut oil works as a substitute.
- Prep Time: 20 minutes
- Cook Time: 10 minutes
Leave a Comment