

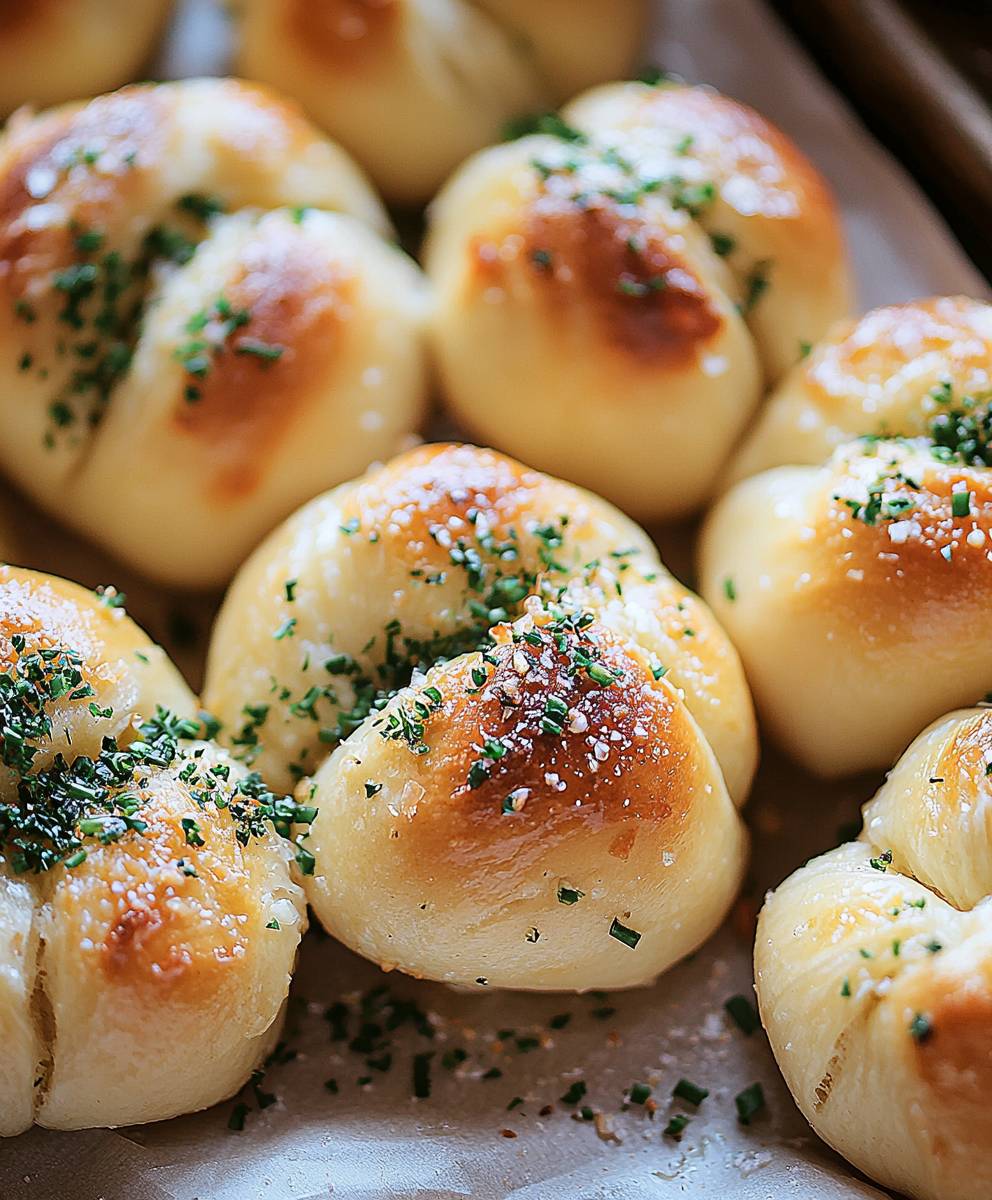
Garlic knots, those pillowy, garlicky, buttery bites of heaven, are more than just an appetizer; they’re a culinary experience! Imagine sinking your teeth into warm, soft dough, infused with the pungent aroma of garlic and the richness of melted butter. Is your mouth watering yet? Mine certainly is!
While the exact origins of garlic knots are debated, most food historians agree they emerged from the bustling pizzerias of New York City. Created as a way to use up leftover pizza dough, these humble knots quickly became a beloved staple, spreading across the country and beyond. They represent the ingenuity and resourcefulness of Italian-American cuisine, transforming simple ingredients into something truly special.
But what is it about these little knots that makes them so irresistible? It’s the perfect combination of textures the soft, yielding interior and the slightly crisp exterior. It’s the bold, savory flavor that comes from the generous coating of garlic butter. And let’s be honest, it’s the sheer convenience! They’re easy to eat, perfect for sharing, and always a crowd-pleaser. Whether you’re serving them as a side dish with pasta, bringing them to a potluck, or simply enjoying them as a snack, garlic knots are guaranteed to disappear fast. So, let’s get baking and create some magic in the kitchen!

Ingredients:
- 1 pound pizza dough, store-bought or homemade
- 4 tablespoons olive oil, divided
- 6 cloves garlic, minced
- 1/4 cup grated Parmesan cheese, plus more for serving
- 2 tablespoons chopped fresh parsley, plus more for serving
- 1 teaspoon dried oregano
- 1/2 teaspoon salt
- 1/4 teaspoon black pepper
- Optional: 1/4 teaspoon red pepper flakes, for a little heat
- Optional: 2 tablespoons melted butter, for brushing after baking
Preparing the Garlic Herb Oil:
Okay, let’s get started! The first thing we’re going to do is make our delicious garlic herb oil. This is what gives the garlic knots their amazing flavor, so don’t skimp on the good stuff!
- In a small bowl, combine 3 tablespoons of the olive oil, the minced garlic, Parmesan cheese, parsley, oregano, salt, pepper, and red pepper flakes (if using).
- Mix everything together really well until it forms a nice, fragrant paste. You should be able to smell the garlic and herbs already yum!
- Set this aside for now. We’ll use it to coat the knots before and after baking.
Shaping the Garlic Knots:
Now comes the fun part shaping the knots! Don’t worry if they don’t look perfect; the rustic look is part of their charm.
- Preheat your oven to 400°F (200°C). Line a baking sheet with parchment paper. This will prevent the knots from sticking and make cleanup a breeze.
- Lightly flour a clean work surface. This will prevent the dough from sticking as you work with it.
- Divide the pizza dough in half. This makes it easier to handle.
- Roll one half of the dough into a long rope, about 1 inch thick.
- Using a sharp knife or pizza cutter, cut the rope into 1-inch pieces. You should get about 15-20 pieces from each half of the dough.
- Now, take one piece of dough and gently roll it into a rope about 6-8 inches long.
- To form the knot, hold one end of the rope and loop it over the other end, creating a simple knot. Tuck the ends underneath the knot to secure it.
- Place the knot on the prepared baking sheet.
- Repeat steps 6-8 with the remaining pieces of dough. Make sure to space the knots out evenly on the baking sheet so they have room to expand.
Coating and Baking:
Almost there! Now we’re going to coat the knots with that amazing garlic herb oil and bake them until they’re golden brown and irresistible.
- Brush the tops of the knots generously with half of the garlic herb oil mixture. Make sure to get into all the nooks and crannies!
- Bake for 15-20 minutes, or until the knots are golden brown and cooked through. Keep an eye on them, as oven temperatures can vary.
- While the knots are baking, melt the remaining 1 tablespoon of olive oil (or butter, if using) in a small bowl.
- Once the knots are out of the oven, brush them immediately with the remaining garlic herb oil mixture and the melted olive oil (or butter). This will give them an extra layer of flavor and shine.
Serving:
The best part enjoying your freshly baked garlic knots! Serve them warm with extra Parmesan cheese and parsley for garnish.
- Sprinkle the garlic knots with extra Parmesan cheese and chopped fresh parsley.
- Serve immediately and enjoy! These are best enjoyed warm, right out of the oven.
- Optional: Serve with marinara sauce for dipping.
Tips and Variations:
Want to customize your garlic knots? Here are a few ideas:
- Cheese Lovers: Add mozzarella cheese to the knots before baking. Just sprinkle some shredded mozzarella over the knots after brushing them with the garlic herb oil.
- Spicy Knots: Add more red pepper flakes to the garlic herb oil for a spicier kick. You can also add a pinch of cayenne pepper.
- Herb Variations: Experiment with different herbs. Try adding basil, rosemary, or thyme to the garlic herb oil.
- Sweet Garlic Knots: For a sweet and savory twist, brush the baked knots with a mixture of melted butter, honey, and a pinch of cinnamon.
- Make Ahead: You can prepare the knots ahead of time and store them in the refrigerator until ready to bake. Just add a few minutes to the baking time.
- Freezing: Baked garlic knots can be frozen for up to 2 months. Thaw them completely before reheating in the oven.
Troubleshooting:
Sometimes things don’t go exactly as planned. Here are a few common issues and how to fix them:
- Knots are too dry: Make sure you’re using enough olive oil in the garlic herb mixture. You can also brush the knots with extra melted butter after baking.
- Knots are burning: Reduce the oven temperature slightly and keep a closer eye on them. You can also tent the baking sheet with foil to prevent them from browning too quickly.
- Knots are not cooking through: Make sure your oven is properly preheated. You may need to increase the baking time slightly.
- Dough is too sticky: Add a little more flour to your work surface.
- Dough is not rising: If you’re using homemade dough, make sure your yeast is active. You can test the yeast by adding it to warm water with a pinch of sugar. If it foams up, it’s good to go.
Storing Leftovers:
If you happen to have any leftover garlic knots (which is unlikely!), here’s how to store them:
- Room Temperature: Store in an airtight container for up to 2 days.
- Refrigerator: Store in an airtight container for up to 5 days.
- Freezer: Store in a freezer-safe bag or container for up to 2 months.
Reheating:
To reheat your garlic knots:
- Oven: Preheat oven to 350°F (175°C). Place the knots on a baking sheet and bake for 5-10 minutes, or until heated through.
- Microwave: Microwave for 15-30 seconds, or until heated through. Be careful not to overheat them, as they can become tough.
Enjoy!
I hope you enjoy making and eating these delicious garlic knots! They’re perfect for parties, game day, or just a cozy night in. Let me know in the comments how they turned out!
Conclusion:
So there you have it! These aren’t just any garlic knots; they’re a warm, pillowy, intensely flavorful experience that will have everyone reaching for seconds (and thirds!). I truly believe this recipe is a must-try because it delivers that perfect balance of soft, chewy dough, pungent garlic, and rich, buttery goodness. It’s comfort food elevated, and honestly, who doesn’t need a little extra comfort in their life? But beyond the incredible taste, what makes these garlic knots so special is their versatility. They’re fantastic as a side dish to your favorite Italian meal, like lasagna or spaghetti. Imagine dipping them into a bowl of marinara sauce pure bliss! They also make a fantastic appetizer for parties or gatherings. Just picture a platter piled high with these golden-brown beauties; they’re guaranteed to disappear in minutes. And don’t be afraid to get creative! Want to add a little extra zing? Sprinkle some red pepper flakes on top before baking for a spicy kick. Craving cheese? A generous dusting of Parmesan or Romano cheese after baking will take them to the next level. You could even stuff them with mozzarella before baking for a cheesy, gooey surprise. The possibilities are endless! Here are a few serving suggestions to get you started: * Classic Marinara: Serve with a warm bowl of your favorite marinara sauce for dipping. * Garlic Herb Butter: Whip up a batch of garlic herb butter for an extra layer of flavor. * Cheesy Garlic Knots: Sprinkle with Parmesan or Romano cheese after baking. * Spicy Garlic Knots: Add red pepper flakes before baking for a spicy kick. * Stuffed Garlic Knots: Stuff with mozzarella cheese before baking for a cheesy surprise. * Pizza Night Companion: Serve alongside your homemade or takeout pizza. * Soup Sidekick: Perfect for dipping into creamy tomato soup or minestrone. * Salad Accompaniment: Adds a warm and savory touch to any salad. * Party Appetizer: A crowd-pleasing appetizer for any gathering. * Lunchbox Treat: Pack a few in your lunchbox for a delicious midday snack. I’ve poured my heart and soul into perfecting this recipe, and I’m confident that you’ll love it as much as I do. It’s surprisingly easy to make, even for beginner bakers, and the results are simply irresistible. So, what are you waiting for? Gather your ingredients, preheat your oven, and get ready to experience the magic of homemade garlic knots. I promise you won’t regret it! And most importantly, I’d love to hear about your experience! Once you’ve tried the recipe, please come back and leave a comment below. Let me know what you thought, what variations you tried, and any tips or tricks you discovered along the way. Your feedback is invaluable, and it helps me continue to improve and share delicious recipes with all of you. Happy baking! I am sure you will enjoy this recipe as much as I do. Print
Garlic Knots: The Ultimate Guide to Perfect, Cheesy Goodness
- Total Time: 40 minutes
- Yield: 30–40 garlic knots 1x
Description
Soft, flavorful garlic knots brushed with a fragrant garlic herb oil, perfect as an appetizer or side dish.
Ingredients
- 1 pound pizza dough, store-bought or homemade
- 4 tablespoons olive oil, divided
- 6 cloves garlic, minced
- 1/4 cup grated Parmesan cheese, plus more for serving
- 2 tablespoons chopped fresh parsley, plus more for serving
- 1 teaspoon dried oregano
- 1/2 teaspoon salt
- 1/4 teaspoon black pepper
- Optional: 1/4 teaspoon red pepper flakes, for a little heat
- Optional: 2 tablespoons melted butter, for brushing after baking
Instructions
- Prepare Garlic Herb Oil: In a small bowl, combine 3 tablespoons of olive oil, minced garlic, Parmesan cheese, parsley, oregano, salt, pepper, and red pepper flakes (if using). Mix well and set aside.
- Shape the Knots: Preheat oven to 400°F (200°C). Line a baking sheet with parchment paper.
- Lightly flour a clean work surface.
- Divide the pizza dough in half.
- Roll one half of the dough into a long rope, about 1 inch thick.
- Cut the rope into 1-inch pieces (about 15-20 pieces per half).
- Roll one piece of dough into a rope about 6-8 inches long.
- Form a knot by looping one end of the rope over the other and tucking the ends underneath.
- Place the knot on the prepared baking sheet.
- Repeat steps 6-9 with the remaining pieces of dough, spacing them evenly.
- Coat and Bake: Brush the tops of the knots generously with half of the garlic herb oil mixture.
- Bake for 15-20 minutes, or until golden brown and cooked through.
- While baking, melt the remaining 1 tablespoon of olive oil (or butter, if using).
- Once out of the oven, brush immediately with the remaining garlic herb oil mixture and the melted olive oil (or butter).
- Serve: Sprinkle with extra Parmesan cheese and chopped fresh parsley. Serve immediately. Optional: Serve with marinara sauce for dipping.
Notes
- Cheese Lovers: Add mozzarella cheese to the knots before baking.
- Spicy Knots: Add more red pepper flakes to the garlic herb oil.
- Herb Variations: Experiment with different herbs like basil, rosemary, or thyme.
- Sweet Garlic Knots: Brush the baked knots with a mixture of melted butter, honey, and cinnamon.
- Make Ahead: Prepare the knots ahead of time and store in the refrigerator. Add a few minutes to the baking time.
- Freezing: Baked garlic knots can be frozen for up to 2 months. Thaw completely before reheating.
- Knots are too dry: Make sure you’re using enough olive oil in the garlic herb mixture. You can also brush the knots with extra melted butter after baking.
- Knots are burning: Reduce the oven temperature slightly and keep a closer eye on them. You can also tent the baking sheet with foil to prevent them from browning too quickly.
- Knots are not cooking through: Make sure your oven is properly preheated. You may need to increase the baking time slightly.
- Dough is too sticky: Add a little more flour to your work surface.
- Dough is not rising: If you’re using homemade dough, make sure your yeast is active. You can test the yeast by adding it to warm water with a pinch of sugar. If it foams up, it’s good to go.
- Prep Time: 20 minutes
- Cook Time: 15 minutes
Leave a Comment