

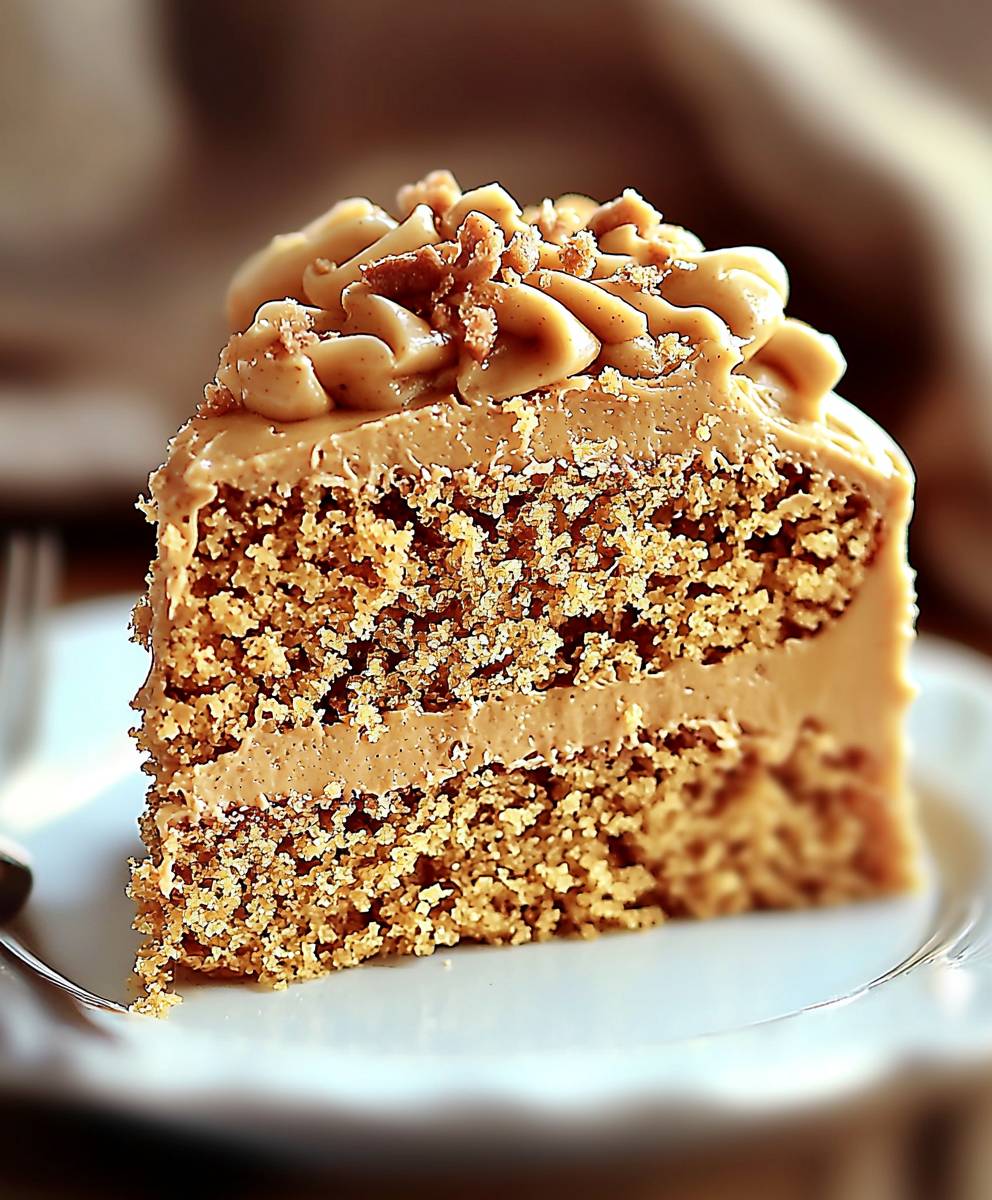
Peanut Butter Cake: Prepare to be amazed! Imagine sinking your fork into a slice of moist, decadent cake, the rich aroma of roasted peanuts filling your senses. This isn’t just any cake; it’s a celebration of the beloved peanut butter flavor, transformed into an unforgettable dessert experience.
While the exact origins of peanut butter cake are somewhat hazy, its roots are deeply embedded in American baking traditions. Peanut butter itself gained popularity in the late 19th century, and it wasn’t long before creative cooks began incorporating it into cakes, cookies, and other treats. This cake quickly became a staple in potlucks, family gatherings, and bake sales across the country.
What makes peanut butter cake so irresistible? It’s the perfect balance of sweet and savory, with a creamy, melt-in-your-mouth texture that’s simply divine. The nutty flavor of the peanut butter complements the sweetness of the cake beautifully, creating a symphony of tastes that will leave you craving more. Plus, it’s surprisingly easy to make, making it a perfect choice for both novice and experienced bakers alike. Whether you’re looking for a show-stopping dessert for a special occasion or a comforting treat to enjoy on a cozy evening, this cake is guaranteed to please. So, let’s get baking and create a peanut butter masterpiece!

Ingredients:
- For the Cake:
- 2 cups all-purpose flour
- 2 teaspoons baking powder
- 1 teaspoon baking soda
- 1/2 teaspoon salt
- 1 cup (2 sticks) unsalted butter, softened
- 1 1/2 cups granulated sugar
- 1 cup packed light brown sugar
- 2 large eggs
- 1 teaspoon vanilla extract
- 1 cup creamy peanut butter
- 1 cup buttermilk
- For the Peanut Butter Frosting:
- 1 cup (2 sticks) unsalted butter, softened
- 1 cup creamy peanut butter
- 4 cups powdered sugar
- 1/2 cup milk, plus more as needed
- 1 teaspoon vanilla extract
- Pinch of salt
- Optional Garnish:
- Chopped peanuts
- Mini peanut butter cups, halved
- Chocolate shavings
Preparing the Cake Batter:
- Preheat and Prep: First things first, let’s get that oven preheated to 350°F (175°C). Grease and flour two 9-inch round cake pans. I like to use baking spray with flour already in it it’s a lifesaver! Make sure you get into all the nooks and crannies to prevent sticking.
- Dry Ingredients: In a medium bowl, whisk together the flour, baking powder, baking soda, and salt. Whisking is key here to ensure everything is evenly distributed. Nobody wants a bite of pure baking soda! Set this aside for later.
- Cream Butter and Sugars: In a large bowl (or the bowl of your stand mixer), cream together the softened butter, granulated sugar, and brown sugar until light and fluffy. This usually takes about 3-5 minutes. Don’t rush this step it’s crucial for a tender cake. You want the mixture to be pale and airy.
- Add Eggs and Vanilla: Beat in the eggs one at a time, then stir in the vanilla extract. Make sure each egg is fully incorporated before adding the next.
- Incorporate Peanut Butter: Add the peanut butter and beat until well combined. Scrape down the sides of the bowl to ensure everything is evenly mixed.
- Alternate Wet and Dry Ingredients: Gradually add the dry ingredients to the wet ingredients, alternating with the buttermilk, beginning and ending with the dry ingredients. So, add about a third of the dry ingredients, then half of the buttermilk, then another third of the dry ingredients, the remaining buttermilk, and finally the last of the dry ingredients. Mix until just combined. Be careful not to overmix! Overmixing develops the gluten in the flour, which can result in a tough cake.
- Divide and Bake: Divide the batter evenly between the prepared cake pans. Spread the batter evenly in each pan. Bake for 30-35 minutes, or until a wooden skewer inserted into the center comes out clean.
- Cool the Cakes: Let the cakes cool in the pans for 10 minutes before inverting them onto a wire rack to cool completely. This prevents the cakes from sticking and allows them to cool evenly. Make sure they are completely cool before frosting!
Making the Peanut Butter Frosting:
- Cream Butter and Peanut Butter: In a large bowl (or the bowl of your stand mixer), cream together the softened butter and peanut butter until smooth and creamy. Again, make sure your butter is properly softened it makes all the difference!
- Add Powdered Sugar: Gradually add the powdered sugar, one cup at a time, beating on low speed until combined. Be careful not to add it all at once, or you’ll end up with a powdered sugar cloud!
- Add Milk and Vanilla: Add the milk and vanilla extract and beat until light and fluffy. You may need to add a little more milk to reach your desired consistency. I like my frosting to be nice and spreadable.
- Add Salt: Stir in a pinch of salt to balance the sweetness.
Assembling the Cake:
- Level the Cakes (Optional): If your cakes have a dome on top, use a serrated knife to carefully level them. This will make stacking and frosting much easier.
- Frost the First Layer: Place one cake layer on a serving plate or cake stand. Spread a generous layer of peanut butter frosting evenly over the top.
- Add the Second Layer: Carefully place the second cake layer on top of the frosting.
- Frost the Entire Cake: Frost the top and sides of the cake with the remaining peanut butter frosting. You can go for a smooth finish or create swirls and peaks with a spatula.
- Garnish (Optional): Decorate the cake with chopped peanuts, halved mini peanut butter cups, or chocolate shavings. Get creative and have fun with it!
- Chill (Optional): For easier slicing, chill the cake in the refrigerator for at least 30 minutes before serving. This will help the frosting set up.
- Serve and Enjoy! Slice and serve your delicious peanut butter cake. It’s perfect with a glass of milk or a scoop of vanilla ice cream.
Tips for the Perfect Peanut Butter Cake:
- Use Room Temperature Ingredients: This is crucial for a smooth batter and even baking. Make sure your butter, eggs, and buttermilk are all at room temperature.
- Don’t Overmix: Overmixing develops the gluten in the flour, which can result in a tough cake. Mix until just combined.
- Use High-Quality Peanut Butter: The flavor of the peanut butter really shines through in this cake, so use a good quality brand that you enjoy. I prefer creamy peanut butter, but you can use chunky if you like the added texture.
- Adjust Sweetness to Taste: If you prefer a less sweet frosting, you can reduce the amount of powdered sugar.
- Storage: Store leftover cake in an airtight container at room temperature for up to 3 days or in the refrigerator for up to 5 days.
Variations:
- Chocolate Peanut Butter Cake: Add 1/2 cup of unsweetened cocoa powder to the dry ingredients for a chocolatey twist.
- Peanut Butter Cup Cake: Stir chopped peanut butter cups into the batter before baking.
- Peanut Butter Swirl Cake: Make a simple chocolate ganache and swirl it into the batter before baking for a marbled effect.
- Gluten-Free Peanut Butter Cake: Use a gluten-free all-purpose flour blend in place of the regular flour. Make sure to choose a blend that contains xanthan gum.
Troubleshooting:
- Cake is Dry: Make sure you’re not overbaking the cake. Check for doneness with a wooden skewer. Also, ensure you’re using the correct amount of liquid in the batter.
- Cake is Dense: This could be due to overmixing or using cold ingredients. Make sure your butter, eggs, and buttermilk are at room temperature and mix until just combined.
- Frosting is Too Thick: Add more milk, one tablespoon at a time, until you reach your desired consistency.
- Frosting is Too Thin: Add more powdered sugar, one tablespoon at a time, until you reach your desired consistency.
Conclusion:
This Peanut Butter Cake isn’t just another cake recipe; it’s a guaranteed crowd-pleaser, a comforting hug in dessert form, and a surefire way to satisfy any peanut butter craving. I truly believe this is a must-try recipe for anyone who loves the irresistible combination of sweet and salty, rich and decadent. The moist, tender crumb, infused with the nutty aroma of peanut butter, and topped with that luscious, creamy frosting it’s simply divine! Why is it a must-try? Because it’s surprisingly easy to make! You don’t need to be a professional baker to achieve bakery-worthy results. The ingredients are readily available, the instructions are straightforward, and the reward is a cake that tastes like you spent hours slaving away in the kitchen. Plus, it’s incredibly versatile. Think of all the possibilities! For a truly decadent experience, serve a slice warm with a scoop of vanilla ice cream and a drizzle of hot fudge sauce. Or, if you’re feeling adventurous, try a peanut butter and chocolate swirl ice cream the combination is heavenly! You could also crumble some peanut butter cups on top for an extra peanut butter punch. Looking for variations? You could easily adapt this recipe to make cupcakes instead of a full cake. Simply adjust the baking time accordingly. For a chocolate peanut butter twist, add a tablespoon or two of cocoa powder to the cake batter and the frosting. Another fantastic variation is to incorporate chopped peanuts into the frosting for added texture and crunch. If you’re catering to a gluten-free crowd, you can substitute the all-purpose flour with a gluten-free blend, ensuring everyone can enjoy this delicious treat. For a more sophisticated presentation, consider layering the cake with a peanut butter mousse or a chocolate ganache. You could also decorate it with peanut brittle or homemade peanut butter cups. The possibilities are endless! I’ve made this Peanut Butter Cake countless times for birthdays, holidays, and just because, and it’s always a hit. It’s the kind of cake that disappears quickly, leaving everyone wanting more. It’s the perfect dessert to share with loved ones, creating sweet memories that will last a lifetime. So, what are you waiting for? Gather your ingredients, preheat your oven, and get ready to bake the most amazing peanut butter cake you’ve ever tasted. I’m confident that you’ll love it as much as I do. And most importantly, I want to hear about your experience! Did you try any of the variations I suggested? Did you add your own special touch? Share your photos and stories in the comments below. I can’t wait to see your creations and hear how much you enjoyed this recipe. Happy baking! Let me know if you have any questions, I’m always happy to help. I hope this Peanut Butter Cake becomes a staple in your baking repertoire, bringing joy and deliciousness to your table for years to come. Don’t forget to rate the recipe once you’ve tried it! Your feedback helps others discover this fantastic treat. Print
Peanut Butter Cake: The Ultimate Recipe and Baking Guide
- Total Time: 60 minutes
- Yield: 12 servings 1x
Description
A moist and delicious peanut butter cake with creamy peanut butter frosting. Perfect for peanut butter lovers!
Ingredients
- 2 cups all-purpose flour
- 2 teaspoons baking powder
- 1 teaspoon baking soda
- 1/2 teaspoon salt
- 1 cup (2 sticks) unsalted butter, softened
- 1 1/2 cups granulated sugar
- 1 cup packed light brown sugar
- 2 large eggs
- 1 teaspoon vanilla extract
- 1 cup creamy peanut butter
- 1 cup buttermilk
- 1 cup (2 sticks) unsalted butter, softened
- 1 cup creamy peanut butter
- 4 cups powdered sugar
- 1/2 cup milk, plus more as needed
- 1 teaspoon vanilla extract
- Pinch of salt
- Chopped peanuts
- Mini peanut butter cups, halved
- Chocolate shavings
Instructions
- Preheat oven to 350°F (175°C). Grease and flour two 9-inch round cake pans.
- In a medium bowl, whisk together the flour, baking powder, baking soda, and salt. Set aside.
- In a large bowl (or stand mixer), cream together the softened butter, granulated sugar, and brown sugar until light and fluffy (3-5 minutes).
- Beat in the eggs one at a time, then stir in the vanilla extract.
- Add the peanut butter and beat until well combined. Scrape down the sides of the bowl.
- Gradually add the dry ingredients to the wet ingredients, alternating with the buttermilk, beginning and ending with the dry ingredients. Mix until just combined. Do not overmix.
- Divide the batter evenly between the prepared cake pans. Bake for 30-35 minutes, or until a wooden skewer inserted into the center comes out clean.
- Let the cakes cool in the pans for 10 minutes before inverting them onto a wire rack to cool completely.
- In a large bowl (or stand mixer), cream together the softened butter and peanut butter until smooth and creamy.
- Gradually add the powdered sugar, one cup at a time, beating on low speed until combined.
- Add the milk and vanilla extract and beat until light and fluffy. Add more milk as needed to reach desired consistency.
- Stir in a pinch of salt to balance the sweetness.
- If cakes have a dome, level them with a serrated knife.
- Place one cake layer on a serving plate. Spread a generous layer of peanut butter frosting evenly over the top.
- Carefully place the second cake layer on top of the frosting.
- Frost the top and sides of the cake with the remaining peanut butter frosting.
- Decorate with chopped peanuts, halved mini peanut butter cups, or chocolate shavings.
- Chill the cake in the refrigerator for at least 30 minutes before serving.
- Slice and serve.
Notes
- Use room temperature ingredients for a smooth batter and even baking.
- Don’t overmix the batter.
- Use high-quality peanut butter for the best flavor.
- Adjust sweetness of frosting to taste.
- Store leftover cake in an airtight container at room temperature for up to 3 days or in the refrigerator for up to 5 days.
- Prep Time: 25 minutes
- Cook Time: 35 minutes

Leave a Comment