

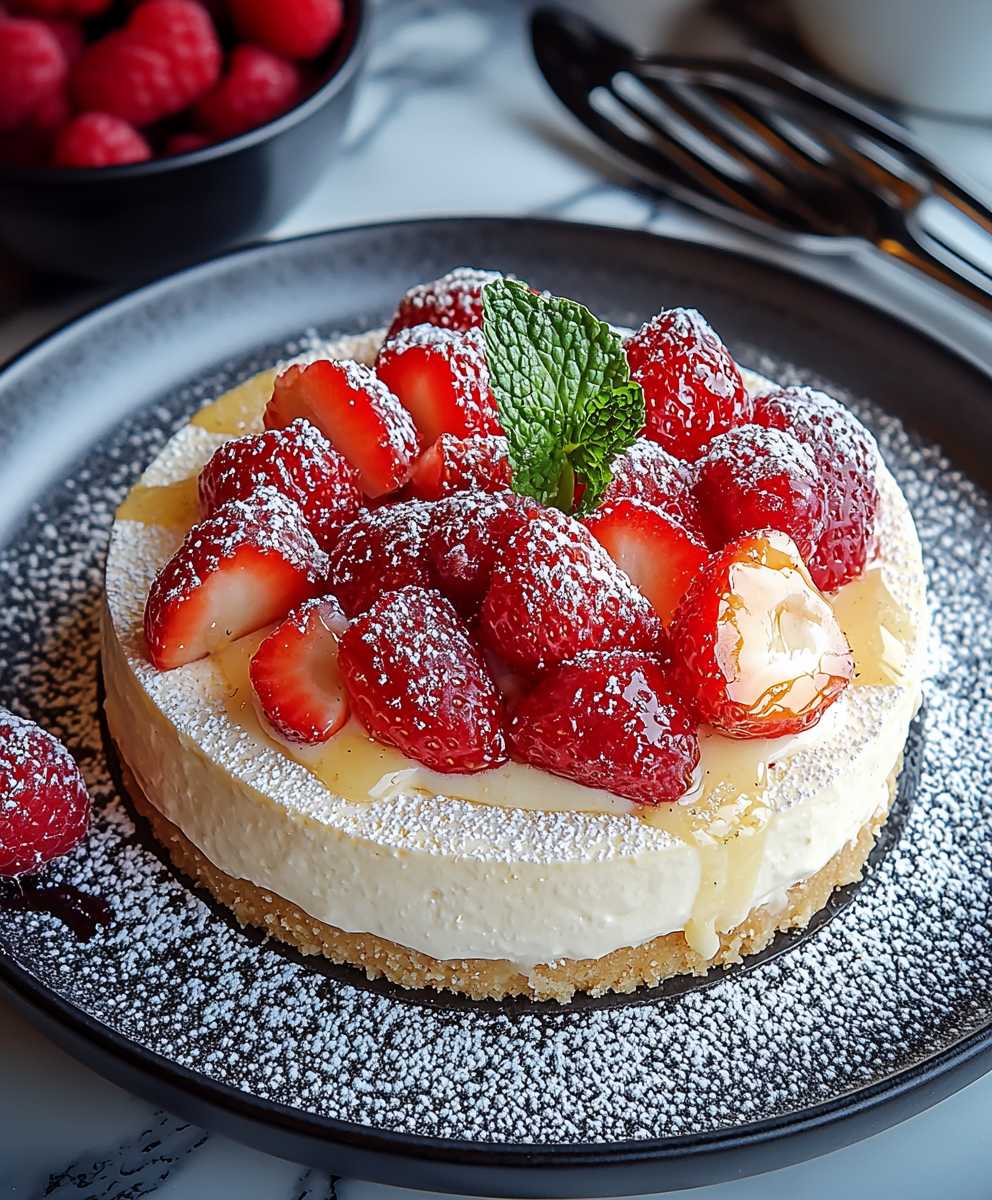
Low Carb Cheesecake: Prepare to indulge in a guilt-free dessert that will redefine your perception of healthy eating! Imagine sinking your fork into a creamy, decadent cheesecake, knowing that each bite aligns perfectly with your low-carb lifestyle. It sounds too good to be true, right?
Cheesecake, in its various forms, has a rich history dating back to ancient Greece, where it was served to athletes as an energy boost. Over the centuries, it has evolved into a beloved dessert enjoyed worldwide. However, the traditional cheesecake recipe is often laden with sugar and carbohydrates, making it a no-go for those watching their intake.
That’s where our low carb cheesecake recipe comes in! People adore cheesecake for its luxurious texture, the perfect balance of sweet and tangy flavors, and its ability to satisfy even the most intense dessert cravings. This version captures all of that magic, but with a fraction of the carbs. We’ve carefully crafted this recipe using alternative sweeteners and low-carb ingredients to deliver a cheesecake experience that is both delicious and diet-friendly. Get ready to enjoy a slice of heaven without the guilt!

Ingredients:
- For the Crust:
- 1 ½ cups almond flour, finely ground
- ¼ cup erythritol or your preferred low-carb sweetener
- ¼ cup unsalted butter, melted
- 1 teaspoon vanilla extract
- Pinch of salt
- For the Filling:
- 32 ounces (4 packages) cream cheese, softened to room temperature
- 1 ¼ cups erythritol or your preferred low-carb sweetener
- 4 large eggs, room temperature
- 1 cup sour cream, full-fat
- 2 tablespoons heavy cream
- 2 teaspoons vanilla extract
- 1 tablespoon lemon juice (optional, but recommended)
- Pinch of salt
- Optional Toppings:
- Sugar-free whipped cream
- Fresh berries (strawberries, blueberries, raspberries)
- Sugar-free chocolate shavings
- Low-carb caramel sauce
Preparing the Crust:
- Preheat the Oven: Preheat your oven to 350°F (175°C). This is crucial for even baking of the crust.
- Combine Dry Ingredients: In a medium-sized bowl, whisk together the almond flour, erythritol (or your chosen sweetener), and salt. Make sure everything is well combined to ensure even sweetness throughout the crust.
- Add Wet Ingredients: Pour the melted butter and vanilla extract into the bowl with the dry ingredients.
- Mix Well: Use a fork or your hands to mix everything together until a crumbly dough forms. The mixture should resemble wet sand.
- Press into Pan: Press the almond flour mixture firmly and evenly into the bottom of a 9-inch springform pan. I like to use the bottom of a measuring cup to really pack it down and create a solid base.
- Pre-bake the Crust: Bake the crust in the preheated oven for 8-10 minutes, or until it’s lightly golden brown. This helps the crust set and prevents it from becoming soggy when the filling is added.
- Cool the Crust: Remove the crust from the oven and let it cool completely while you prepare the filling. This is important to prevent the filling from melting the crust.
Preparing the Filling:
- Beat the Cream Cheese: In a large bowl, beat the softened cream cheese with an electric mixer until it’s smooth and creamy. This is the most important step for a lump-free cheesecake, so take your time and make sure there are no clumps. Scrape down the sides of the bowl as needed.
- Add Sweetener: Gradually add the erythritol (or your chosen sweetener) to the cream cheese, beating until well combined. Again, scrape down the sides of the bowl to ensure everything is evenly mixed.
- Incorporate Eggs: Add the eggs one at a time, beating well after each addition. It’s crucial to add the eggs slowly and mix gently to avoid incorporating too much air into the batter, which can cause the cheesecake to crack.
- Add Sour Cream and Heavy Cream: Mix in the sour cream and heavy cream until just combined. Don’t overmix at this stage, as it can also lead to cracking.
- Add Vanilla and Lemon Juice: Stir in the vanilla extract and lemon juice (if using). The lemon juice adds a subtle tang that complements the sweetness of the cheesecake.
- Final Mix: Give the batter one final gentle mix to ensure everything is evenly distributed.
Baking the Cheesecake:
- Prepare Water Bath: Wrap the bottom of the springform pan tightly with heavy-duty aluminum foil. This will prevent water from seeping into the cheesecake during baking. Place the wrapped pan inside a larger roasting pan.
- Pour in the Batter: Pour the cheesecake filling over the cooled crust in the springform pan.
- Add Hot Water: Carefully pour hot water into the roasting pan, reaching about halfway up the sides of the springform pan. The water bath helps to create a moist environment in the oven, which prevents the cheesecake from cracking and ensures even baking.
- Bake: Bake in the preheated oven for 55-70 minutes, or until the edges of the cheesecake are set but the center still has a slight jiggle. The baking time may vary depending on your oven, so keep an eye on it.
- Turn Off Oven and Let Cool: Turn off the oven and crack the oven door slightly. Let the cheesecake cool in the oven for 1 hour. This gradual cooling process helps to prevent cracking.
- Refrigerate: Remove the cheesecake from the water bath and let it cool completely on a wire rack. Then, cover it with plastic wrap and refrigerate for at least 4 hours, or preferably overnight. This allows the cheesecake to fully set and develop its flavor.
Serving and Storing:
- Remove from Pan: Before serving, carefully remove the cheesecake from the springform pan. Run a thin knife around the edges of the cheesecake to loosen it from the pan.
- Slice and Serve: Slice the cheesecake with a sharp knife and serve chilled.
- Add Toppings (Optional): Top with sugar-free whipped cream, fresh berries, sugar-free chocolate shavings, or low-carb caramel sauce, if desired.
- Store: Store leftover cheesecake in the refrigerator for up to 5 days. Make sure to cover it tightly with plastic wrap to prevent it from drying out.
Tips for Success:
- Room Temperature Ingredients: Using room temperature cream cheese and eggs is crucial for a smooth and creamy cheesecake. It helps the ingredients blend together more easily and prevents lumps from forming.
- Don’t Overmix: Overmixing the batter can incorporate too much air, which can cause the cheesecake to crack during baking. Mix until just combined.
- Water Bath is Key: The water bath is essential for preventing cracking and ensuring even baking. Don’t skip this step!
- Cooling Process: The gradual cooling process in the oven and then in the refrigerator is just as important as the baking process. It helps the cheesecake set properly and prevents cracking.
- Sweetener Choice: You can use any low-carb sweetener you prefer, such as erythritol, xylitol, or stevia. Adjust the amount to your taste.
- Crust Variations: If you don’t want to use almond flour, you can also use coconut flour or a combination of both. You may need to adjust the amount of butter depending on the flour you use.
- Flavor Variations: Get creative with the flavors! You can add cocoa powder for a chocolate cheesecake, or pumpkin puree for a pumpkin cheesecake.
Troubleshooting:
- Cracked Cheesecake: If your cheesecake cracks, don’t worry! It will still taste delicious. You can cover the cracks with whipped cream or toppings. To prevent cracking in the future, make sure to use a water bath, don’t overmix the batter, and cool the cheesecake gradually.
- Soggy Crust: If your crust is soggy, make sure to pre-bake it before adding the filling. You can also try using a thicker crust.
- Lumpy Filling: If your filling is lumpy, make sure to use room temperature cream cheese and beat it until it’s smooth and creamy before adding the other ingredients.
Conclusion:
And there you have it! This low carb cheesecake recipe is truly a game-changer, and I wholeheartedly believe it deserves a spot in your regular dessert rotation. Why? Because it delivers all the creamy, decadent satisfaction of a classic cheesecake without the guilt. We’re talking about a dessert that lets you indulge your sweet tooth while staying true to your health goals a win-win in my book! But the real magic lies in how surprisingly easy it is to make. Forget complicated steps and hours spent in the kitchen. This recipe is straightforward, uses readily available ingredients, and yields consistently delicious results. Trust me, even if you’re a novice baker, you can absolutely nail this. The rich, tangy flavor, combined with the smooth, melt-in-your-mouth texture, will have everyone convinced you’re a professional pastry chef. Beyond its health benefits and ease of preparation, this cheesecake is incredibly versatile. Looking for serving suggestions? A dollop of sugar-free whipped cream and a sprinkle of fresh berries (raspberries and blueberries are particularly good choices) elevate it to restaurant-worthy status. For a chocolatey twist, drizzle some melted sugar-free chocolate over the top. Or, if you’re feeling adventurous, try adding a hint of lemon or orange zest to the batter for a burst of citrusy flavor. The crust is also ripe for experimentation! While the almond flour crust provides a wonderfully nutty base, you could substitute it with a coconut flour crust for a slightly sweeter, more tropical vibe. You could even add a touch of cinnamon or nutmeg to the crust for a warm, comforting spice. And speaking of variations, don’t be afraid to get creative with the fillings! Consider swirling in some sugar-free peanut butter for a Reese’s-inspired treat, or adding a layer of sugar-free caramel sauce for an extra decadent experience. You could even incorporate some sugar-free chocolate chips into the batter for a delightful surprise in every bite. The possibilities are truly endless! I’ve poured my heart and soul into perfecting this recipe, and I’m confident that you’ll love it as much as I do. It’s the perfect dessert for special occasions, weeknight treats, or simply when you need a little something to satisfy your cravings. It’s also a fantastic option for those with dietary restrictions, allowing them to enjoy a classic dessert without compromising their health. So, what are you waiting for? Gather your ingredients, preheat your oven, and get ready to embark on a cheesecake adventure! I promise you won’t be disappointed. Once you’ve tried this low carb cheesecake, you’ll wonder how you ever lived without it. I’m incredibly excited to hear about your experience with this recipe. Did you try any variations? What were your favorite toppings? Did you make any adjustments to the recipe to suit your preferences? Please, share your thoughts, photos, and feedback in the comments below. Your insights are invaluable, and they help me continue to improve and refine my recipes. Happy baking! Print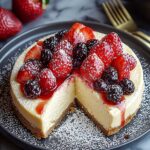
Low Carb Cheesecake: The Ultimate Guide to Delicious & Guilt-Free Dessert
- Total Time: 385 minutes
- Yield: 12 servings 1x
Description
A rich and creamy keto cheesecake with an almond flour crust, perfect for a low-carb dessert.
Ingredients
- 1 ½ cups almond flour, finely ground
- ¼ cup erythritol or your preferred low-carb sweetener
- ¼ cup unsalted butter, melted
- 1 teaspoon vanilla extract
- Pinch of salt
- 32 ounces (4 packages) cream cheese, softened to room temperature
- 1 ¼ cups erythritol or your preferred low-carb sweetener
- 4 large eggs, room temperature
- 1 cup sour cream, full-fat
- 2 tablespoons heavy cream
- 2 teaspoons vanilla extract
- 1 tablespoon lemon juice (optional, but recommended)
- Pinch of salt
- Sugar-free whipped cream
- Fresh berries (strawberries, blueberries, raspberries)
- Sugar-free chocolate shavings
- Low-carb caramel sauce
Instructions
- Preheat your oven to 350°F (175°C).
- In a medium-sized bowl, whisk together the almond flour, erythritol (or your chosen sweetener), and salt.
- Pour the melted butter and vanilla extract into the bowl with the dry ingredients.
- Use a fork or your hands to mix everything together until a crumbly dough forms.
- Press the almond flour mixture firmly and evenly into the bottom of a 9-inch springform pan.
- Bake the crust in the preheated oven for 8-10 minutes, or until it’s lightly golden brown.
- Remove the crust from the oven and let it cool completely while you prepare the filling.
- In a large bowl, beat the softened cream cheese with an electric mixer until it’s smooth and creamy.
- Gradually add the erythritol (or your chosen sweetener) to the cream cheese, beating until well combined.
- Add the eggs one at a time, beating well after each addition.
- Mix in the sour cream and heavy cream until just combined.
- Stir in the vanilla extract and lemon juice (if using).
- Give the batter one final gentle mix to ensure everything is evenly distributed.
- Wrap the bottom of the springform pan tightly with heavy-duty aluminum foil. Place the wrapped pan inside a larger roasting pan.
- Pour the cheesecake filling over the cooled crust in the springform pan.
- Carefully pour hot water into the roasting pan, reaching about halfway up the sides of the springform pan.
- Bake in the preheated oven for 55-70 minutes, or until the edges of the cheesecake are set but the center still has a slight jiggle.
- Turn off the oven and crack the oven door slightly. Let the cheesecake cool in the oven for 1 hour.
- Remove the cheesecake from the water bath and let it cool completely on a wire rack. Then, cover it with plastic wrap and refrigerate for at least 4 hours, or preferably overnight.
- Before serving, carefully remove the cheesecake from the springform pan. Run a thin knife around the edges of the cheesecake to loosen it from the pan.
- Slice the cheesecake with a sharp knife and serve chilled.
- Top with sugar-free whipped cream, fresh berries, sugar-free chocolate shavings, or low-carb caramel sauce, if desired.
- Store leftover cheesecake in the refrigerator for up to 5 days. Make sure to cover it tightly with plastic wrap to prevent it from drying out.
Notes
- Using room temperature cream cheese and eggs is crucial for a smooth and creamy cheesecake.
- Overmixing the batter can incorporate too much air, which can cause the cheesecake to crack during baking. Mix until just combined.
- The water bath is essential for preventing cracking and ensuring even baking.
- The gradual cooling process in the oven and then in the refrigerator is just as important as the baking process.
- You can use any low-carb sweetener you prefer, such as erythritol, xylitol, or stevia. Adjust the amount to your taste.
- If you don’t want to use almond flour, you can also use coconut flour or a combination of both. You may need to adjust the amount of butter depending on the flour you use.
- Get creative with the flavors! You can add cocoa powder for a chocolate cheesecake, or pumpkin puree for a pumpkin cheesecake.
- Prep Time: 20 minutes
- Cook Time: 55 minutes
Leave a Comment