

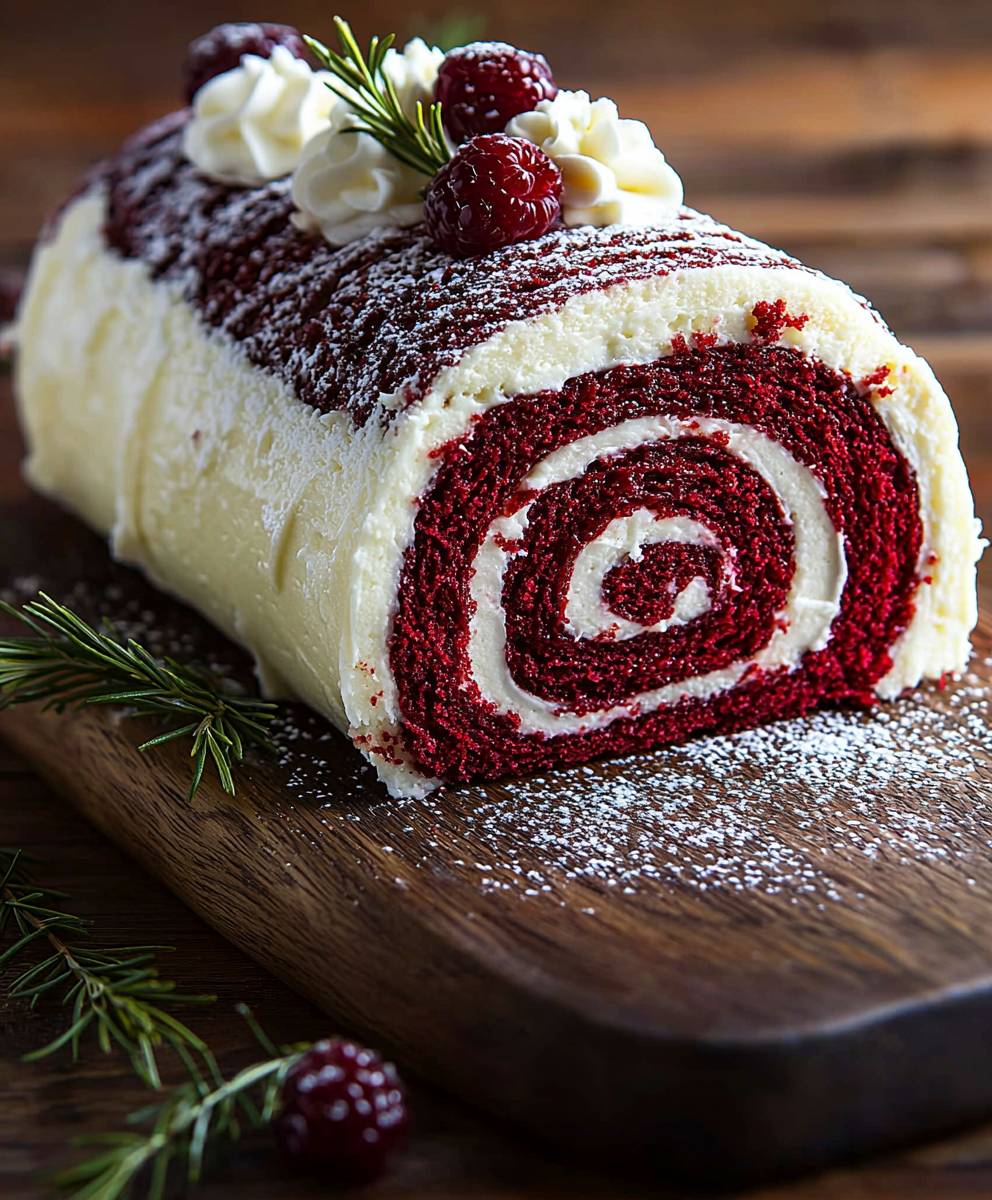
Red Velvet Cake Roll: Prepare to be amazed by this show-stopping dessert that’s surprisingly easy to make! Imagine a vibrant, crimson-hued cake, swirled with a luscious, creamy filling, creating a visually stunning and utterly irresistible treat. This isn’t just a cake; it’s an experience!
While the exact origins of red velvet cake are debated, its popularity soared in the mid-20th century, thanks in part to clever marketing by food companies. Some believe it originated during the Depression era, where bakers used beet juice to enhance the color and moisture of their cakes. Whatever its true beginnings, the red velvet flavor profile a delicate balance of cocoa, tanginess, and a hint of vanilla has captured hearts (and taste buds) for generations.
People adore a Red Velvet Cake Roll for several reasons. First, there’s the visual appeal. The striking contrast between the red cake and the white filling is simply gorgeous. Then, there’s the taste: the subtle cocoa notes of the cake, combined with the creamy, slightly tangy filling, create a flavor symphony that’s both comforting and sophisticated. And let’s not forget the texture! The soft, spongy cake and the smooth, rich filling melt in your mouth, making each bite a pure delight. Plus, a cake roll is a fun and impressive alternative to a traditional layer cake, perfect for holidays, special occasions, or simply when you want to treat yourself and your loved ones to something extraordinary.

Ingredients:
- For the Cake:
- 1 cup all-purpose flour
- 1/4 cup unsweetened cocoa powder
- 1 teaspoon baking powder
- 1/2 teaspoon baking soda
- 1/4 teaspoon salt
- 1 cup granulated sugar
- 1/2 cup vegetable oil
- 1/2 cup buttermilk
- 2 large eggs
- 1 teaspoon vanilla extract
- 1 ounce (2 tablespoons) red food coloring
- 1 teaspoon white vinegar
- For the Cream Cheese Filling:
- 8 ounces cream cheese, softened
- 1/2 cup (1 stick) unsalted butter, softened
- 3 cups powdered sugar
- 1 teaspoon vanilla extract
- For Dusting:
- Powdered sugar, for dusting the cake roll
Preparing the Red Velvet Cake
- Preheat and Prepare: First things first, let’s get our oven ready! Preheat your oven to 350°F (175°C). Grease a 10×15 inch jelly roll pan really well. I like to use baking spray with flour already in it, but you can also grease it with shortening and then dust it with flour. Make sure you get into all the corners! Line the bottom of the pan with parchment paper, leaving an overhang on the two longer sides. This will make it super easy to lift the cake out later.
- Combine Dry Ingredients: In a medium bowl, whisk together the flour, cocoa powder, baking powder, baking soda, and salt. Whisk it all together until it’s nicely combined. This ensures that the baking powder and soda are evenly distributed, which is key for a light and fluffy cake.
- Combine Wet Ingredients: In a large bowl, whisk together the sugar, oil, buttermilk, eggs, and vanilla extract until smooth. Make sure there are no lumps of sugar.
- Add Red Food Coloring and Vinegar: Now for the signature red color! Add the red food coloring and vinegar to the wet ingredients and whisk until well combined. The vinegar helps to activate the red food coloring and gives the cake a slightly tangy flavor, which is characteristic of red velvet.
- Combine Wet and Dry Ingredients: Gradually add the dry ingredients to the wet ingredients, mixing on low speed until just combined. Be careful not to overmix! Overmixing can develop the gluten in the flour, resulting in a tough cake. Mix until the batter is smooth and there are no visible streaks of flour.
- Pour into Pan and Bake: Pour the batter into the prepared jelly roll pan and spread it evenly. Use an offset spatula or the back of a spoon to ensure the batter reaches all the corners. Bake for 12-15 minutes, or until a toothpick inserted into the center comes out clean. Keep a close eye on it, as it can overbake easily.
Rolling the Cake
- Prepare for Rolling: While the cake is baking, prepare a clean kitchen towel or a large sheet of parchment paper. Dust it generously with powdered sugar. This will prevent the cake from sticking to the towel or parchment paper when you roll it.
- Invert and Roll: As soon as the cake comes out of the oven, immediately invert it onto the prepared towel or parchment paper. Carefully peel off the parchment paper that lined the bottom of the pan.
- Roll the Cake: Starting from one of the shorter ends, gently roll the cake up in the towel or parchment paper. Be careful not to crack the cake. Roll it up snugly but not too tightly.
- Cool Completely: Place the rolled cake on a wire rack and let it cool completely. This is crucial! If you try to fill and roll the cake while it’s still warm, the filling will melt, and the cake will be more likely to crack. Let it cool for at least an hour, or even longer if you have the time.
Making the Cream Cheese Filling
- Cream Butter and Cream Cheese: In a large bowl, beat the softened cream cheese and butter together with an electric mixer until smooth and creamy. Make sure both the cream cheese and butter are at room temperature for the best results. This will prevent lumps in your filling.
- Add Powdered Sugar: Gradually add the powdered sugar, one cup at a time, beating on low speed until combined. Be careful not to add the powdered sugar too quickly, or it will create a cloud of dust!
- Add Vanilla Extract: Stir in the vanilla extract until well combined.
- Whip Until Fluffy: Increase the mixer speed to medium-high and beat the filling for 2-3 minutes, or until it is light and fluffy. This will incorporate air into the filling, making it even more delicious.
Assembling the Cake Roll
- Unroll the Cake: Once the cake is completely cool, carefully unroll it. Be gentle, as the cake can be delicate.
- Spread the Filling: Spread the cream cheese filling evenly over the cake, leaving about 1/2 inch border along one of the longer edges. This will prevent the filling from squeezing out when you roll the cake back up.
- Reroll the Cake: Starting from the edge with the filling, gently reroll the cake. Use the towel or parchment paper to help you roll it up tightly.
- Wrap and Chill: Wrap the cake roll tightly in plastic wrap and refrigerate for at least 2 hours, or preferably overnight. This will allow the filling to set and the cake to hold its shape.
Serving the Cake Roll
- Dust with Powdered Sugar: Before serving, unwrap the cake roll and place it on a serving platter. Dust it generously with powdered sugar. This adds a touch of sweetness and makes the cake roll look even more appealing.
- Slice and Serve: Use a sharp serrated knife to slice the cake roll into 1-inch thick slices. Serve immediately and enjoy!
Tips for Success:
- Don’t Overbake: Overbaking the cake will make it dry and more prone to cracking when you roll it. Keep a close eye on it and remove it from the oven as soon as a toothpick inserted into the center comes out clean.
- Cool Completely: Make sure the cake is completely cool before filling and rolling. This will prevent the filling from melting and the cake from cracking.
- Use Room Temperature Ingredients: Using room temperature cream cheese and butter for the filling will ensure that it is smooth and creamy.
- Be Gentle: Be gentle when rolling the cake to avoid cracking.
- Chill Before Serving: Chilling the cake roll before serving will allow the filling to set and the cake to hold its shape.
Variations:
- Chocolate Chips: Add chocolate chips to the cream cheese filling for a chocolatey twist.
- Nuts: Sprinkle chopped nuts over the cream cheese filling for added texture and flavor.
- Fruit: Add a layer of fresh berries or fruit preserves to the cream cheese filling.
- Different Frosting: Try using a different frosting, such as a chocolate ganache or a vanilla buttercream.
Conclusion:
This Red Velvet Cake Roll isn’t just a dessert; it’s a showstopper, a conversation starter, and a guaranteed crowd-pleaser. The vibrant red hue, the delicate sponge, and the creamy, tangy filling all combine to create a symphony of flavors and textures that will leave you and your guests wanting more. I truly believe this recipe is a must-try for anyone who loves baking, or simply appreciates a delicious and beautiful treat. Why is this Red Velvet Cake Roll a must-try? It’s simpler than it looks! I know, rolling a cake can seem intimidating, but I’ve broken down each step to make it as foolproof as possible. Plus, the results are so worth the effort. Imagine presenting this gorgeous roll at your next holiday gathering or birthday celebration. The “oohs” and “aahs” alone will make you feel like a baking superstar! Beyond the visual appeal, the taste is simply divine. The slight tang of the buttermilk and cocoa powder in the cake perfectly complements the sweet and creamy filling. It’s a balanced and satisfying dessert that isn’t overly sweet, making it perfect for even the most discerning palates.Serving Suggestions and Variations:
The possibilities are endless when it comes to serving and customizing this Red Velvet Cake Roll. For a classic presentation, simply dust the roll with powdered sugar before slicing and serving. You can also add a drizzle of melted white chocolate for an extra touch of elegance. * Serving Suggestions: Serve chilled or at room temperature. A scoop of vanilla ice cream or a dollop of whipped cream alongside each slice elevates the experience even further. For a festive touch, garnish with fresh berries like raspberries or strawberries. * Variations: Feel free to experiment with the filling! While the classic cream cheese filling is always a winner, you could try a mascarpone filling for a richer, more decadent flavor. Or, for a lighter option, use a stabilized whipped cream filling. You could even add chopped pecans or walnuts to the filling for a bit of crunch. Another fun variation is to add a layer of raspberry jam between the cake and the filling for a burst of fruity flavor. If you’re feeling adventurous, try using a different extract in the cake, such as almond or vanilla bean paste, to enhance the flavor profile. For a chocolatey twist, add chocolate chips to the cake batter. * Holiday Ideas: For Christmas, decorate the roll with red and green sprinkles or edible glitter. For Valentine’s Day, shape the filling into a heart before rolling the cake. For Easter, use pastel-colored sprinkles and edible flowers. I’ve poured my heart and soul into perfecting this recipe, and I’m confident that you’ll love it as much as I do. Don’t be afraid to get creative and put your own spin on it. Baking should be fun and rewarding, and this Red Velvet Cake Roll is the perfect recipe to unleash your inner baker. So, what are you waiting for? Gather your ingredients, preheat your oven, and get ready to create a masterpiece. I can’t wait to hear about your baking adventures! Please, try this Red Velvet Cake Roll recipe and share your photos and experiences with me. Let me know what variations you tried and how they turned out. Happy baking! I’m excited to see your creations! Print
Red Velvet Cake Roll: The Ultimate Guide to Baking Perfection
- Total Time: 180 minutes
- Yield: 8–10 servings 1x
Description
A classic Red Velvet Cake Roll with a tangy cream cheese filling, perfect for a festive dessert.
Ingredients
- 1 cup all-purpose flour
- 1/4 cup unsweetened cocoa powder
- 1 teaspoon baking powder
- 1/2 teaspoon baking soda
- 1/4 teaspoon salt
- 1 cup granulated sugar
- 1/2 cup vegetable oil
- 1/2 cup buttermilk
- 2 large eggs
- 1 teaspoon vanilla extract
- 1 ounce (2 tablespoons) red food coloring
- 1 teaspoon white vinegar
- 8 ounces cream cheese, softened
- 1/2 cup (1 stick) unsalted butter, softened
- 3 cups powdered sugar
- 1 teaspoon vanilla extract
- Powdered sugar, for dusting the cake roll
Instructions
- Preheat oven to 350°F (175°C). Grease a 10×15 inch jelly roll pan and line with parchment paper, leaving an overhang.
- Whisk together flour, cocoa powder, baking powder, baking soda, and salt in a medium bowl.
- In a large bowl, whisk together sugar, oil, buttermilk, eggs, and vanilla extract until smooth.
- Add red food coloring and vinegar to the wet ingredients and whisk until well combined.
- Gradually add the dry ingredients to the wet ingredients, mixing on low speed until just combined. Do not overmix.
- Pour batter into the prepared pan and spread evenly. Bake for 12-15 minutes, or until a toothpick inserted into the center comes out clean.
- While the cake is baking, dust a clean kitchen towel or parchment paper generously with powdered sugar.
- Immediately invert the cake onto the prepared towel or parchment paper. Peel off the parchment paper that lined the bottom of the pan.
- Starting from one of the shorter ends, gently roll the cake up in the towel or parchment paper.
- Place the rolled cake on a wire rack and let it cool completely.
- In a large bowl, beat the softened cream cheese and butter together with an electric mixer until smooth and creamy.
- Gradually add the powdered sugar, one cup at a time, beating on low speed until combined.
- Stir in the vanilla extract until well combined.
- Increase the mixer speed to medium-high and beat the filling for 2-3 minutes, or until it is light and fluffy.
- Once the cake is completely cool, carefully unroll it.
- Spread the cream cheese filling evenly over the cake, leaving about 1/2 inch border along one of the longer edges.
- Starting from the edge with the filling, gently reroll the cake. Use the towel or parchment paper to help you roll it up tightly.
- Wrap the cake roll tightly in plastic wrap and refrigerate for at least 2 hours, or preferably overnight.
- Before serving, unwrap the cake roll and place it on a serving platter. Dust it generously with powdered sugar.
- Use a sharp serrated knife to slice the cake roll into 1-inch thick slices. Serve immediately and enjoy!
Notes
- Don’t overbake the cake.
- Cool the cake completely before filling and rolling.
- Use room temperature ingredients for the filling.
- Be gentle when rolling the cake.
- Chill before serving.
- Variations: Add chocolate chips, nuts, fruit, or a different frosting.
- Prep Time: 30 minutes
- Cook Time: 15 minutes

Leave a Comment