

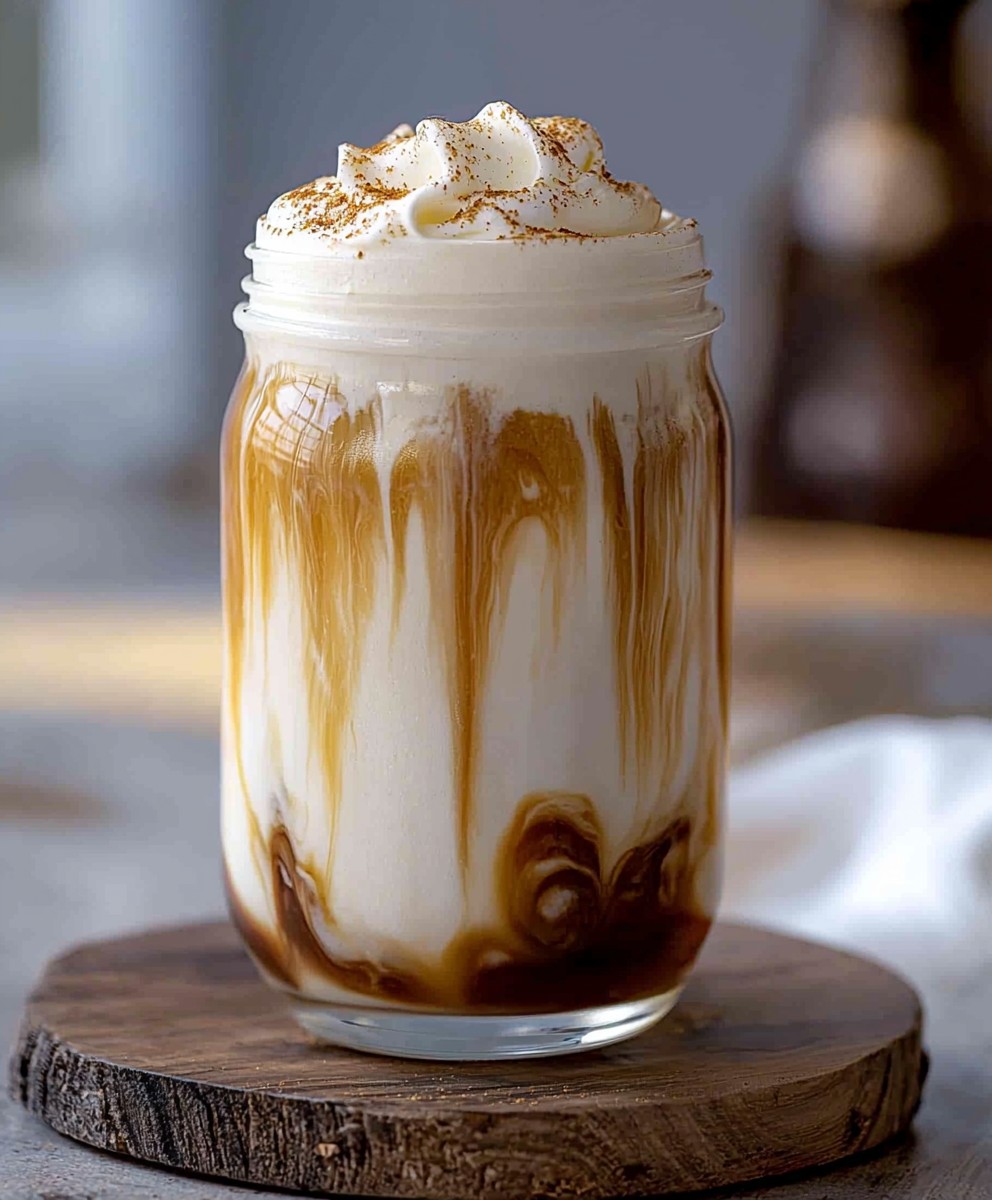
Vanilla Sweet Cream Cold Foam: Prepare to elevate your iced coffee game to a whole new level! Forget those expensive coffee shop runs because I’m about to share the secret to crafting the most luscious, velvety smooth Vanilla Sweet Cream Cold Foam right in your own kitchen. This isn’t just any topping; it’s a cloud of sweet, creamy perfection that transforms your everyday iced coffee into a decadent treat.
While cold foam itself is a relatively recent innovation, inspired by the desire for a lighter, more airy alternative to traditional whipped cream, the concept of flavoring coffee with vanilla has a rich history. Vanilla beans, originating from Mexico, were prized by the Aztecs and later introduced to Europe, quickly becoming a coveted ingredient in desserts and beverages. The combination of vanilla and cream has always been a winning one, and this Vanilla Sweet Cream Cold Foam is a testament to that timeless pairing.
People adore this topping for its incredible texture it’s light and airy, yet rich and creamy, creating a delightful contrast against the cold, bold coffee beneath. The subtle sweetness of the vanilla perfectly complements the coffee’s bitterness, creating a balanced and harmonious flavor profile. Plus, it’s incredibly easy and quick to make, requiring only a few simple ingredients and minimal effort. Who wouldn’t love a touch of luxury that can be whipped up in minutes?

Ingredients:
- For the Sweet Cream Base:
- 1 cup heavy cream (36-40% milk fat)
- 1/4 cup 2% milk (or whole milk for extra richness)
- 1/4 cup vanilla syrup (see recipe below, or use store-bought)
- For the Vanilla Syrup (Homemade):
- 1 cup granulated sugar
- 1 cup water
- 1 vanilla bean, split lengthwise and seeds scraped (or 1 tablespoon vanilla extract)
- Equipment:
- Electric milk frother (cold foam setting preferred) or immersion blender
- Measuring cups and spoons
- Small saucepan
- Whisk
- Airtight container for storing syrup
Preparing the Vanilla Syrup:
Okay, let’s start with the vanilla syrup. You can definitely use store-bought, but trust me, homemade is SO much better and it’s surprisingly easy. Plus, you can control the sweetness and the intensity of the vanilla flavor.
- Combine Sugar and Water: In a small saucepan, combine the granulated sugar and water. Give it a quick stir to help the sugar start dissolving.
- Add Vanilla Bean (or Extract): If you’re using a vanilla bean, split it lengthwise and scrape out the seeds. Add both the pod and the seeds to the saucepan. If you’re using vanilla extract, hold off on adding it until after the syrup has cooled.
- Heat and Dissolve: Place the saucepan over medium heat. Bring the mixture to a gentle simmer, stirring constantly until the sugar is completely dissolved. This usually takes about 5-7 minutes. Make sure there are no sugar crystals clinging to the bottom of the pan!
- Simmer and Infuse: Once the sugar is dissolved, reduce the heat to low and let the syrup simmer gently for another 5 minutes. This allows the vanilla flavor to really infuse into the syrup. If you used a vanilla bean, this step is crucial.
- Cool and Strain (if using vanilla bean): Remove the saucepan from the heat and let the syrup cool completely. If you used a vanilla bean, remove the pod before storing. You can strain the syrup through a fine-mesh sieve to remove any small particles from the vanilla bean, but it’s not absolutely necessary.
- Add Vanilla Extract (if using): If you’re using vanilla extract, stir it into the cooled syrup now.
- Store: Pour the vanilla syrup into an airtight container (a glass jar works great) and store it in the refrigerator for up to 2 weeks.
Making the Sweet Cream Base:
Now that our vanilla syrup is ready (or you’ve got your store-bought version), we can move on to the sweet cream base. This is where the magic happens!
- Combine Ingredients: In a measuring cup or small bowl, combine the heavy cream, milk, and vanilla syrup. The ratio is important here, so try to be precise. The heavy cream gives it that luxurious, thick texture, the milk thins it out just enough, and the vanilla syrup adds the perfect amount of sweetness and flavor.
- Whisk (Optional): Give the mixture a quick whisk to ensure everything is well combined. This isn’t strictly necessary, but it helps to create a more uniform texture.
Creating the Cold Foam:
This is the fun part! We’re going to transform that sweet cream base into a cloud of delicious cold foam.
- Prepare Your Frothing Device: If you’re using an electric milk frother with a cold foam setting, simply pour the sweet cream base into the frother, filling it to the maximum fill line. If you’re using an immersion blender, pour the sweet cream base into a tall, narrow glass or jar.
- Froth the Cream:
- Electric Milk Frother: Select the cold foam setting and press start. The frother will automatically create the cold foam in a matter of seconds.
- Immersion Blender: Insert the immersion blender into the glass or jar, making sure the head of the blender is fully submerged in the sweet cream base. Start blending on low speed, gradually increasing the speed as the cream begins to thicken. Move the blender up and down to incorporate air and create a stable foam. This usually takes about 30-60 seconds. Be careful not to over-blend, as this can cause the cream to separate.
- Check the Consistency: The cold foam is ready when it’s thick, creamy, and holds its shape. It should be pourable, but not runny. If it’s too thin, continue frothing for a few more seconds. If it’s too thick, you can add a splash of milk to thin it out.
Assembling Your Drink:
Alright, the cold foam is ready! Now let’s put it all together and enjoy our delicious creation.
- Prepare Your Cold Brew (or Iced Coffee): Fill a glass with ice. Pour in your cold brew coffee or iced coffee, leaving enough room at the top for the cold foam. You can adjust the amount of coffee to your liking. I usually go for about 3/4 of the glass.
- Pour the Cold Foam: Gently pour the cold foam over the top of the coffee. The foam should sit on top of the coffee, creating a beautiful layered effect. Don’t be afraid to be generous with the foam!
- Optional: Add a Garnish: If you want to get fancy, you can add a garnish to your drink. A sprinkle of cocoa powder, a drizzle of caramel sauce, or a few coffee beans are all great options.
- Enjoy! Grab a straw (or don’t, if you prefer to sip the foam directly) and enjoy your homemade Vanilla Sweet Cream Cold Foam!
Tips and Tricks for Perfect Cold Foam:
- Use Cold Ingredients: Make sure your heavy cream and milk are well-chilled before you start. This will help the foam to form more quickly and easily.
- Don’t Over-Froth: Over-frothing can cause the cream to separate and become grainy. Stop frothing as soon as the foam reaches the desired consistency.
- Adjust the Sweetness: If you prefer a less sweet drink, you can reduce the amount of vanilla syrup in the sweet cream base. You can also use a sugar-free vanilla syrup.
- Experiment with Flavors: Get creative and experiment with different flavors! You can add a pinch of cinnamon, a dash of nutmeg, or a few drops of peppermint extract to the sweet cream base.
- Make it Vegan: For a vegan version, you can use plant-based heavy cream and milk alternatives. Just be aware that the texture of the foam may be slightly different.
- Storage: While it’s best to use the cold foam immediately, you can store any leftover sweet cream base in the refrigerator for up to 24 hours. You may need to whisk it again before using. However, the cold foam itself doesn’t store well, as it will deflate over time.
Troubleshooting:
- My cold foam is too thin: Make sure your ingredients are cold and that you’re using enough heavy cream. You may also need to froth it for a longer period of time.
- My cold foam is too thick: Add a splash of milk to thin it out. You may have over-frothed it.
- My cold foam is separating: You may have over-frothed it. Try using a lower speed on your immersion blender.
- My vanilla syrup is too thick: Add a little bit of water to thin it out.
- My vanilla syrup is too thin: Simmer it for a longer period of time to reduce the liquid.
Variations:
- Salted Caramel Sweet Cream Cold Foam: Add a pinch of sea salt and a tablespoon of caramel sauce to the sweet cream base.
- Pumpkin Spice Sweet Cream Cold Foam: Add a teaspoon of pumpkin pie spice to the sweet cream base.
- Chocolate Sweet Cream Cold Foam: Add a tablespoon of cocoa powder and a teaspoon of chocolate extract to the sweet cream base.
- Peppermint Sweet Cream Cold Foam: Add a few drops of peppermint extract to the sweet cream base.
- Irish Cream Sweet Cream Cold Foam: Add a tablespoon of Irish cream liqueur (or a non-alcoholic Irish cream syrup) to the sweet
Conclusion:
This Vanilla Sweet Cream Cold Foam recipe is truly a game-changer, transforming your everyday iced coffee into a café-worthy indulgence. I genuinely believe that once you try this, you’ll never go back to plain iced coffee again! The creamy, subtly sweet flavor perfectly complements the bitterness of the coffee, creating a balanced and utterly satisfying drink. It’s incredibly easy to make, requiring minimal effort and ingredients, yet the result is something truly special. Forget those expensive coffee shop runs; you can now create this decadent treat in the comfort of your own home, whenever the craving strikes. But why is this recipe a must-try? Beyond the incredible taste, it’s the versatility that really shines. You’re not just limited to using it on iced coffee. Imagine topping your cold brew with this velvety foam, or even using it as a delightful addition to iced lattes. It’s also fantastic on top of iced teas, adding a touch of sweetness and creaminess that elevates the entire experience. Think of it as a blank canvas for your beverage creativity!Serving Suggestions and Variations:
The possibilities are endless! For a richer experience, try using heavy cream instead of half-and-half. If you’re watching your sugar intake, you can easily substitute the simple syrup with a sugar-free alternative like stevia or erythritol. A dash of cinnamon or nutmeg adds a warm, comforting touch, especially during the cooler months. For a more decadent treat, consider adding a tablespoon of your favorite liqueur, like Irish cream or amaretto, to the foam before blending. And don’t forget the toppings! A sprinkle of cocoa powder, chocolate shavings, or even a drizzle of caramel sauce can take your Vanilla Sweet Cream Cold Foam creation to the next level. Get creative and experiment with different flavors and textures to find your perfect combination. You could even try infusing the simple syrup with different herbs or spices, like lavender or cardamom, for a truly unique and sophisticated flavor profile. Another fun variation is to add a pinch of sea salt to the foam. The salt enhances the sweetness and creates a delightful contrast that will tantalize your taste buds. You can also experiment with different extracts, such as almond or coconut, to add a subtle hint of flavor. I encourage you to play around with the recipe and make it your own. Don’t be afraid to experiment with different ingredients and techniques until you find the perfect combination that suits your taste.Share Your Creations!
I’m so excited for you to try this recipe and experience the magic of homemade Vanilla Sweet Cream Cold Foam. Once you’ve made it, I’d love to hear about your experience! Share your photos and variations on social media using [Your Hashtag Here] so I can see your amazing creations. Let me know what you think in the comments below what variations did you try? What did you pair it with? I can’t wait to see what you come up with! Happy sipping! I am confident that this recipe will become a staple in your home. Print
Vanilla Sweet Cream Cold Foam: The Ultimate Guide to Making It At Home
Leave a Comment