

Angel Biscuits baking is a delightful experience that brings a touch of Southern charm to your kitchen. These light and fluffy biscuits, often described as a heavenly blend of yeast rolls and traditional biscuits, have a rich history that dates back to the early 20th century. Originating from the Southern United States, Angel Biscuits were created to provide a convenient yet delicious option for families, making them a beloved staple at breakfast tables and holiday gatherings alike.
What I adore about Angel Biscuits baking is the perfect balance of taste and texture. The combination of baking powder and yeast gives these biscuits a unique rise, resulting in a tender, flaky bite that melts in your mouth. Whether slathered with butter and jam or served alongside savory dishes, they are sure to impress. Plus, the convenience of preparing the dough ahead of time means you can enjoy fresh, warm biscuits with minimal effort. Join me as we explore the delightful world of Angel Biscuits baking and discover why this dish has captured the hearts of so many!

Ingredients:
- 2 cups all-purpose flour
- 1 tablespoon baking powder
- 1 teaspoon baking soda
- 1 teaspoon salt
- 1/4 cup granulated sugar
- 1/2 cup unsalted butter, cold and cubed
- 1 cup buttermilk
- 1/4 cup active dry yeast
- 1/4 cup warm water (about 110°F)
- 1 tablespoon honey (optional, for a touch of sweetness)
Preparing the Dough
Lets get started on making these delightful angel biscuits! The first step is to prepare the yeast mixture, which will give our biscuits that light and fluffy texture.
- In a small bowl, combine the warm water and active dry yeast. If youre using honey, add it here as well. Stir gently and let it sit for about 5-10 minutes until it becomes frothy. This means the yeast is active and ready to work its magic!
- While the yeast is blooming, in a large mixing bowl, whisk together the flour, baking powder, baking soda, salt, and sugar. Make sure everything is well combined.
- Next, add the cold, cubed butter to the flour mixture. Using a pastry cutter or your fingers, work the butter into the flour until the mixture resembles coarse crumbs. This step is crucial for achieving that flaky texture we love in biscuits!
- Once the butter is incorporated, make a well in the center of the flour mixture. Pour in the buttermilk and the activated yeast mixture. Gently stir with a wooden spoon or spatula until the dough just comes together. Be careful not to overmix; we want to keep it light and airy!
Chilling the Dough
Now that we have our dough, its time to let it rest. Chilling the dough helps to develop the flavors and makes it easier to handle.
- Cover the bowl with plastic wrap or a clean kitchen towel and place it in the refrigerator for at least 30 minutes. This will allow the dough to firm up a bit, making it easier to roll out later.
Rolling and Cutting the Biscuits
After the dough has chilled, its time to roll it out and cut our biscuits!
- Preheat your oven to 425°F (220°C). Line a baking sheet with parchment paper or a silicone baking mat to prevent sticking.
- Lightly flour your work surface and turn the chilled dough out onto it. Using a rolling pin, roll the dough out to about 1/2-inch thickness. Dont worry if its not perfect; rustic is part of the charm!
- Using a biscuit cutter or a glass, cut out rounds from the dough. Make sure to press straight down without twisting to ensure the biscuits rise properly. Place the cut biscuits on the prepared baking sheet, leaving a little space between each one.
- If you have leftover dough, gently gather it together, roll it out again, and cut out more biscuits. Repeat until all the dough is used up.
Baking the Biscuits
Now comes the exciting partbaking our angel biscuits!
- Once all the biscuits are on the baking sheet, you can brush the tops with a little melted butter if you like. This will give them a beautiful golden color and extra flavor.
- Place the baking sheet in the preheated oven and bake for 12-15 minutes, or until the biscuits are golden brown on top. Keep an eye on them, as oven temperatures can vary!
- When theyre done, remove the biscuits from the oven and let them cool on the baking sheet for a few minutes before transferring them to a wire rack. This will help them stay fluffy and prevent them from getting soggy.
Serving Suggestions
These angel biscuits are incredibly versatile and can be enjoyed in many ways. Here are a few serving suggestions:
- Serve them warm with a pat of butter and a drizzle of honey or jam for a delightful breakfast treat.
- Pair them with fried chicken or your favorite

Conclusion:
In summary, this Angel Biscuits recipe is an absolute must-try for anyone looking to elevate their baking game. The light, fluffy texture combined with a hint of sweetness makes these biscuits perfect for breakfast, brunch, or even as a delightful side for dinner. Whether you enjoy them slathered with butter and jam, paired with a hearty stew, or simply on their own, these biscuits are sure to impress. For a fun twist, consider adding herbs like rosemary or thyme for a savory variation, or sprinkle in some cheese for a cheesy delight. You can also experiment with different flours, such as whole wheat or gluten-free options, to suit your dietary preferences. The versatility of Angel Biscuits means you can easily adapt them to fit any occasion or taste. I encourage you to give this recipe a try and experience the joy of baking these delightful treats. Once you do, I would love to hear about your experience! Share your thoughts, variations, and any tips you discover along the way. Happy baking, and may your kitchen be filled with the heavenly aroma of Angel Biscuits! Print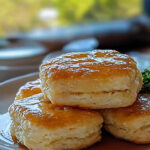
Angel Biscuits Baking: A Delightful Recipe for Fluffy, Buttery Treats
- Total Time: 42-45 minutes
- Yield: 12 biscuits 1x
Description
These angel biscuits are a light and fluffy blend of traditional biscuits and yeast rolls, perfect for breakfast or as a side dish. Easy to make and versatile, they rise beautifully and can be enjoyed warm with butter, honey, or jam.
Ingredients
Scale- 2 cups all-purpose flour
- 1 tablespoon baking powder
- 1 teaspoon baking soda
- 1 teaspoon salt
- 1/4 cup granulated sugar
- 1/2 cup unsalted butter, cold and cubed
- 1 cup buttermilk
- 1/4 cup active dry yeast
- 1/4 cup warm water (about 110°F)
- 1 tablespoon honey (optional, for a touch of sweetness)
Instructions
- In a small bowl, combine the warm water and active dry yeast. If using honey, add it here as well. Stir gently and let it sit for about 5-10 minutes until frothy.
- In a large mixing bowl, whisk together the flour, baking powder, baking soda, salt, and sugar until well combined.
- Add the cold, cubed butter to the flour mixture. Using a pastry cutter or your fingers, work the butter into the flour until it resembles coarse crumbs.
- Make a well in the center of the flour mixture. Pour in the buttermilk and the activated yeast mixture. Gently stir with a wooden spoon or spatula until the dough just comes together. Avoid overmixing.
- Cover the bowl with plastic wrap or a clean kitchen towel and refrigerate for at least 30 minutes.
- Preheat your oven to 425°F (220°C). Line a baking sheet with parchment paper or a silicone baking mat.
- Lightly flour your work surface and turn the chilled dough out onto it. Roll the dough out to about 1/2-inch thickness.
- Using a biscuit cutter or a glass, cut out rounds from the dough, pressing straight down without twisting. Place the cut biscuits on the prepared baking sheet.
- Gather any leftover dough, roll it out again, and cut out more biscuits until all the dough is used.
- Brush the tops of the biscuits with melted butter if desired.
- Bake in the preheated oven for 12-15 minutes, or until golden brown on top.
- Remove from the oven and let cool on the baking sheet for a few minutes before transferring to a wire rack.
Notes
- For a richer flavor, consider adding herbs or cheese to the dough.
- These biscuits can be served warm with butter, honey, or jam, or as a side to savory dishes like fried chicken.
- Prep Time: 30 minutes
- Cook Time: 12-15 minutes

Leave a Comment